background image

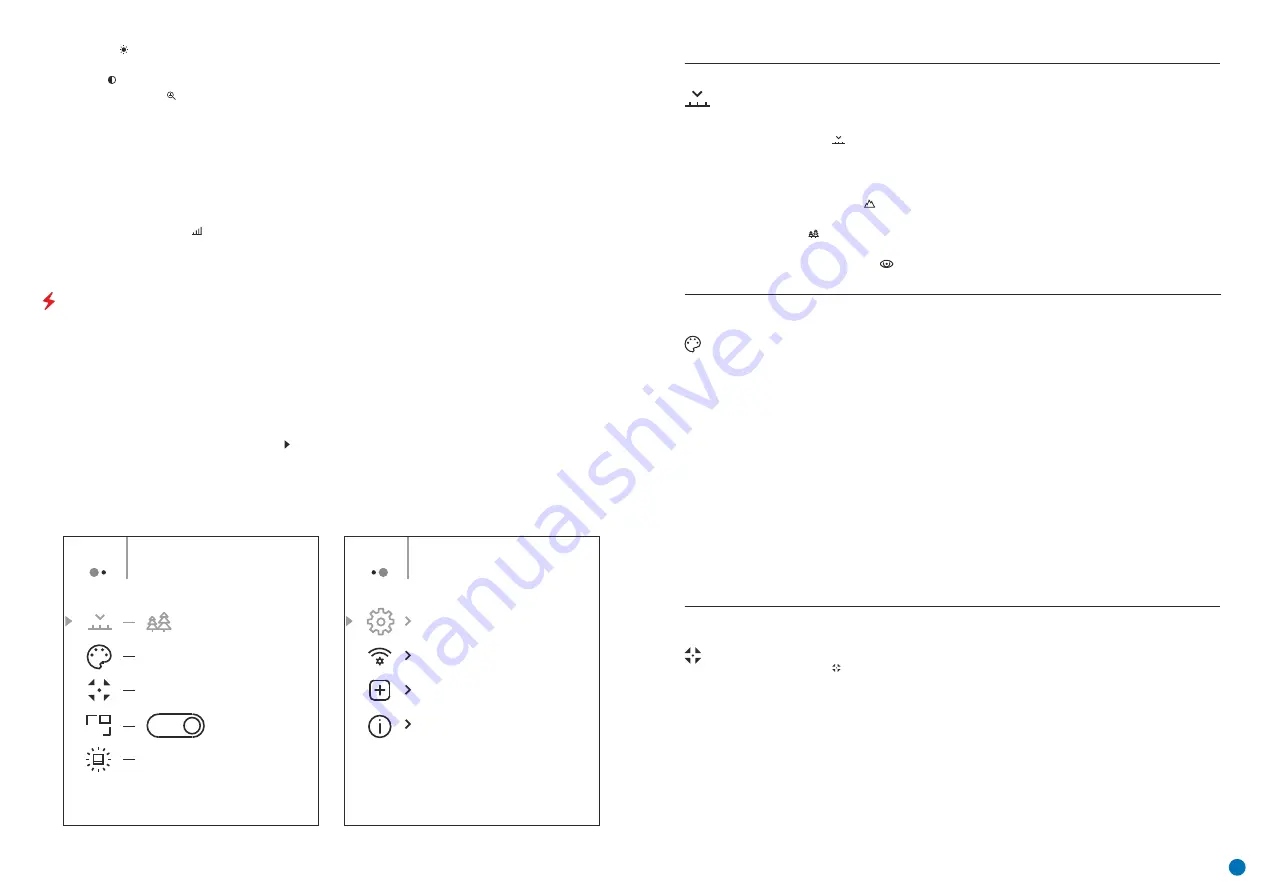
General view of the menu


Tab 1 


Tab 2

Menu    

General Setting

Menu    

Mode

PIP

Off

Hot White

Automatic

10

Calibration 

Mode


Selection of calibration mode There are three calibration modes: manual, semi-automatic 

and automatic.

џ

Press and hold the Menu button (3) to enter the menu.

џ

Select the  


 'Calibration Mode' option.

џ

A short press of the Menu button (3) opens the submenu.

Automatic

Semi-automatic

The  user  independently  sets  the  calibration  requirements  (according  to  the  image  being 
observed).

џ

A short press of the Menu button (3) confirms the selection.

Manual

Manual calibration. Close the lens cap before beginning calibration. 

џ

Select one of the calibration modes described below with the UP (4) / DOWN (2) buttons. 

Calibration requirements in the automatic mode are determined programmatically, with the 

calibration process being started automatically.

MAIN MENU FUNCTIONS

џ

Enter the menu with a long press of the Menu button (3). 

џ

Press the UP (4) / DOWN (2) buttons to move through the menu functions.

џ

To exit the menu, press and hold down the Menu button (3).

џ

Automatic exit from the menu occurs after 10 seconds of inactivity.

џ

When exiting the menu, the cursor location (    ) is remembered only for the duration of the one working session 

(i.e. until the device is powered off). The next time the device is powered on and the menu is accessed, the cursor 

will be at the first item on the menu.

џ

One short press of the Menu button (3) opens a menu item.

џ

Menu navigation is be means of scrolling. When the last item on the first tab is reached, navigation moves to 

the first item of the second tab. 

Note. 

Current magnification is calculated as the product of the base magnification and the smooth digital zoom 

ratio. Example: where the basic device magnification is 3.0x and the smooth digital zoom ratio is x1.7, the actual 

magnification is 5,1х (3,0*1,7). The next time the device is turned on, the image is projected onto the display with 
the brightness and contrast settings saved from the previous power off.

Brightness

    – by pressing the UP (4) / DOWN (2) buttons and changing the display brightness value from 00 to 

20.

Smooth digital zoom

    – by pressing the UP (4) / DOWN (2) buttons and changing the digital zoom value from 1.0 

to 4.0. The increment size of the digital zoom is 0.1.
To exit the menu, press and hold down the Menu button (3), or wait 10 seconds for automatic selection.
The initial smooth digital zoom factor displayed is equal to x1.0 if the discrete zoom is inactive, x2.0 if is 2x, and 

x4.0 if 4x.

Contrast

    – by pressing the UP (4) / DOWN (2) buttons and changing the display contrast value from 00 to 20.

Stadiametric rangefinder

    –


press the UP (4) / DOWN (2) buttons to change the position of the markings for 

determining  the  distance  of  the  object  being  observed  (see  Section  16  for  further  information  on  the 
rangefinder).

Mode


Identification  Mode

      – 

A  universal  mode  for  application  under  various  observation 

conditions.

Selection of observation mode The thermal imager has three automatic operating modes. 

Each of these modes includes an optimum combination of parameters (brightness, contrast, 
intensity etc.) for ensuring the best image quality under any given observation conditions. 

џ

A short press of the Menu button (3) opens the menu.

џ

Press and hold the Menu button


(3) to enter the menu.

џ

Select one of the settings described below with the UP (4) / DOWN (2) buttons.

џ

Select the    ‘Mode’ option.

џ

A short press of the Menu button (3) confirms the selection. 

Mountains/Rocks

    – 

High Contrast Mode This is the optimum mode for observing wildlife 

against a background of rocks, and soil in an upland situation.

Forest

    – 

Low Contrast Mode This is the optimum mode for observing wildlife against a 

background of vegetation.

Colour
Palettes


Violet

Red Monochrome

Ultramarine

Hot Red

Sepia

A black and white palette (cold temperature corresponds to white, and hot temperature to 
black). 

Rainbow

џ

Press and hold the Menu button (3) to enter the menu.

џ

A short press of the Menu button (3) opens the menu.

џ

Select one of the palettes described below with the UP (4) / DOWN (2) buttons.

Hot White

A black and white palette (cold temperature corresponds to black, and hot temperature to 
white). 

Colour Palette Selection The principal display mode for an observed image is ‘Hot White’. The 
‘Colour Palettes’ menu item allows you to select an alternative palette:

џ

Select the ‘Colour Palettes’ option.

Hot Black

џ

A short press of the Menu button (3) confirms the selection. 

Composition and description of the menu

4

Summary of Contents for AXION Series

Page 1: ...AXION Thermal Imaging Monoculars Operating Instructions English Fran ais Deutsch Espa ol Italiano...

Page 2: ...tructions Imageurs Thermiques AXION 9 16 Fran ais Mode d emploi W rmebildkameras AXION 17 24 Deutsch Bedienungsanleitung Generador de im genes t rmico AXION 25 32 Espa ol Instrucciones de uso Termovis...

Page 3: ...rect line of sight m 77421 X 30 uncooled 320x240 50 12 4 4 16 2 4 1 2 3 3 28 3 5 0 12 7 3 12 8 5 1300 1420 AMOLED 1024x768 3 4 3V Li Ion Battery Pack PS3 3200 mAh DC 3 7V 5V USB 4 Ip 7 Yes 25 40 13F 1...

Page 4: ...the microUSB connector 8 onthedevice Insert the rechargeable battery 10 supplied with your device or purchased separately fully along the guiderailintotheAPSchargerslot 11 Point A on the battery and...

Page 5: ...switches to the internal power supply without the devicepoweringoff Externalpowerissuppliedfromanexternalsource suchasa5VPowerBank Attachtheexternalpowersourcetothedevice sUSBconnector 8 Fig 1 Anicono...

Page 6: ...m by pressing the UP 4 DOWN 2 buttons and changing the digital zoom value from 1 0 to4 0 Theincrementsizeofthedigitalzoomis0 1 Toexitthemenu pressandholddowntheMenubutton 3 orwait10secondsforautomatic...

Page 7: ...the numbers Press the Menu button 3 to move throughthedigits This function enables you to set a password to access the device from an external device This passwordisusedwhenlinkinganexternaldevice e g...

Page 8: ...ubmenubypressingtheMenubutton 3 AshortpressoftheMenubutton 3 switchesthemarkerdirectionfromthehorizontaltothe verticalandviceversa Then bymovingthemarkeracrossthedisplay youcandeletethenextdefectiveti...

Page 9: ...icewillturnoff This function disables the transfer of images to the display reducing the intensity of its illumination to a minimum Thishelpspreventinadvertentunmasking Thedevicewillcontinuetofunction...

Page 10: ...en background Image is too dark Poor image quality reduced detection distances When used in low temperature conditions image quality of the surroundings is worse than in positive temperature condition...

Page 11: ...moire incorpor e Voie Wi Fi Fr quence Standard Distance de r ception en ligne de vis e directe m 77421 X 30 Non refroidi 320x240 50 12 4 4 16 2 4 1 2 3 3 28 3 5 0 12 7 3 12 8 5 1300 1420 AMOLED 1024x...

Page 12: ...chargeur Les imageurs thermiques AXION sont livr s avec un bloc batterie ion lithium APS3 rechargeable permettant d utiliser l imageur thermique pendant 4 heures La batteriedoit trecharg eavantlapremi...

Page 13: ...externependantlarechargeprogressivedelabatterieAPS3 L alimentationdoitprovenird unesourceexterne commeunchargeur5V Si l appareil fonctionne sur une alimentation externe et si la batterie APS3 n est pa...

Page 14: ...ers le haut 4 et fl che vers le bas 2 et en modifiantlavaleurduzoomnum riqueentre1 0et4 0 L incr mentduzoomnum riqueest0 1 Le facteur de zoom num rique continu initial affich est gal x1 0 si le zoom d...

Page 15: ...tion d un mot de passe AppuyezsurleboutonMenu 3 pourlancerlesous menu Wi Fi Pour sauvegarder lemot de passe et quitter lesous menu appuyez et maintenez enfonc le boutonMenu 3 Cette fonction vous perme...

Page 16: ...ous la forme de points noirs brillants blancsoucolor s bleuourouge peuventappara tre Cenesontpasdesd fauts Supprimezlepixeld fectueuxenappuyantrapidementsurleboutonONOn Calibration Confirmezvotres lec...

Page 17: ...r fixe inf rieur sous l objet et l aide des boutons de navigation fl che vers le haut 4 fl che vers le bas 2 d placez le curseur horizontal sup rieur par rapport au curseur fixe horizontal inf rieur a...

Page 18: ...EN Lamaintenancedoit treeffectu eaumoinsdeuxfoisparanetdoitcomprendrelesmesuressuivantes Essuyez lessurfaces ext rieures des pi ces en m tal et en plastique et d poussi rez avec un chiffon en coton de...

Page 19: ...ichers Wi Fi Kanal Frequenz Standard Empfangsreichweite in direkter Sichtlinie m 77421 X 30 ungek hlt 320x240 50 12 4 4 16 2 4 1 2 3 3 5 7 3 12 8 5 1300 AMOLED 1024x768 3 4 3V Li Ion Akkupack PS3 3200...

Page 20: ...des USB Kabels 15 mit dem microUSB Anschluss des Netzsteckers 16 Stecken Sie das Ger t in eine Steckdosemit100 240V 17 AufladendesAkkus Option1 Abb 2 Stecken Sie den Netzladeadapter 16 in die Netzste...

Page 21: ...FUNKTIONENbeschrieben SchaltenSiedasGer tnachGebrauchdurchlangesDr ckenaufdieTasteON 5 aus ACHTUNG Das Objektiv des Ger ts darf nicht auf starke Energiequellen wie z B Laser emittierende Ger te oder...

Page 22: ...ist Hinweis Die aktuelle Vergr erung wird als das Produkt der Basisvergr erung und dem Verh ltnis des stufenlosen digitalen Zooms berechnet Beispiel wenn die Basisvergr erung des Ger ts 3 0x und das V...

Page 23: ...ierung ausgef hrt wird DieMeldung Formatierungabgeschlossen bedeutet dassdieFormatierungbeendetist Best tigenSiedieAuswahlmiteinemkurzenDr ckenderTasteMenu 3 Wi Fi Einstellungen Mit dieser Option k nn...

Page 24: ...den Marker ber das Display bewegen das n chste fehlerhafte Pixell schen W hlen Sie JA wenn Sie zur werksseitigen Pixelkarte zur ckkehren m chten und NEIN wennSienichtm chten W hlenSiedasSymbol unddr c...

Page 25: ...t der Beleuchtung auf ein Minimum Dies verhindert eine unbeabsichtigte Enttarnung Das Ger t funktioniert weiterhin WenndieTasteON 5 gehaltenwird zeigtdasDisplay Displayaus undeinen 160m 66m 28m FUNKTI...

Page 26: ...ntladen M gliche Ursache USB Kabel besch digt Das Ger t wurde w hrend des Betriebs einer statischen Au adung ausgesetzt Ger tepasswort wurde ge ndert Das Ger t be ndet sich ein einem Bereich mit viele...

Page 27: ...deo foto Cantidad de memoria interna Canal Wi Fi Frecuencia Est ndar Rango de recepci n en la l nea visual directa m 77421 X 30 no refrigerado 320x240 50 12 4 4 16 2 4 1 2 3 3 28 3 5 0 12 7 3 12 8 5...

Page 28: ...su dispositivo o comprada por separado totalmente a lo largo del carril de gu a hasta la ranuradelcargadorAPS 11 v aseFig 3 Se pueden cargar dos bater as al mismo tiempo hayunasegundaranuraparaello C...

Page 29: ...Conectelafuentedealimentaci nexternaalconectorUSBdeldispositivo 8 Fig 1 Cuando se desconecta la alimentaci n el ctrica externa el dispositivo cambia a la alimentaci n el ctrica internasinapagarse Apar...

Page 30: ...brilloycontrasteguardadosdelanteriorapagado Contraste pulsando los botones UP ARRIBA 4 DOWN ABAJO 2 y cambiando el valor del contraste de la pantallade00a20 Tel metroestadiam trico Pulse los botones U...

Page 31: ...opietario Un usuario de Stream Vision tiene acceso total a todas las funcionesdeldispositivo Esta funci n le permite establecer una contrase a para acceder al dispositivo desde un dispositivo externo...

Page 32: ...a su estadooriginal Seleccioneelicono ypulseelbot nMen 3 Si se ha eliminado correctamente un p xel la palabra OK aparece brevemente en la pantalla Atenci n Pueden aparecer uno o dos p xeles en la pan...

Page 33: ...puertodesuordenador Aparecer ndosopcionesdeconexi nenlapantalla Usocomotarjetadememoria Labater ainstaladaeneldispositivonosecargar El ordenador detectar el dispositivo autom ticamente y no requiere i...

Page 34: ...xistente o interrumpida El dispositivo est fuera del rea de cobertura Wi Fi Hay obst culos entre el dispositivo y el receptor p ej paredes de hormig n Se requiere calibraci n Bater a totalmente descar...

Page 35: ...orata Canale Wi Fi Frequenza Standard Gamma di ricezione del raggio visivo diretto m 77421 X 30 non raffreddato 320x240 50 12 4 4 16 2 4 1 2 3 3 28 3 5 0 12 7 3 12 8 5 1300 1420 AMOLED 1024x768 3 4 3V...

Page 36: ...ig 3 Attaccare il connettore microUSB sul cavo USB 15 al connettore microUSB sul dispositivo di rete 16 Inserire il connettore in una presa elettrica da 100 240V 17 Il punto A sullabatteria e il punto...

Page 37: ...a batteria APS3 sar gradualmentericaricata L alimentazioneesterna fornitadaunafonteesterna qualePowerBankda5V Quando lafonte di alimentazione esterna viene scollegata il dispositivopassa all alimentaz...

Page 38: ...rio a 0 1 Per uscire dal menu premere e tenere premuto il tasto enu 3 oattendere10secondiperlaselezioneautomatica Il fattore dello zoom digitale continuo iniziale visualizzato pari a x1 0 se lo zoom d...

Page 39: ...r suldisplay Impostare una password Questa opzione permette all utente di impostare una password per accedere al dispositivo da un dispositivo esterno Questa password viene utilizzata per collegareund...

Page 40: ...prendere la registrazione esercitando una pressione breve sul tasto Down REC Gi Reg 2 Modalit FOTO Fotografareun immagine Cambiareallamodalit FOTOesercitandounapressioneprolungatasultastoDown REC Gi R...

Page 41: ...isplayoff Displayspento Questa funzione disattiva il trasferimento di immagini al display riducendo l intensit della sua illuminazione a unminimo Questoaiutaaprevenirelosmascheramentoinvolontario Ildi...

Page 42: ...ttricit statica durante il funzionamento Il dispositivo si trova in un area con un grande numero di reti Wi Fi che possono causare interferenze La password del dispositivo stata cambiata Luminosit o l...

Page 43: ...7 25 40 143x41x69 0 25 1024 768 mp4 jpg 16 2 4 802 11 b g n 15 77422 X 38 320x240 50 12 5 5 5 5 22 2 4 1 2 3 3 28 3 5 0 12 5 8 10 1 5 1700 1860 AMOLED 1024x768 3 4 3 Li Ion Battery Pack PS3 3200 DC 3...

Page 44: ...2 11 microUSB 8 USB 15 microUSB USB 15 microUSB 16 100 240 17 B 16 PB8I 7 10 14 4 AXION Battery Pack PS3 4 1 2 USB 15 16 USB 5 10 APS 11 3 LED 13 4 Up Zoom 8 microUSB 10 3 Menu 1 7 10 2 Down Rec 5 ON...

Page 45: ...0 10 LED 10 20 60 95 30 APS 10 14 4 Batteryrelease 9 0 10 20 60 30 40 0 C 45 C 24 USB 8 PowerBank 5V PS3 PS3 ON 5 1 ON 5 7 6 M SA SA ON 5 ON 5 automatic ON 5 2 4 Down 2 enu 3 enu 3 43...

Page 46: ...omatic 10 enu 3 Menu 3 Up 4 Down 2 Menu 3 Menu 3 Up 4 Down 2 00 20 10 Up 4 Down 2 16 3 0 1 7 5 1 3 0 1 7 Up 4 Down 2 1 0 4 0 0 1 x1 0 2 0 2 4 0 4 Up 4 Down 2 00 20 Rocks Identification mode Up 4 Down...

Page 47: ...2 enu 3 M Y Menu 3 M Y enu 3 Up 4 Down 2 Flash Memory card formatting enu 3 Up 4 Down 2 enu 3 C Wi Fi Wi Fi StreamVision enu 3 Wi Fi 12345678 Up 4 Down 2 Up 4 Down 2 enu 3 Menu 3 Menu 3 enu 3 Up 4 Do...

Page 48: ...4 Wi Fi Wi Fi enu 3 Menu 3 enu 3 X Y enu 3 enu 3 enu 3 Up 4 Down 2 Up 4 Down 2 Menu 3 1 2 AXION ON 5 OK 5 12 Down REC 2 Down REC 2 Down REC 2 Down REC 2 0 5 Axion PHOTO Down REC 2 100 100 100 98 img_x...

Page 49: ...vision com StreamVision QR AXION Stream Vision Wi Fi StreamVision ON 5 Displayoff ON 5 Displayoff ON 5 160m 66m 28m DISPLAY OFF Useasmemorycard Up 4 Down 2 Useaspower Useasmemorycard Menu 3 USB Power...

Page 50: ...https www pulsar nv com glo ru podderzka tchasto zadavaemye voprosy 91 AXION EN 55032 2015 c Wi Fi USB Wi Fi Wi Fi Wi Fi Wi Fi Wi Fi USB 8 48...

Page 51: ...www pulsar vision com PulsarNightVision pulsar vision Pulsar Night Vision...

Reviews: