background image

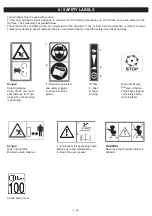
II / SAFETY LABELS

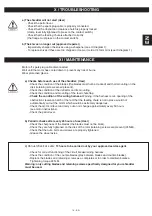
Your shredder must be used with caution.
To this end, pictogram labels designed to remind you of the main precautions you should take have been affixed to the 
machine. Their meaning is explained below.
These labels are considered to be an integral part of the shredder. If any of them become detached or difficult to read,
contact your dealer to have it replaced. We also recommend that you read the safety instructions carefully.

3 - EN

Danger! 

Rotating blades.
Keep hands and feet a
safe distance from ope-
nings when the machine
is operating.

1 -

Wear ear protectors

and safety goggles

2 -

Wear protective

gloves

Throttle

1 -

Fast

2 -

Slow

3 -

Stop

Danger! 

Risk of projectiles. 
Maintain a safe distance 

1 -

Disconnect the spark plug cable

before any repair maintenance

2 -

Read the user manual 

WARNING

Never use the shredder without a
deflector.

Sound power level

2

1

1

2

3

2

1

Wait until all com-
ponents of the ma-
chine have stopped
completely before
touching them.

Summary of Contents for IROKO 55P

Page 1: ...0S X55L SHREDDER DEVOR X60S X55L Notice originale Original instructions www pubert fr CONSIGNES DE SECURITE Pour votre s curit et votre confort d utilisation la lecture compl te de ce manuel est oblig...

Page 2: ...tatif pour le sujet trait En cas de probl me ou encore pour toute question relative la machine adressez vous un revendeur agr Conservez ce manuel port e de main pour le consulter tout moment et assure...

Page 3: ...ouverture de la goulotte d alimentation Arr ter le moteur quand la machine est sans surveillance Ne pas laisser les mains ou toute autre partie du corps ou d un v tement I int rieur de la chambre d a...

Page 4: ...vous recommandons galement de lire attentivement les consignes de s curit 3 FR Danger Lames en rotation Garder les mains et les pieds distance des ouvertures lorsque la machine fonctionne 1 Porter une...

Page 5: ...e La puissance r elle d un moteur install sur une machine d pendra de diff rents facteurs comme la vitesse de rotation les conditions de temp rature d humidit de pression atmosph rique de maintenance...

Page 6: ...omatique 1 Levier des gaz 1 Jauge de niveau d huile 1 3 2 4 8 15 16 11 12 13 14 9 5 17 10 6 7 1 2 3 4 5 6 7 8 9 1 1 1 1 1 1 1 4 8 15 16 16 16 16 16 16 16 16 16 16 16 16 16 16 16 16 16 16 16 16 16 16 1...

Page 7: ...ignation Qt 1 Ensemble carter de coupe moteur 1 1 2 Ensemble goulotte poign e de transport 1 1 3 Tube pied broyeur 2 2 4 00 5 00 6a Roue pleine 2 0 6b Roue gonflable 0 2 7 Axe de roue 1 1 8 01234 5 6...

Page 8: ...2 cales de bois p mini 60 mm pos es sur un tabli ou une table Prenez soin de ne pas tre en appui sur des pi ces pouvant tre endommag es capot protection palier vis de fixation contacteur c Assembler...

Page 9: ...oy oy oy oy oy oy oy oy oy oy oy oy oy oy oy oy oy oy oy oy oy oy oy oy oy oy oy oy oyeu eu eu eu eu eu eu eu eu eu eu eu eu eu eu eu eu eu eu eu eu eu eu eu eu eu eu eu eu eu eu eu eu eu eu eu eu eu...

Page 10: ...e starlock 12 2 2 6a 6b 10 11 9 10 10 9 6a 6b 10 11 g Reposer le broyeur sur le sol Attention 2 personnes h Retirer la trappe de protection entr e carter de coupe 1 2 3 Roue pleine Roue gonflable Vis...

Page 11: ...la goulotte par dessus ces crous puis laisser la descendre en appui sur les vis et resserrer les crous 3 Plein en essence 4 Plein en huile SUBARU EP 17 3 4 L SUBARU EP 17 0 6 L 0 6 L 0 L Attention Un...

Page 12: ...celle ci pour viter un ventuel retour de ceux ci Veillez ce que personne ne se trouve dans la zone d jection ATTENTION Ne travaillez ja mais sans le d flecteur du conduit d jection risque de projecti...

Page 13: ...r la tirer puis la faire pivoter compl te ment vers le bas D gager tous les v g taux qui encombrent le broyeur Contr ler qu il ne reste rien dans la goulotte d entr e et dans la goulotte d jection Ref...

Page 14: ...ch ma 1 des couteaux Attention seule les couteaux ainsi que les vis de fixations sp cifiquement con ues pour votre broyeur doivent tre utilis es Remonter les couteaux en prenant soins de ne pas oublie...

Page 15: ...e qui deviendrait extr mement dangereux V rifier le niveau d huile moteur et refaire le niveau vidange toutes les 50 heures environ se reporter notice moteur V rifier le niveau d essence b Contr les p...

Page 16: ...Z s Z s d W W Z D Z Z Z D Z Z Z s Z s y E ddKz h W h E h...

Page 17: ...e model for the subject being discussed In the event of any problems or for any questions related to the machine please contact an approved reseller Keep this manual close at hand for ease of consulta...

Page 18: ...om the feeding chute Switch off the motor when the shredder is unattended Do not place hands or any other part of the body or clothing inside the feeding chamber discharge chute or near any moving par...

Page 19: ...also recommend that you read the safety instructions carefully 3 EN Danger Rotating blades Keep hands and feet a safe distance from ope nings when the machine is operating 1 Wear ear protectors and sa...

Page 20: ...The actual power of a motor installed on a shredder will depend on various factors such as rotation speed conditions of temperature humidity atmospheric pressure maintenance and others Weight 64 Kg 6...

Page 21: ...de casing infeed Deflector 1 Air filter casing 1 Spark plug 1 Exhaust silencer 1 Petro tank cap 1 Automatic return starter cord 1 Throttle 1 Oil gauge 1 3 2 4 8 15 16 11 12 13 14 9 5 17 10 6 7 4 8 15...

Page 22: ...lade casing assembly 1 1 2 Feeding chute transportation handle assembly 1 1 3 Shredder foot tube 2 2 4 1 1 5 1 1 6a Solid wheel 2 0 6b Inflatable wheel 0 2 7 Wheel axle 1 1 8 0 12 1 1 9 Wheel spacer 2...

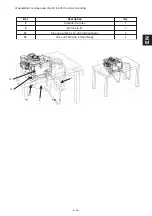
Page 23: ...retaining screw contact switch etc c Assemble the right foot to the motor mounting Ref Description Qty 3 Shredder foot tube 1 0 12 1 1 Zinc screw HM 8 x with toothed flange 1 inc B H M8 with toothed...

Page 24: ...screw HM 6 x 16 with toothed flange 4 8 12 8 13 13 EN 16 16 7 16 16 16 16 16 16 16 16 16 16 16 16 16 16 16 16 16 16 16 16 16 16 16 16 16 16 16 16 16 16 16 16 15 14 3 e Assembl bl bl bl bl bl bl bl bl...

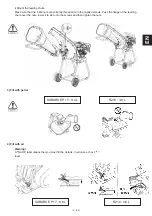
Page 25: ...scription Qty 6a Solid wheel 2 0 6b Inflatable wheel 0 2 9 Wheel spacer 2 0 10 Flat washer 12 4 2 11 Starlock washer 12 2 2 6a 6b 10 11 9 10 10 9 6a 6b 10 11 Solid wheel Inflatable wheel 12 13 11 14 1...

Page 26: ...ws Pass the flange of the feeding chute over the nuts lower it to slot onto the screws and then tighten the nuts 3 Fill with petrol 4 Fill with oil Warning A No Oil label means that you must fill the...

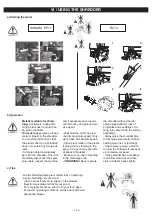
Page 27: ...c feeding chute standing to the right of it to avoid any possible kickback of material Make sure no one is standing in the discharge zone WARNING Never operate the shredder without the dis charge pipe...

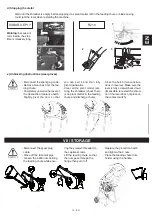
Page 28: ...n fully pivot downwards Clear all the plant matter jam ming the shredder check there is no plant matter in the feeding chute and discharge chute Close the hatch follow instruc tions in reverse Make su...

Page 29: ...ly knives as well as fastening screws specifi cally designed for your crusher must be used To reassemble knives by taking care not to forget to restore the balance weight 4 Torque 24 N M To correctly...

Page 30: ...place would not automatically cut out the motor which would be extremely dangerous Check the motor oil level and carry out an oil change approximately every 50 hours see motor instructions Check the...

Page 31: ...E Z s d h W W h D d Z D d d Z Z s y E E h D t t W...

Page 32: ...I 2 FR II 3 FR III 4 FR IV 4 FR V 6 FR VI 11 FR VII 12 FR VIII 13 FR IX 13 FR X 14 FR XI 14 FR XII 14 FR 1 RU...

Page 33: ...I 2 RU 5 VI e V 2 g RU...

Page 34: ...II 3 RU 1 2 1 2 3 1 2 2 1 1 2 3 2 1...

Page 35: ...G D H F F A B A B C D E F G CE H IV SAE J 1349 64 64 4 2 4 5 4000 4000 3 7 3 5 3400 3200 100 A 100 A 2000 14 CE 90 A 86 A EN 13683 2007 1 A 1 A 95 A 99 A 2000 14 CE 2005 88 EC 1 A 1 A Subaru EP 17 Lon...

Page 36: ...12 13 14 9 5 17 10 6 7 4 8 15 16 16 16 16 16 16 16 16 16 16 16 16 16 16 16 16 16 16 16 16 16 16 16 16 16 16 16 16 16 16 16 16 16 16 16 16 16 16 16 16 16 16 16 11 11 11 11 11 11 11 11 11 11 11 11 11 1...

Page 37: ...1 1 1 2 1 1 3 2 2 4 1 1 5 1 1 6a 2 0 6b 0 2 7 1 1 8 1 1 9 2 0 10 12 4 2 11 starlock 12 2 2 12 rapid M6 4 4 13 6 x16 4 4 14 8 x 16 4 4 15 8 x 40 8 8 16 8 12 12 1 2 3 4 5 6a 6b 8 9 10 11 12 13 14 15 16...

Page 38: ...16 16 16 16 16 16 16 16 16 16 16 16 16 16 16 16 16 16 16 16 16 16 16 16 16 16 16 15 14 14 14 14 14 14 14 14 14 14 14 14 14 14 14 14 14 14 14 14 14 14 14 14 14 14 14 14 14 14 14 14 14 14 14 14 14 14 14...

Page 39: ...16 15 14 14 14 14 14 14 14 14 14 14 14 14 14 14 14 14 14 14 14 14 14 14 14 14 14 14 14 14 14 14 14 14 14 14 14 14 14 14 14 14 14 14 14 14 14 14 14 14 14 14 14 14 14 14 14 14 14 14 14 14 14 14 14 14 1...

Page 40: ...f 6a 2 0 6b 0 2 9 2 0 10 12 4 2 11 starlock 12 2 2 9 RU 6 10 11 9 10 10 9 6 10 11 g h 1 2 3...

Page 41: ...10 RU i i 4 8 3 4 SUBARU EP 17 3 4 SUBARU EP 17 0 6 LONCIN LC 170 0 6 LONCIN LC 170 2 10W30 RU...

Page 42: ...VI a 4 b c 11 RU SUBARU EP 17 LONCIN LC 170 1 2 3 4 5 45 2 1 2 3 4 5 6...

Page 43: ...12 RU d SUBARU EP 17 1 2 LONCIN LC 170 e 4 8 2 VII 1 3 2 RU...

Page 44: ...N MIN MIN MINI I I I I I I I I I I I I I I I I I I I I I I I I I C 45 45 45 45 45 45 45 45 45 45 45 45 45 45 45 45 45 45 45 45 45 45 45 45 45 45 45 45 45 45 45 45 45 45 45 45 45 45 45 45 45 45 45 45 4...

Page 45: ...14 RU X a b IX 1 C 36 IX 1 XI a 50 b 20 24 c 50 3 24 XII RU...

Page 46: ...d cf VII 4 2 5 M10 2 5 4 M10 4 cf V 2 i XII...

Page 47: ......

Page 48: ...9 date 10 signataire 11 signature 12 Voir n de s rie 13 en derni re page EN EC Declaration of conformity I the undersigned 11 2 declare by the present document that the machine described below complie...

Reviews: