background image


45 


2.


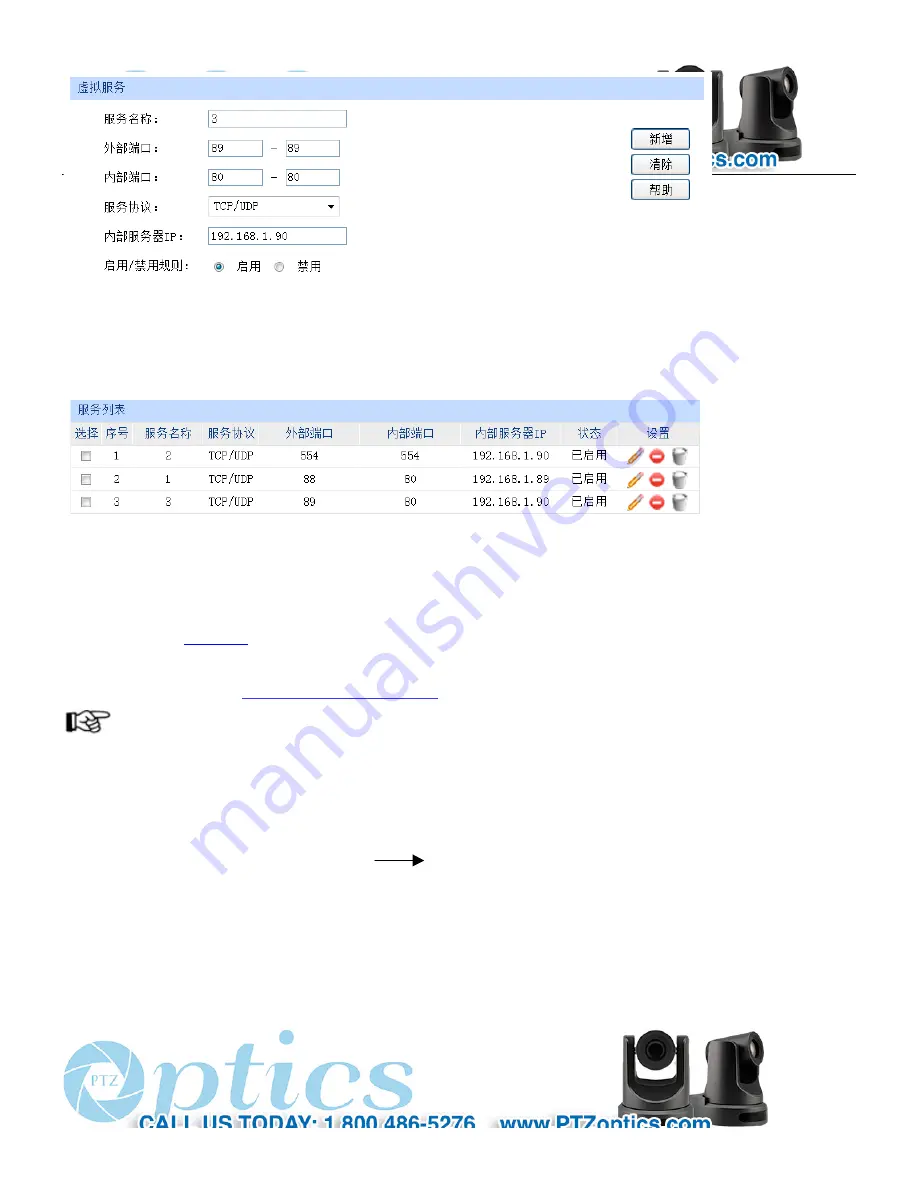
Dynamic DNS visit camera


1.1


Camera accessed by dynamic DNS 

Set domain name to camera, setup the parameter, then dynamic DNS can access camera. 

Access link

http://hostname 

:port number 

For example, setup host computer name: youdomain.f3322.org, camera port number: 554, 

Access link should be: 

http://youdomain.3322.org:554


NOTE


If camera port default as 80,then unnecessary to input port number, use host name can access camera directly . 

VLC stream media player monitoring 

1.


Visit VLC media server procedure


1.1


Open VLC media player, click "Media"              "Open Network Steam", or click "Ctrl+N"; as below: 


Summary of Contents for 20X-IP

Page 1: ...PTZ Optics 20X IP User Manual V3 1 1 English...

Page 2: ...mera to rain or moisture n Don t remove the cover Otherwise you may get an electric shock In case of abnormal operation contact the authorized engineer n Never operating under unspecified temperature...

Page 3: ...13 9 RS 232 Interface 16 10 Serial Communication Control 18 11 Menu Setting 32 12 Equipment Setup and internet connection 37 13 IP camera visited controlled by LAN 38 14 IP Camera accessed controlled...

Page 4: ...of installation Do not grasp the camera head when carrying the camera Don t turn camera head by hand Doing so may result in mechanical damage Don t apply in corrosive liquid gas or solid environment...

Page 5: ...4 Supplied Accessories When you unpack check that all the supplied accessories are included Camera 1PCS AC power adaptor 1PCS Power cord 1PCS RS232 cable 1PCS Remote controller 1PCS User manual 1PCS...

Page 6: ...5 Quick Start Step1 Please check connections are correct before starting...

Page 7: ...take effect Step4 Press the Switch ON OFF button on the rear of the camera the power lamp light Step5 Pan Tilt will rotate to the maximum position of top right after the camera started then it return...

Page 8: ...7 the item MENU RESTORE DEFAULT Restore Set the value Yes press HOME button to restore the factory default settings RESTORE DEFAULT Restore Yes Change Value Home OK Menu Back...

Page 9: ...coding efficiency for high definition video conference terminals The camera applies 2D and 3D noise reduction at the same time based on motion estimation algorithm and effectively reduces the noise 4...

Page 10: ...Zoom 16x Network interface RJ45 Minimal Illumination 0 5 Lux F1 8 AGC ON Audio Interface Line In Line Out 3 5mm Electronic shutter 1 25s 1 10000s USB Interface USB2 0 White Balance Auto Indoor Outdoo...

Page 11: ...Interface 8 RS232 OUT jack 2 Audio LINE OUT Interface 9 Network 3 CVBS Interface 10 HDMI Interface 4 Dip switches 11 HD SDI Interface 5 System select switch 12 USB2 0 6 RS485 jack 13 DC 12V jack 7 RS...

Page 12: ...rase a preset position CLEAR PRESET Numeric button 0 9 Or CLEAR PRESET Erase all the preset individually 4 BLC Backlight Compensation Button BLC ON OFF Press this button to enable the backlight compen...

Page 13: ...operate with the remote controller 7 Button 8 Pan Tilt Control Buttons Press arrow buttons to perform panning and tilting Press HOME button to face the camera back to front 9 Menu Setting Menu button...

Page 14: ...13 USE IR Remote Controller...

Page 15: ...en a button combination is required do it in sequence For example F1 means press first and then press and press F1 at last 1 Pan Tilt Control Move up Press Move down Press Move left Press Move right P...

Page 16: ...ON OFF Press this button to enable the backlight compensation Press it again to disable the backlight compensation Note Backlight is only effective in full auto exposure mode 5 Presets Set Clear 1 To...

Page 17: ...ored preset positions and settings Note No action is executed if a relative preset position is not stored 7 Camera Selection Press the button corresponding to the camera you want to operate 8 Camera I...

Page 18: ......

Page 19: ...RXD 3 TXD 3 TXD 4 GND 4 DTR 5 RXD 5 GND 6 GND 6 DSR 7 IR OUT 7 RTS 8 NC 8 CTS 9 RI Camera Mini DIN 1 DTR 1 DTR 2 DSR 2 DSR 3 TXD 3 TXD 4 GND 4 GND 5 RXD 5 RXD 6 GND 6 GND 7 IR OUT 7 NC 8 NC 8 NC No F...

Page 20: ...19 VISCA Network Configuration...

Page 21: ...The camera can be controlled via RS485 Half duplex mode supports VISCA or Pelco D or Pelco P protocol supports the following configurations Baud rate 2400 4800 9600 bit s Start bit 1 bit Data bit 8 bi...

Page 22: ...3 FF Indicates that two sockets are already being used executing two commands and the command could not be accepted when received Command Canceled z0 6y 04 FF y Socket No Returned when a command which...

Page 23: ...0q 0r 0s FF pqrs Zoom Position CAM_Focus Stop 8x 01 04 08 00 FF Far Standard 8x 01 04 08 02 FF Near Standard 8x 01 04 08 03 FF Far Variable 8x 01 04 08 2p FF p 0 low 7 high Near Variable 8x 01 04 08...

Page 24: ...39 0B FF Iris Priority Automatic Exposure mode Bright 8x 01 04 39 0D FF Bright Mode Manual control CAM_SlowShutter AutoSlowShutterLimit 8x 01 04 2A 0p 00 FF CAM_Iris Reset 8x 01 04 0B 00 FF Iris Sett...

Page 25: ...Aperture sharp ness Reset 8x 01 04 02 00 FF Aperture Control Up 8x 01 04 02 02 FF Down 8x 01 04 02 03 FF Direct 8x 01 04 42 00 00 0p 0q FF pq Aperture Gain CAM_PictureEffect Off 8x 01 04 63 00 FF Pict...

Page 26: ...n Limit Position ZZZZ Tilt Position LimitClear 8x 01 06 07 01 0W 07 0F 0F 0F 07 0F 0F 0F FF CAM_AFSensitivity High 8x 01 04 58 01 FF AF Sensitivity High Normal Low Normal 8x 01 04 58 02 FF Low 8x 01 0...

Page 27: ...Position CAM_WBModeInq 8x 09 04 35 FF y0 50 00 FF Auto y0 50 01 FF Indoor mode y0 50 02 FF Outdoor mode y0 50 03 FF OnePush mode y0 50 05 FF Manual CAM_RGainInq 8x 09 04 43 FF y0 50 00 00 0p 0q FF pq...

Page 28: ...al Sharpness CAM_ApertureInq Sh arpness 8x 09 04 42 FF y0 50 00 00 0p 0q FF pq Aperture Gain CAM_PictureEffectM odeInq 8x 09 04 63 FF y0 50 02 FF Off y0 50 04 FF B W CAM_MemoryInq 8x 09 04 3F FF y0 50...

Page 29: ...50 08 FF 1920x1080i50 y0 50 09 FF 1920x1080p25 y0 50 0A FF 1280x720p50 y0 50 0C FF PAL y0 50 0D FF PAL y0 50 0E FF PAL IR_Receive 8x 09 06 08 FF y0 50 02 FF On y0 50 03 FF Off Pan tiltMaxSpeedInq 8x 0...

Page 30: ...nq 8x 09 04 A4 FF y0 50 00 FF Off y0 50 01 FF Flip H y0 50 02 FF Flip V y0 50 03 FF Flip HV CAM_IridixInq 8x 09 04 A7 FF y0 50 00 00 0p 0q FF pq Iridix Position CAM_AFZone 8x 09 04 AA FF y0 50 00 FF T...

Page 31: ...herBlockInq 8x 09 7E 7E 02 FF y0 50 0p 0q 00 0r 00 00 00 00 00 00 00 00 00 FF p bit0 Power 1 On 0 Off q bit2 LR Reverse 1 On 0 Off r bit3 0 Picture Effect Mode CAM_EnlargementBl ockInq 8x 09 7E 7E 03...

Page 32: ...Preset 0xFF Address 0x00 0x03 0x00 Preset ID SUM Clear Preset 0xFF Address 0x00 0x05 0x00 Preset ID SUM Call Preset 0xFF Address 0x00 0x07 0x00 Preset ID SUM Auto Focus 0xFF Address 0x00 0x2B 0x00 0x0...

Page 33: ...t 0xA0 Address 0x00 0x03 0x00 Preset ID 0xAF XOR Clear Preset 0xA0 Address 0x00 0x05 0x00 Preset ID 0xAF XOR Call Preset 0xA0 Address 0x00 0x07 0x00 Preset ID 0xAF XOR Auto Focus 0xA0 Address 0x00 0x2...

Page 34: ...33 Menu Setting...

Page 35: ...pComp Exposure compensation value Optional items 7 7 Effective only in ExpComp Mode item to On Gain Limit Maximum gain limit Optional items 0 15 Effective only in Auto AAE Bright mode Backlight Set th...

Page 36: ...tive only in Manual mode BG Blue gain Optional items 0 255 Effective only in Manual mode RG Tuning Red gain fine tuning Optional items 10 10 Effective only in Auto Indoor Outdoor mode BG Tuning Blue g...

Page 37: ...The depth of field scale switch Optional items On Off AF Zone Interested in focusing area Optional items Top Center Bottom AF Sense Automatic focusing sensitivity options Optional items Low Normal Hi...

Page 38: ...decided according to the agreement AUTO VISCA protocol Optional items 1 7 P_D_Address PELCO D protocol Optional items 0 254 P_P_Address PELCO P protocol Optional items 0 31 V_AddrFix If I can change...

Page 39: ...EFAULT menu appears as shown in the following figure Restore Confirm restore factory settings Optional items Yes No Note Press HOME button to confirm All parameter restore default Include IR Remote ad...

Page 40: ...stallation 1 Connect internet camera to your internet or to your PC directly via internet cable 2 Turn on DC12V power 3 The orange light of internet port lit on green light flashing and the physical c...

Page 41: ...as below Run upgrade_En exe UPGRADE v1 8 by CD Rom click Search The software will show the current LAN camera s IP address subnet mask number network gateway number and camera MAC serial number etc sh...

Page 42: ...41 Click config then go to below...

Page 43: ...en camera IP must be 192 168 1 xx the first second third number must keep the same NOTE IP camera default IP address 192 168 100 88 user admin password admin 2 Visit Access IP Camera 2 1 Input http 19...

Page 44: ...43 2 2 Input login name and password click confirm then pop up below window language select button on the left bottom...

Page 45: ...Setup IPC accessed controlled by dynamic DNS 2 dynamic DNS available Dyndns org 3322 org 1 1 Router Port Mapping Take TP LINK router for example enter Router Home Page interface page select Transit co...

Page 46: ...xample setup host computer name youdomain f3322 org camera port number 554 Access link should be http youdomain 3322 org 554 NOTE If camera port default as 80 then unnecessary to input port number use...

Page 47: ...L address rtsp ip port number 1 Main stream rtsp ip port number 2 sub stream When RTSP port number default value is 554 then can be omitted as rtsp ip 1 or rtsp ip 2 IP Camera parameter setup 1 Homepa...

Page 48: ...window will show full screen double click again will return to initialized size Status bar in viewing window shown as below 1 Video playback pause button control real time video pause stop the last p...

Page 49: ...cus In Focus Out Focusing on distant objects or Focusing on close objects 4 Set Call When PTZ turn to expected position can set up a number of preset that user want click Set button when PTZ turn to o...

Page 50: ...he bigger resolution is the clearer the image will be more network bandwidth will be taken 4 Bit Rate User can assign bit flow stream normally speaking the bigger bit flow is the clearer the image wil...

Page 51: ...stant bit rate video coder will be coding according to preset speed Variable bit rate video coder will adjust the speed based on preset speed to gain the best image quality 7 I key frame interval Set...

Page 52: ...sponding numerical Default 16 5 Hue Hue 0 100 slider control on the right shows the corresponding numerical Default 50 6 Distortion Adjusted the wide angle lens image distortion occurs controllable ra...

Page 53: ...3 Bit rate Bit rate 96k 128k 256k selectable 4 Input Type line in only 5 Input VolL The volume of the left channel 6 Input VolR The volume of the right channel 7 Button Press apply button to save para...

Page 54: ...tton system restart 3 User and password The user can modify the password letters and Numbers only 4 Apply Cancel Modify password and click the apply button to the login page press cancel button to can...

Page 55: ...network device the device can run multiple web applications each network program using network port to transmit data so data transmission to be carried out between the port and port Port setting is to...

Page 56: ...Port Support TCP protocol default port 5678 5 Apply Cancel Modify network parameters then press Apply button to modify network parameters press Cancel button to cancel network parameters 6 Device Inf...

Page 57: ...roller one by one the camera IP address will be shown on screen Method 2 connect camera to PC with ethernet cable use upgrade_En exe to search for IP address l Please enter the IP address to web brows...

Page 58: ...57 Method 2 Open upgrade_En exe change IP and click Set...

Page 59: ...d to restart the camera 2 methods to restart as below Method 1 Turn off and turn on manually to restart camera Method 2 On web page find System and click Apply when under remote controlling environmen...

Page 60: ...top 81 01 04 07 00 FF Tele Standard 81 01 04 07 02 FF Wide Standard 81 01 04 07 03 FF Tele Variable 81 01 04 07 2P FF P 0 low speed 7 high speed Wide Variable 81 01 04 07 3P FF Focus Stop 81 01 04 08...

Page 61: ...speed 24 high speed tilt speed 1 low speed 20 high speed 2 2 Zoom control URLformat as below http Camera IP cgi bin ptzctrl cgi ptzcmd action zoom speed More descriptions Camera IP This camera IP add...

Page 62: ...61 action including posset poscall position number 0 89 100 254...

Page 63: ...image 1 Check whether the power cord is connected voltage is OK POWER lamp is light 2 Check whether the camera can self test after startup 3 Check the BOTTOM switch and make sure the two switches are...

Page 64: ...an incorrect way cause the wrong IP address or forget web passwords press the IR remote controller Manual to restore the default value Default IP 192 168 100 88 Default username admin Default password...

Page 65: ...r company Cannot be cloned copied or translated without the permission of the company Product specifications and information which were referred to in this document are for reference only and the cont...

Reviews: