background image

User’s Manual


29 

5.2.12 Mobile Phone and Tablet PC Access   

The DVR is currently compatible with mobile phones running Windows

®

 Mobile, Symbian

®

 S60 

Version 3 & 5 operating systems, iPhones

®

, Blackberry

®

 OS 5, and Android

®

 on 3G 

networks.    For tablet PC running regular Windows OS, please refer to the 

Net-Viewer 

Program

 section of this Manual for setup instruction.


Before you can access the DVR from a mobile phone, you need to setup the Network 

Configuration on the DVR. Go to section 5.2.7 or 5.2.8 for instructions. You will also need to 

set the configurations in section 5.2.5.4. 

NOTE: 

The video speed depends on the speed of the internet connection.


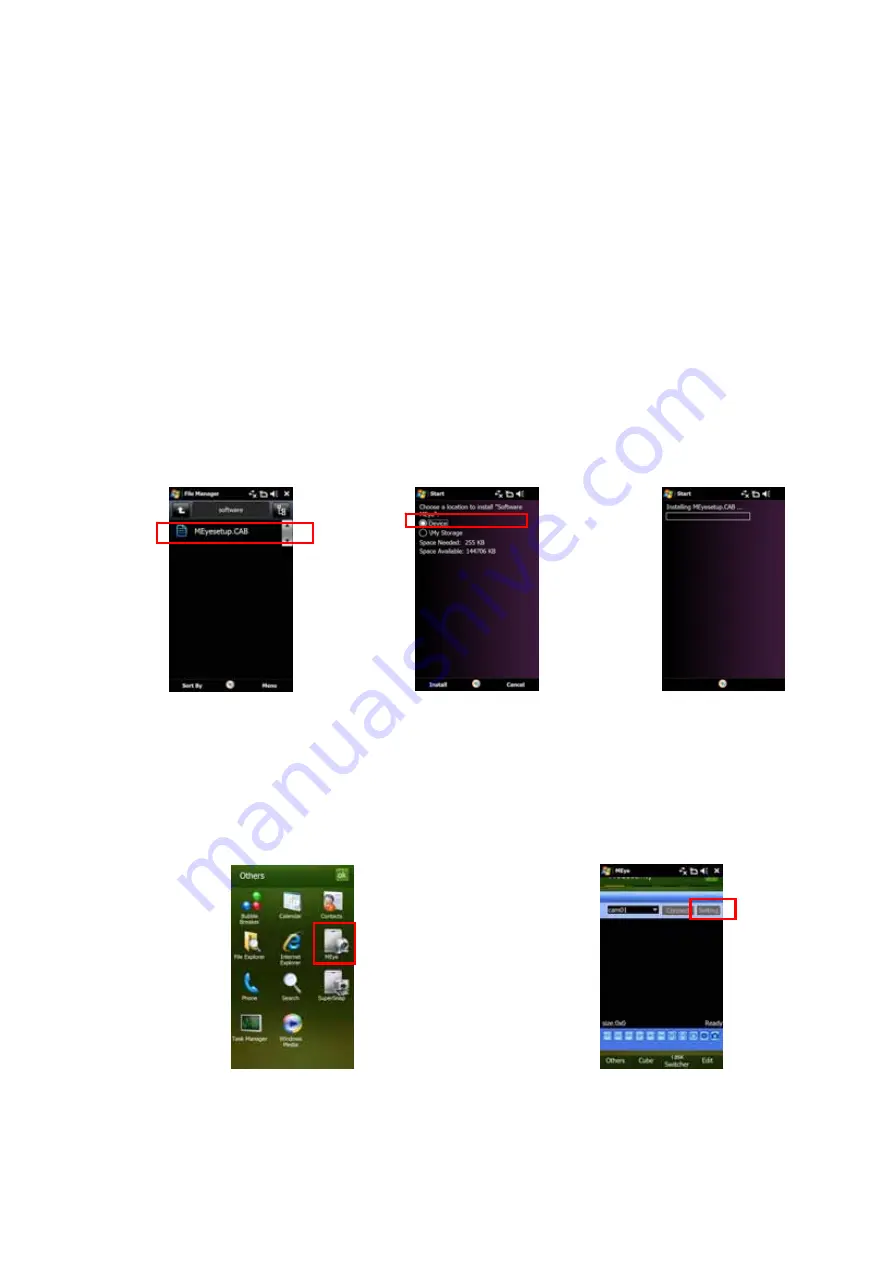
When accessing from a mobile phone with Windows Mobile operating system, follow 
these procedures: 

1. Install the webcam program that is included on the supplied CD by copying the 

meye.CAB

” file to the mobile phone. You can do this by attaching the mobile phone to a 

computer and copying the file from the CD to the phone. 

2. Click the windows mobile folder and choose the file “

meyesetup.cab

”. Select the file 

which will open the window. The file is generally default to save to the Device’s built-in 

memory, but you can choose to save it to Storage Card. 

3. Choose storage location and click “

Install

” to start the installation.


4. After installation finishes, click the icon named “meye” to run the program. This will display 

the program screen. 

5. Click the “Setting” button to enter the Setting menu


Summary of Contents for P16-41439

Page 1: ...8 Channel Security Kit With 8 Night Vision Cameras P16 41439 User s Maual All brand names and trademarks are properties of their respective owners ...

Page 2: ...CTING THE POWER SUPPLY 10 3 3 CONNECTING THE CAMERAS 10 CHAPTER 4 DVR START UP 11 4 1 SYSTEM INITIALIZATION 11 4 2 MAIN INTERFACE 11 CHAPTER 5 DVR MENU AND OPTIONS 12 5 1 MAIN MENU PREVIEW 13 5 2 MAIN MENU 14 5 2 1 Playback Functions 14 5 2 2 Record 15 5 2 3 Hard Disk Management 16 5 2 4 Basic Setups 17 5 2 4 1 Language 17 5 2 4 2 Date Time 17 5 2 4 3 Password 17 5 2 4 4 Display 18 5 2 4 5 Video A...

Page 3: ...wser IE 27 5 2 12 Mobile Phone and Tablet PC Access 29 5 3 KEYLOCK 38 5 4 CHANNEL SWITCH 38 5 5 VIDEO SEARCH 38 5 6 PTZ CONTROL 39 5 6 1 Cruise Setup 39 5 7 MUTE 39 5 8 MANUAL REC 39 5 9 STOP REC 40 5 10 ROTATION 40 5 11 START CRUISE 40 5 12 STOP CRUISE 40 5 13 STANDBY 40 CHAPTER 6 ACCESSING WITH INTERNET EXPLORER 41 6 1 LOG IN 41 6 2 MAIN INTERFACE OF NET VIEWER 42 6 2 1 Menu column 42 6 2 1 1 Li...

Page 4: ...to radio communication However there is no guarantee that interference will not occur in television reception which can be determined by turning the equipment off and on The user is encouraged to try and correct the interference by one or more of the following measures Reorient or relocate the receiving antenna Increase the separation between the equipment and the receiver Connect the equipment in...

Page 5: ...NC Camera Cables Remote Control with batteries USB Mouse 6 ft 1 8m Ethernet Cable 6 ft 1 8m BNC to RCA Cable DC12V DVR Power Adapter 2 DC12V Camera Power Adapter User Manual Software CD SYSTEM REQUIREMENTS Please be sure the computer that you install the included software with complies with the following specifications IBM PCs or 100 Compatibles Windows XP Vista 7 Internet Explorer 7 or Newer Web ...

Page 6: ...ttempt to remove the top cover If any abnormal operation is observed unplug it immediately and contact technical support Warning You may be subjected to severe electrical shock if you remove the cover of the DVR 8 Handle DVR box carefully If you accidentally drop your DVR on any hard surface it may cause a malfunction If the DVR doesn t work properly due to physical damage contact an authorized de...

Page 7: ...on view record playback simultaneously Security Certified Hard Drive pre installed Easy control with USB mouse Instant viewing using Windows Mobile Symbian S60 Version 3 5 iPhone Blackberry OS 5 and Android Internet Remote Functions View Search Playback Backup and Setup Email alerts with JPEG attachment Microsoft Windows XP Vista and 7 compatible ...

Page 8: ...previous menu screen 10 Channel Select 1 5 Select to display channel 1 thru 5 Move up Move Left OK PTZ Press to enter selected option or open PTZ menu in main display screen Move Right 11 Navigation Buttons Move Down 12 USB Data Port Connect USB device Flash Drive Hard Drive 13 USB Mouse Port Connect USB Mouse 14 IR Receiver Remote control signal receiver 15 Rewind 6 Press to display channel 6 or ...

Page 9: ...net Port Connect intranet internet RJ45 interface 4 VGA Connect to monitors with VGA input port 5 Audio input 4 Channel RCA interface for Channel 1 8 6 Audio Outputs Audio Signal Outputs to amplifier or audio equipments RCA interface 7 Video outputs Connect to monitor inputs BNC interface 8 Video inputs Connect CH1 8 BNC interface 9 PTZ Pan Tilt Zoom Output to PTZ enabled camera 1 2 4 5 6 3 7 8 9 ...

Page 10: ...l Select 1 4 5 9 0 Digit Key 5 9 and 0 ALL Display all Channels Quad View Menu Open main menu PTZ Open PTZ Control menu EXIT Press to go back to previous or exit menu UP Down OK Select Left Right Press to increase volume or option in menus Press to increase volume or option in menus Record Stop EXTRA No Function Rewind Play Forward Press to select reduced speed playing Press once to stop playing p...

Page 11: ...s designed for data backup to a USB flash drive Do not connect a USB flash drive to the USB MOUSE port at the bottom 2 Use the mouse buttons to perform the following a Left Button Click to select a menu option during live viewing in split screen double click on a channel to view the selected channel in full screen double click the channel again to return to split screen view b Right Button Click t...

Page 12: ...eras power source into a UPS or battery backup system will provide you recorded coverage after power failures Time depends on type of UPS used NOTE Ensure the cable is pushed all the way into the power supply Otherwise the DVR will not power on 3 3 Connecting the Cameras NOTE Prior to mounting the cameras to their desired destination please ensure all cameras are working Perform these steps near t...

Page 13: ...ad the Pop up Menu by clicking the left button of the mouse to select options when clicking any area outside the menu you will close the Pop up menu USING THE ONSCREEN DISPLAY Use the system s graphical onscreen display to navigate menus and configure options and settings 1 Date Time Displays the date and time on the system 2 Channel Title Displays the customizable name for the channel 3 Record St...

Page 14: ...isplay START CRUISE Start PTZ cruise track START CRUISE Stop PTZ cruise track STANDBY Select to go into standby mode To close the Sub Menu click anywhere onscreen Using the Virtual Keyboard Mouse Only When using the mouse you can input certain values using the onscreen virtual keyboard You will need to use the Virtual Keyboard when entering your User ID and Password To use the Virtual Keyboard 1 C...

Page 15: ...User s Manual 13 5 1 Main Menu Preview Network Display Alarm PTZ Mobile MD Motion Detect Password Language Date Time Playback Record Advanced Basic HDD MAIN MENU Video Audio Info Maintain ...

Page 16: ...backup the recorded file you selected You can also put a check mark in the box at the end of multiple files if you want to backup more then one file at a time To search by file click the FILE LIST button This option will allow you to view all of the available files by channel and type all normal or alarm FIRST Indicates the first page of recording history you have searched When you view other page...

Page 17: ...irmation window and then remove the USB flash drive NOTE If there is not enough space on the USB flash drive the system will display the following Space is not enough NOTE Backup file will be in H 264 format you can convert it to AVI format using the Multimedia Player program that comes with the DVR or through the net viewer program so you can use any player that supports AVI format 5 2 2 Record S...

Page 18: ...ne day to another After you have completed the schedule click Apply button to save the settings You can also click on the Default button to use the system defaults The system default settings are Alarm all time on Motion Detection ON 5 2 3 Hard Disk Management To manage the installed Hard Disk click Main Menu HDD to enter HDD MANAGEMENT The HDD Management screen shows the capacity and available re...

Page 19: ...e time TIME FORMAT Use the drop down menu and select 12HOURS or 24HOURS TIME ZONE Use the drop down menu to select the time zone you are in DST Use the drop down menu to select ON OFF to enable disable Daylight Savings Time 5 2 4 3 Password Click Main Menu Basic Password This option allows you to set the user permissions and password of up to 6 users Click Config to individually configure the user...

Page 20: ...io output options such as resolution and format You can also preset a channel display sequence timing or adjust the volume Margin is the position of the display for better fitting of your screen 5 2 5 Advanced Setups 5 2 5 1 Alarm To configure the Alarm mode of each channel click Main Menu Advanced Alarm to enter into ALARM SETUP menu HDD Loss Set action when HDD is operating irregularly HDD Space...

Page 21: ...eparated into a 15 10 area When any movements in the selected area are detected recording or alarm will be triggered The semi transparent area means no motion detection will be performed in those areas EMAIL Enable or disable e mail when motion detection is triggered Red Motion Detection Enabled Clear Motion Detection Disabled NOTE You can click and drag the mouse cursor when selecting deselecting...

Page 22: ...ntain reboot time When enabling the auto maintain function you can setup system to restart regularly to clear up some temporary storage memory 5 2 5 6 PTZ To configure the PTZ Pan Tilt Zoom function click Main Menu Advanced PTZ The cameras that come with the kit do not support PTZ function please refer to the user s manual of your PTZ cameras for proper settings Please note the channel settings mu...

Page 23: ...our router 2 Reserve an IP Address in your router that is not used by other computers or devices connected to your internal network 3 Write down the assigned IP Address of your DVR Subnet Mask IP Address of your Router Gateway of your DVR for future reference when configuring the DVR 1 Select STATIC as the network TYPE 2 Setup Media Port and Web Port recommended to leave these at the default value...

Page 24: ... are using Note Your DVR supports these three common types of Internet Services DHCP Cable Modem PPPoE DSL Modem and Static IP Fiber Optics Actual service type may vary please ask your ISP for the exact service type 2 Write down the IP Address provided by your ISP if your ISP is using Static IP Subnet Mask Gateway Address DNS Address es provided by your ISP of your DVR for future reference when co...

Page 25: ... Domain Name Server Address to the IP Address of your router 8 Leave the UPNP option at ON Click APPLY to save your changes PPPoE 1 If your ISP provides you a Static IP Address select STATIC as the network TYPE 2 Leave Media Port at 9007 3 Setup Web Port leave at 80 but some ISPs block inbound traffic on port 80 to prevent web servers so if the DVR cannot be remotely accessed choose a different po...

Page 26: ...y for computer or devices outside of your local network to access your DVR through your router To do so please use the following method s NAT Network Address Translation Port Forwarding DMZ De Military Zone DDNS Dynamic DNS Please refer to your router or firewall user s manual for reference Note Improper configuration on the router or firewall will prevent you from accessing your DVR from outside ...

Page 27: ...add 1024 to the end of the IP address 2 For instructions on the most popular routers go to www portforward com Click on the Routers List and select your router from the list of router manufacturers by clicking on the brand and model number 3 On the next page that opens click on the Default Guide link This will take you to the port forwarding instructions for your router 4 When you access the DVR f...

Page 28: ...e UPNP enabled by default but just to make sure log into your router to check it is refer to manufacturer guidelines on how to do this F Once both your DVR and router have UPNP enabled you are now able to view your DVR from any computer with high speed Internet access To do this you need to type your external IP address in the Internet Browser address bar followed by 1024 Note There are 2 types of...

Page 29: ...r remote access over the internet you need to modify your browser controls Note Ensure you are using Internet Explorer 7 or newer to use this feature Open IE Click Help Select About Internet Explorer To Modify Internet Explorer controls 1 Turn OFF Pop Up Blocker Go to Tools Select Pop up Blocker If On please select Turn Off Pop up Blocker 2 Access Active X Controls Select Tools Select Internet Opt...

Page 30: ... or the program is unsigned then go to Internet Explorer Tools Internet Options then click on the ADVANCED tab on the top right This will open the window in scroll down to Security and select on the options to Allow software to run or install even if the signature is invalid and Allow Active Content to Run Files on My Computer Warning It is strongly recommended to return all Internet Explorer Secu...

Page 31: ...d of the internet connection When accessing from a mobile phone with Windows Mobile operating system follow these procedures 1 Install the webcam program that is included on the supplied CD by copying the meye CAB file to the mobile phone You can do this by attaching the mobile phone to a computer and copying the file from the CD to the phone 2 Click the windows mobile folder and choose the file m...

Page 32: ...webcam program that is included on the supplied CD by copying the Meye_RMYT_5th sisx file to the mobile phone copy the file Meye_RMYT_3rd sisx if you are using S60 Version 3 You can do this by attaching the mobile phone to a computer and copying the file from the CD to the phone 2 Select the copied sisx file on your phone to install it 3 After the phone finishes copying the file it will ask for pe...

Page 33: ...click DONE to display the screen to start viewing the live image Alias Enter the user defined DVR name if configured Option click to select whether history list should be included When accessing with an iPhone follow these procedures 1 From you iPhone Select App Store from your home screen 2 Select the Search icon 3 Type meye in the search field 4 Download and install the Asee Application 5 After ...

Page 34: ...further details 1 Download and install the Blackberry Desktop Manager on your PC 2 Connect your phone to your PC via USB cable 3 Open the Desktop Manager 4 Choose Application Loader from the Main Menu 5 Under the Add Remove Applications pane click Start Button 6 Click the Browse button and locate the meye alx file on the included CD Select the meye file under Device application selection and click...

Page 35: ...lect Edit Permissions in the drop down menu Make sure Connections Interactions and User Data are set to Allow 2 To run the application the Blackberry viewer is installed in the Downloads directory 3 Open the Downloads folder and then click the meye icon to open the viewing interface The functions of the various icons are as follow 1 Connect Disconnect 2 Full screen 3 Snapshot 4 Setup 5 Help 6 Next...

Page 36: ... the password setup in DVR under section 5 2 4 3 5 Select the Network Type supported by your phone 6 Click the Save button to save the settings and system will return to Live display You can save the connection settings for different DVRs when you give the Settings different names under Settings and click save To open the list of DVRs that you have connected to click the History button to open the...

Page 37: ...ext Channels Group icon to switch channels and then choose the channel you want to display 2 Click the Full screen icon to view in full screen display mode click the Trackball on the mobile phone to quit full screen mode 3 Click Next page again button to view the Navigation Controls if you have a PTZ Camera installed with your DVR 4 Click Help button to view the software s Help instruction ...

Page 38: ...n our driver CD 2 Copy the downloaded Meye pak to your phone 3 Make sure your mobile is connected to a network and can download software files 4 Go to All Program and select the Market icon 5 In the Market interface click Search on the upper right corner and enter apk manager to search for the apk manager program 6 Highlight and install the Apk Manager program searched ...

Page 39: ...llation steps to install the software 8 Goto All Programs and select Apk Manager 9 Locate the Meye apk on the included CD and copy to your phone 10 Select and install the software to your phone 11 Goto All Programs and select the meye icon ...

Page 40: ...he Login User Name for you DVR under section 5 2 4 3 Password Enter the Login User Password for your DVR under section 5 2 4 3 History Click the History button at the upper right hand corner to view records of previously connected devices NOTE If your phone is not compatible with the above list please check our website once again to see if your phone is listed 5 3 Keylock Click Keylock of the pop ...

Page 41: ...ll also point to the loaded point AUTO SCAN Continuously turn the PTZ camera STOP SCAN Stop turning the PTZ camera SET CRUISE Click to open the CRUISE SETTING Menu Use this CRUISE SETTING menu to set a sequence of points for your PTZ camera to point at You will need to only view the camera you would like to control before entering this screen in order to control that specific camera POINT Indicate...

Page 42: ...ction 5 2 4 5 5 11 Start Cruise If you have purchased a PTZ camera separate and would like to start the PTZ camera to start cruising click START Cruise on the pop up menu to start the function set in section 5 6 1 5 12 Stop Cruise Click STOP CRUISE on the pop up menu to stop the cruising function set in section 5 6 1 5 13 Standby Click STANDBY Cruise to put your DVR in standby mode all recording w...

Page 43: ...el or firewall setting is set properly as stated above Please also make sure all of the setup of your modem or router is setup properly 6 1 Log in After the ActiveX plug in is installed please refresh the screen to load the login page Enter your DVR s login information Click the Login button to view remotely through Internet Explorer Please note default password is empty System allows Administrato...

Page 44: ...stem will enter into Live display You can enable disable showing certain cameras control the volume or control the movement of PTZ cameras if you have such cameras installed 6 2 1 2 Playback This option allows you to playback recordings remotely 1 Select the day channel and type and click search 2 Select any event from search result list to playback 1 2 3 ...

Page 45: ...same Record settings that you would see on the firmware menus of the DVR Open sub menu Network to access the same Network settings that you would see on the firmware menus of the DVR Open sub menu Alarm to access the same Alarm settings that you would see on the firmware menus of the DVR Open sub menu PTZ to access the same PTZ settings that you would see on the firmware menus of the DVR ...

Page 46: ...nu Setting to access the same Setting options that you would see on the firmware menus of the DVR Open sub menu Maintenance to remote control your DVR to restart format HDD or update your DVR firmware Open sub menu Host to access the current status of your DVR ...

Page 47: ...ne previous setting you have saved last time CLEAN clear presetting bit setting SET CRUISE Start Cruise STOP CRUISE Stop Cruise 1 On Off Live display When Live display status is On Clicking the button closes Live display When Off clicking the button opens the Live display 2 Capture Capture Screen image and save to PC as bmp image 3 Recording Operate DVR recording remotely 4 Channel display The ico...

Page 48: ... click a file from the File List to begin playback 4 Click BACKUP Backup begins to C DVR ip_address Backup NOTE If you playback a file you must wait for the file to load before backing it up otherwise you may receive an error message 5 When file backup is complete click OK in the confirmation window The confirmation window show the save path of the backup file NOTE Backup files are saved as 264 fi...

Page 49: ... IN LIEU OF OTHER WARRANTIES EXPRESS OR IMPLIED AND PROXIMUS NEITHER ASSUMES NOR AUTHORIZES ANY PERSON TO ASSUME FOR IT ANY OTHER OBLIGATION OR LIABILITY IN CONNECTION WITH THE SALE OR SERVICE OF THE PRODUCT IN NO EVENT SHALL PROXIMUS BE LIABLE FOR ANY SPECIAL OR CONSEQUENTIAL DAMAGES ARISING FROM THE USE OF THE PRODUCT OR ARISING FROM THE MALFUNCTIONING OR NON FUNCTIONING OF THE PRODUCT OR FOR AN...

Reviews: