

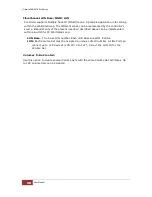


Fibre to SAS/SATA Disk Array
110
User Manual
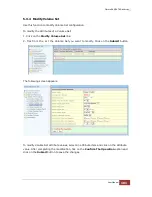
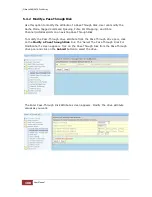
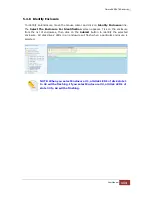
Clone Disk Procedure
1.
Select one of the members as the “Clone Source” (status indicated as Raid Set #)
by clicking on the appropriate check box.
NOTE: An error message will be showed on the screen, when
the selected disk is not in a Raid Set.
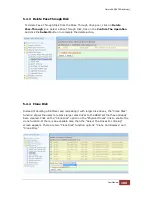
2.
Select a “Clone Target” (status indicated as Free or Hot Spare) by clicking on the
appropriate check box.
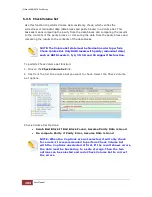
3.
If you have available disk member, you can repeat above procedures to define
another clone pair.
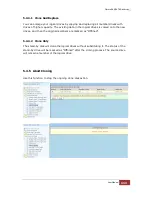
4.
Select clone type.
The pair number for both the “Clone Source” and the “Clone Target” will be indicated in
the screen. Tick on the “Confirm The Operation” check box and click on the “Submit”
button on the screen; the controller will automatically start the cloning process using the
existing “stand-by” (Free or Hot Spare drive) to clone the source drive (the Raid Set
member drive). The cloning process percentage will be indicated in the “Volume State”
area of the “RAID Set Hierarchy” screen. Completion of the Clone function process will
be indicated by a notification message on the event log.
Summary of Contents for EP-4643S2D2-F8S6
Page 1: ...Fibre to SAS SATA RAID Subsystem User Manual Revision 1 1...
Page 47: ...Fibre to SAS SATA Disk Array User Manual 47 3 Place the drive carefully in the disk slot...
Page 74: ...Fibre to SAS SATA Disk Array 74 User Manual...
Page 75: ...Fibre to SAS SATA Disk Array User Manual 75...
Page 76: ...Fibre to SAS SATA Disk Array 76 User Manual...
Page 77: ...Fibre to SAS SATA Disk Array User Manual 77...
Page 78: ...Fibre to SAS SATA Disk Array 78 User Manual...
Page 79: ...Fibre to SAS SATA Disk Array User Manual 79...
Page 140: ...Fibre to SAS SATA Disk Array 140 User Manual...