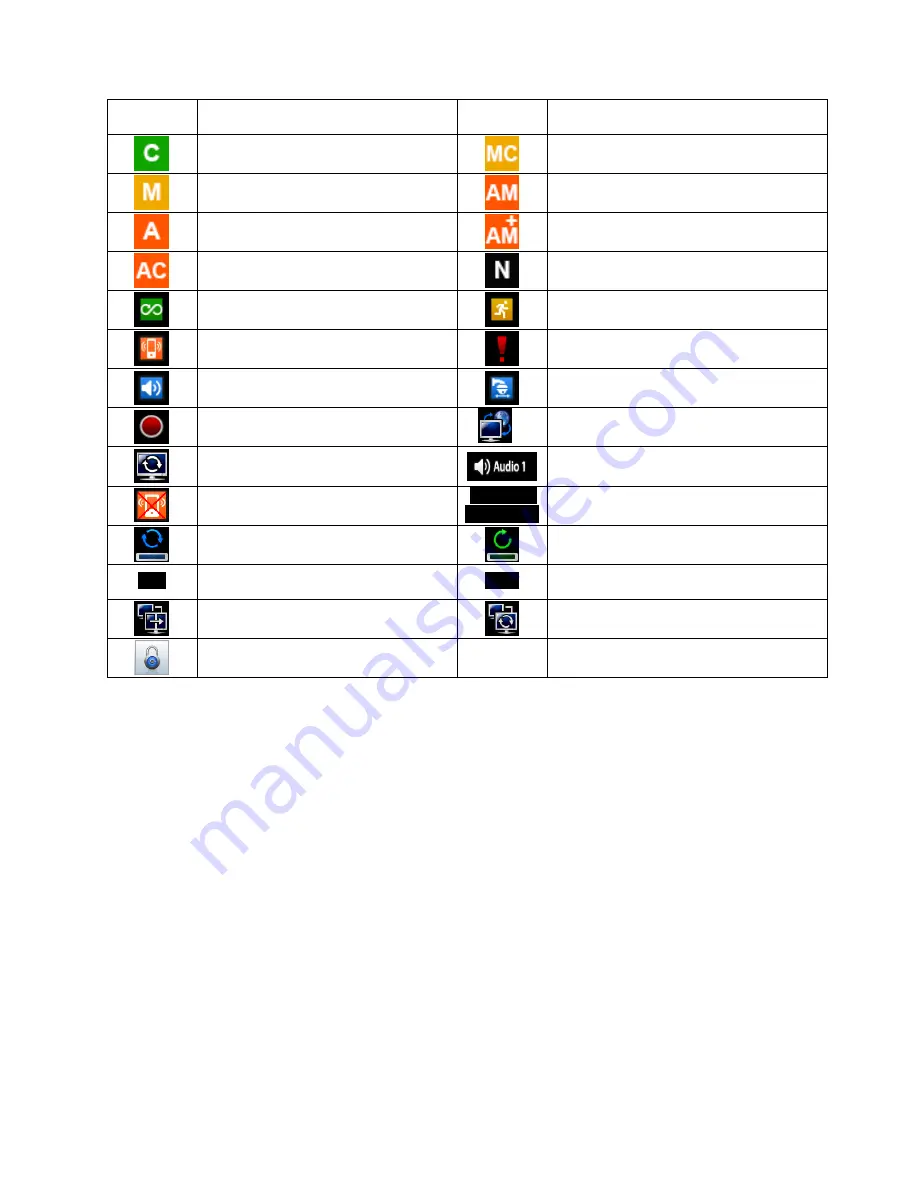
background image


23 

3.6  Screen Icon


Icon 

Description 

Icon 

Description 


Continuous recording schedule 


Cont Motion recording schedule 


Motion recording schedule 


 Alarm recording schedule 


Alarm recording schedule 


Cont. +  Alarm recording schedule 


Cont Alarm recording schedule 


No Recording schedule 


Continuous recording mode 


Motion recording mode 


Alarm recording mode 


Emergency recording mode 


Audio recording (When connected) 


PTZ mode 


Recording in progress 

16 

Remote access indication/ No. of connected 

users (up to 16) 


In channel sequencing 


Audio channel 


Master Alarm Overwritten 

2013/12/16 

PM 12:00:00


Date / Time 


HDD Overwriting Enabled 


HDD Overwriting Disabled (Recording) 

XX%


Estimated HDD usage 

KBD1


Keyboard controller mode 


Spot out Enabled 


Spot out sequencing 


Key Locked 


Summary of Contents for 16000AQH

Page 1: ...dels User s Manual S Type 412EH 824EH A Type 1648EH E Type 412CQH C Type 412KH 824KH 1648KH 32960KH G Type 412AQH J Type 8000AQH 16000AQH G Type 824AQH 1648AQH MADE IN KOREA This document contains preliminary information and is subject to change without notice V122014 ...

Page 2: ...PART 15 SUBPART B Class A Explanation of Graphical Symbols Warnings Installation and servicing should be performed only by qualified and experienced personnel Power off the DVR when connecting cameras audio or sensor cables The manufacturer is not responsible for any damage caused by improper use of the product or failure to follow instructions for the product The manufacturer is not responsible f...

Page 3: ... damage to the equipment Wall or shelf mounting should follow the manufacturer s instructions and should use a mounting kit approved by the manufacturer Move this equipment and cart combination with care Quick stops excessive force and uneven surfaces may cause the equipment and cart combination to overturn 7 Power Sources This equipment should be operated only from the type of power source indica...

Page 4: ... service person and should conform to all local codes 17 Correct Batteries CAUTION RISK OF EXPLOSION IF BATTERY IS REPLACED BY AN INCORRECT TYPE DISPOSE OF USED BATTERIES ACCORDING TO THE INSTRUCTIONS ATTENTION RISQUE D EXPLOSION SI LA BATTERIE EST REMPLACÉE PAR UN TYPE INCORRECT DISPOSEZ DE BATTERIES EN ACCORS AVEC LES INSTRUCTIONS 18 Operating Temperature An operating temperature range is specif...

Page 5: ...5 The List of Configuration DVR Set or Manual CMS CD Remote Controller Quick Guide Screws HDD Brackets Data Cable Power Cable Adapter ...

Page 6: ...hut down completely It is safe to wait for 5 seconds before turning the power on again Shut Down by DVR s menu selection does NOT physically power off the machine Please physically unplug the power cable from the DVR to completely turn off Do not turn off External storage device e g USB memory stick powered removable external hard disk and similar while the DVR is on It may cause permanent damage ...

Page 7: ...Screen Icon 23 3 7 Login 24 3 7 1 Status 25 3 7 2 General 25 3 7 3 Event 30 3 8 DEVICE 32 3 8 1 Display 32 3 8 2 Network 35 3 8 3 Alarm 37 3 8 4 Storage 38 3 8 5 Camera 41 3 8 6 Audio 42 3 8 7 Text In 42 3 9 RECORD 42 3 9 1 Record 42 3 9 2 Schedule 46 3 9 3 Motion 47 3 10RELAY 47 3 10 1ALARM IN 48 3 10 2MOTION 48 3 10 3EMERGENCY 49 3 10 4TEXT IN 50 3 10 5VIDEO LOSS 50 4 OPERATION INSTRUCTION 52 4 ...

Page 8: ...2 Event Search 106 6 6 3 POS ATM 107 6 7 Disconnection 108 6 8 Uninstall 109 7 CMS WEB CLIENT PRO 111 7 1 System Requirements 111 7 2 Setup and Login 111 7 3 Live Display 112 7 4 Search Screen 113 7 5 PTZ Control 114 7 6 Capture 115 8 CMS MOBILE VIEWER 117 8 1 iPhone iPad mViewer Pro 117 8 1 1 System Requirements 117 8 1 2 Installation 117 8 1 3 Site Registration 118 8 1 4 Connection 119 8 1 5 Liv...

Page 9: ...Power Supply Cable C 412KH 824KH 1648KH 32960KH G 412AQH Type Power Supply Adapter DC 12V 6 67A and Power Supply Cable J 8000AQH 16000AQH Type Power Supply Adapter DC 12V 6A and Power Supply Cable G 824AQH 1648AQH Type Power Supply Cable Remote Control With 2 AAA batteries Installation CD CMS Pro Software User s Manual Quick Guide 1 2 Service If there is any problem in the product please refer ser...

Page 10: ...10 1 3 System Connection Diagram S Type 412EH 824EH 4 8 CH DVR A Type 1648EH 16 CH DVR ...

Page 11: ...11 C Type 412KH 824KH 1648KH 4 8 16 CH DVR C Type 32960KH 32 CH DVR ...

Page 12: ...12 E Type 412CQH 4 CH HD SDI DVR G Type 412AQH 4 CH HD SDI DVR ...

Page 13: ...13 G Type 824AQH 1648AQH 8 16 CH HD SDI DVR J Type 8000AQH 16000AQH 8 16 CH True Hybrid DVR ...

Page 14: ...and SATA 5 Please mount DVD RW at the SATA 5 port Up to five SATA devices HDD and DVD RW are able to be connected to the SATA ports in serial however the devices must be connected onto correct SATA port Refer to the table below to mount HDDs and DVD RW S and E 4CH Type 4 8 CH DVR Storage SATA 1 Port HDD 1 HDD A Type 4 8 16 CH DVR Storage SATA 1 2 Port HDD 1 2 1 HDD 2 HDD HDD C F 4 8 16CH G 4 8 16C...

Page 15: ...SE IT MAY CAUSE PERMANENT DAMAGE TO THE HARD DISK TO TURN OFF DVR PLEASE USE SHUTDOWN KEY ON SYSTEM MUNU BAR LOCATED ON THE RIGHT MARGIN AND THEN UNPLUG THE POWER CABLE FROM DVR 2 1 5 HDD Capacity Each model has different HDD capacity Below table shows the maximum HDD capacity for each model Type S E 4CH A E 8 16CH C G and J Capacity 4TB 8TB 16TB 2 1 6 DVD RW Installation Securely mount DVD RW usi...

Page 16: ...starts 720P and 1080P HD SDI inputs can be used simultaneously with no restriction NOTE 1080i input cannot be used simultaneously with 720P and or 1080P and does not support digital zoom in live mode 2 2 3 Monitor Connections Video Out S A C G and J Type Only Use with the CCTV monitor Connect BNC cable between CCTV monitor and VIDEO OUT of the DVR VGA Use with the computer monitor Connect VGA cabl...

Page 17: ...CABLE USED MAKE SURE TO USE AN HDMI CERTIFIED CABLE CAUTION BLACK SCREEN WILL DISPLAY IF THE MONITOR DOES NOT SUPPORT THE SELECTED RESOLUTION IN ORDER TO CHANGE THE RESOLUTION PLEASE PRESS REW FF BACKWARD FORWARD IN SERIES USING FRONT BUTTON OR REMOTE CONTROLLER THEN THE RESOLUTION WILL BE CHANGED TO 1024 X 768 2 2 5 Audio Connections Connect an audio device to AUDIO IN and a speaker system to AUD...

Page 18: ...a paper clip press and hold the reset switch for 2 3 seconds and release until popup message will display 2 2 15Power Supply connections S Type Plug the power supply adapter DC 12V 3A included to DC12V connector and plug another side to power source Adapter input voltage is a free volt 100 VAC 240 VAC Please do not use any different power supply adapter because it may cause the DVR to malfunction ...

Page 19: ... the monitor to 75 ohms to prevent abnormally bright or collapsed images If wish to connect another device e g a recorder to the back of the monitor please set the impedance switch on the rear side of the monitor to HIGH Z High Impedance and set the last device to 75 ohms Alarm Input Connector Do not input any type of voltage to the AI 1 AI4 AI 16 connectors ...

Page 20: ...u Setup mode REW Fast backward playback changes up to x128 with each press Zoom Out on PTZ mode BACKWARD Frame backward playback Zoom In on PTZ mode PLAY PAUSE Viewing mode Instant playback playback the recorded video from the last three minutes Playback mode 1X PLAY PAUSE Focus Near in PTZ mode FORWARD Frame forward playback Focus Far in PTZ mode FF Fast forward playback changes up to x128 with e...

Page 21: ...6 channel DVR Select Camera No 1 10 use 1 10 direction key Select Camera No 11 16 press key and use 1 6 direction key Below shows how to select camera channel for 32 channel DVR Select Camera No 1 10 use 1 10 direction key and press key Select Camera No 11 32 combine 1 10 key and press key Ex Camera No 20 press 2 10 and key Camera No 31 press 3 1 and key 3 3 Front Panel S 4 8CH A and E 4CH Type 4 ...

Page 22: ...use button functions the same as Enter key on the front panel of DVR Right mouse button displays the channel function key such as Audio PTZ PIP Color and Position on selected channel S A and C Type Name of Key Function Audio Enable Disable Audio Color Change Brightness Contrast Saturation of the selected channel When supported PTZ Enable Disable PTZ control PIP Picture in Picture function Position...

Page 23: ...ording schedule Continuous recording mode Motion recording mode Alarm recording mode Emergency recording mode Audio recording When connected PTZ mode Recording in progress 16 Remote access indication No of connected users up to 16 In channel sequencing Audio channel Master Alarm Overwritten 2013 12 16 PM 12 00 00 Date Time HDD Overwriting Enabled HDD Overwriting Disabled Recording XX Estimated HDD...

Page 24: ...in menu consists of 4 sub menu SYSTEM DEVICES RECORD RELAY To escape from the setup menu and save settings of DVRs please Click Exit button on the screen Users may use direction keys or mouse Click to exit from Setup Please Click the EXIT button on the screen NOTE Press AUDIO ESC in the setup screen It operates like CANCEL ESC During live mode AUDIO ESC button operates as on off of audio focused c...

Page 25: ...followings DVR name DVR ID MAC Address Firmware Date Language IP Address UPnP Video Signal HDD Usage Camera Audio Connection HDD information Record Start End time NOTE Values cannot be changed at Status Please see General to change the value 3 7 2General Please Click SYSTEM General and the following screen will display ...

Page 26: ...h Remote Controller and or Joystick operations Please Click on DVR ID box and the following virtual Numpad will display Take any whole number between 1 and 255 Please Click desired numbers on the virtual Numpad to input Use to erase one number every time Use to erase the whole numbers Use to move the cursor Also you can use a mouse to move the cursor between numbers Please choose OK to confirm the...

Page 27: ...he Month Calendar to select Year Month and Day Move to next Year Move to previous Year Move to next Month Move to previous Month Click a date The date will be displayed in blue color Please follow the procedure below for time adjustment Click items AM PM H M S to change A selected item will be highlighted in a box Adjust the number by Clicking buttons on the right hand side Repeat the same procedu...

Page 28: ...nected to Time Server If not displaying please Click When NTP Time s Clock is displayed please Click to synchronize NTP Server s clock with DVR clock NOTE The displayed Server Time could be 30 minutes or 1 hour off from actual local time when the region is on Daylight Saving Time period Just disregard it and sync the time When you proceed to EXIT The very correct time should have been applied and ...

Page 29: ... Click and the following screen will display Click on the right hand side of Group Name box or Group Name box Then the virtual keyboard will display Please Click desired characters up to 60 letters on the virtual keyboard Select access rights for the Group by checking some of the following items All Setup Archiving Shutdown Search Network and Reboot If Click All all items are checked unchecked at ...

Page 30: ...te New User but it is necessary to send email notification NOTE Users may create up to 8 Groups and 8 Users per Group Login Check Selectively enable password protection for important operations Please check the operations that wish to enable password protection CAUTION USERS WILL NOT BE ASKED TO ENTER THE PASSWORD FOR OPERATION S WHEN PASSWORD PROTECTION IS NOT ACTIVATED 3 7 3Event Please Click SY...

Page 31: ...onnect Setup Change from Remote E mail Send Success Failure HDD Add Remove Relocate HDD Format Success Failure Data Clear Success Failure S M A R T check Bad HDD Rec Day On Off HDD Overwrite On Off DST On Off Lock On Off Click Delete box to delete the log contents Click Export box to Export the log contents to USB memory stick NOTE Maximum of 2 000 Event Log can be saved After 2000 logs older log ...

Page 32: ... NTSC PAL and AUTO The default value is AUTO Once the setting is changed it will ask to reboot for the new recognition of video out Transparency option allows users to adjust a level of transparency of menu display Press or button to adjust the transparency Please Click OSD Icon and the following screen will display The OSD Icon menu allows users to select what to display on the screen Click to re...

Page 33: ...ng screen will display The Menu Icon menu allows users to customize the Left and Right side popup menu which is displayed on the screen by moving a mouse pointer on each side Left side popup menu is for Display options and Right side popup is for System options Click All selects deselects all sub options Click to restore default value Please Click Sequence and the following screen will display The...

Page 34: ...lay Spot Monitor and the following screen will display To Select the type of spot out Click combo box Users can select Multi spot or Spot The Sequence menu allows users to adjust channel sequencing interval of Spot Monitor X1 Seq Adjust interval for Full screen sequencing X4 Seq Adjust interval for 4 split screen sequencing X8 Seq Adjust interval for 8 Split screen sequencing X9 Seq Adjust interva...

Page 35: ... SMTP If users want to use dvrdomain com which is offered by manufacturer instead of own SMTP server please click on the check box dvrdomain com To use own SMTP Click the check box on the left hand side of Own SMTP box In order to use SMTP server properly please Select your Internet security protocol None SSL TLS SSL Click the keyboard icon on the right hand side of SMTP Server box and the virtual...

Page 36: ...ng uncheck from the checkbox next to Default Value Frames 1 3 5 7 15 frames for NTSC 1 3 5 6 12 5 frames for PAL Qualities Low Standard High Super NOTE Default Frame rate and Quality are 15 and High NOTE Dual Streaming mode may reduce network traffic and then show display more smooth at the low speed network environment DDNS Dynamic Domain Name System service registers its unique Domain name to a ...

Page 37: ... list of DDNS Server As for Domain Name users have to input the Domain Name given from the selected DDNS Server As for ID and Password use the user ID and Password to log in to the selected DDNS Server Click Run DDNS service to start mapping from DVR to DDNS Server NOTE Users must join dyndns org or no ip com prior to using it as DDNS server Please check corresponding website for more information ...

Page 38: ...e Click Alarm Out and the following screen will display The Alarm Out menu will allow users to give title and to select the type of Alarm output Click the keyboard icon on the right hand side of each box on name column or name column and the virtual keyboard will display Then please register the title of Alarm output When a check box is marked on Use a corresponding Alarm output starts operating H...

Page 39: ...se OK to confirm Then Progress window will display and the process starts When all data are deleted a message box HDD format has been completed will pop up NOTE When users add used HDDs from the same type of DVR users can access data in DVRs as Read Only or keep CAUTION DELETED DATA CANNOT BE RESTORED Please Click S M A R T and the following screen will display S M A R T S M A R T shows the status...

Page 40: ... notification It will notify when free space in HDD is less than the specified value The values are from 0 100 Check Alarm out users can set the alarm out when free space in HDD is less than the specified value If Click All all items are check uncheck at once Check E mail users can receive the email notification to registered email address when free space in HDD is less than the specified value If...

Page 41: ...a IF a PTZ camera itself supports OSD menu use the setup values to enter and use the OSD menu using the DVR interface If OSD entering command is 95 PSET for example designate 95 for Menu item If shortcut key to use Tour function is 71 79 PSET designate 70 for Tour item and If shortcut key to use Pattern function is 81 89 PSET designate 80 for Pattern item The setting information herein is used for...

Page 42: ...ras CAUTION AN AUDIO INPUT CANNOT BE LINKED TO 2 OR MORE VIDEO CHANNELS NOTE This setting will not affect audio on live mode the audios are bound to same video channel on live mode 3 8 7Text In NOTE Please refer to 11 TEXT IN 3 9 RECORD 3 9 1Record A DVR has 5 different types of recording mode as followings Users may combine those 5 and apply by hour basis Continuous record continuously Motion rec...

Page 43: ...box All items are changed at once Please Click Motion and the following screen will display The Motion menu allows users to set Motion based recording rates and resolution Each box on Title column shows camera title registered in DEVICES Camera Users cannot change camera titles here Click each box on Resolution column to select recording resolution of a corresponding camera Users may select one of...

Page 44: ...g rate varies by selected recording resolution Click each box on Quality column to select recording quality of a corresponding camera Users may select its recording quality from Super High Standard and Low Click each box on Post Rec column to select recording duration 10 seconds 10 minutes of a corresponding camera Click Drop down list to change the setting values of Resolution Frames Quality and ...

Page 45: ...w Click each box on Post Rec column to select recording duration 10 seconds 10 minutes of a corresponding camera Click Drop down list to change the setting values of Resolution Frames Quality and Post Rec And If Click Drop down list of all frame All items are changed at once Please Pre Event and the following will display Pre Event is effectively used when users select recording mode by Motion Ala...

Page 46: ...he entire row will be registered Click a column 00 23 and the entire column will be registered Click Save button to save setting Click and hold mouse cursor on the Schedule table and then brush as you want The brushed cells will be registered as your record mode selection Repeat the procedure for Camera No 2 to 16 If users want all other cameras to have the same mode please Click Save to all CH bu...

Page 47: ...elect Sensitivity in Sensitivity box Lowest Low Medium High and Highest Click to Deselect the area first Click Select and will be able to select the area of detection on the grid Click blocks to activate Click Save button to save setting Drag and Drop Mouse Cursor on Blocks and rows columns to select unselect the areas Repeat the procedure for Camera No 2 to 16 If users want every camera to have t...

Page 48: ...he main monitor Message When Alarm In is on the alarm message will pop up on the OSD Repeat the above procedure for Alarm In 2 Alarm In 16 Up to 2 for A and E 4CH Type Up to 16 for C G and J Type Click Copy to All CH button to copy Notification Local Actions to all channels To select cameras for recording when alarm In is on Please change setting in Record Recording Alarm Record camera 3 10 2MOTIO...

Page 49: ...dures below Select alarm outputs to be worked when Emergency button is pressed Please check a check box of use column on Alarm Out box More than two alarm outputs can be set If Click All of use box all items are checked unchecked at once Please check a check box of use column on Preset box More than two cameras can be set If Click All of use box all items are checked unchecked at once Click Drop d...

Page 50: ...can be set If Click All of use column all items are checked unchecked at once Click Drop down list of Preset to change Cameras preset If Click Drop down list of all preset box all items are changed at once Select group for notification when Text In 1 is on Please check a check box of E Mail box More than two Groups can be set Click Drop down list of E mail Attachment box to attach None JPEG or EXE...

Page 51: ...t when video loss is occurred to cam 1 Please check a check box of use column on Preset box More than two cameras can be set If Click All of use box all items are checked unchecked at once Click Drop down list of Preset to change Cameras preset If Click Drop down list of all preset box all items are changed at once Select group for notification when video loss is occurred to cam 1 Please check a c...

Page 52: ...tion Alarm recording schedule Continuous Alarm recording schedule No Recording schedule Continuous recording mode Motion recording mode Alarm recording mode Emergency recording mode Audio recording When connected PTZ mode Recording in progress 16 Remote access indication No of connected users up to 16 In channel sequencing Audio channel Master Alarm Overwritten 2013 12 16 PM 12 00 00 Date Time HDD...

Page 53: ...lit screens or multi window view formats will display alternately i e 1 4 8 9 10 16 32 Channel Sequencing Please press SEQUENCE key to display images in sequencing view format periodically This automatic sequence function is not limited to the full screen format but can be used in any view mode In 8 channels DVR 1 or 4 camera sequencing view mode is possible in 16 channels DVR 1 4 8 9 or 10 camera...

Page 54: ...cus Far Focus Near Iris Close Iris Open Save Preset Go to the Preset Go to OSD main menu Run Group Tour 1 9 Run Pattern 1 9 To use a mouse in Pan Tilt mode select and double click a channel first Right Click on selected channel to open Channel menu then Click PTZ to activate PTZ control OSD menu A key pad control will show as follows To add new preset select Preset No and button Click To move to p...

Page 55: ...y Clicking menu button or using 95 Goto button Please refer the PTZ camera manual for details 4 1 6System Log Pleas Press key and the System Log screen will display System Event shows all logs of actions taken by users 4 1 7Key Lock Press to operate the key lock function This function is indicated by icon in the center of the screen Once the Key Lock function is activated users cannot use any key ...

Page 56: ...fenrent recording mode Playback mode runs in the available maximum number of split screen format To change the viewing mode please press DISPLAY key or Camera Select key 1 16 NOTE Using a mouse Double Click to view the full screen and double Click one more time to back to Split Screen NOTE Pushing a wheel of mouse Enter Playback mode Following is the key usage found in playback mode Users may also...

Page 57: ...ng the arrow buttons in the calendar Move to next Year Move to previous Year Move to next Month Move to previous Month Click on a certain date wish to playback The date will be displayed in Blue color Click on the time bar and Red line will move to the selected time and playback will begin instantly There are four other functions in this mode This function allows users to take screenshot and save ...

Page 58: ...ed One or more cameras can be selected Choose Event Search and select specific event s to be included Or choose POS ATM Search then virtual keypad is display Type a keyword to search by Click OK to search the recorded data for selected event and key word transactions Searched data will be listed on the side There are three other functions in this mode This function allows users to take screenshot ...

Page 59: ... Search to search the recorded data Searched data will be listed on the side There are five other functions in this mode This function allows users to take screenshot and save to USB in jpeg format Able to save the listed images The Archive function allows users to copy the recorded video in EXE or AVI format to a storage device USB memory stick or DVD RW Refer to 5 5 Archive for more information ...

Page 60: ... drag the mouse This function allows users to save the area Click Search to search the recorded data Searched data will be listed on the side There are three other functions in this mode This function allows users to take screenshot and save to USB in jpeg format Able to save the listed images The Archive function allows users to copy the recorded video in EXE or AVI format to a storage device USB...

Page 61: ...ring Display Menu Bar Left Side System Menu Bar Right Side Icon Description Icon Description Main monitor Display 1 4 8 9 10 16 32 General Status Activate Sequencing mode 1 4 8 9 10 Open Event Log Multi Spot 1 4 8 9 10 16 None or Spot Enter Setup mode Disable Alarm out Alarm Out control Enter Search Mode OSD On Off Enter Archive mode Freeze Live Image Activate Key Lock Bookmark System Restart Acti...

Page 62: ...nt to store Users can archive multi channel at the same time only EXE format one channel only for AVI format Click the on the right hand side of FROM box to set the storage start time Click the on the right hand side of TO box to set the storage end time Click Format box to select EXE or AVI Click Device box to select a storage device out of USB and CD DVD RW Click the keyboard display on the righ...

Page 63: ...the total archiving file exceeds the capacity of the media then the popup message will display once the maximum capacity of the media is reached Please change the media and press OK to proceed CAUTION PLEASE DO NOT USE THE SPACE WHEN ENTER BACKUP FILE NAME CAUTION DURING ARCHIVE PROCEDURE PLEASE DO NOT DETACH STORAGE DEVICE OR POWER OFF THE DVR OTHERWISE IT MAY CAUSE PERMANENT DAMAGE TO THE DVR OR...

Page 64: ... Professional Central Monitoring Software CMS Pro Full featured Enterprise Class Surveillance Solution User s Manual This document contains preliminary information and is subject to change without notice ...

Page 65: ...to devices on site users may make bi directional audio communication over the network The map supports multi layer structure so that each map on different layers can respond interactively On the map users may lay out icons of each device Event signal triggers the icons on the map to blink so that users may monitor event signals on the map And Users can check the live view of individual camera on t...

Page 66: ...nstalled it is recommended to completely uninstall or delete the old version Insert the provided CD in a PC Run the CMS Pro Setup exe file When the following screen appears click Next When the following screen appears select folder and click Next When the following screen appears select the check box according to user s preference and click Next ...

Page 67: ...ogin 5 2 2 1 Login Process Open the CMS Pro Users may open it by selecting the execution file through Start menu Start CMS Pro or by double clicking the execution icon on the desktop Select a user ID in the Login window Users may see the entire list of IDs that are registered into the program by clicking on the drop down menu in the right side Initially only the Administrator is registered as defa...

Page 68: ... each part on the screen 1 Application 2 View set 3 Setup menu 4 Help menu 5 Server list pane 6 Display windows 7 Health check pane 8 Map list pane 9 Screen split selection icons 10 Audio control bar 11 Remote device system log pane 12 Remote device event log pane 13 CMS system log pane 14 Sequencing 15 Event Beep On Off 16 Alarm Out Control 17 Frame Skip On Off 18 Full Screen Mode 19 Mic On Off N...

Page 69: ...y distinguished Description Type brief description of the site IP Address Input IP address or Domain Name of DVR check from the SETUP DEVICES Network in DVR Command Port Input Administrator s number among port numbers set in DVR check from the SETUP DEVICES Network in DVR Default port number is 5920 Stream Port Input Video Audio number among port numbers set in DVR check from the SETUP DEVICES Net...

Page 70: ...ose the setting panel by clicking OK If users wish to exit without saving then click Cancel Alarm In name setting on CMS when Alarm In event occurs If users check Display to Event Log registered name shows on event log Clear all Text remove all registered name This function automatically detects and DVRs Servers which are connected under the same local router as the PC Click Scan Device then follo...

Page 71: ...ndow Right mouse click and click connect on the site or double clicking the device will show the tree of cameras and here users can extract the channel they want To add the channels into new group drag drop or double click on the camera Users are able to continue to extract and add the channel by connecting other DVRs To remove the added channel please Right mouse click on the channel and click Ch...

Page 72: ...applied after program restarts and the contents are as below Display Mode It shows the format of display and YUV Mode is the default and it is not adjustable Default Division Users can select the number of division of display channels when the program initially displays the screen from 1 to 144 division Users are able to save division of display by marking the Remember the pervious state check box...

Page 73: ...otice windows when a certain text is detected from a DVR that has an attached Text POS device Device choose a device Message add message like VOID When added message VOID occurs from DVR window will pop up 5 4 3 3 Record Backup Users can customize the storage path of the image file of Screenshot or Zoom in Screenshot by typing the path or clicking the folder icon Save Directory Screenshot Select t...

Page 74: ...ay save the current CMS Pro configuration data as a file and import it later to the same PC or another one Select Save Directory Users can select the save directory of setup data or log data by designating the folder in the PC or other storage device and the change of the directory will be applied only after clicking OK button and exit Select Data Select data which users would like to save in the ...

Page 75: ... For example if 5 Min is set as a playback period then users are able to see the last 5 minute s data from the current time To activate the Instant Playback just right click on a live screen and select Instant Playback 5 4 3 6 Auto Sequence Auto Sequence Users are able to switching the camera view and setup the dwelling time Set the dwelling time by clicking the to increase and decrease duration 3...

Page 76: ...permitted to set only Search PTZ control and E map functions Create users name and Password and then type Description of the account Mark the authorization check boxes to allow It is possible to give an authorization selectively to the individual user account Check All grants all the authorizations and Uncheck All deprives all the authorizations Click OK to save and exit 5 4 4 2 Edit User Account ...

Page 77: ... able to create E maps on theirs demands and it enables to monitor the site Click Setup Local Setup E Map to register new E Maps 5 4 5 1 Registering a New E map Please follow the procedure below for registering new E Maps Click New E Map from E Map List Click Load E Map Image to apply background image So as to add devices Cam Audio and Alarm to E Map please connect sites from Server List Drag devi...

Page 78: ...f items please double click a text To save all setting please click Apply button 5 4 6Remote Device Setup Select a device to enter device s configuration and Click OK then the web browser will pop up as below Enter ID and Password to open Remote Device Setup page and following page will display Web server port default 80 should be port forwarded to use remote device configurations NOTE Remote Devi...

Page 79: ...rent password New Password input the new password Confirm Password confirm the new password NOTE User ID cannot be modified 5 4 8Help 5 4 8 1 About The version of CMS Pro can be checked here 5 5 View The viewer of this program is composed with 5 types of different panes Server List Remote Device System Log Remote Device Event Log CMS System Log and Health Check 5 5 1Server List When the device is ...

Page 80: ...e in the Remote Device Event Log menu to see the menu or uncheck Visible in order not to see the menu Users can select the registered device from the drop down box menu Alarm In Motion Video Loss Alarm Out can be selected separately as Event More than 2 events can be selected at the same time And by clicking Event log On Off after right mouse click on the device in the server list users can check ...

Page 81: ...check the log information of the CMS program Check Visible in the CMS System Log menu to see the menu or uncheck Visible in order not to see the menu Click the Update Log button to update the log User can classify the Manager and User by checking the ID and get the information of connect disconnect and shutdown of the user 5 5 5Health Check This is the menu where users can easily check the overall...

Page 82: ...ot being recorded currently but can be recorded later Motion Status Motion is not activated and supported Motion is being activated Motion is not activated but can be activated later Alarm In Status Alarm In is not activated and cannot be added Alarm In is being activated Alarm In is not activated currently but can be added later Alarm Out Status Alarm Out is not activated and cannot be added Alar...

Page 83: ...panes 5 6 Application 5 6 1Search There are five different types of search menu Timebar Event POS ATM Thumbnail and Smart Search The detailed information and directions is described in chapter 6 8 5 6 2Exit If users wish to exit the program then click the Exit in the Application menu ...

Page 84: ...ty group data and time information Dual Triple monitor can be available and the quadruple monitor can be available by using splitter Two live panes 256 channels for each pane 5 7 2Live Monitor Menu The following functions are operated when the right mouse button is clicked on the screen 5 7 2 1 Full Screen On Click Full Screen On to make selected channel into a full screen Click Full Screen Off to...

Page 85: ...3Hour The default time is 3Min NOTE Users can also set up the Instant playback in the menu Local Setup Environment The image capture is supported in the instant playback viewer by clicking right mouse button on Capture Image NOTE For more detailed information of captured image please refer to the Chapter 6 7 2 6 Screen Capture Print 5 7 2 4 Digital Zoom To use digital Zoom please make the display ...

Page 86: ...play is on 1Ch mode The digital zoom function is able to zoom approximately x32 5 7 2 5 PTZ Control After right mouse click on the channel that PTZ camera is connected select PTZ control Users can designate the certain position and set the name by using Preset function Up to 255 presets can be designated Zoom in out function Zoom Area ...

Page 87: ...ured image by clicking Save as Image Create a name of captured image and select the image type as BMP or JPG Users are able to choose the folder where they wish to store the image Click Show Captured Image to show the captured images Users can even recapture the part of the captured image by dragging the place users want Click Print button to print all the captured images at once If users want to ...

Page 88: ...hone of PC Users can deliver the audio through the speaker connected to DVR by sending the audio from PC where CMS Pro is activated 5 7 2 9 Instant Recording Click right mouse button to activate the Instant Recording In the Instant Recording there are three choices of start recording setup and open folder Click Start Recording to record the particular channel that user wants If users want to have ...

Page 89: ...up Please type the previous password that users entered in Password setup When Users want to stop recording click right mouse again and select Instant Recording and choose stop recording Choose Setup in the Instant Recording to set up the recording duration and default directory In the recording duration users can setup the hours and minutes by clicking the upside down arrows Open folder will allo...

Page 90: ...e to display time or uncheck the menu to hide it 5 7 3Screen Layout Control Every menu pane can be relocated by drag and drop 5 7 4Change Division Display From a single full screen to 256 channels various combination of channel display is provided by clicking the icon at the bottom of the screen 5 7 5Sequencing Click the icon to switch the channel according to setup made in auto sequence in Local ...

Page 91: ... more than 2 channels at the same time is available only in time bar search 5 8 2Time Bar Search Open a search window by clicking the search in the application menu Click the connect after right mouse clicking on the device list Once it is connected to the program date month and year of the recorded data is highlighted in the calendar The text box in the left bottom side of the window shows the ti...

Page 92: ...us will change Enter Digital Zoom Users can use Digital zoom Please refer 6 7 2 4 Digital Zoom Capture and Print Screen Users can capture image Please refer 6 7 2 6 Screen Capture and Print NOTE Audio and Digital Zoom are supported only in 1CH display mode In the playback menu users are able to search the data from the beginning of the day or from the cursor position Or just simply click on the ti...

Page 93: ...in event search Specify the start time and end time in Date Time setting and click Search button To check the event that is detected on the right side of the search window double click the event that users want 5 8 4POS ATM Search Click the connect after right mouse clicking on the device and select the POS ATM Search Type the actual keyword that users want to find in the POS ATM text box Select a...

Page 94: ...t can be setup as 32 64 128 and 256 Specify the start time and end time in Date Time setting and click Search button Double click the listed snapshot images to check and play the video Click Stop Search to stop the search and check the video to the stop time The video will be displayed in the video display panel at the bottom of the search window Users can move the panel around the screen and adju...

Page 95: ...er program Please refer to Local setup E map in chapter 6 4 5 5 9 2Sowing E Map In order to show the added E map please click Map List and right mouse click Show Map Viewer from E Map List To move to the linked E Map please double click Link icon on E Map If users click cameras on E Map it is able to see the video of cam on E Map directly 5 9 3Alarm In Out Control The Alarm In icon on the map is b...

Page 96: ...k the Uninstall file in the CMS Pro folder in the PC Click the uninstall file and the following message box will pop up Click OK to remove the program and its components If uninstall is complete successfully the following message will pop up ...

Page 97: ...97 iCMS iCMS User s Manual This document contains preliminary information and is subject to change without notice ...

Page 98: ...stem Mac OS 10 6 0 or higher NOTE It is recommended to connect Max 16 HD SDI Full HD cameras with iCMS WARNING DUE TO A LIMITATION OF A MAC CONNECTING MORE THAN 16 HD SDI FULL HD CAMERAS MAY RESULT IN MALFUNCTIONING OF THE SOFTWARE TO CONNECT MORE THAN 16 HD SDI FULL HD CAMERAS PLEASE ENABLE DUAL STREAMING OPTION ON THE DVR 6 2 Program Installation Please follow the program installation procedures...

Page 99: ... Menu below 6 3 Login After installation of the software iCMS icon appears in Application folder Please double Click on the icon to execute the program Select User Name by Clicking upside down arrow and enter corresponding Password to login 6 4 Watch Mode 6 4 1Log in Screen Please Click Device manager and the following screen will display ...

Page 100: ...R site name which will be displayed on the Server list Please note that this name has nothing to do with the ID registered in DVR Users may create the name that is fairly easy to distinguish Description type brief description of the site IP Address input IP address or Domain Name of DVR check with SETUP DEVICES Network in DVR Command Port input Administrator s number among port numbers set in DVR ...

Page 101: ...User Name and Password have to be same as the DVR setting When users want to edit the existing device information please choose the device and Click Edit When users want to delete the existing device information on the list please select the device and Click Remove If users click the Remove button it will show the message below Please Click the OK button to remove the connected device 6 4 2 2 Disp...

Page 102: ...ial and Courier Font Size select the size of the font from 10 to 20 and the default is 15 Color select the color among 16 different colors 6 4 2 3 Password Change Please Click Password Change in setup menu to change the password This ID and password is for opening the iCMS This is not related to any DVR s login password Please select the ID from the drop down list and type original password Please...

Page 103: ...l display Similarly if users select Channel No 16 13 16 quad screen will display 9 Split Screen Mode Click on No 9 button and 9 split screen will display The 9 split screen is in combination of 1 9 and 8 16 If users select Channel No 9 and Click the button 1 9 split screens will display Similarly if users select Channel No 10 8 16 split screens will display 16 Split Screen Mode Click on No 16 butt...

Page 104: ...Health check shows the status of how many cameras are activated how many HDDs are available and how many channels are recorded Monitoring shows the status of the number of motion detection and how many alarm in and alarm out are activated Number Description 1 DVR name 2 Start and finish recorded date and time 3 The version of the firmware 4 The number of Connected network ex CMS Mobile CMS etc to ...

Page 105: ... PTZ control menu can be hidden by Clicking PTZ ICON below the PTZ menu 6 5 5System Log In the Live mode system Log is shown This will allow users to check System Log of Remote Site DVR 6 6 Search Mode This involves searching recorded video to playback the video of a specific date and time Users are able to search the recorded data in the iCMS program by Date Time Event and POS ATM Search Date Tim...

Page 106: ...increase the speed by x1 x2 x4 x8 x16 x32 x64 and Extreme 2 Sequence Mode 3 Display Mode Click the button to divide the screen by 1 4 9 16 and Full 4 Time Bar 24 Hour 5 Data Bar Recorded data 6 Time Select Bar When Date Time search is completed please Click Playback control button to begin playback 6 6 2Event Search The Event button allows users to search event recorded data of DVR To start the ev...

Page 107: ...hoose one of the devices among the Server List and right Click on the mouse to have popup menu Please Click Connect to start the event search Event search has Event Type Select Camera and Date Time setting Select Camera select a camera which has Text In connection to search Only 1 camera can be selected Date Time setting please specify the start and end time Text Option Display Option Users are ab...

Page 108: ...result of the POS ATM search Double Click on the event to playback of the data 6 7 Disconnection When disconnect please right Click on the connected site and choose Disconnect if users Click Disconnect the message box below will display ...

Page 109: ...109 6 8 Uninstall Please go into the Application folder and right Click on the iCMS icon Please choose Move to Trash to uninstall the iCMS program ...

Page 110: ...110 CMS Web Client Pro CMS Web Client Pro User s Manual This document contains preliminary information and is subject to change without notice ...

Page 111: ...rnet Operating System Windows XP Professional SP3 Windows 7 32 64 Windows 8 32 64 Others DirectX 9 0 C or higher 7 2 Setup and Login MS Explorer web browser is required to install ActiveX in order to use this program Open a browser and type the IP address of DVR It is required to install ActiveX in the first connection Click the message above in the screen then following menu box will display Clic...

Page 112: ...oller Able to control the volume Select display split mode Users can choose 1 4 6 8 9 13 16 and Full screen OSD Font color Able to change the color of the OSD font Additional features can be found with Right Click on Live screen Digital zoom 1CH Display ONLY Able to Zoom in for precise monitoring Audio On Off Able to turn on off Audio function Display Option Show Camera Name Display Camera Name on...

Page 113: ...er from 1 16 individually or all channels Play functions for playback Fast Backward Play Fast Forward Play Play Stop Go to the First Image Go to the Last Image Go to the Previous Image Go to the Next Image Select display split mode Users can choose 1 4 9 16 split displays consequently Indicate the recorded data in Time bar figure Select playback speed Users can choose x1 x2 x4 x8 x16 x32 x64 and E...

Page 114: ... window The screen contains following features Pan Tilt Direction button Zoom In Zoom Out control button Focus Near Focus Far control button Iris control button Preset control button Camera select button NOTE Must complete the control setting on its DVR and Cameras first ...

Page 115: ...e is displayed Color Control Users can change Brightness Contrast and Saturation of the captured image Save as Image Users can save the edited image in new name Original Image Users can undo all modification made to the image Preview Print Able to see print preview Show Captured Image Display all the previous captured images ...

Page 116: ...116 CMS Mobile Viewer CMS Mobile Viewer User s Manual This document contains preliminary information and is subject to change without notice ...

Page 117: ... this program because it is specialized to perform on iOS interface 8 1 2Installation Turn on the iPhone or iPad then connect to App Store Move to search menu and type mviewer then tap Select program which is offered by dvrdomain for free When users tap a button it will be turned to please tap to start installation ...

Page 118: ... will show and tap on top right corner Enter Site Name IP or DDNS address Enter Admin Stream port value Default 5920 5921 Enter ID Password Default admin 1111 Select Video Stream Full Frame and High Speed Full Frame to see full frame in 1ch on Live mode and 1 4CH Playback mode High Speed for better transmission on Live and Playback mode Tap to save the setting ...

Page 119: ...h high quality video when the network condition is good Otherwise the video would be lagged NOTE Please tap Off in Full Frame and tap On in High Speed for better transmission when the network condition is bad NOTE Video Stream does not apply when the dual streaming is on in the device NOTE Video Stream cannot be applied to some old models Please keep your device with the latest firmware version 8 ...

Page 120: ...lay mode users can double tap on certain channel to change to 1CH display mode Tap to enable PTZ function Please refer to 9 1 7 PTZ Control for more detail Tap to remove Camera Name and Date Time from OSD Tap to enable audio or Tap to disable audio 1CH display ONLY Tap to switch from Live mode to Playback mode To use Zoom feature simply pinch and drag in 1CH display 1CH display ONLY NOTE Audio Zoo...

Page 121: ... PTZ function Please refer to 9 1 7 PTZ Control for more detail Tap to enable audio or Tap to disable audio 1CH display ONLY Tap to take Snapshot To use Zoom feature simply pinch and drag in 1CH display 1CH display ONLY NOTE Audio Zoom and PTZ are available only in full screen mode 1channel only 8 1 7PTZ Control Users are able to control PTZ with iPhone or iPad by touching the screen Tap or to exe...

Page 122: ...eft to Right to descend 16 15 14 3 2 1 Tap or to choose split mode between 1 4 9 and 16 In Multi channel display mode user can double tap on certain channel to change to 1CH display mode Tap or to control the playback Tap or to take Snapshot Tap to remove Camera Name and Date Time from OSD Tap to switch from Live mode to Playback mode Tap or to enable audio 1CH display ONLY Tap or to disable audio...

Page 123: ...t the device To see other pictures slide finger across the screen Tap to send the snapshot to the Photos Tap to delete the selected snapshot 8 1 10Setting Tap to check the information of the application Users can read the manual 8 1 11Uninstallation In order to uninstall application tap the icon and hold for a while until the program icon shows x mark then click X ...

Page 124: ...3 7 inch screen NOTE mViewer Pro might not work even though Android OS version is high enough It is due to the hardware specification of Android device 8 2 2 Installation Turn on the mobile device then connect to Play Store Search mviewer pro then select program which is offered from dvrdomain for free Tap to start installation When Access popup is displayed please tap ...

Page 125: ... menu and tap on top right corner Enter Device Name IP Host address Enter Cmd Stream port value Default 5920 5921 Enter User ID Password Default admin 1111 Tap to save the setting To edit or delete the saved site press the Device Name for 2 sec from Live Device List and popup menu will display ...

Page 126: ...bile device 8 2 5Live View Portrait View To select other channels Slide finger from Right to Left to ascend 1 2 3 14 15 16 Slide finger from Left to Right to descend 16 15 14 3 2 1 Tap to enable Landscape view when the device is tilted Tap or to select video steam ...

Page 127: ...eo in 1ch on Live mode Tap to enable PTZ function Please refer to 9 2 7 PTZ Control for more detail Tap to enable Alarm Out control Please refer to 9 2 8 Alarm Out Control for more detail Tap to enable audio or Tap to disable audio Tap to change to other Device if there is any Tap to switch to Search mode ...

Page 128: ...l screen mode 1channel only NOTE Video Stream does not apply when the dual streaming is on in the device NOTE Video Stream cannot be applied to some old models Please keep your device with the latest firmware version 8 2 6Live view Landscape View Tap to enable landscape view when the device is tilted horizontally Tap screen once and menu bar will display on each side of OSD To select other channel...

Page 129: ...ra Name and Date Time from OSD Tap to take Snapshot Enter file name and press to save the image NOTE Audio and PTZ are available only in full screen mode 1channel only NOTE Video Stream does not apply when the dual streaming is on in the device NOTE Video Stream cannot be applied to some old models Please keep your device with the latest firmware version 8 2 7PTZ control Users are able to control ...

Page 130: ...ut Alarm from the connected DVR to its output source 8 2 9Search Users are able to search the recorded data with mobile device Tap PLAYBACK on main menu or on Live monitoring to use search function Choose date and time that wish to search from Calendar and tap to execute search To select other channels Slide finger from Right to Left to ascend 1 2 3 14 15 16 Slide finger from Left to Right to desc...

Page 131: ...H display ONLY Tap to change to other Device if there is any Tap to switch to Live mode Tap or to take Snapshot Enter file name and press to save the image Tap or to remove Camera Name and Date Time from OSD NOTE Audio is available only in full screen mode 1channel only 8 2 10Snapshot Gallery Users are able to watch snapshot with the mobile device Tap on main menu to enter the gallery Tap Device n...

Page 132: ... set Password Lock Tap Password Lock from the setting menu Enter password Default password is 1111 Tap to enable Password Lock when launching the mViewer pro Tap to change the password 8 2 12Uninstallation Move to Setup Application Manage Applications then select Tap icon then it will ask to delete the program ...

Page 133: ...133 TEXT IN POS TEXT IN POS User s Manual ...

Page 134: ...se correct USB to RS232 converters as follows FTDI chipset included converter Prolific PL2303 PL2303X PL2303HX chipset included converter Winchiphead chipset included converter When using a converter please connect USB slot of DVR first then restart in order to the DVR recognizes the USB converter as an RS 232 Serial In When using a multi converter the port recognizes Serial In1 as its shortest li...

Page 135: ...lues changed please restart the DVR so that the DVR recognizes attached Serial In connections Use RS232 null modem cable between POS Cash Register and USB to RS232 converter RS232 cross over connector is useful when users need to switch the Rx Tx connections ...

Page 136: ... Please check a check box of use column on Preset box More than two cameras can be set If Click All of use column all items are checked unchecked at once Click Drop down list of Preset to change Cameras preset If Click Drop down list of all preset column all items are changed at once Select group for notification when Text In 1 is on Please check a check box of E Mail column More than two Groups c...

Page 137: ...datory Please Click Setup Devices TEXT IN then users will see the display below 9 5 1Text Overlay A use may choose whether to display the text inputs connected to the rs232 port on OSD screen They have 4 menus as followings None any displays on the OSD screen Live displays incoming information from the serial port in real time on the OSD screen Record displays the saved information on the OSD scre...

Page 138: ...S Cash Register Additional filtering may also be required Discard Pattern Line Delimiter and MCPL are used with without Auto mode to get desired text inputs format Start Pattern Indicates the beginning of the new data when new designated data are received from a serial device End Pattern Indicates the end of the data when designated data are received from a serial device Line Delimiter Inputs char...

Page 139: ... the saved discard pattern press the pattern then virtual keyboard will display To delete the saved discard pattern Press x next to each pattern 9 5 4Example When it firstly connected the data will be displayed as below CAUTION THE SCREEN MUST BE ON 1CH VIEW MODE TO SEE TEXT IN DATA Input a certain repeated string to Line Delimiter like OD on the picture Decide the number of minimum characters in ...

Page 140: ...enter the Start Pattern and End Pattern Check or uncheck the Auto box to see the differences Depending on models of POS Cash Register machines it may give a better result or not Users may need to repeat the processes to get the best result Sometimes checking the recorded data and pause the playback would be easier to verify ...

Page 141: ...by keyword in Playback mode Click in the Playback mode then Users will see the following screen Please Click to do Event Search and choose POS ATM Search then virtual keypad is display Type a keyword to search by Searched data will be listed ...

Reviews: