


-9-
1.
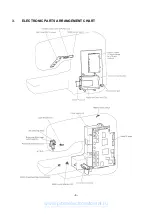
DISASSEMBLING AND REASSEMBLING THE OUTER PARTS AND MAIN
PARTS
1.
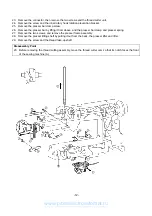
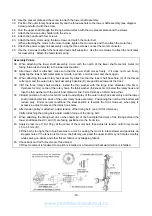
Remove the screw securing the face plate, and the face plate by sliding it to the left.
2.
Remove the screw securing the free arm cover, and the free arm cover by sliding it to the left.
3.
Remove the notch on the right side of the upper cover, and while holding it to the right remove the upper
cover.
4.
Remove the one screw on the front thread guard cover, then remove the front thread guard cover.
5.
Remove the screw securing the front cover (at back right side of handle), and loosen the two screws (below
jaw section on face plate side, below free arm). Open the front cover toward the front, remove the three
connectors and then the front cover.
(When removing the connectors, always release the lock on the main board connector first.)
(When the front cover has been removed, always adjust the touch panel after assembling the front cover.)
6.
Remove the screws at the 4 locations, then remove the FDD unit.
7.
Remove the two screws securing the needle plate, and the needle plate.
8.
Remove the three screws securing the rear cover, and the rear cover from the rear side.
9.
Remove the two securing screws, then remove the thread winder cover.
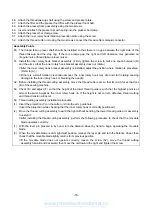
Disassembly Points
5.
To remove the front cover, slide part (D) up, unhook the two catches (H) from the base plate and the jaw section
of the front cover (E) from the bottom of the thread guide, then pull the front cover away at the front.
∗
Before disconnecting the flat cable connector (F), be sure to release its lock.
(Disconnecting the flat cable with the connector locked will damage the terminals and cause the keys to
stop operating correctly.)
8.
Before removing the rear cover, lower the presser foot lifter.
www.promelectroavtomat.ru
Summary of Contents for M3000C
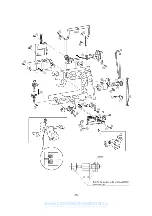
Page 4: ... 2 1 MECHANICAL CHART EMBROIDERY UNIT MECHANISM www promelectroavtomat ru ...
Page 6: ... 4 3 ELECTRONIC PARTS ARRANGEMENT CHART www promelectroavtomat ru ...
Page 13: ... 11 www promelectroavtomat ru ...
Page 17: ... 15 www promelectroavtomat ru ...
Page 19: ... 17 www promelectroavtomat ru ...
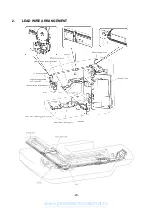
Page 25: ... 23 2 LEAD WIRE ARRANGEMENT www promelectroavtomat ru ...
Page 67: ...ULT2003D S G 3100D ULT2001N ULT2001C M3000N M3000C 11C03HF114200 www promelectroavtomat ru ...