29
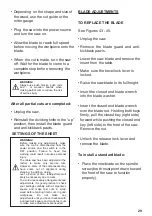
• Depending
on the shape and size of
the wood, use the cut guide or the
miter gauge.
• Plug
the saw into the power source
and turn the saw on.
•
Allow the blade to reach full speed
before moving the workpiece onto the
blade.
• When
the cut is made, turn the saw
off. Wait for the blade to come to a
complete stop before removing the
workpiece.
WARNING!
Always use push blocks, push rods
and / or wooden boards when
making partial cuts to reduce the risk
of serious injury.
After all partial cuts are completed:
• Unplug
the
saw.
• Reinstall
the dividing knife in the “up”
position, then install the blade guard
and anti-kickback pawls.
WARNING!
Before making any adjustments, make
sure the tool is disconnected from the
power source and the switch is in the
OFF position. Failure to heed this
warning could result in serious personal
injury.
The table saw has been adjusted at the
factory to make very precise cuts.
However, some of the components may
have come out of alignment during
shipping. In addition, during
over a period of time, readjustment will
likely be necessary due to wear.
To avoid unnecessary arrangements and
adjustments, it is good practice to check
your settings carefully with a carpenter's
square and make test cuts in scrap
wood before making finish cuts in good
workpieces. Do not make any
adjustments until you have checked with
a carpenter's square and made test cuts
to make sure adjustments are needed.
BLADE ADJUSTMENTS
TO REPLACE THE BLADE
See Figures 43 - 45.
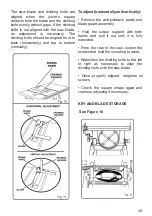
• Unplug the saw.
• Remove the blade guard and anti-
kickback pawls.
• Lower
the saw blade and remove the
insert from the table.
• Make
sure the bevel lock lever is
locked.
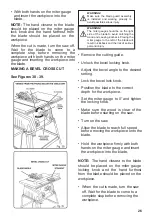
• Raise
the saw blade to its full height.
• Insert
the closed end blade wrench
into the blade washer.
• I
nsert the closed end blade wrench
over the blade nut. Holding both keys
firmly, pull the closed key (right side)
forward while pushing the closed end
key (left side) to the front of the saw.
Remove the nut.
• Unlock the release lock
lever and
remove the blade.
To install a standard blade:
• Place
the new blade on the spindle
screw (teeth must point down toward
the front of the saw to function
properly).
SETTINGS OF THE SHEET
Summary of Contents for PRO-SB1800
Page 1: ...Table Saw User s Manual Model No PRO SB1800 English 2 I Español 50 ...
Page 37: ...37 ...
Page 41: ...NOTES ...
Page 42: ...NOTES ...
Page 43: ...NOTES ...
Page 44: ...NOTES ...
Page 45: ...NOTES ...
Page 46: ...NOTES ...
Page 47: ...NOTES ...
Page 48: ...www promakertools com ...
Page 49: ...Sierra de Banco Manual del Usuario Modelo No PRO SB1800 ...
Page 91: ...91 LISTA DE PIEZAS ...
Page 95: ...NOTAS ...
Page 96: ...www promakertools com ...

