


OPERATING INSTRUCTIONS
9
BEFORE LIGHTING THE GRILL
DO NOT ATTEMPT TO LIGHT THE GRILL IF YOU SMELL
GAS.
WARNING! IT IS CRITICAL THAT THE GAS BURNERS ARE
PROPERLY INSTALLED WITH THEIR ORIFICES INSIDE
THE BURNERS AIR SHUTTERS. If not properly installed,
gas may leak outside of the burner that could lead to fire,
potential damage to your grill and bodily injury. (Please
refer to Fig. 1 for correct burner installation)
Inspect the gas supply piping or hose prior to turning the gas
“ON”. If there is evidence of cuts, wear, or abrasion, it must be
replaced prior to use. The replacement pressure regulator and
hose assembly for the LP unit must be the type specified by
ProFire. Do not use the grill if the odor of gas is present. The
pressure regulator and hose assembly supplied with the unit
must be used.
If the unit is LP, screw the regulator and hand tighten to the
valve of the cylinder and leak check the hose and regulator
connections with a soap and water solution before operating
the grill. Reference page 5 for leak test procedure.
Always keep your face and body as far away as possible when
lighting.
Refer to spiders and insects warning and procedure under the
cleaning and maintenance page of this manual.
TO LIGHT THE GRILL BURNER
1. Open the grill lid completely.
Do not attempt to light the grill
with the lid closed.
2. Open the gas supply shut-off valve.
3.
Push and turn the burner knob to “LIGHT”.
4. Push the ignitor button for 4 seconds. You will hear a snap-
ping sound, indicating that a spark is being delivered to the
burner.
5. If the burner does not light in 4 seconds, turn the knob to
“OFF” and wait 5 minutes before repeating steps 3 and 4.
6. To light burners using a long stemmed match or match holder.
Insert lighted match through the cooking grid to the burners
below the flavor plates and turn knob to “LIGHT”.
7.
If grill does not light, turn all knobs to “OFF” and have a quali-
fied service technician check the grill.
8.
Turn all knobs to “OFF” and shut off gas supply when not in
use.
NOTICE:
On the initial use, light the grill and let it run on “HIGH” for 15
-20
minutes to burn off any residues from the factory.
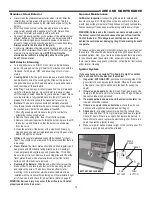
ADJUSTING FOR PROPER FLAME
Each burner is tested and adjusted at the factory prior to shipment.
However, variations in the local gas supply or conversion from one
gas to another may make it necessary to adjust the burners. On
the main burners and side burners the flames should be blue and
stable with yellow tips and no excessive noise or lifting
(Fig. 1).
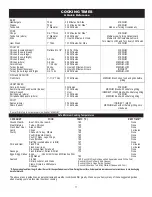
GOOD FLAME
BAD FLAME
YELLOW
YELLOW
Burner Flame
BLUE
BLUE
Fig. 1
CAUTION: CAREFUL AS THE BURNER MAY BE VERY HOT!
If the burners do not operate correctly, check if the air shutter or
burner ports are blocked by dirt, debris, spider webs, etc. and pro-
ceed with air shutter adjustment. The amount of air which is drawn
into a burner is governed by a metal cup at the inlet of the burner
called an air shutter. It is locked in place by a screw, which must be
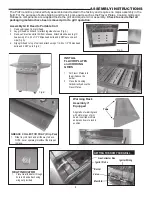
loosened prior to lighting the burner for adjustment. To access the
grill burner air shutters, first remove the control panel by removing
the screws on the corners of the control panel
(Fig. 2)
. Remove the
control knobs. Pull the control panel outwards while unplugging the
ignitor
(Fig 3)
. With a screwdriver, loosen the screw on the side of
the air shutter. Light the burner and adjust according to the direc-
tions below
(Fig. 4)
. Access and adjustment of the side burner and
rear burner (when equipped) air shutters is done in the same man-
ner as the main burners.
Fig 3.
CONTROL PANEL
SCREWS
Fig . 2
Orifice Manifold
Orifice
Shutter Set Screw
Cross Holes Facing Up
Air Shutter
MAIN BURNER
Fig. 4
A yellow flame indicates insufficient air: Open the air shutter to
allow more air to the burner. Flame is noisy, blows out, or lifts away
from the burner or will not light, this indicates too much air. Close
the air shutter. Once the air shutter is adjusted turn the burner off
and reverse steps to reassemble.
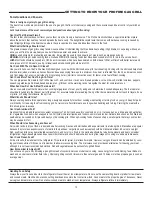
LIGHTING SIDE BURNER
(If Equipped) (Fig. 4)
1. Remove the burner cover.
2.
Push and turn the burner control knob to the “LIGHT” position
and immediately push ignitor button for 4 seconds or until the
burner is lit. If the burner does not light in 4 seconds turn the
burner to “OFF” and wait at least 5 minutes for the gas to dissi-
pate before trying to light again.
3. The side burner can also be lit with a long match or match
holder if ignitor fails to light the burner.
4. To light with a match or match holder, hold the lighted match
next to the burner ports and turn the burner control knob to
“LIGHT”. Remove and extinguish the match quickly when the
burner lights.
LIGHTING REAR BURNER
(If Equipped) (Fig. 5)
1.
Open The Lid.
Push and turn the rotisserie burner control to
“LIGHT”.
2. Push the ignitor button (marked rotisserie). You will hear a
snapping sound indicating that a spark is being delivered to
the burner.
3. If the burner does not light in 4 seconds, turn the knob to
“OFF” and wait 5 minutes before try to light again.
4. If the ignitor does not light the burner it may be lit with a long
stemmed match or match holder. Hold the match next to the
burner then turn burner control knob to “LIGHT”. Remove and
extinguish the match quickly when the burner lights.
Rear Broiler
MATCH LIGHT
Side
Burner
Fig. 4
Fig. 5


