


8
ASSEMBLY INSTRUCTIONS
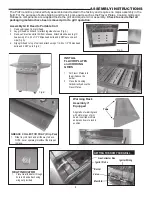
The ProFire Grill is produced fully assembled and tested in the factory and requires no major assembly in the
field. For the purpose of safe shipping and transit, some parts such as the Flavor Plates, Cooking Grids and
Rotisserie components are wrapped inside the grill and require minor assembly.
Check to ensure that all
packaging material have been removed prior to grill operation.
INSTALL
FLAVOR PLATES
and COOKING
GRIDS
1. Put Flavor Plates into
the grill above the
burner.
2. Place the Cooking
Grids directly above the
Flavor Plates.
GREASE COLLECTOR TRAY (Drip Pan)
1. Slide tray into track and all the way to back.
NOTE: never operate grill without the drip pan
in place.
HEAT INDICATOR
1. Place Heat Indicator through
hole in lid and attach using
wing nut provided.
GETTING TO KNOW YOUR GRILL
Burner
Gas Collector Box
Ignitor Probe
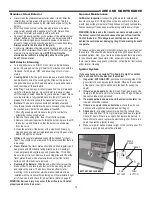
Assembly Grill Head to Portable Cart
1. Remove drip pan from grill head.
2. Lay grill head on its back for attaching side shelves (Fig. A).
3. Remove Protective white film from shelves. Attach side shelves to grill
head using 4 1/4-
20 x 1/2” Philips head bolts and 4 KEP nuts on each
side (Fig. A).
4. Align grill head to top of cart and attach using 4 1/4-
20 x 1/2” Philips head
bolts and 4 KEP nuts (Fig. B).
Fig. A
Fig. B
Tabs
Warming Rack
Assembly if
Equipped
Align tabs of warming rack
with slots in rear of grill
head. Insert tabs in slots
and press down to lock in
position.
Valve
Manifold
Ignitor Wiring


