


10
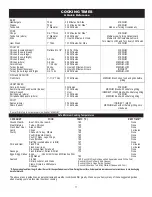
HEAT SETTINGS:
HIGH: Used for quick searing of meats and vegetables.
MEDIUM: Grill steaks, pork chops and hamburgers. You may also
sear meats on Medium and finish cooking them on LOW.
LOW: Used for cooking dense vegetables, roasts, thick cuts of meat,
poultry and fish.
Grilling requires high heat for searing and proper browning. Most
foods are cooked at the highest heat setting for the entire cooking
time. However, when grilling large pieces of meat or poultry, it may be
necessary to turn the heat to a lower setting after the initial browning,
this will cook the food completely through without burning the outside.
Foods cooked for a long time or basted with a sugary marinade may
need a lower heat setting near the end of the cooking time. The done-
ness of the meat whether rare, medium, or well done, is affected to a
large degree by the thickness of the cut. Trim any excess fat from the
meat before cooking. To prevent steaks or chops from curling during
cooking, slit the fat around the edges at 2-inch intervals. When de-
frosting meats, it is recommended that it be done overnight in a refrig-
erator as opposed to a microwave as the microwave can dry out or
even partially cook the meat.
GRILLING TECHNIQUES
Direct
For grilling/searing steaks, chops, burgers, sausages, fish filets,
chicken parts or shish kabobs. Your ProFire Gas Grill is designed to
cook with the lid closed. Close lid to finish grilling and to retain natural
juices and moisture. Use high heat for quick searing and more of a
char flavor.
Indirect
(using 2 outside burners)
For roasts, ribs, hams, whole chicken, turkey, game or whole fish.
Using the indirect heat method, turn on right and left burners with
center burner off, then place food over the center unlit burner.
Indirect
(with water pan)
Fill an aluminum foil pan with water or other ingredients, (such as
wine, juices, herbs, spices, etc.). Center the pan on the flavor plates
to moderate the temperature and to add moisture and flavor. The
cooking juices from the food drops into the water pan creating a sa-
vory water vapor from which the foods absorbs flavor and moisture.
Pan Roasting
To cook large cuts of meat, pot roast, turkey, whole chickens or ham
in natural juices or seasoning. Place aluminum roasting pan on top of
cooking grids. For extra flavor, add your favorite vegetables, wine or
juices, garlic and onions to the drip pan. Use the liquid to baste or as
a gravy.
Smoke
(addition of wood chips or chunks)
Ordinary meat, whole fish, poultry and game becomes a taste sensa-
tion when smoked. Using the water pan technique and your hard
wood soaked in water for several hours. Place wood in a convenient
MHP reusable stainless steel smoke box directly on flavor plates
alongside of water pan.
Rotisserie
(if equipped, or is available as an accessory)
Poultry, lamb, beef and pork retain their flavor when spit-roasted.
Meat is rotated over the heat keeping it constantly bathed in its own
juices, ensuring that all sides become done at one time. A drip pan
can be used to collect the drippings for basting or gravy.
USING YOUR PROFIRE GRILL
TO BEGIN:
1. Be sure the drip pan is in place and pushed all the way to the
back of the grill.
2. Light the burners using the instructions given.
3.
Turn the control knobs to “HIGH” and allow the grill to PREHEAT
for 15 minutes or until desired temperature is displayed on the
thermometer. The lid is to be closed during the grill preheat pe-
riod.
4. Place the food on the grill and cook to the desired temperature
doneness. Adjust heat setting, if necessary. The control knob
may be set to any position between “HIGH and “LOW”.
5.
Turn all knobs to “OFF” and shut off gas supply when you are
finished grilling.
6. Allow grill to cool and clean the drip pan and cooking grids after
each use.
SUGGESTIONS FOR SUCCESSFUL GRILLING
Never leave food unattended.
Cooking with the lid closed will decrease cooking time, provide an
even temperature, conserve gas, lessen flare-ups and improves
flavor.
When opening the lid, wear a barbecue mitt that covers your wrist.
Stand to the side of the grill and lift the lid handle slowly.
Apply salt to meat only after cooking to prevent it from drying out.
Baste meat with barbecue sauce or other sugar-based sauces
only during the last few minutes of cooking to prevent burning.
Turn food only once, halfway through cooking time.
Use a long handle spatula or tongs to turn meat instead of piercing
with a prong to prevent juices from escaping.
Brush vegetables, lean cuts of meat, skinless poultry, fish and
seafood with oil to prevent sticking.
If using bamboo skewers, soak the skewers in cold water for 30 to
45 minutes before cooking time.
To burn off grease after cooking, operate the grill on high for 10
minutes or until it stops smoking. When the grill cools down, brush
the cooking grids with a brass wire brush and remove and clean
the drip pan.
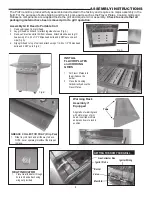
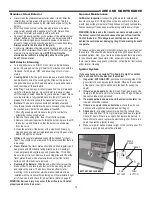
ROTISSERIE and REAR BROILER
(if equipped) (Fig. 6)
The rear broiler is an infrared type, which provides intense searing
radiant heat. Preferred by professional chefs over other methods, this
intense heat is perfect for searing in the natural juices and nutrients
found in quality cuts of meats. When lit, the rear broiler will reach
cooking temperatures in about 3 minutes. The orange/red glow will
even out in about 5 minutes.
The rotisserie motor is equipped with gears capable of turning up to a
25-lb. cut of meat or poultry. The motor is mounted to a stainless steel
bracket, which attaches to the left side of the grill. The rotisserie motor
must be electrically grounded in accordance with local codes or, in the
absence of local codes, with the National Electrical Code, ANSI/NFPA
70-1990.
WARNING:
This appliance is equipped with a three-prong
(grounding) plug for your protection against shock hazard and should
be plugged directly into a property grounded three-prong receptacle.
Do not cut or remove the grounding prong from this plug.
The spit rod for the rotisserie fits into the motor assembly by placing
the pointed end into the motor and the other end on the support at the
left side of the grill. With the spit rod pushed in as far as possible into
the motor, the grooved spit rod bushing should rest on the right side
bracket. The removable handle should only be in place when handling
the spit rod.
To load the spit rod begin with the handle in place, and slide one of
the meat holders with prongs facing away from the handle onto the
rod. Push the rod through the center of the food, then slide the second
meat holder with prongs towards the food onto the rod. Center the
food on the rod then push the meat holders firmly into the food.
Tighten the wing nuts.
Once the food is secure insert the spit rod into the motor. It is normal
for the spit rod to flex when large cuts of meats are being cooked.
NOTE: After the first use, it is likely that the stainless steel above the
burner will darken to a dark blue color. The electric motor should be
removed and stored in a dry place when not in use.
WARNING: Do not use the Rear Broiler and the bottom burners at
the same time!
Fig. 6


