ProFire PFLX26G Owner'S Manual Download Page 3

 SAFETY INSTRUCTIONS 

-Never grill without the drip pan in place and pushed all the way to the back of the grill. Without it,  hot grease could leak downward and produce a 

fire or explosion hazard. 
-Do not locate the grill under overhead unprotected surfaces. Use only in well ventilated areas. Do not use in buildings, garages, sheds, breeze-
ways, or other such enclosed areas. 

THIS UNIT IS FOR OUTDOOR USE ONLY. 

-If a cart unit is stored indoors the LP cylinder must be disconnected and the LP cylinder stored outside in a well ventilated area, out of reach of 
children. 

-Never use the grill during windy conditions. If located in a consistently windy area, oceanfront, mountaintop, etc., a windbreak will be required. 
Always adhere to the specified clearances. 
-Never use a dented or rusty LP tank. 

-Never place paper inside the grill. 
-The ProFire gas grill is designed for use without lava rock. The use of lava rock or other forms of briquettes may cause a fire hazard. 
-Never obstruct the flow of combustion and ventilation air to the grill. 

-Keep the ventilation opening of the cylinder enclosure free and clear from debris. 

Only original factory parts should be used when repairing your grill. The use of unapproved or untested parts will void your warranty 

and may cause serious personal harm. 

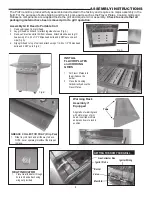
LOCATING YOUR PROFIRE GRILL 

This gas appliance is designed and certified for outdoor use only. Do not locate this grill under overhead combustible surfaces. Do not operate the 
grill inside a building, garage, recreational vehicle or any enclosed area. When choosing an area, consider exposure to wind, proximity to traffic 
paths and length of gas supply line. Keep gas supply lines as short as possible to reduce pressure drop. Keep the grill away from windy areas, but 

keep the grill in a well-ventilated area. Do not obstruct the flow of combustion and ventilation air around the grill. The supporting edges of the grill 
must be located level and flat. The counter should also be leveled. 
 

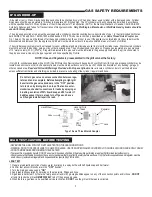
LP GAS CYLINDER VENTILATION REQUIREMENTS 

To prevent invisible combustible gas from accumulating in your cylinder enclosure, you must provide adequate ventilation. This is accomplished by 
having one side of the gas cylinder enclosure left completely open to the outside or by providing four ventilation openings. Two openings are to be 

at the cylinder valve level (approx 16” above the floor) and on opposite walls of the enclosure. Two more openings must be at

 the floor level on 

opposite sides of the enclosure The floor level openings must start at the floor level and shall extend no higher than 5” abo

ve the floor. Each open-

ing must have a minimum 10 square inches of free area. To achieve proper ventilation, you must drill a series of holes, omit grout from the ma-
sonry joints or replace a brick with a hardware cloth screen. If the floor in the cabinet is raised and the space beneath the cabinet is open to the 
outside, the lower ventilation openings may be in the floor. 

For your safety, you must provide these openings for drainage, replacement air and cross ventilation of any storage area exposed to possible leak-
age from gas connections, the barbecue or propane cylinder. 

HOUSEHOLD PROPANE SERVICE 

It is recommended that the same ventilation requirement be used for household propane service as propane cylinders. 
 

CLEARANCE TO COMBUSTIBLE CONSTRUCTION 

A minimum clearance of 12” from the sides and 12” from the back of the grill 

to adjacent vertical combustible construction must be main-

tained. 

CLEARANCE TO NONCOMBUSTIBLE CONSTRUCTION 

A minimum clearance of 2 1/2” from the back of the grill

 above cooking surface to non-combustible construction is required to allow the grill 

hood to open completely. 

A minimum of 6” clearance to the sides 

of the grill above cooking surface to non-combustible construction is recommended to provide space for 

the rotisserie motor and the spit rod. The grill can be installed directly next to non-combustible construction below the cooking surface.  


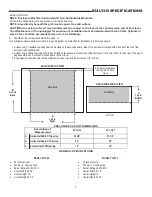
MODEL IDENTIFICATION 

Your ProFire Gas Grill is identified by a model number and a serial number located on the rear of the grill behind the side 

burners or on the right side behind the faceplate. Always use both the model and serial numbers when contacting ProFire 
about your grill. For future reference, take the time now to record the model and serial numbers below: 

MODEL NUMBER:__________SERIAL NUMBER:_____________________DATE PURCHASED:_________________ 

How to contact us: 

Phone: 888.781.4657, Fax: 888.781.3965, Email: [email protected] or write: Customer Service, 

ProFire Grills, 5565 North 124th Street, Butler, WI 53007 


Summary of Contents for PFLX26G

Page 1: ...SE INSTRUCTIONS FOR FUTURE REFERENCE Heavy duty stainless steel construction Stainless steel side shelves Easy access to storage and gas cylinder on LP model 12 foot hose with quick disconnect included with natural gas model Heavy duty locking swivel casters PFLX26Gwithout Rear Broiler PFLX26Rwith Rear Broiler and Rotisserie PFLX33Gwithout Rear Broiler PFLX33Rwith Rear Broiler and Rotisserie Porta...

Page 2: ...ord and the fuel supply hose away from any heated surfaces Children should never use your ProFire Grill Accessible parts of the grill may be very hot Keep young children away while it is in use You should exercise reasonable care when operating your ProFire Grill It will be hot during cooking or cleaning and should never be left unattended or moved while in operation Should the burners go out whil...

Page 3: ...sure left completely open to the outside or by providing four ventilation openings Two openings are to be at the cylinder valve level approx 16 above the floor and on opposite walls of the enclosure Two more openings must be at the floor level on opposite sides of the enclosure The floor level openings must start at the floor level and shall extend no higher than 5 above the floor Each open ing mu...

Page 4: ...stem during any pressure testing of that system at test pressures in excess of 1 2 psig 3 5kPa The grill must be isolated from the gas by closing its valves during any pressure testing of the supply system at test pressures equal to or less than 1 2 psig 3 5kPa Never use LP gas in a unit designed for natural gas If you wish to convert your grill from one type of gas to the other you may order a ga...

Page 5: ... cart Extra spare cylinders must be stored outdoors out of the reach of children and outside of any building garage or other enclosed area Read and Follow All Warnings Provided with Propane Cylinders Never locate a cylinder under or near the barbecue unless sufficient ventilation and shielding is provided to prevent any heating of the cylinder regulator and hose Do not turn gas valve on unless con...

Page 6: ...ica professional ProFire Grill ProFire Grill Upgrades Available Adds Beauty Convenience and Versatility to Your Outdoor Cooking Enjoyment A B C A Double Side Burner 30 000 BTU s B Single Side Burner 15 000 BtU s C Drop In Single Side Burner 14 000 BTU s All Weather Grill Cover Aluminum Griddle Warming Rack Adds Additional Cooking Space Part PF26WRM Fits 26 Inch Grill Part PF33WRM Fits 33 Inch Gril...

Page 7: ...ntended for installation in a built in enclosure 1 At least one 1 ventilation opening shall be provided on the exposed exterior side of the enclosure located within 5 inches of the top of the enclosure and unobstructed 2 At least one ventilation opening should be provided on the exposed exterior side of the enclosure 1 inch or less from the floor level The upper edge should be no more than 5 inche...

Page 8: ...l the way to back NOTE never operate grill without the drip pan in place HEAT INDICATOR 1 Place Heat Indicator through hole in lid and attach using wing nut provided GETTING TO KNOW YOUR GRILL Burner Gas Collector Box Ignitor Probe Assembly Grill Head to Portable Cart 1 Remove drip pan from grill head 2 Lay grill head on its back for attaching side shelves Fig A 3 Remove Protective white film from...

Page 9: ...LLOW Burner Flame BLUE BLUE Fig 1 CAUTION CAREFUL AS THE BURNER MAY BE VERY HOT If the burners do not operate correctly check if the air shutter or burner ports are blocked by dirt debris spider webs etc and pro ceed with air shutter adjustment The amount of air which is drawn into a burner is governed by a metal cup at the inlet of the burner called an air shutter It is locked in place by a screw...

Page 10: ...ce the food on the grill and cook to the desired temperature doneness Adjust heat setting if necessary The control knob may be set to any position between HIGH and LOW 5 Turn all knobs to OFF and shut off gas supply when you are finished grilling 6 Allow grill to cool and clean the drip pan and cooking grids after each use SUGGESTIONS FOR SUCCESSFUL GRILLING Never leave food unattended Cooking wit...

Page 11: ... with oil before grilling INDIRECT MED brush with oil before grilling MEDIUM MEDIUM brush with oil before grilling FRUIT Apples whole Pears halved 35 40 Minutes 10 14 Minutes INDIRECT MED MEDIUM brush with oil before grilling skin side down Sear at HIGH up to 2 minutes per side finish at MEDIUM Ground Meat Meat Mixtures Fresh Beef Veal Lamb Poultry Pork and Ham Sausage Eggs Egg Dishes Seafood Beef...

Page 12: ... to it Keeping it clean will greatly reduce flare ups and grease fires TO CLEAN Be sure the grill is cool Remove the cooking grids and lift out the flavor plates Brush with a steel wire brush until all the carbon build up and other debris are removed Replacing The Burners Slide the end with air shutter over the brass orifice Then place the burner onto the mounting bracket and replace the screw The...

Page 13: ...reading the tip of the thermometer should not touch fat layers bone or gristle or if using the rotisserie the spit rod What Utensils Should I Use Always use long handle forks spatulas or tongs designed especially for outdoor cooking when testing or turning food on your grill Keep hot pads or mitt handy for removing food from cooking grid For juicy more flavorful meats use tongs when handling and t...

Page 14: ...h a small pin Be careful not to enlarge holes Constant flare ups 1 Grill too cold before start of cooking 2 Cooking grid or flavor plates may be heav ily coated with burned on grease 3 Fatty foods 4 Heat setting too high 1 You should always pre heat grill for 5 to 10 minutes before cooking 2 Clean cooking grids Clean Flavor Plates 3 Trim excessive fat from fatty meats 4 Lower heat setting Flavor p...

Page 15: ...ner Orifice PF80 10LX 3 3 4 4 Burners PF80 3828S 2 2 3 3 Electrode W 28 Ignitor Wire PERF137 101 1 1 Bushing for Rotisserie PERF13710H 1 1 Rotisserie Bracket PERF137 S14 4 1 1 Infrared Rear Broiler Burner PF80 100 2 2 Rotisserie Mear Forks PF80 99 1 1 Rotisserie Spit Rod PF80 98 1 1 Rotisserie Spit Rod Handle PFR06 1 1 Rotisserie Motor PF80 34R 1 1 Electrode for Rear Broiler PHLX26G PFLX26R PFLX33...

Page 16: ...r service or failure to perform normal and routine maintenance including but not limited to damage caused by insects within the burner tubes as set out in the owner s manual Deterioration or damage due to severe weather conditions such as hail discoloration due to exposure to chemicals either directly or in the atmosphere hurricanes earthquakes tornadoes or acts of God are not covered by this Lim ...

Reviews: