background image


Page 57 

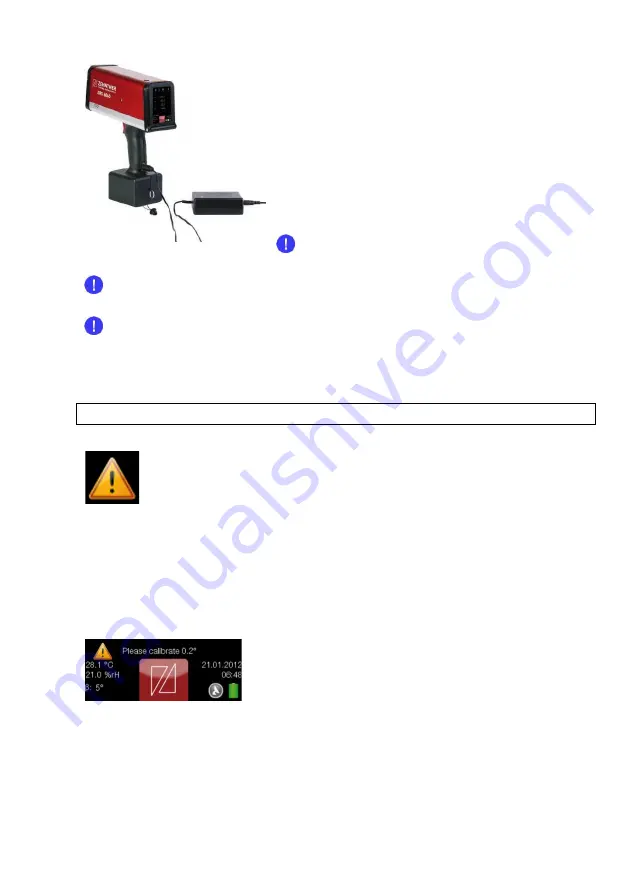
To charge the battery, plug the charger plug into 
the socket on the ZRS 6060 and connect the 
charger to a wall socket (100 

– 240 V, 50 - 60 Hz). 

The special plug on the charger has a reverse 
polarity protection. The unit can be used and turned 
off or on while charging. 
For disconnecting the charger press on the “push 
button” on the plug of the battery charger. 


the battery should always be charged 

completely and only with the supplied charger. 


The battery may only be replaced by Proceq or by an authorized Proceq 
agent.  


If the unit hasn´t been used for a longer period of time, e.g. several months, it 
should be charged before using. 


15  Status and error messages   

15.1 General 

If an error message appears on the display, press on the warning 
triangle to get a more detailed explanation of the error. The error 
message disappears if you press “acknowledge”. 


15.2 

Status message “Battery voltage is critical” 


For detailed information please refer to chapter 14 

„Built-in battery and charging“ o

page 56.  
 

15.3 

Status message “Please calibrate 0.2°” 


Press the warning triangle for detailed information.  


Summary of Contents for ZRS 6060

Page 1: ...ZRS 6060 Retroreflectometer Firmware as from v 1 0 Instruction manual...

Page 2: ...f the ZRS 6060 11 4 Device overview 13 4 1 Adjustable display inclination 14 4 2 Main window 14 5 Setting up 17 6 Navigation 17 6 1 Activation Deactivation 17 6 2 Scrolling 17 6 3 Exit 17 7 Calibrate...

Page 3: ...Sorting of the measurements 39 11 2 Overview measurements sorted 40 11 3 Detailed entry information 40 11 4 Input of additional information 40 11 5 Printing of a measuring report 41 11 6 Storing the...

Page 4: ...ngs to factory default 54 13 7 Diagnostics 55 14 Built in battery and charging 56 14 1 Battery 56 14 2 Battery status indication on the display 56 14 3 Charging 56 15 Status and error messages 57 15 1...

Page 5: ...Page 5 16 3 Adjustment of display inclination resistance 61 17 Technical specifications 61 Glossary 63...

Page 6: ...q SA to update Some of the images shown in this instruction manual may be of a pre production model and or are computer generated therefore the design features of the delivered product may differ in v...

Page 7: ...excellent visibility under all lighting conditions even in bright sunlight Innovative options to customize the reflectometer to personal requirements integrated 5 megapixel camera WAAS GPS unit holst...

Page 8: ...0 is exclusively intended for determination of the night visibility coefficient of retroreflection RA and R of traffic signs safety garments and other reflective materials with measurement of three di...

Page 9: ...m and hold the courier liable immediately in the following way When opening the parcel we noticed that etc This superficial checking of the goods has to be done within a time limit set by the carrier...

Page 10: ...y 1 Retroreflectometer 1 calibration standard front plate 1 battery charger 100 240V 50 60 Hz 1 mapping and data analysis software MappingTools 1 USB cable for data transfer to computer 1 certificate...

Page 11: ...se for the ZRS 6060 The calibration standard front plate always has to be mounted on the ZRS 6060 before stowing it in the shoulder bag 3 5 Options with modification of the ZRS 6060 built in WAAS GPS...

Page 12: ...llumination entrance angle 30 adapter for illumination entrance angle 40 adapter for illumination entrance angle 45 voltage converter DC AC 12V 230V to be plugged into the cigarette lighter Proceq SA...

Page 13: ...Page 13 4 Device overview 4 5 1 11 3 10 7 6 14 9 8 2 13 12 15 2 2 4 5 5 5 6 6 6 7 8 9 10 14 16...

Page 14: ...justing screw for display inclination resistance of touchscreen 4 1 Adjustable display inclination The ZRS 6060 is equipped with an adjustable display inclination This ensures an optimal visibility of...

Page 15: ...Page 15 Main window Enlarged view Overview Display view in average mode Main window Enlarged view Overview 22 17 18 19 20 21 21 21 23 25 26 27 23 31 28 28 28 30 17 18 19 30 29 20 20...

Page 16: ...ple determined atomatically 22 Observation angle 23 Single values of observation angle 24 Average value of observation angle 25 Temperature and relative humidity 26 Illumination entrance angle 27 Batt...

Page 17: ...sleep time can be set in the menu see chapter 13 6 4 Power on page 51 6 Navigation 6 1 Activation Deactivation Certain functions can be activated deactivated by tipping on the corresponding icon on th...

Page 18: ...splayed If the front plate with calibration standard is not mounted the status message Plate is missing is displayed Should you carry out a measurement without front plate the illumination angle 0 wil...

Page 19: ...valid only for the delivered instrument Always protect the calibration standard from dust moisture and other environmental factors keep it mounted on the ZRS 6060 and store the instrument in its shou...

Page 20: ...ndard or the optical window is damaged or soiled the instrument will inform accordingly Reject the wrong calibration with eliminate the cause e g by cleaning and recalibrate Should the calibration sti...

Page 21: ...o latch audibly 7 4 Calibration on second calibration standard It is possible to calibrate the ZRS 6060 on a second calibration standard e g prescribed by the company or authority Press the symbols an...

Page 22: ...the corresponding row to select the second calibration standard In the default settings the second calibration standard is called Metas The selected calibration standard is indicated by After the sec...

Page 23: ...ct disruption In this case you either need to re certify the value of the second calibration standard on a regular basis or replace it The appropriate name of the second calibration standard can be en...

Page 24: ...20 0 33 0 5 6060 DE 5 0 20 0 33 1 6060 EN 5 0 2 0 33 2 6060 CEN 5 0 33 0 5 1 6060 A S 4 0 20 0 33 0 5 1 1 5 oder 2 Depending on selection 6060 C S 5 Please select 3 observation angles 8 2 Practical ex...

Page 25: ...ard delivery includes a shoulder strap When you are not carrying the ZRS 6060 in the shoulder bag we recommend using the shoulder strap Secure the ZRS 6060 by connecting the safety clip of the shoulde...

Page 26: ...ymbol on the display has to be activated Press the measuring button 2 to trigger a measurement The measuring period takes about 2 3 seconds The last single values are displayed in the left column and...

Page 27: ...ting a lower reference value If the minimum requirements are fulfilled pass the measuring values appear in green Should the measured value not reach the minimum requirements fail the measured values a...

Page 28: ...pter 13 5 Jobs on page 49 or using the MappingTools software see separate instruction manual Top list Middle list Bottom list Here additional information can be added using the touchscreen The entered...

Page 29: ...se refer to chapter 11 Archive as from page 39 Connect the ZRS 6060 with an external printer e g the portable USB printer Press the desired measurement to print out the test report If no measurement i...

Page 30: ...h calibration standard is always removed before mounting an adapter Always mount the front plate with calibration standard before storing the instrument There is no difference in carrying out the meas...

Page 31: ...handle from 2 2 m to 4 m 86 6 157 5 33 Fork 34 Handle 35 Remote measuring button 36 Strain relief with safety clip 37 Remote connection 38 Fixing screw 39 Extension button 40 Fork release button 33 34...

Page 32: ...ck the screws on both sides and slide the fork over the ZRS 6060 Afterwards tighten the screws on both sides If you ordered the handle as an option later you need to remove the two black screws on the...

Page 33: ...tive cover of the ZRS 6060 connection socket by pulling on the cover string Plug the remote connection 37 into the connection socket of the ZRS 6060 Now you are ready to carry out measurements on high...

Page 34: ...pped with a 5 megapixel camera providing additional information on the measurement The camera is installed on the top of the ZRS 6060 Press to activate the camera The instrument indicates the followin...

Page 35: ...status indication on the display No GPS Signal The WAAS GPS unit is not able to receive a positioning signal The coordinates cannot be displayed Weak GPS Signal The WAAS GPS unit is receiving the pos...

Page 36: ...d in the archive The WAAS GPS unit is not able to receive a positioning signal The coordinates cannot be displayed In this case no GPS coordinates will be stored with the measurement The performance o...

Page 37: ...e that it will not be scratched or broken If soiled clean with a microfiber cleaning cloth Never use strong detergents or solvents 10 5 2 Barcode measurements Before triggering a measurement the barco...

Page 38: ...yed for the next measurement The barcode stored with a measurement is listed in the row Sign Code This information can be accessed through edit as described in chapter 8 8 Edit delete and store measur...

Page 39: ...me the last measurement is on top Press the corresponding row to show the respective list Here you also have the possibility to delete to entire archive To export or delete the complete list press the...

Page 40: ...eted at once Here you can delete single entries or open the quick entry information by pressing on the button More Further details will be displayed and additional information can be added here Fehler...

Page 41: ...ion street and so on For changing the location press on this row and afterwards on the icon Edit Press for the number keyboard Press for the special signs keyboard Press for the standard keyboard 11 5...

Page 42: ...ng the measuring data on USB flash drive Connect a USB flash drive to the USB interface host Press to store all measuring entries of the current database on the USB flash drive The exported measuremen...

Page 43: ...he picture on the left Now you can make a back up copy of the files Database zsdf and the folder Database_PICS on your local hard disk You can also open the measuring archive on the ZRS 6060 using our...

Page 44: ...as described in the separate instruction manual MappingTools If the ZRS 6060 is equipped with the optional WAAS GPS module and there was a valid signal during the measurements then they will be displa...

Page 45: ...Page 45...

Page 46: ...Page 46 13 Menu 13 1 Menu structure...

Page 47: ...te in the menu as described in chapter 6 Navigation on page 17 13 3 Measure mode Press and to get to Measure mode in order to change the settings of the measure mode 13 3 1 Auto save measurements Pres...

Page 48: ...roreflective material e g traffic sign safety garments etc can be defined for each observation angle by setting a lower limit If a measured value exceeds this minimum value the criterion is fulfilled...

Page 49: ...to a specific job Depending on the type of your organization contractor road laboratory manufacturer etc a job could be a specific client the development of product xy a special project and so on If y...

Page 50: ...ound to volume 3 and the language to French these settings will be stored in the user profile User James prefers the sound volume at 4 and the language English If you switch between these two users al...

Page 51: ...between 2 and 120 minutes can be chosen The instrument can also be switched off manually by pressing the on off button long In case of older units the auto sleep time can be adjusted here You can choo...

Page 52: ...a specific project in a new database Before deleting a database it is recommended to make a back up copy on a computer or USB flash drive Deleting the database cannot be undone all data will be lost...

Page 53: ...will be included in the test report printed by a USB printer Top list Middle list Bottom list 13 6 9 Calibration After expiry of the selected calibration interval the ZRS 6060 will remind you that a...

Page 54: ...open this menu item Zehntner calibrates the touchscreen However in the course of time the precision of the touchscreen may abate In this case it might be helpful to recalibrate the touchscreen 13 6 12...

Page 55: ...set to factory default cannot be undone If you are sure to carry out the reset to the factory default you need to confirm the message with Yes 13 7 Diagnostics Press and and select Setup to receive in...

Page 56: ...age 51 14 2 Battery status indication on the display Battery is empty The instrument switches off automatically Battery is soon empty The instrument should be charged approx 50 approx 80 100 battery i...

Page 57: ...r The battery may only be replaced by Proceq or by an authorized Proceq agent If the unit hasn t been used for a longer period of time e g several months it should be charged before using 15 Status an...

Page 58: ...unintentional calibration to wrong values e g if the standard is damaged or soiled or the measurement opening of the instrument is soiled the instrument informs you accordingly We recommend rejecting...

Page 59: ...RS 6060 If the firmware of the ZRS 6060 freezes reset the instrument by shutting it off completely by pressing the on off button long 16 Maintenance and cleaning 16 1 Maintenance carried out by the us...

Page 60: ...e housing may not be opened under any circumstances since the measuring geometry would be misaligned The measuring geometry can only be adjusted by means of special testing equipment in our factory Th...

Page 61: ...bility would be to use a coin e g the EUR 1 00 or 2 00 coin For tightening turn the fixing screw clockwise For loosening turn it anticlockwise 17 Technical specifications If also equipped with observa...

Page 62: ...solution External charger 100 240 V 50 60 Hz 50 VA universal Battery Li Ion Mn 14 4 V 6 5 Ah Charging time approx 3 hours Life cycle LED approx 500 000 measurements Operating temperature 10 C to 50 C...

Page 63: ...nts 38 Technical data 38 Battery Capacity 52 57 Changing 58 Charging 58 Charging cycle 57 Status indication 57 C Calibration 19 54 Calibration standard 20 Factory calibration 60 Last calibration 56 On...

Page 64: ...nting 32 Holster 12 Humidity Activation 55 Deactivation 55 Humidity measurement 41 I Illumination adapters 31 Information Input 42 Instrument Delivery 10 Description 8 Overview 14 Transport 10 Interfa...

Page 65: ...ions Activation 55 Deactivation 55 Description 31 Handles 31 Illumination adapters 31 with modification of the ZRS 6060 12 without modification of the ZRS 6060 13 P Pass Fail measurements 28 49 Power...

Page 66: ...echnical specifications 62 Temperature Activation 55 Deactivation 55 Units 55 Temperature measurement 41 Test report 42 46 Time setting 52 Timer 49 Touchscreen 16 Inclination 62 Inclination adjustment...

Page 67: ......

Page 68: ...Subject to change Copyright 2017 by Proceq SA Schwerzenbach All rights reserved www proceq com Version 2 1 dated 08 08 2017...

Reviews: