background image

E4-4

GP2000  Series VM Unit User Manual

‹

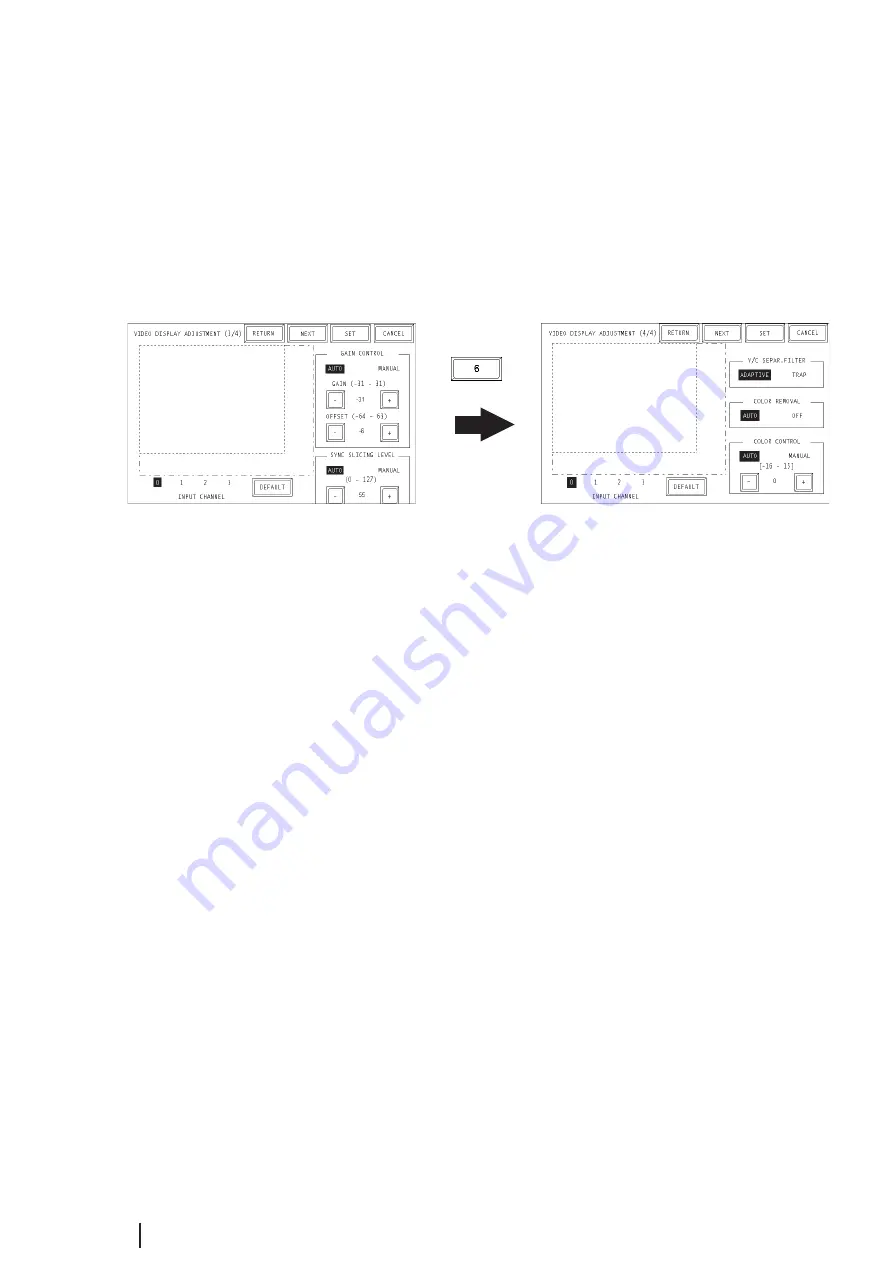
 SYNC SLICING LEVEL

Set the depth of the level for detecting the synchronization signal. If the synchroniza-
tion signal depth of the video signal is shallower than the standard, or if the depth
varies, the synchronization signal will not be detected. This condition will result in
horizontal or vertical blurring of the screen. When this symptom occurs, adjusting
the detection level may stabilize the blurred screens. In normal operation, leave the
setting at Automatic mode. If screen blurring occurs, changing the setting to a lower
level may solve the problem.

„

 VIDEO DISPLAY ADJUSTMENT (4/4)

‹

 Y/C SEPAR. FILTER

Selects the input Y/C separation filter. If a significant level of noise related to the
color signal is observed when displaying images with higher color saturation, select
"Trap". This setting is sometimes effective at reducing the noise level.

‹

 COLOR REMOVAL

Select either "Auto" mode, which turns ON/OFF the color removal function auto-
matically, or "OFF" mode, which turns OFF the function. When the amplitude of the
color-burst signal is small, the screen may automatically change to monochrome
display. Selecting "OFF" mode will force color reproduction of the image.

‹

 COLOR CONTROL

Changes the amplification of the Chroma signal. When the amplification value of  the
Chroma signal (including the colorburst signals) is out of standard range, the stan-
dard adjustment features may not render optimal images. Changing this setting may
result in optimal images.

Summary of Contents for GP2000-VM41

Page 1: ...GP2000 Series VM Unit User Manual...

Page 2: ...ed trademarks of their respective companies PREFACE 1 It is forbidden to copy the contents of this manual in whole or in part without the express permission of Digital Electronics Corporation of Japan...

Page 3: ...E2 2 2 2 1 Video Display E2 2 2 2 2 VGA SVGA Display E2 3 2 2 3 External Interface E2 4 2 3 Interface Specifications E2 4 2 3 1 Video Input Interface E2 4 2 3 2 RGB Input and Output Interfaces E2 5 2...

Page 4: ...o a power supply Do not touch the circuit board attached to the inner face of the VM Unit Do not modify the design of the VM Unit Doing so may cause a fire or electric shock Design your system so that...

Page 5: ...and bottom of the GP may be hidden In this case scroll the screen to view these images When connecting the certain video input signal to the maltiple units by using T junction connection or Daisy chai...

Page 6: ...2600 Series Screen Editor Software GP PRO PB III for Windows Ver 5 05 or higher 1 GP PRO PBIII for Windows Ver 5 05 or higher is required to utilize the VM unit s full range of features If you are cur...

Page 7: ...rence information prior to operating the VM Unit Type of VM Unit Information Format Manual Name Covers GP2000 unit setup and operation Paper Manual sold separately GP2000 Series User Manual PDF file i...

Page 8: ...cause the combination to fail to meet UL c UL standard re quirements UL1604 Conditions of Acceptability and Handling Cautions 1 Power input and output I O wiring must be in accordance with Class I Div...

Page 9: ...ning reference informa tion Provides useful or important supplemental information Screen editor software Indicates the GP PRO PB III for Windows screen editor soft ware GP Indicates steps in a procedu...

Page 10: ...es the GP with a single video RGB output which allows the display of GP screen images on a PC monitor GP screen data can also be captured converted to a JPEG file and saved to a CF Card JPEG images on...

Page 11: ...GP PRO PB III for Windows Ver 5 05 1 or higher is required If you are currently using an earlier version of this software you will need to upgrade to 5 05 For information contact your local Pro face...

Page 12: ...ty Dust Atmosphere When vibration is NOT continuous 10 Hz to 57 Hz 0 075 mm 57 Hz to 150 Hz 9 8 m s 2 When vibration is continuous 10 Hz to 57 Hz 0 035 mm 57 Hz to 150 Hz 4 9 m s 2 Noise Voltage Pulse...

Page 13: ...e 640 x 480 dots Normal 3 320 x 240 dots 1 4 mode 160 x 120 dots 1 16 mode Compatible Mode 320 x 240 dots Normal 640 x 480 dots Zoom 384 x 288 dots Normal 768 x 576 dots Zoom Extend Mode 640 x 480 dot...

Page 14: ...ots 3 800 x 600 dots Extend Mode 640 x 480 dots Normal 320 x 240 dots 1 4 mode 160 x 120 dots 1 16 mode 800 x 600 dots Normal 400 x 300 dots 1 4 mode 200 x 150 dots 1 16 mode Horizontal Vertical 128 t...

Page 15: ...ications No of interfaces Connector 640 x 480 dots GP 2500 800 x 600 dots GP 2600 GLC2600 1 D sub 15 pin Socket 2 3 Interface Specifications 2 3 1 Video Input Interface Video cameras VCRs or tuners ca...

Page 16: ...connection 12 NC No connection 13 HD Horizontal synchronization signal TTL Positive negative 14 VD Vertical synchronization signal TTL Positive negative 15 NC No connection Be sure to use a straight...

Page 17: ...0 Series VM Unit User Manual 2 4 Part Names and Functions Units mm in A B C 110 4 33 146 5 75 27 1 06 19 0 75 A RGB OUT RGB Output Connector B RGB IN RGB Input Connector C VIDEO IN 0 to 3 Video Input...

Page 18: ...ble varies depending on the type of cable used Check the cable specifications prior to installation CE Marking regulations require the attachment of a Ferrite Core included to each video cable used Be...

Page 19: ...E2 8 GP2000 Series VM Unit User Manual Memo...

Page 20: ...he VM Unit in the GP using the following steps 1 Unplug GP unit s power cord 2 Remove the rear face connector cover attached to Expansion Unit I F 2 EXT2 3 Carefully insert the VM Unit into the GP unt...

Page 21: ...at both ends FP CV00 2 5m made by Digital Electronics Corporation FP CV01 5 0m made by Digital Electronics Corporation Connect the cables before starting up the PC monitor and the GP To prevent a poss...

Page 22: ...as the starting address of the video control area After the starting address is specified in COMPAT IBLE mode 22 continuous words in EXTEND mode 43 continuous words begin ning from the starting addres...

Page 23: ...DEO DISPLAY ADJUSTMENT VIDEO DISPLAY ADJUSTMENT 1 4 INPUT CHANNEL Select video device s input channel VIDEO IN 0 through 3 MODE Select whether the input from the video device is color or monochrome De...

Page 24: ...decimeter circuit built into the decoder When mono chrome signals are being received disabling the signal processing filter decimeter circuit may result in finer image quality In normal operations lea...

Page 25: ...Selects the input Y C separation filter If a significant level of noise related to the color signal is observed when displaying images with higher color saturation select Trap This setting is sometime...

Page 26: ...d SET UP CAPTURE OPERATION screens This menu is displayed only when the VM Unit is installed QUALITY 1 100 Enter the desired quality of the captured JPEG file Reducing this setting s value will reduce...

Page 27: ...he Menu bar refer to GP2000 Series User Manual sold separately Touching at the left side of the Menu bar three times calls up the PC SCREEN SETTING screen Then touch any of the detail settings shown b...

Page 28: ...the table on the next page to find the cause of the problem Once you identify the problem use the suggested countermeasures to correct it To prevent an electric shock be sure to check that no electric...

Page 29: ...ct X X v tag extended mode indirect setting designates a video screen number that does not exist X Video control area is incorrectly specified when it is set via the touch panel switch or PLC X X Inva...

Page 30: ...e of the following error messages will appear 1 CH indicates VM Unit channel numbers 0 to 3 When multiple video or RGB input lines are used if one of these lines signals causes an error video screen r...

Page 31: ...E5 4 GP2000 Series VM Unit User Manual Memo...

Reviews: