background image

12345678901234567890123456789012

12345678901234567890123456789012

12345678901234567890123456789012

12345678901234567890123456789012

12345678901234567890123456789012

12345678901234567890123456789012

12345678901234567890123456789012

12345678901234567890123456789012

12345678901234567890123456789012

12345678901234567890123456789012

12345678901234567890123456789012

12345678901234567890123456789012

12345678901234567890123456789012

12345678901234567890123456789012

12345678901234567890123456789012

12345678901234567890123456789012

12345678901234567890123456789012

12345678901234567890123456789012

12345678901234567890123456789012

12345678901234567890123456789012

12345678901234567890123456789012

C h a p t e r   4

Touch Panel Commands

1. Command List

3. Touch Interface Data

2. Boot-up Initialization 4. Touch Panel Commands

FP2600-T11 User Manual

4-1

4-1

Command List

Here, the touch panel commands ( host -> touch panel ) supported by the FP2600-
T11 are described.   The comma (,) used between the transferred format sent by the
touch panel to the host computer is only for separating commands, and  has nothing to
do with the actual touch panel commands.

Command codes and data are all expressed in hexadecimal format.

(Example: 65h = 65 HEX)

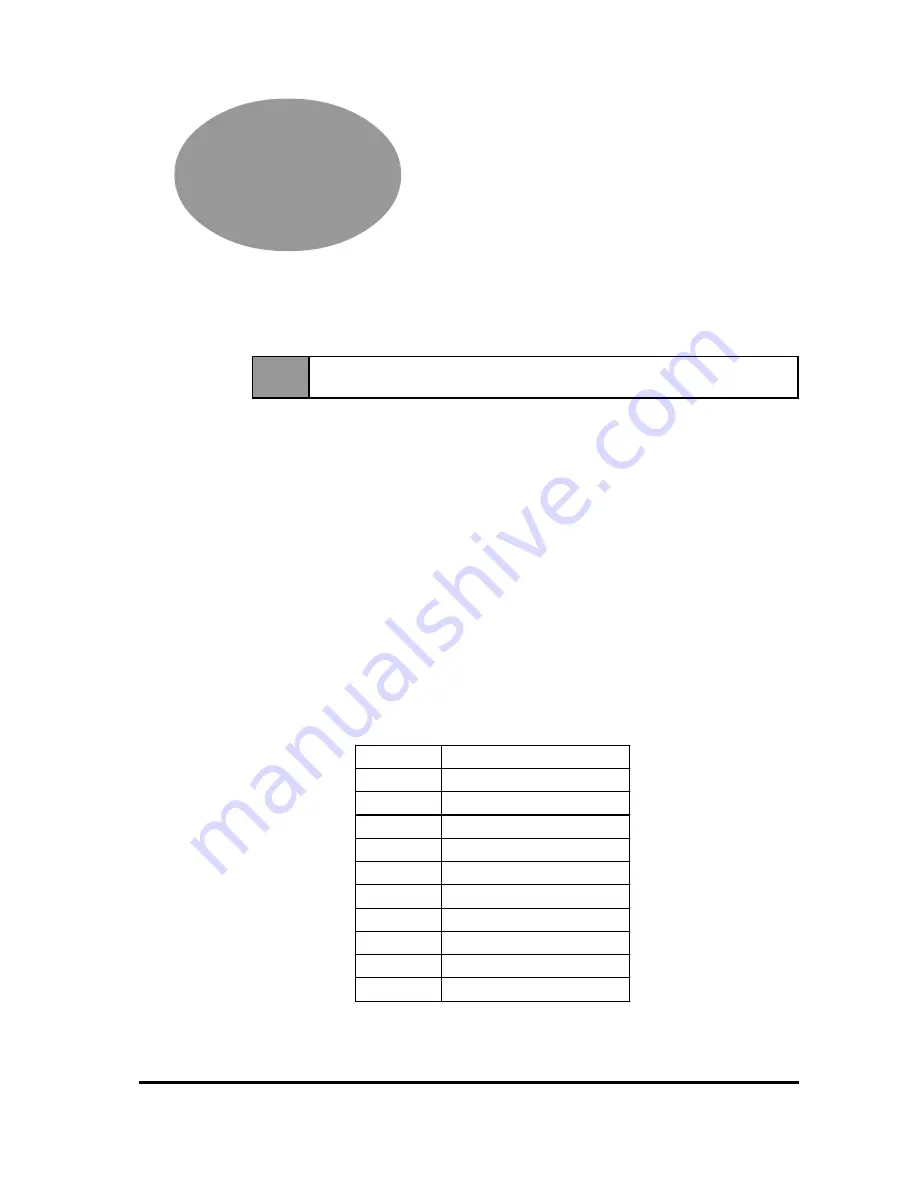
<Touch Panel Commands>

Regardless of the dip-switch settings, the FP's display, click sound and buzzer
can all be controlled from the host computer by sending one-character touch
panel commands to the FP unit.   The dip-switch settings are only enabled when
the FP is turned ON.

Code

Function

65h / 67h Display ON

66h / 68h Display OFF

69h

Click sound (high) ON

6Ah

Click sound (high) OFF

6Bh

Click sound (low) ON

6Ch

Click sound (low) OFF

71h

Buzzer (high) ON

72h

Buzzer (high) OFF

73h

Buzzer (low) ON

74h

Buzzer (low) OFF

Summary of Contents for FP2600-T11

Page 1: ...FP2600 T11 User Manual Digital Electronics Corporation...

Page 2: ...nces may exist between the specfications given here and the Japanese ones AllCompany Manufacturernamesusedinthismanualaretheregisteredtrademarksof theirrespectivecompanies 2001 Digital Electronics Cor...

Page 3: ...at hand and refer to it when necessary The following symbols are used throughout this manual to ensure the safe use of the FP unit Pleasemakesuretofollowallinstructionsgivensincetheyexplainimportants...

Page 4: ...alwaysunplugtheunitbeforedisassembling it Do not modify the FP unit in any way since it may cause a fire or electric shock Whenchangingthebacklight besuretoturnofftheunit spowerfirst inordertopreventa...

Page 5: ...hisliquidshouldenteryoureye besuretoflushtheeyewithrunningwaterformorethan 15 minutes and see a doctor immediately ThecurrentbrightnessoftheLCDscreenwilldependonthescreen scurrentdisplayand theLCD sco...

Page 6: ...nctional Specifications For AC100V 2 3 2 3 Interface Specifications For AC100V 2 4 1 Analog RGB Interface 2 4 2 Serial Interface 2 6 3 USB Interface 2 7 2 4 Cable Diagrams 2 8 1 Pin Connections for th...

Page 7: ...4 1 Command List 4 1 4 2 Boot upInitialization 4 2 4 3 Touch Interface Data 4 3 4 4 Touch Panel Commands 4 5 Chapter 5 Troubleshooting 5 1 Troubleshooting 5 1 1 Possible Device Problems 5 1 2 No Disp...

Page 8: ...he FP When Connecting to a PC The FP unit s analog interface is designed for standard SVGA mode The number of dots pixels displayedareasfollows Size H Sync V Sync Dot Clock Range 800 X 600 35 156 1 KH...

Page 9: ...systemmonitor Theflat frontpanelprovidesprotectionequivalenttothe rigorousIP65Fstandard and evenwithoutitsoptionalprotectivecover thefrontpanel is highly resistant to both water and dust Panel can be...

Page 10: ...User Manual Contained in plastic case Installation Gasket 1 Installation Brackets 4 FP2500 T11 FP2600 T11 Installation Guide 1 Theseitemshaveallbeencarefullypackedwithspecialattentiontoproductquality...

Page 11: ...x FP2600 T11 User Manual MEMO...

Page 12: ...567890123456789012 12345678901234567890123456789012 12345678901234567890123456789012 12345678901234567890123456789012 12345678901234567890123456789012 12345678901234567890123456789012 1234567890123456...

Page 13: ...on to the FP A B type cable Backlight Bulbs PS600 BU00 Replacement Backlight bulbs Installation Brackets GP070 AT01 Metal installation brackets for FP2600 T11 Rubber Gasket GP WP10 MS Replacement rubb...

Page 14: ...ional Specifications 5 Names and Functions of FP Parts 3 Interface Specifications 6 Flat Panel FP Dimensions FP2600 T11 User Manual 2 1 2 Environment Specifications 2 1 1 See the next page s note 2 1...

Page 15: ...ff these conditions can lead to the ingress of oil into the FP and separate protection measures are suggested Also if non approved oils are present it may cause deformation or corrosion of the front p...

Page 16: ...V pixels 1pixel R G B pixel DisplayColors 262 144 colors R G B Six bits each Brightness 200cd m2 typ 1 Dot Pitch mm 0 33H 0 33W Resolution 1024 1024 Method Resistive Film Analog DisplayMode SVGAgraph...

Page 17: ...ase Adjustment Dimmer Adjustment Default Setting All Clear Function Size H Sync V Sync Dot Clock Range 800 x 600 35 156 1 KHz 56 1 Hz 36 000MHz 1 800 x 600 37 879 1 KHz 60 1 Hz 40 000MHz 1 640 x480 31...

Page 18: ...rn R R signal GND 7 Return G G signal GND 8 Return B B signal GND 9 Reserved NC spare for input 10 Digital grounding Digital signal GND 11 Reserved NC spare for input 12 Reserved NC spare for input 13...

Page 19: ...P units are designed to match the pin order used on most PC serial interfaces so that a straight cable can be used to connect the two Therefore connect each pin s signal to the same signal name on the...

Page 20: ...7 2 3 3 USB Interface Pin Assignments and Signal Names for USB Interface Communication Low speed Device Connector Btypeconnector Pin NO Signal Name Condition Pin Location 1 USB1 5V 5VIN 2 USBD1 USBda...

Page 21: ...ground 11 Reserved 12 Reserved 13 H SYNC Input 14 V SYNC Input 15 Reserved FG FG 1 RED IN 2 GRIN IN 3 BLU IN 4 NC 5 GND 6 RED GND 7 GRN GND 8 BLU GND 9 NC 10 GND 11 NC 12 NC 13 HSYN 14 VSYN 15 NC FG...

Page 22: ...RD 3 SD 4 DTR 5 GND 6 DSR 7 RS 8 CS 9 NC FG FG PC side FP side SIO cable Signal names for the FP s SIO interface are designed to match the same pin order as the SIO interface on a standard PC 2 4 3 P...

Page 23: ...VGAInterface analogRGB Connector F Serial Interface Connector Used for both sending touch panel data to thehost andreceivingcommandsfromthe host G USB Interface Connector Used for both sending touch...

Page 24: ...FP2600 T11 User Manual Specifications 2 11 2 6 Flat Panel FP Dimensions 2 6 1 External Dimensions AC100V Unit mm in Top Front Side 301 0 11 85 58 2 28 8 0 31 317 12 48 243 9 57 227 0 8 94...

Page 25: ...anual Specifications 2 12 2 6 2 Installation Brackets 2 6 3 FP Installation Dimensions 16 0 63 31 1 22 19 5 0 77 10 0 39 11 0 43 under 4 R 2 Panel 301 5 11 87 1 0 0 04 0 227 5 8 96 0 04 0 FP 1 0 Unit...

Page 26: ...tion Gasket s Positioning It is strongly recommended that you use the gasket It absorbs vibration in addition to repellingwater PlacetheFPonalevelsurfacewiththedisplaypanelfacingdownward CheckthattheF...

Page 27: ...Installation Front Side HorizontalInstallation When installing the FP sideways place it so that the Power Terminals point up wards Check that heat from surrounding equipment will not cause the FP to o...

Page 28: ...on slots at the top and bottom of the unit total 4 slots Installing the FP 3 Insert each of the fasteners shown below Be sure to pull thefastenerbackuntilitisflush with the rear of the attachment hole...

Page 29: ...Installation and Wiring 4 Use a Phillips screw driver to tighten each fastenerscrewand secure the FP in place Do not use too much force since it may damage the FP unit A torque of only 0 5 N m issuff...

Page 30: ...Cable Connection To prevent electrical shocks be sure the Power Cable is plugged first into the FP unit then into the wall main supply Your FP2600 T11 uses input voltage of only AC100V If your power...

Page 31: ...Voltage and Noise Reduc ingtransformersthathavecapaci ties that exceed 100VA WhensupplyingpowertotheFPunit please separate the input output and operation unit lines as shown in the figure m a i n pow...

Page 32: ...am a Grounding resistance of under 100 If exclusive grounding is not possible use a common connection point dia gram b The grounding wire should have a cross sectional area greater than 2mm2 Make the...

Page 33: ...standardconnectionmethod used with IBM PCs SW1 6 Turns touch panel input s click sound ON OFF SW1 5 Selects Backlight Automatic OFF mode Not used Always OFF SW1 3 3 1 Operation Mode Setup and Adjustme...

Page 34: ...se set this switch ON to extend the life of the backlight Also if a display related command is transmitted by the SIO this Automatic Backlight OFF mode will be automatically disabled SW1 7 This is a s...

Page 35: ...layed on the central part of the screenwhenthefollowingFPstartupisperformed 1 OSD Startup Method Touch the screen within 5 seconds in order of 1 2 and 3 Display 2 Main Menu Theleftillustrationsarethem...

Page 36: ...ssofcolors Horizontaldisplaypositionadjustment Thefunctiontoadjusthorizontalpositionofthedisplayscreen Verticaldisplaypositionadjustment Thefunctiontoadjusttheverticalpositionofthedisplayscreen Horizo...

Page 37: ...htbypressingthevalue VerticalDisplayPositionAdjustment Display moves up by pressing the value HorizontalSizeAdjustment Screen size can be enlarged horizontally by the value PhaseAdjustment CLK phase c...

Page 38: ...h Interface Data 2 Boot up Initialization 4 Touch Panel Commands FP2600 T11 User Manual 4 1 4 1 Command List Here the touch panel commands host touch panel supported by the FP2600 T11 are described Th...

Page 39: ...s Clears its internal buffer Initializes the serial communication mode Baud rate 9600bps Data length 8 bits Parity none Stop bit 1 bit Initializes the system default values Function Default Setting Di...

Page 40: ...and Y coordinates have a resolution of 1024 The origin point 0 0 is located in the upper left corner of the screen 0 0 1023 1023 OS and Touch Panel Driver Combinations Screendisplayorigin withresolut...

Page 41: ...ple If the coordinate X 23 11h Y 500 1F4h is touched 11h 0h 17h 1h F4h touched 11h 0h 17h 1h F4h continuousoutputwiththesamelocation 11h 0h 17h 1h F4h movingthelocationwithoutreleasingtouch 11h 0h 17h...

Page 42: ...off by using this command it is necessarytowritetheDisplayONcommandtoturnitonagain Unlikewhenmakingthedisplayturnoffbyautomaticbacklight OFF mode the display will not reappear by touching the panel F...

Page 43: ...rder of priority for the buzzer and click sounds is as follows They are not processedsimultaneously Sound Command Code Priority Order Buzzer high ON 71h high low Buzzer low ON 73h Click sound high ON...

Page 44: ...Thefollowingcommandsarereserved Ifthesecommandsareused theyare sometimestreatedaserrors 00h 01h 02h 05h 0Ah 0Bh 0Dh 0Eh 0Fh 14h 15h 16h 17h 18h 19h 1Bh 1Dh 20h 21h Reserved 22h 23h 25h 26h 27h 28h 29h...

Page 45: ...Touch Panel Commands 4 8 FP2600 T11 User Manual MEMO...

Page 46: ...7890123456789012 12345678901234567890123456789012 12345678901234567890123456789012 12345678901234567890123456789012 12345678901234567890123456789012 12345678901234567890123456789012 123456789012345678...

Page 47: ...ower switch NO YES Is it using the correct powervoltage Is the power supply cable connected properly totheunit Has the 11V unit s backlight CFL been set up correctly There is a problem with the FP uni...

Page 48: ...cted correctly Is display mode right Connect the RGB cable correctly Chapter 2 4 Cable Diagrams Select the correct display mode with Dip SW1 4 Chapter 3 3 Operation Mode Setup and Display Positioning...

Page 49: ...connectedcorrectly YES NO There is a problem with the FP unit Please contact your local FPdistributor When the touch panel does not react or its reaction is very slow after it is pressed followtheflo...

Page 50: ...ging the Backlight When the surface or the frame of the display gets dirty soak a soft cloth in water withaneutraldetergent wringtheclothtightly andwipethedisplay Do not use paint thinner organic solv...

Page 51: ...attached to the FPcorrectly To keep your FP unit in its best condition please inspect the following points peri odically FPOperationEnvironment Is the operating temperature within the allowable range...

Page 52: ...ife of 50 000 hours approx 5 7 years at 25o C and 24 hour operation when the backlight is lit continuously time required forbrightnesstofalltohalfitsnormallevel For backlight replacement details refer...

Page 53: ...Maintenance FP2600 T11 User Manual 6 4 MEMO...

Page 54: ...ironment iii Flat Panel FP Dimensions 2 11 FP Installation Dimensions 2 12 FP Operation Environment 6 2 FP Parts Names and functions 2 10 Front LED 2 10 3 9 Functional Specifications 2 3 G General Spe...

Page 55: ...1 S Safety Instructions iii iv Sampling Rate 4 4 Serial Interface 2 6 2 10 Setup value clear 3 11 3 12 Sideways Installation 3 2 Signal Names 2 5 2 6 2 7 SIO Interface Cable 1 1 1 2 2 9 Specifications...

Reviews: