Prizelawn CBR IV Owner'S Manual Download Page 4

B

A

B

A

Impeller

Knob

Discharge

Chute

Discharge 

Chute

Settings

Knob

Two major factors should be considered when determining correct spreader settings of any product:

1. 

The product application rate, or the amount of material applied per 1,000 square feet.


2. 

The effective pattern width, or the actual width in which material is applied. Label settings are a guide 

and can be affected by numerous factors.

Normal spreading of materials requires no 

adjustment (factory setting “A”) unless stated on 

the package. In those cases where the spread 

pattern has shifted, the pattern can be adjusted 

left and right by loosening the two knobs on the 

discharge chute and moving the chute closer or 

farther away from the impeller. Settings of “A, B, 

and C” are provided as reference.

A simple visual pattern test can be 

made by operating the spreader over a 

non-turf area and evaluating the pattern. 

A more accurate method is to place a 

row of common, disposable, aluminum 

cake pans approximately 1 foot on 

centers. Set the rate plate at a middle 

setting and make 3 or 4 passes in the 

same direction as shown. Pour the 

material collected from each pan into 

individual bottles of the same size. Set 

them side by side in order, and visually 

inspect their volume. If the pattern is not 

centered (example: volume in bottle #2 

left not equal to bottle #2 right), adjust 

the discharge chute up or down as 

described in “

PATTERN ADJUSTMENT

” section above.

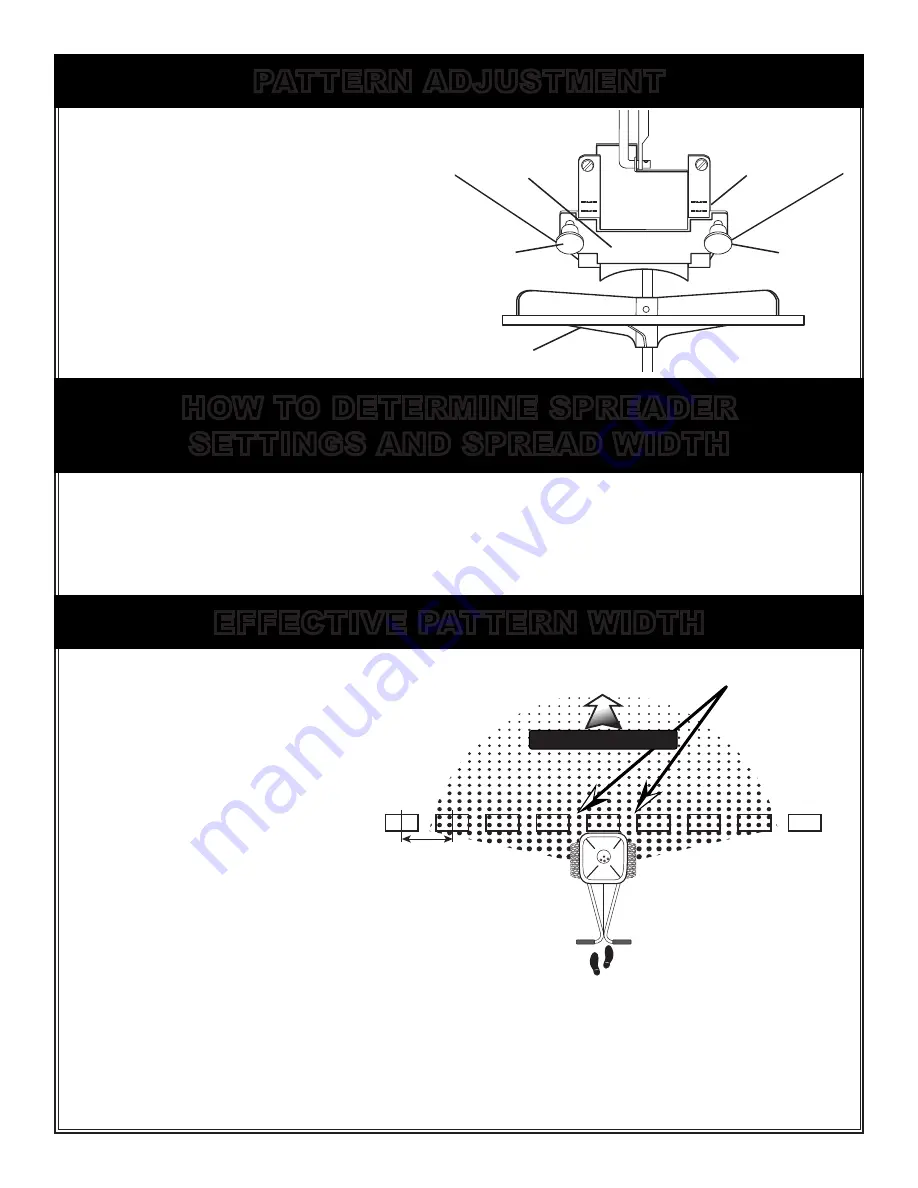
Once the pattern is uniform, the effective pattern width can be determined. The  effective pattern width is 

the distance out from the spreader to a point where the amount of material is 1/2 the average amount in the 

center pans. This distance is multiplied by 2 to achieve the total effective pattern width.

Leave space for wheel path

Direction of travel

Space pans 1’ 

on centers

PATTERN ADJUSTMENT

HOW TO DETERMINE SPREADER

SETTINGS AND SPREAD WIDTH

EFFECTIVE PATTERN WIDTH

Summary of Contents for CBR IV

Page 1: ...Model CBR IV Model CBR IVSS 6 11 18 Part P15525 1 YEAR 1 YEAR Prizelawn CBR lV COMMERCIAL BROADCAST SPREADER Owner s Manual...

Page 2: ...l hub and the axle 2 Attach leg brace to frame as shown using 4 1 4 20 x 2 1 4 carriage bolts and locknuts 3 Turn spreader upright on wheels Insert screen into hopper sliding it under the screen clips...

Page 3: ...never pull 4 Hold handle so top of spreader is level Tipping the spreader too far can cause uneven spreading 5 The settings and swath widths on the product label are recommended starting points Alway...

Page 4: ...f area and evaluating the pattern A more accurate method is to place a row of common disposable aluminum cake pans approximately 1 foot on centers Set the rate plate at a middle setting and make 3 or...

Page 5: ...CBR IV CBR IVSS settings when only the product weight square foot coverage and visual inspection of the material is available FERTILIZER BAG RATE Pounds of fertilizer used per 1 000 sq ft of coverage...

Page 6: ...l become the property of PRIZELAWN If PRIZELAWN determines that the Product covered by this warranty requires service PRIZELAWN shall prepay return shipping charges from PRIZELAWN In all other instanc...

Page 7: ...ar Cover 2 P14837 6 Handle Lever Ass y P15513 04 23 Gear Cover Clamps 3 P14868 1 7 Handle Grip 2 P14870 24 Gear Support P14834 8 Upper Handle P15497 P15498 25 Axle Collar w Set Screw P14971 1 9 Contro...

Page 8: ...g in hopper pivot points on the shut off linkage and the spring in the housing under the rate plate Remove the gear cover and wash gears thoroughly and oil all bearing areas as shown Re install gear c...

Page 9: ...ng 2 1 4 20 hex bolts and locknuts Tighten nuts and then loosen nuts just enough to allow the deflector plate to swing freely Attach kick arm to deflector as shown using 2 10 24 x 5 8 screws and lockn...

Page 10: ...utted up against a sidewalk driveway lot line etc minimizing the amount of material thrown into these areas Handle Lever ROTATE TO OFF POSITION 1 2 3 4 5 Key Part Description 1 P15651 Frame Bracket 2...

Reviews: