


Setting up Your EnvirON Remote
Step 1. Powering Up.
Clip the correct arrangement of pins for your
location onto the wall adapter and then plug
it into a convenient wall socket. The adapter
is designed to work with all supply voltages
and frequencies. Plug the connector on the
end of the lead into the charging socket on
the rear of
EnvirON Remote
[10] and the
charging LED [4] will light. The charging LED
is extinguished once the battery is fully
charged after which you can disconnect the
power cable. You don’t need to wait for the
unit to fully charge before beginning to use it.
Alternatively, if you intend to permanently
power the unit from the wall power, don’t
remove the power cable once the charging
LED is extinguished. If you wish to power
the unit from the auxiliary power of your
wheelchair, please contact either Pretorian
or your wheelchair vendor.
Step 2. Pair each button.
First of all, decide which buttons you wish
to use with which appliances. For example,
you may want to use the first five buttons
to control a TV (via EnvirON Hub), two to
control two electrical devices (via iClick)
and one to open a door (via Environ Connect).
It will make setting up your
EnvirON
Remote
easier if you write your choices on
the provided Configuration Chart using a
dry-wipe pen- for example:
Note that all infra-red functions must go
through EnvirON Hub since this is the device
which converts wireless signals to infra-red.
Mains electrical devices are always controlled
via iClick and Door/ Window/ Curtain/ Lock
controls are always controlled via Environ
Connect. By writing these in the ‘Via’ column,
you are compiling a list of which buttons need
to be paired with which receiver.
The next step is to pair each touch button with
its respective receiver. This applies whether or
not you will use the touch buttons, i.e. you must
still carry out this step even if you will be using
switch scanning.
To pair touch button 1 with iClick Socket 1,
first make sure iClick is in EnvirON mode by
pressing the Mode button until the EnvirON
LED lights. Then press the PAIR 1 button on
iClick and observe the adjacent LED flashing.
Now press and hold the Pair button [6] on
EnvirON Remote
and then touch button 1. Once
pairing has taken place (usually no more than
1 second), the flashing LED on iClick lights
steadily for a few seconds.
EnvirON Remote
displays ‘P’ on its display [3] and button 1 LED
also lights. You may now release both PAIR and
the touch button.
Next, begin pairing touch button 2 with iClick
socket 2 by pressing PAIR 2 on iClick. Now
press and hold the Pair button [6] on
EnvirON
Remote
and then touch button 2. Again, the
flashing LED on iClick lights steadily for a few
seconds.
EnvirON Remote
displays ‘P’ on its
display [3] and button 2 LED also lights.
Next, pair touch buttons 3 to 7 (inclusive) with
Hub. Press the PAIR button on Hub and observe
its pairing LED flashing. Now press and hold the
Pair button [6] on
EnvirON Remote
and then
touch button 3
only
. Once pairing has taken
place, the flashing LED on Hub lights steadily
for a few seconds.
EnvirON Remote
displays ‘P’
on its display [3] and button 3 LED also lights.
While the ‘P’ is displayed, also touch buttons
4, 5, 6 and 7. Their respective LEDs also light
to indicate that each of the five buttons has
been paired with Hub as a group
. Note that
groups of buttons don’t necessarily need to
be consecutive. You could, for example, have a
group comprising buttons 1, 3, 5 and 7.
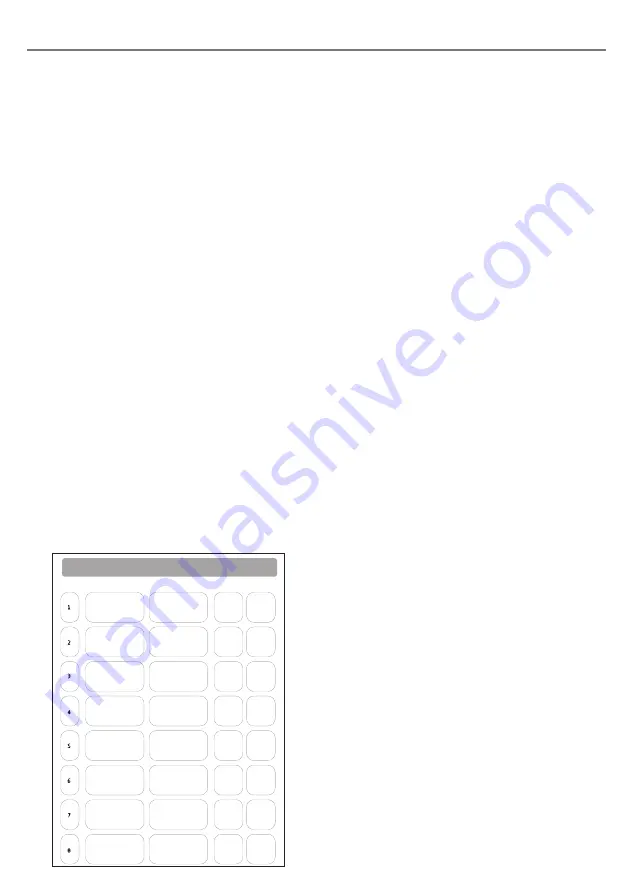
Configuration Chart
Quick-Start Guide to setting up
Scanning Remote.
Button
Function
Appliance
Via
Code
Fill out the Configuration Chart
(overleaf) with your required button functions.
2
TV
TV
Pair each button with its receiver by pressing Pair on the receiver and
then BOTH Pair/Learn and the relevant touch button on Scanning Remote.
3
by
POWER
6V
CODE
LEARN
TEST
PAIR
IR IN
Once the ‘P’ appears on the display,
press any further buttons you may wish
to form part of the same pairing group.
You can add these until the P is extinguished.
4
by
FUNC
TION
PAIR
LEAR
N
Now set the function of each button by
pressing Function to select and
Pair/Learn to change.
5
by
FUNC
TION
PAIR
LEAR
N
by
FUNC
TION
PAIR
LEAR
N
Make sure Scanning Remote battery
is charged or is powered from wall adapter.
Press Function to make sure the unit is awake.
1
by
FUNC
TION
PAIR
LEAR
N
Lamp 1
iClick
Socket 1
iClick
Socket 2
Environ
Connect
Hub
Hub
Hub
Hub
Hub
Lamp 2
TV
TV
TV
TV
TV
Door
Summary of Contents for EnvirON
Page 11: ...Notes ...


