


C844 Upright Cycle
Page 41
3.
Choose one:
IF . . .
THEN . . .
You are replacing the upper ribbon
Continue with the next step.
cable
You are replacing the lower ribbon
Skip to Step 9.
cable
Replacing the Upper Ribbon Cable
4.
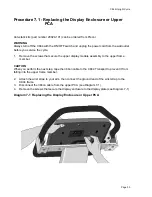
Disconnect the ribbon cable from the upper PCA per Steps 1 through 3 of
Procedure 7.1.
5.
Tape the lower end of the
new
upper ribbon cable to the upper end of the
original
upper
ribbon cable.
6.
Pull the original upper ribbon from the bottom of the upright weldment. When the connector
of the new cable clears the upright, disconnect and discard the original ribbon cable.
7.
Connect the new upper ribbon cable to the upper PCA per Steps 10 through 13 of
Procedure 7.1.
8.
Choose one: If you are installing a new lower ribbon cable on the cycle . . .
THEN . . .
OTHERWISE . . .
Continue with the next step.
Skip to Step 13.
9.
Place the C844 Cycle on its front end. Remove the pan from the base of the cycle.
10. Disconnect the lower ribbon cable from the lower PCA.
11. Tape the upper end of the new lower ribbon cable to the lower end of the old lower ribbon
cable. Pull the cable through the cycle frame.
12. Connect the new lower ribbon cable to the lower PCA.
13. Install the pan on the base of the cycle. Return the cycle to its upright position.
14. Connect the upper and lower ribbon cables to each other.
15. Install the upright covers on the pedestal weldment.
16. Check the operation of the cycle as described in Section Four.