


905E, 9.1, 9.10 Treadmills
Page 34
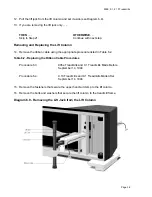
Procedure 6.5 - Replacing the Lower PCA
Removing the Lower PCA
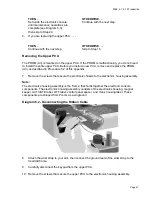
1.
Place the magnetic safety key in the
ACTIVATE
position, then turn on the treadmill with the
circuit breaker.
2.
Incline the treadmill to its maximum elevation.
3.
Stop the treadmill by placing the magnetic safety key in the
OFF
position, then unplug the
power cord from the wall outlet.
WARNING
Before continuing with this procedure, review the Warning and Caution statements listed in
Section One of the Residential Treadmill Service Manual.
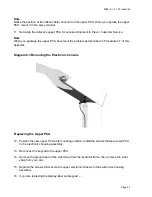
4.
Lift the hood as described in Procedure 5.1 of the Residential Treadmill Service Manual.
5.
Attach the anti-static wrist strap to your arm, then connect the ground lead of the wrist strap
to the treadmill frame.
6.
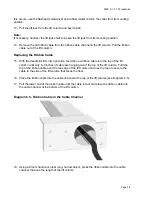
Disconnect the ribbon cable from the lower PCA.
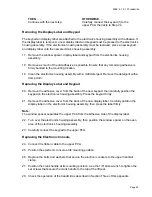
7.
Disconnect the wires listed in Table 6.1 from the lower PCA connectors.
Table 6.1. Wires Connected to the Lower PCA
Wire Color
Lower PCA Connector
Red
M+
Black
M–
Brown
AC-L
Blue (White)
AC-N
8.
Remove the bolts and nuts that secure the lower PCA to the motor mounting chassis.
9.
Remove the lower PCA from the motor chassis groove. Set aside the lower PCA for
eventual shipment to Precor.
Note:
When you package the lower PCA, provide the information listed in Procedure 2.7.
Replacing the Lower PCA
10. Position the lower PCA in the motor chassis groove.
11. Thread the nuts onto the lower PCA mounting bolts.
Summary of Contents for 9.10
Page 5: ...905E 9 1 9 10 Treadmills Page 5 9 1 Electronic Console 9 10 Electronic Console...
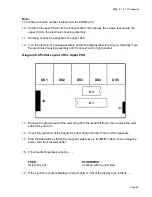
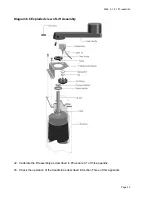
Page 15: ...905E 9 1 9 10 Treadmills Page 15 Diagram 4 2 Upper Lift Column Assembly...
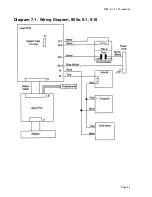
Page 44: ...905E 9 1 9 10 Treadmills Page 44 Diagram 7 1 Wiring Diagram 905e 9 1 9 10...
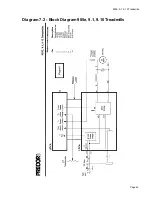
Page 45: ...905E 9 1 9 10 Treadmills Page 45 Diagram 7 2 Block Diagram 905e 9 1 9 10 Treadmills...


