background image

26

Using the Scatterbird App

If you want to set some days on 
and some days off, you can
easily do this. If you want to 
vary the number of bangs, 
change the interval times 
between bangs, loudness, or if 
you want to set different start 
or fi nish times for every day 
you can easily do this too. With 
the “DAILY” tab you have 100% 
flexibility with every setting on 
every day!

Though the programming 
will take a few minutes to 
set up, remember that the 
unpredictable nature of the
bangs day to day helps prevent 
birds being accustomed to the 
Scatterbird, making it more 
effective than any other gas gun 
available.

When you have completed your 
settings for each day to what 
you want to happen, remember 
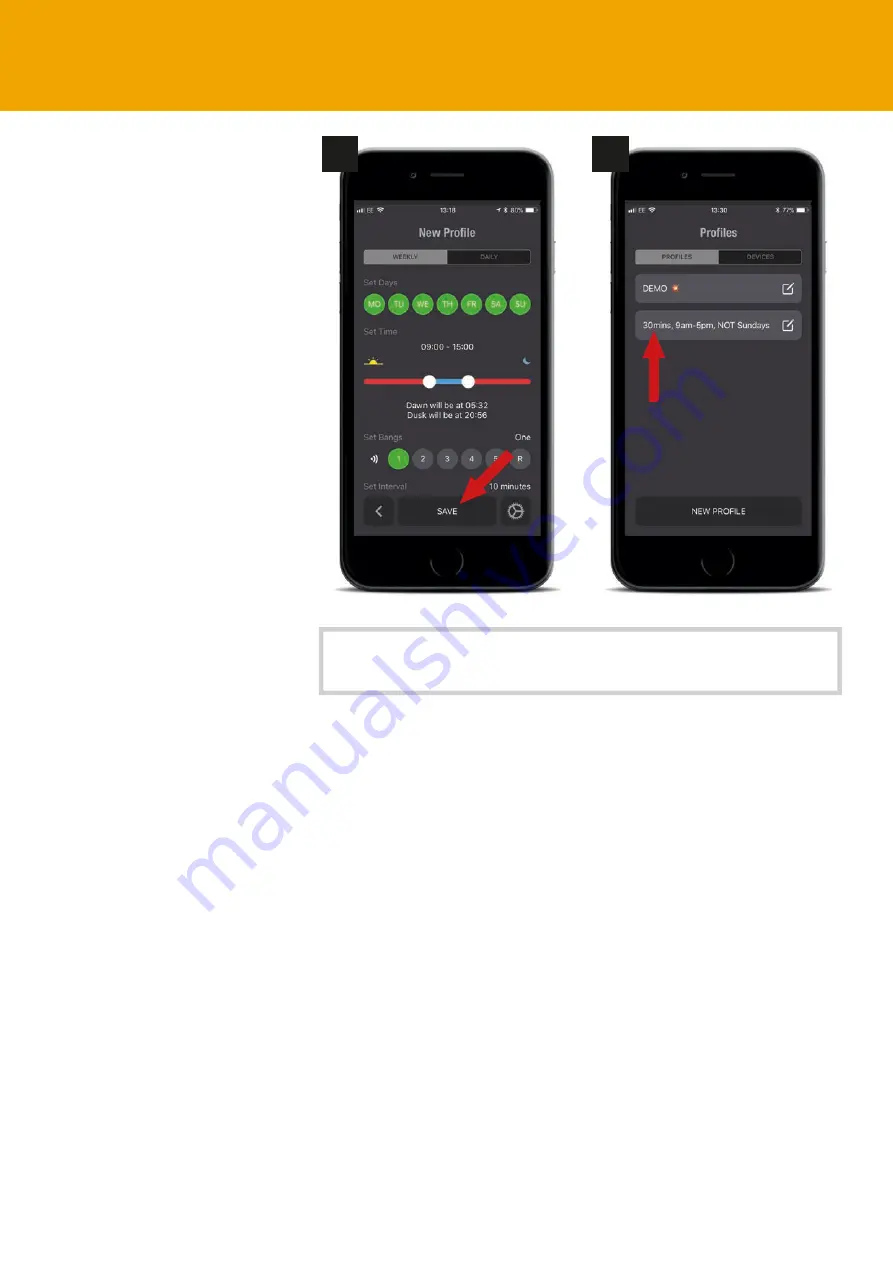
to “SAVE” the profi le (Fig 5) 
and to give it a name for future 
reference.

You can give profi les names 
which describe exactly what 
they will do (Fig 6). The example 
has the interval between 
clusters, start and fi nish time 
during the day and that it is 
switched off on Sundays, but 
you could have more or less 
information as you decide.

If you want to re-edit a profi le at 
any time you can do so by just 
pressing the name from the list 
of profi les (Fig 6). You can then 
edit as you wish, then resave.

Fig 5

Fig 6

Remember: You may be able to view the complete screen, but 
you may need to scroll up/down to see all the different items.

Summary of Contents for ScatterBird MK4

Page 1: ...ALWAYS WEAR SAFETY PROTECTION TO HSE EN SPECIFICATIONS Operator s Handbook portek co uk MARK 4 GAS POWERED BIRD SCARER ...

Page 2: ...ation Set Up Android Page 14 Checking the Scatterbird App Will Work Page 14 Downloading the Scatterbird App Page 16 Checking that Bluetooth is Active Page 17 Things to Check Before Running the App Page 18 Using the Scatterbird App Page 19 App Overview Page 19 Weekly Program Page 21 Daily Program Page 25 Connecting to Scatterbird Page 27 Multiple Scatterbirds Page 31 Additional App Features Page 33...

Page 3: ...y Rules WARNING Read and understand all the instructions before use Failure to follow the instructions in this manual may cause fire hearing loss or other injury This machine is strictly to be operated by one person Never place any object in front of or inside the barrel WARNING When using this machine basic safety precautions should be followed to reduce risk of personal injury and machine damage...

Page 4: ...mented with state of the art electronics to enable a wide range of easily programmed features Though the Scatterbird MK4 is an easy to operate machine we recommend reading this instruction book fully before operating It covers safe use setup programming and a troubleshooting guide Please keep this instruction book safe for future use should it be needed 4 Setting up and assembly Sounding Barrel Le...

Page 5: ... Source Assembly The Scatterbird MK4 requires a 12V power supply to drive the electronics There are two options available 1 Using the Supplied 12V Lead Complete with crocodile clips these leads are already attached to the electronics of the Scatterbird unit You simply need to connect the red to the positive terminal and the black to the negative terminal of your own 12V battery Please make sure th...

Page 6: ... the bottom back panel by undoing the 6 screws Pull apart the white connector block that holds the main wiring harness to the crocodile battery lead DO NOT pull apart by holding the wires hold the connector block Note The now unused crocodile lead can be tidied with a cable tie for future use or if wanted can be removed completely from the unit To do this remove the spade terminals from the crocod...

Page 7: ...s connector block which you have fed through into this side cavity Photo 5 Make sure that you have the pip on the connector blocks matched together These ensure that the polarity of the wires is correct when they are connected to the battery Photo 6 The spade connectors on this short lead can now be attached to the rechargeable battery Make sure that the red wire is connected to the red positive t...

Page 8: ...using a fire 2 When the unit is being transported always ensure that the gas is turned off at the gas bottle Gas Connection The unit comes with a standard POL type regulator which is fixed at 1 bar of pressure DO NOT use any other type of regulator The gas regulator can be attached to any size of propane gas bottle that has a POL connection this is the standard type used in UK When the regulator i...

Page 9: ... an angle to them as can be seen from the picture of the complete unit Press the sprung loaded pips into the leg so you can start to ease the leg into the main unit Photo 2 3 It can be easier to do this one pip at a time twisting the leg slightly to get the pip to go in When the pips are in the leg can be pushed as far as it will go Photo 4 You may well be able to feel when the pips locate in a gr...

Page 10: ... need to slide the screen to left or right to see the icon 2 Next click on the General icon to see the general phone settings information screen Fig 2 You may need to scroll up or down to find it 3 Select the About option Fig 3 Click on this to get to the next screen Once again you may need to scroll up or down to find it 4 Locate the iOS software version information by scrolling up or down On thi...

Page 11: ... may need to scroll up or down to find it Check to the Bluetooth is switched on if it is active you should see On to the right hand of the Bluetooth icon Fig 2 3 If Bluetooth is switched off click the icon then the on off switch your Bluetooth should now become active and a list of Bluetooth devices will appear below the on off switch The Bluetooth icon will also appear in the top right hand of th...

Page 12: ... screen to left or right to see the icon 2 On entering the App Store click on the Search icon then type Scatterbird into the search bar Fig 2 3 3 The App will come up in the search you can either click the GET button Fig 4 to download it instantly or click the icon to find out more about the application including it s features ratings and update history Fig 1 Fig 2 Fig 3 Fig 4 Remember You may be ...

Page 13: ... be connected to either your phone network or the internet when you program the profiles From the comfort of your home you can easily set up the profiles and then later send them to your Scatterbird when in the field Your Scatterbird MK4 will function 100 without this feature if you are not connected to the internet when programming Fig 5 Fig 6 Remember You may be able to view the complete screen ...

Page 14: ...rgy Bluetooth 4 0 or higher If you need to check to see what version your smart phone is then the below details will help you do this 1 Press the icon on the main screen This will bring up the main menu of items on your phone Scroll around until you find the Settings icon and click to get to the next screen Fig 1 2 Scroll to find the About Phone listing and click it Fig 2 4 Find Software Informati...

Page 15: ... 5 If the search for Scatterbird brings up the App then it will almost definitely work on your android phone Fig 6 This is because the App store will only show apps that should work with your phone so it will check that you have Bluetooth 4 4 or above Phone manufacturers alter some functionality from the normal sometimes so occasionally a phone will meet the above tests but still fail to work with...

Page 16: ... the search results Fig 3 Click on the App icon to find out more about the application including it s features ratings and update history While in the main information pages you can download the App by clicking on INSTALL Fig 4 If the App does not come up when you search the store for your Android phone then your phone is not compatible with the App Fig 1 Fig 2 Fig 3 Fig 4 Remember You may be able...

Page 17: ... information You may need to scroll up or down to find it Check to see if Bluetooth is active Fig 3 3 If Bluetooth is switched on and active you should see either On under the Bluetooth heading or a coloured slider switch to the right of the Bluetooth icon Fig 4 However if Bluetooth is switched off click the on off slider switch your Bluetooth should now become active and the Bluetooth icon will a...

Page 18: ... the Bluetooth option time and date already set up for you Things to check before running the Scatterbird App on your Android Phone For the dawn and dusk feature to work your phone needs to be connected to either your phone network or the internet when you program the profiles From the comfort of your home you can easily set up the profiles and then later send them to your Scatterbird when in the ...

Page 19: ...ure the intervals between each cluster of bangs plus a random feature time to start in the morning and time to finish in the afternoon or evening The Scatterbird unit will then continue doing the same pattern everyday every week You also have the option of turning any day off if you want to as well The more that you vary the banging of a gas gun the better so you can now have Daily Program You can...

Page 20: ...EW PROFILE button Fig 3 you will be asked if the application can use your location Fig 4 this will allow it to know where you are and from that information know when dawn and dusk are Click allow You can now start to create a profile for use on your new Scatterbird The NEW PROFILE screen may all be visible on one screen or you may need to scroll the screen to see the different parts like the sampl...

Page 21: ...off not banging on Saturday and Sunday but on during the other days 2 Set Time This is the time during the day that the unit will operate The start and stop times can be changed by placing your finger on one of the sliders and moving it along Fig 3 4 You will see the start or stop time changing as you do this You can alter the time in half hourly amounts anytime between midnight and 11 30pm the sa...

Page 22: ...arnings will only work if your location is know by your phone when you create or edit a Profile Your location is known by your phone if you are connected to the internet Some phones will also know your location without being connected by the use of proximity to phone masts This updates your position and advises your phone of dawn and dusk setting for your location If your phone does not have your ...

Page 23: ... can be varied by using the slider at the bottom of the profiles page Fig 1 You may need to scroll your screen up to see this 5 Loudness Here you can adjust the volume of the profile to suit varying conditions Fig 1 If you have a particular field close to neighbours you may want to reduce the volume in this circumstance As Scatterbirds get older the residues in the propane gas slowly reduce the si...

Page 24: ...ome up allowing you to give a name to your profile Fig 2 Prev Page for this walk through we have named it DEMO Fig 3 Prev Page Click SAVE and you will notice that the profile screen has now been renamed You can have as many profiles as you want it can be a good idea to describe the function in the name You can even include icons if you wish If you want to change the name of a profile click on the ...

Page 25: ...not The opening screen will show the first day of the week Monday Here the day is switched off it can be switched on by touching the on off slider button to show green Fig 3 The other features set time set bangs set interval and loudness all are identical to the descriptions on the WEEKLY tab found on the previous pages Changes will be made here for Monday You need to set every day individually Yo...

Page 26: ... more effective than any other gas gun available When you have completed your settings for each day to what you want to happen remember to SAVE the profile Fig 5 and to give it a name for future reference You can give profiles names which describe exactly what they will do Fig 6 The example has the interval between clusters start and finish time during the day and that it is switched off on Sunday...

Page 27: ...r Scatterbird MK4 to a power source either an external or internal 12V battery Once the battery is connected you will see a small blue intermittent flash from an LED located under the silver information sticker on the upper orange plastic back plate This LED indicates the unit has power and Bluetooth connectivity is available It is effectively looking for something to talk to while it is flashing ...

Page 28: ...catterbird is immediately looking for something to talk to By clicking on the Scatterbird listed Fig 5 your smart phone will automatically try to connect to the unit Depending on the programme and the speed of your phone this may take a couple of minutes Fig 6 Once it has connected to your Scatterbird the App will ask you to Pair it with your phone Fig 7 Fig 4 Fig 5 Fig 6 Fig 7 Remember You may be...

Page 29: ...time your Scatterbird is connected to a phone Click on the Scatterbird and you will be shown the units battery level as well as details about the last profile used and the last time the Scatterbird was synchronized Fig 3 If this is the first time connecting to your Scatterbird then there will be no information listed only battery level Select a profile you wish to use by clicking on the PROFILE bu...

Page 30: ...catterbird to run If you want to test it to make sure it fires OK then press the TEST button Fig 6 and then confirm the test fire Fig 7 You will be shown a countdown screen which counts from 10 to 0 Fig 8 When the counter hits zero the Scatterbird should go bang once Make sure you and anyone in the vicinity have suitable ear protection on when test firing and stand behind the gun as it is quieter ...

Page 31: ...irds You will only need to scan for and Pair with any Scatterbird unit once After that your phone will automatically see the Scatterbird in Bluetooth range and connect automatically The range of this varies phone to phone but is typically 15 20m You may find some phones have a greater range When you are in range you will see the Bluetooth symbol next to the listed Scatterbird turn from red to gree...

Page 32: ...n have in its list Many will be able to hold hundreds in memory but some may only be able to have as low as 12 for example all depending on the make and model of the phone Fig 13 Fig 14 Remember You may be able to view the complete screen but you may need to scroll up down to see all the different items Additional Notes Daylight Saving British Summer Time Please note that your Scatterbird MK4 unit...

Page 33: ... to new pin codes These can all be the same number if you wish but would be unknown to anyone unauthorised by you To change the pin code click the Settings icon Fig 1 If for any reason you need to forget the device perhaps because you sell it or you change your phone you have the option to do so Fig 2 If you do this by mistake you can always search for it as you did the first time and pair it agai...

Page 34: ...ormally would give you the date the Scatterbird was last synced last profile giving the name of the last profile that was synced and battery level To save confusion the first two of these last synced and last profile will only give results if you are looking at the last phone that was used to sync the Scatterbird If another phone was used to put the last profile in then this will not show up What ...

Page 35: ...oud bang Most problems can be tracked down to 1 Hose damage 2 Blocked barrel 3 Battery condition 4 Solenoid valve 5 Spark generator 6 Gas delivery 7 Blocked jet 8 Spark plug gap 9 Corroded connections Guidelines in this publication will help you to troubleshoot these issues If you are having trouble with your Scatterbird MK4 this troubleshooting section will help you determine the problem and reme...

Page 36: ...the solenoid valve Photo 1 opening and about 3 seconds later another clunk as it closes If this can be heard then the solenoid is almost definitely OK Check with the gas now reconnected Can you hear the gas rushing in when the solenoid opens If so then the solenoid is OK Remember that the unit will go bang if it has gas and ignition so always have ear defenders on in preparation for this If you ca...

Page 37: ...there are three then the yellow extra wire which piggy backs from the other one is not needed If the unit does not work after cleaning and checking wires than replace the spark generator If it is replaced with a unit that has different wiring then adapt as necessary If the new one only has the three connections then ensure that the piggy back wire is taped with electrical tape to ensure it does no...

Page 38: ... up in the jet and may need cleaning To do this remove the split pin that holds the two part jet together Photo 1 This will allow the inner jet solenoid and gas hose to be removed Photo 2 Unscrew the jet from the solenoid body Photo 3 After removal run a 1mm drill bit through the jet slowly by hand Photo 4 Clean the jet thoroughly to ensure there is no residue remaining swarf or contaminants which...

Page 39: ...el is partly removed it is good practice to check the spark plug as well as the HT lead wire is OK Check that the spark plug is correct NGK BPR6ES or equivalent Check also that the spark plug gap is correct it should be about 3 4mm the thickness of a 1 coin If the gap is too small it will not ignite the gas Replace the spark plug or HT lead as necessary and put the unit back together making sure t...

Page 40: ...ake the spade terminals off the spark generator clean the contacts and replace using petroleum jelly to protect if needed This troubleshooting guide should solve the most common problems you might have with the Scatterbird MK4 If it still does not fire after these checks then get in touch with you local dealer or Portek for further information parts or technical assistance Portek will also repair ...

Page 41: ... INTO TOP BACK PLATE FIXED INTO TOP BACK PLATE SPARK PLUG SPARK GENERATOR PVC SLEEVE POWER SUPPLY CONNECTOR RESIN POTTED CONTROLLER CIRCUIT BOARD OPTIONAL INTERNAL BATTERY LEAD BATTERY LEAD FOR EXTERNAL BATTERY WHITE SOLENOID VALVE MOUNTED ON BARREL HT LEAD ...

Page 42: ...42 Parts Lists 1 2 3 4 5 6 7 8 9 10 11 12 13 15 14 16 17 19 18 20 21 22 ...

Page 43: ...d 2 Screws 033 12 11 Plastic Outer Barrel with Label and 2 Screws 033 38 12 Brass Elbow Male Female 033 14 13 Metal Backplate and 6 Screws 033 39 14 Side Plate with 3 Thumbscrews and Washers 033 41 15 High Tension HT Lead 033 19 16 Assembled Circuit Board including Backplate and 4 Screws 033 40 17 Leg Assembly Set of 4 033 30 18 Internal Battery 034B 19 Short Battery Lead 031 12C 20 Internal Batte...

Page 44: ...irective 2014 30 EU EMC Directive Declaration made by Stephen Morris Designer on 01 08 2018 Portek Ltd Bryn Hall Knolton Bryn Overton on Dee Wrexham LL13 0LF Tel 01234 889 454 Fax 01234 889 464 General enquiries sales portek co uk 2018 Portek Ltd Issue 1 08 18 Noise Level at 5m 120LA max dB Power 12 volt battery internal or external Spark Plug NGK BPR6ES or equivalent Specifications ...

Reviews: