


Current Poin
t
:
T
UP'
o
r 'DOWN'
button to highlight the
Current Point icon (refer to S2 in figure4), press and release 'SET' button. Such operation
will function only after destination has been entered, a state defined as navigation, and causes the
Home N
to count by one
Home N+1
, say:
There are three ways of marking a waypoint:
_Auto-marking: the unit will automatically mark user's current location as waypoint according
to set marking interval, minimum of one minute;
_Manual-marking: the operation OP2 is the manual-marking;
_Combined-marking: such setting will enable both the Auto-marking and Manual-marking to
function simultaneously.
Op3---
to set the way of marking location, use '
UP'
or '
DOWN'
button to highlight the
Current
Point
icon (refer to S2 in figure1), press and holds '
SET'
button for 3 seconds, then you will
enter into the setting mode of marking current location. The following figure shows the relevant
procedure.
OP2--- o mark your current location as a waypoint,use '
OP4---
To review a certain waypoint marked down and saved before: Highlight
Home Point
icon (refer to S1 in Figure4), press and release '
SET'
button, then the three digit number
will be blinking, using 'UP' and 'DOWN' button to select the waypoint number you want and the
latitude,longitude,altitude and GMT data field correspond to the waypoint simultaneously. When
using 'OK' button to leave, the lat/long/alt data field show the current location again.
Destined Point
: The latitude, longitude and altitude of proposed destination is to be input here.
OP5---
T
sing'
UP'
or '
DOWN'
button to highlight the Destination Icon
(refer to S3 in figure 4), press the '
SET'
button once to go to the latitude icon , then press
'
OK'
button to input data. Remember that every input must be confirmed by pressing '
OK'
button.
After the input of latitude and longitude is completed, the
Navigation Pointer
centered in the
LCD screen will point to the proposed destination at the direction you should be heading. And also
the distance between starting point and destination will be displayed in the
Distance
data field.
GPS Navigation Pointer and Digital Compass
When a proposed
Destination
is input, The
Polaris
can guide you to that point
.
Also it can guide
you back to your starting point. To navigate to a destination simply follow the
Navigation Pointer.
The Navigation Pointer
will always point directly to the
Destination
, no matter what your
current location might be
.
Figure 6: Setting Marking Mode
12
Working theory about Navigation Pointer:
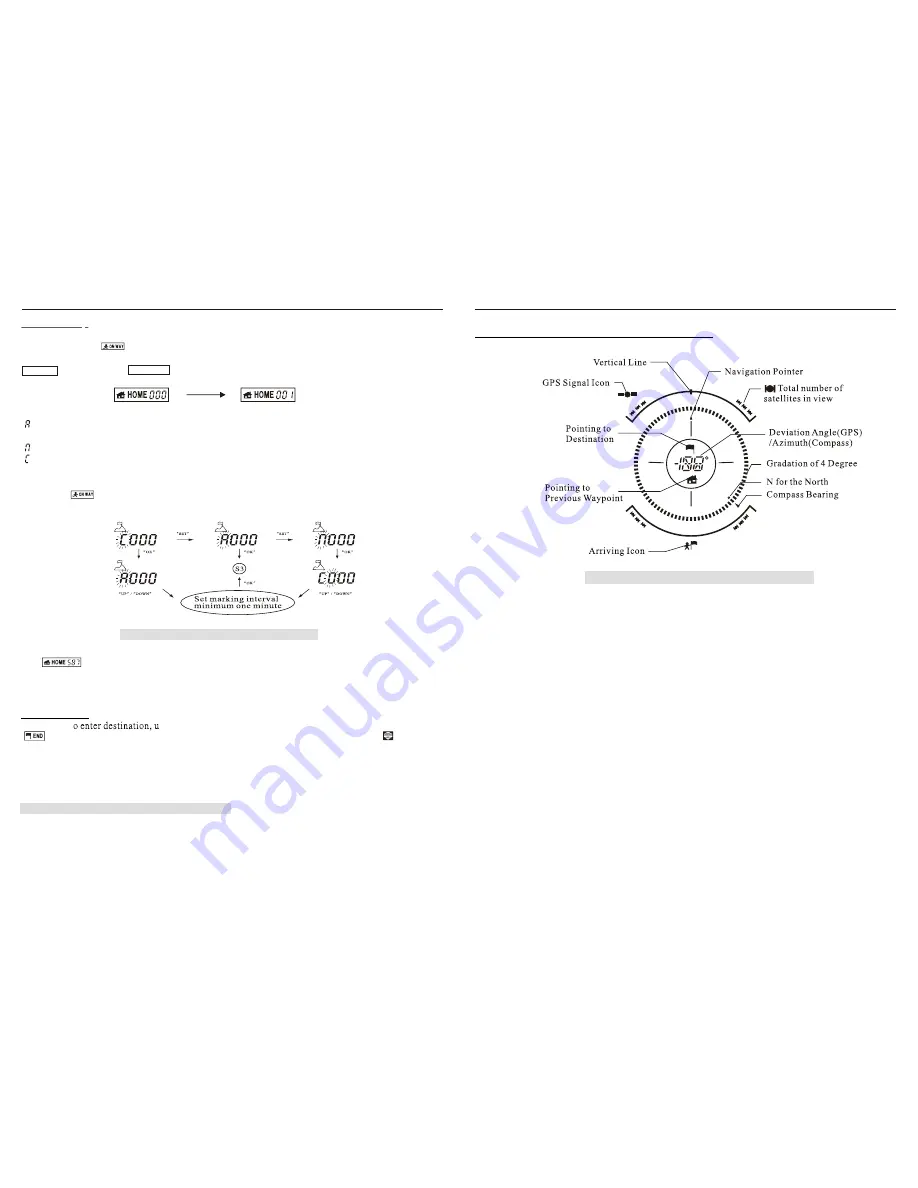
Figure 7: Navigation Pointer Description
When using the Navigation function, the Polaris required you to hold it rightly before you,
with the
Vertical Line
in alignment with the direction you face or head. Otherwise it may guide
you to a wrong destination. On the top of the above diagram there is the
Vertical Line
which
symbolizes the direction you are heading. If a
Destination
is just input, the
Navigation Pointer
will keep pointing to it. Only if you are heading rightly toward the destination, the
Navigation
Pointe
r will point straight up and the arrow will align with the
Vertical Line.
If only you deviate
from the direction to your destination, a
Deviation Angle
will occur and be shown in the center of
the ring. A specific circumstance is depicted by the left picture of the
following diagram in which the
Destination
is targeted. The right picture illustrates another
circumstance in which
Home (n-1)
(previous waypoint) is targeted and user is going back.
Centered in the ring is the
Deviation Angle.
13
POLARIS USER MANUAL
POLARIS USER MANUAL