


To see the distance you walked from the starting point to current position
Use
UP
button four times to highlight icon , press SET button once, distance
icon will change to with the data below it showing the straight line distance;
press SET button twice, distance icon will change to , with data below it
showing distance of zigzag course.
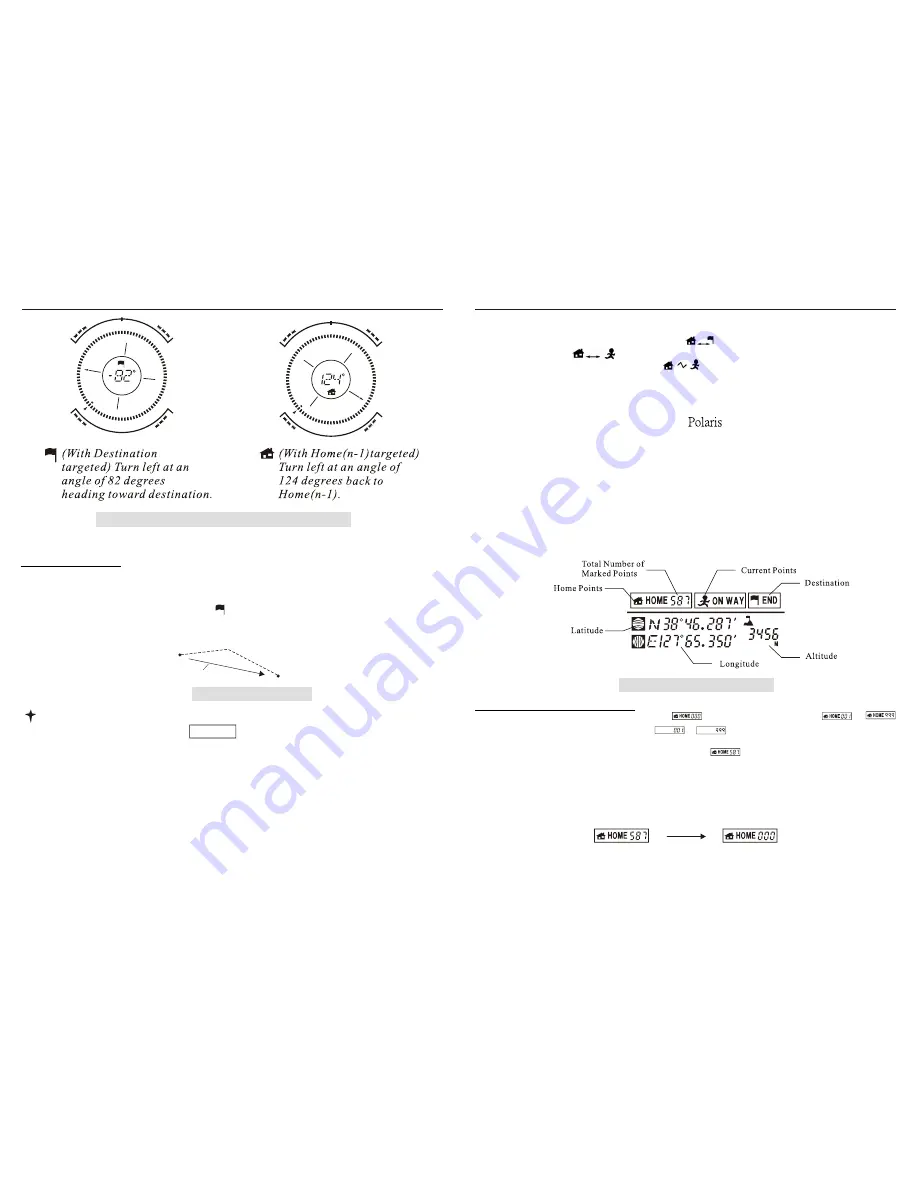
Three Waypoints and their Operations
When using Polaris to mark down certain location, we call this location as a
waypoint
,
geographic position of which is saved and reviewable for future reference.
Polaris features three waypoints on top of its LCD as illustrated by Figure 5:
Home Point
,
Current Point
and
Destination
. Just immediate below the three waypoint icons are the Latitude,
Longitude and Altitude data field which always display the geographic position of user's current
location, except when reviewing the waypoints saved before.
In order to mark and save current location as a waypoint, first user must use the Home Point icon to
mark down current location as Home 0 or starting point, then enters a proposed destination
through Destination icon, thereafter using Current point icon to mark every location in passing and
save as Home N.
Figure 5: Three Points Date Field
Familiar with
Home Point ( Home 0 to Home 999 )
:
Total 2000 waypoints can be marked here.
Is starting point or Home 0. To
th
st
th
is waypoint of the second to 1000 ; while to is the 1001 to 2000 waypoint you
marked down before.
OP1---
Mark
Home 0
: Highlight the "Home point icon" (refer to S1 in Figure4) and then
press and hold "
SET"
button for 3 seconds, the latitude, longitude and altitude of your current
position will be stored and displayed.
NOTE : Marking
Home 0
confirms that a new start will be made and all the data saved before
will be deleted completely. So occurs the following procedure:
11
Figure 8: Navigation Pointer function
Navigation Operation
In light of the two function of the
Navigation Pointer,
four specific cases
are discussed here:
Case 1___Basic Navigation
: After marking Home 0 (
OP1
) and entering a destination (
OP5
), a
process called
Starting Navigation
,
Navigation Pointer
will be triggered and keep pointing in
the direction leading to the destination. Icon centered on the screen will appear too, as showed
in left picture of figure 8.
Current Point
Pointer bearing Destination
Case 1: Basic Navigation
Note: in this exploration state, system will automatically or manually mark down the
geographic position you passed, with
Home (N)
counting the waypoints. When user arrives at
Destination, the
Arriving Icon
will blink and Arriving alarm will be generated, until press '
OK'
button to stop it.
14
POLARIS USER MANUAL
POLARIS USER MANUAL