Polaris Xr-5DC Instruction Manual Download Page 10

I

n-Depth Use of 

Polaris

    So far, however, the unit fails to record the distance your walk covered, and can't mark 
down waypoints during this walk. In order to enable it to do the jobs, you should first 

establish a track

, which requires two points: the starting point or 

Home 0

, an d a 

destination. 

To mark your current position as Home 0:

   Press UP or DOWN button once to highlight the home point icon                 , then press 
and hold '

SET' 

button for 3 seconds, the latitude, longitude and altitude of your current 

position will be stored.
A destination may be specifically picked out from a map or randomly caught in mind. 
If you have no specific destination, you are suggested to input a destination with one 
minute difference in latitude and longitude from the starting point, say:


(Starting Point)

(Destination)

To establish a track without specific destination:
   

Press 

UP

 three times to highlight the Destination Icon             , then press the 

SET


button once to highlight latitude icon       

then press 

OK

 button to enter data field. With 

starting latitude remaining on display and figure 

or

 W 

blinking, press 

OK 

four times 

to highlight the forth digit (the single minute), press UP button to increase the value by 
one minute. Press OK button four times to highlight longitude icon      

likewise up 

change the longitude by one minute.

To establish a track with specific destination:
   

Press 

UP

 three times to highlight the Destination Icon             , then press the 

SET


button once to highlight latitude icon      

then press 

OK

 button to enter data field. Using

 UP or DOWN button to change the value you want and confirm by pressing OK button. 
Finish the entire input likewise digit by digit.

   After a destination has been input, the navigation pointer      is activated with its arrow 
pointing to it, signifying that user following this direction will arrive at the destination 
ultimately. The straight distance between Home 0 and the destination                 also 
appears in the distance data field     .

   Now you can use the device to mark down waypoints if you talk a walk from the Home 0, 
and the unit will measure distance the walk cover symbolized with icon                  or    
             .

To mark your current standing location as a waypoint

Press 

UP 

button


twice to highlight the 

Current Point

 icon                 

,

 then press and 

release SET button. 
Such operation will causes the home point icon                   to increase by one                   .

10

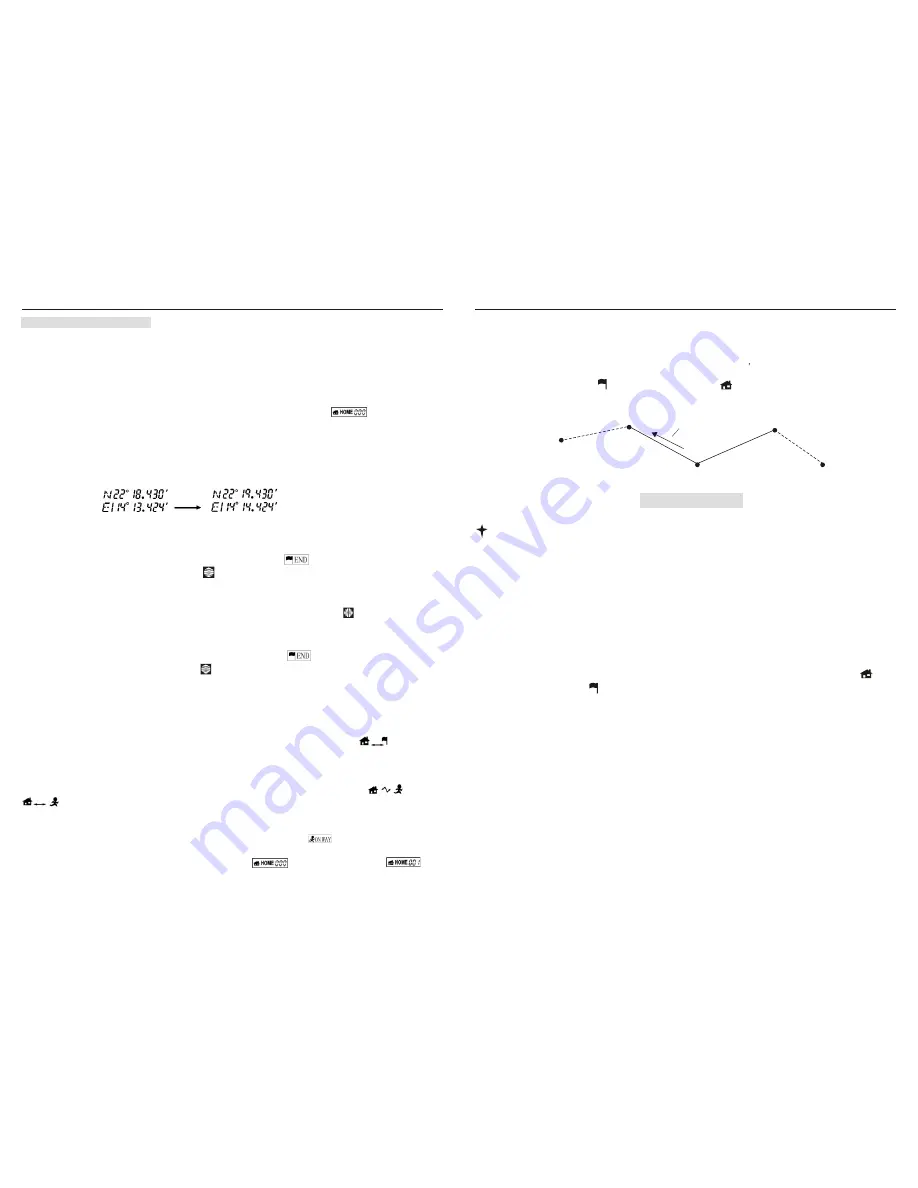
Case 2__ Backtracking

 : In case 1, when user arrive at a certain waypoint Home N, as shown in 

the following diagram, circumstance require him to go back to waypoint Home (N-1). Wanting 

unit to guide back to that point, he should act in this way:

Op6--- 

press and hold 'DOWN' and 'SET' button for two seconds

      Such dual keying will make the

 Navigation Pointer

 point   to   

Home  (N-1)

 from current 

location (

Point N)

. Icon      will disappear while icon     centered on the display will appear, as 

shown in the right picture of Figure 8.


Case 2: Backtracking 


Note: In this trailing back state, system will stop marking waypoint. When user arrives at 

Home (n-1)

, arriving icon will blink and arriving alarm will be generated. At this time, all other 

button will be disabled, until pressing'OK' button to stop it. Once the 'OK' is pressed, 

Home (N-1)


will decrease to 

Home (N-2)

 and the latitude, longitude and altitude windows display the 

geographic position of Home (N-1) as current point, and the pointer will point to Home (N-2). So 

occurs the same step until, when arriving at Home 0 or in case 3 when forward-tracking has been 

triggered.

Case 3___Forward-Tracking

: in case 2, when user arrived at waypoint Home (N-1), 

Circumstance require the user go back to Home N again. In order to use the unit to guide him back 

to Home N, he should act in this way:

Op7

 --- press and hold 'UP' and 'SET' button for two seconds. Such dual keying will force the


Navigation Pointer

 point to 

Home N

 from current location Home (N-1).Icon     will 

disappear while icon    Centered on the display will appear, as shown in the left picture of 

Figure 8.

Home 0

N-1

Pointer bearing

N

+1

N

Destination

15

POLARIS USER MANUAL

POLARIS USER MANUAL

‡F

‡I

Summary of Contents for Xr-5DC

Page 1: ...F If user hasnot used thisGPS unit forseveral months thealmanac data forthe satellites maybe out of date Theunit is capableof recollecting thisinformation on itsown but theprocess can take several minutes Time to FirstFix TTFF isthe time ittakes a GPSreceiver to findsatellites after the user firstturns it on when the GPSreceiver has lostmemory or hasbeen moved over300 miles from its lastlocation V...

Page 2: ...ure of the GPS receiver satellite geometry A low DOP value indicates better relative geometry and higher corresponding accuracy The DOP indicators are GDOP geometric DOP PDOP position DOP HDOP horizontal DOP VDOP vertical DOP and TDOP time clock offset Distance The length between two waypoints or from your current position to a destination waypoint This length is measured in great circle over the ...

Page 3: ... very precise orbit and transmit signal information to the earth GPS receivers take this information and compares the time a signal was transmitted by a satellite with the time it was received The time differenceindicate how far away the satellite is With distance measurements from a few more satellites the receiver can determine the user s position GPS receiver must be locked on to the signal of ...

Page 4: ... 12 channel Hot start 10sec Warm start 40sec Cold start 120sec Update Rate 1 Hz continuous Accuracy Antenna Physical Size Power Battery Duration Temperature Range Position 10m CEP S A off Velocity 0 1 sec S A off Time 1ms Built in patch 131 4mm H 61 8mm W 28mm D Three 1 5V AAA Batteries 16 hours 0 0 15 C to 70 C 21 POLARIS USER MANUAL POLARIS USER MANUAL Specifications ...

Page 5: ... 6 Continue for another 50 meters and mark down Home 2 7 Show the just passed distance refer to OP8 at page 15 Note latitude and longitude of the destination must differ from that of Home 0 at least 0 02minute or it may cause the Polaris to trigger the arriving alarm without user s moving which result in failure to stop the alarm by pressing OK button If such condition do happen just walk way from...

Page 6: ...meand failing to calibrate it remains fixedin NW a charactercentering in the ring of navigationpointer Thermometer Icon performingas atmosphere temperatureindicator with the leftone showing temperaturefrom 10 to24 degree inCelsius or 14 to76 degree inFahrenheit the rightone showing from25 to 60 degree in Celsiusor 77 to140 degree inFahrenheit Distance data field working as anodometer and straightl...

Page 7: ...9 Use Up or DOWN button to highlight the distance icon refer to S4 in figure4 press and release SET button distance icon will shifted to while the distance will correspond to it ___ cumulative distance between starting point Home 0 to current point Home N During navigation to show suchdistance just actlike OP9 Note Inaccuratedistance will resultif GPS signalis lost duringnavigation Speed With GPS ...

Page 8: ...der tospeed charge process and notto discharge wastefully 8 4 5 6 8 9 The difference between the two pictures in Figure9 is the left one depicts the an inactive Navigation Pointer with the centered characters denoting user s heading or compass azimuth while the right one depicts an active Navigation Pointer with the centered signed digits calculating the angle betweenuser s heading andthe directio...

Page 9: ...SER MANUAL To Charge batteries 1 Pull theplastic cover fromthe charging port insert adaptor smini USB terminal then connect the adaptor sanother terminal toAC power mainsocket 1 Take the unit outside in an open area where there is no obstruction from a clear view of sky press POWER button to turn on the unit You will see all the icons pop up on the screen for three seconds After the shown all then...

Page 10: ...the destination also appears in thedistance data field Now you can use the device to mark down waypoints if you talk a walk from the Home 0 and the unit will measure distance the walk cover symbolized with icon or To mark your current standing locationas a waypoint Press UP button twice to highlight the Current Point icon then press and release SET button Such operation will causes the home point ...

Page 11: ...ar with Home Point Home 0 toHome 999 Total 2000 waypoints canbe marked here Is starting pointor Home 0 To th st th is waypoint ofthe second to1000 while to is the 1001 to 2000 waypoint you marked down before OP1 Mark Home 0 Highlight the Home point icon refer to S1in Figure4 andthen press and hold SET button for 3seconds the latitude longitude and altitudeof your current position will bestored and...

Page 12: ...o inputdata Remember thatevery input mustbe confirmed bypressing OK button After the input of latitude and longitude is completed the Navigation Pointer centered in the LCD screen will point to the proposed destination at the direction you should be heading And also the distance betweenstarting point anddestination will bedisplayed in theDistance data field GPS Navigation Pointerand Digital Compas...

Reviews: