background image

1300 555 514                                                                                                                                                                                                  13


Steering Wheel Controls 


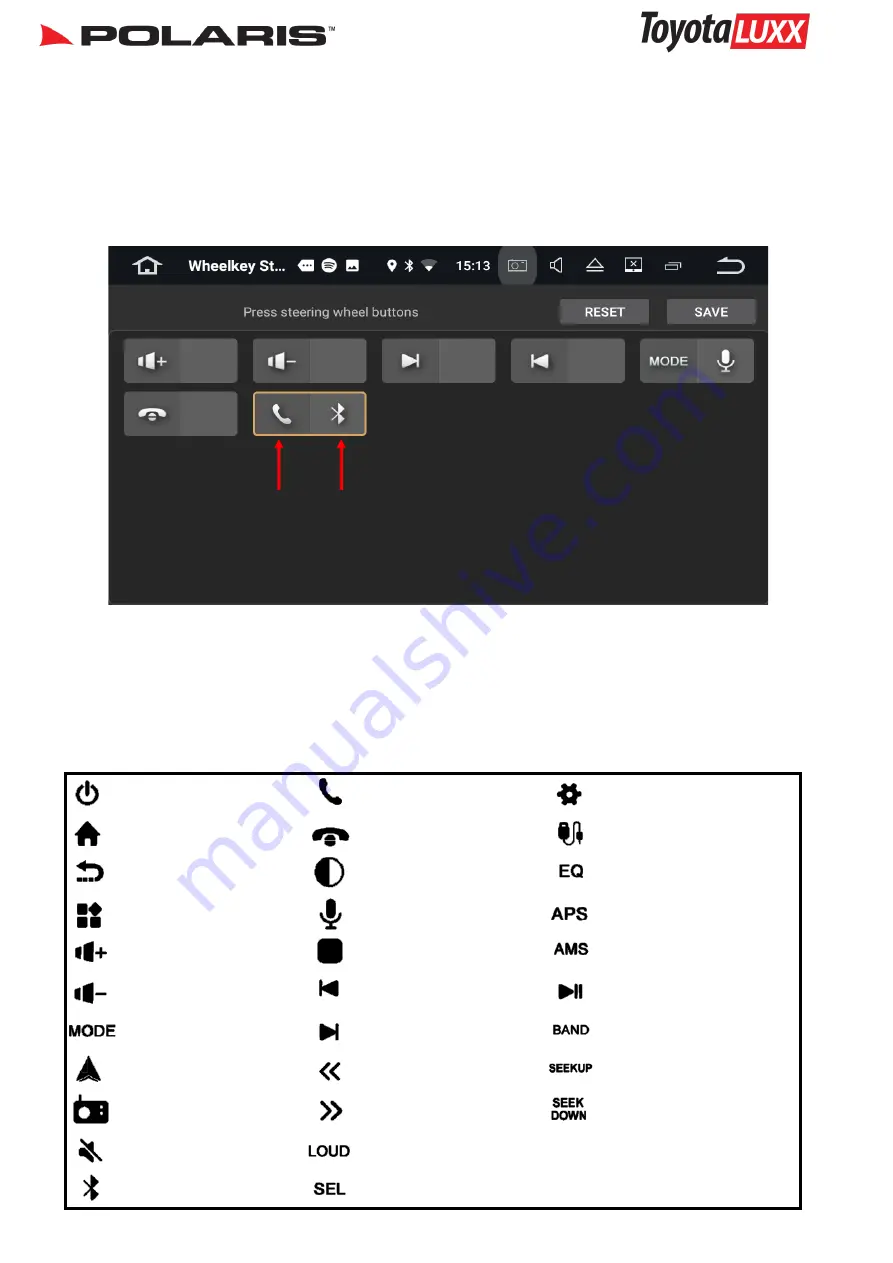
Once you have programmed all your steering wheel controls in, your screen should look 
similar to the one below:


Short 


click 


Long


click 


If you have made a mistake or you wish to change the functions you can press 

reset 

and 

start the process again. If you are happy then press save. Test all your SWC functions. 


Standby


Main menu


Back to prev screen


Widgets 


Volume up


Volume down


Mode 


Radio 


Mute


Bluetooth


Answer 


Hang Up 


Brightness


Ok Google 


Skip Back 


Skip Forward 


Rewind


Fast Forward 


On/off


Sound & Equalizer 


Settings 


Steering Wheel Control functions


Power/ standby 


Answer call


Settings 


Home /main menu 


Hang up call


AV in 


Back to previous screen


Brightness control


Equaliser 


Widgets 


Ok Google 


Radio: Scans through pre

-

sets 


Volume Up 


Stop (music / movies files)


Radio: Scans 


Volume Down


Skip previous 


Play / Pause (music / movie files)


Mode 


Skip forward 


Radio: Change bands 


Navigation 


Rewind 


Radio: Seek up 


Radio 


Fast Forward 


Radio: Seek Down 


Mute 


Toggle loud on/off 


Bluetooth 


Sound & Equaliser 


Summary of Contents for ToyotaLUXX

Page 1: ...1300 555 514 Installation Manual Please read this manual before installing this product ...

Page 2: ...s damaged or tampered with in any way this includes installing foreign mapping or software onto the SD card The installation of 3rd party apps that may cause harm to the unit Warranty Terms The ToyotaLUXX is covered 2 years and includes Defective Equipment Defective Cables Not Covered under warranty Abuse Improper installation Alteration to Cables includes cutting of any cables Accidents Water dam...

Page 3: ...e Notes Older Toyota head units Radio Reception 11 Mounting the head unit 79 series side bracket modification 11 Steering Wheel Controls 12 13 Dimensions 15 Returns Procedure 16 Please note once the unit is installed you can access your user manual on the head unit or you can download a copy from our website www polarisgps com au Also check out our youtube channel Polaris GPS for troubleshooting t...

Page 4: ...d If installing into a 24Volt vehicle you will need a 10 amp converter which can be purchased through automotive electronic shops such as Jaycar electronics To avoid short circuit in the electrical system ensure that the negative battery cable is disconnected before installation To avoid possibility of shorting out the electrical circuit in the unit never connect the battery wire directly to the v...

Page 5: ... cables Bluetooth mic input cable 9 Polaris Reverse Camera with RCA adaptor Toyota Power Harness Connects to ToyotaLUXX RCA plugs Red RCA AUX in R White RCA Aux in L 4 pin plug Rear Speakers plugs into OEM Harness 8 pin plug Main power Front speakers plugs into OEM harness 6 pin plug Steering wheel controls for newer Toyota vehicles Orange w black stripe Reverse In Blue w white stripe AMP Ctrl Pin...

Page 6: ...1300 555 514 6 Wiring Diagram ...

Page 7: ...BRANDS AND MODELS Acc CUT AND TAPE OFF WIRES AS NOT NEEDED IN THIS SET UP AS NOT NEEDED IN THIS SETUP RCA PLUGS INTO CAMERA INPUT FOUND ON HEAD UNIT CONSTANT CAMERA AND TRIGGER DIAGRAM 1 Head REVERSE TRIGGER POWER FROM REVERSE LIGHTS RCA PLUGS INTO CAMERA INPUT FOUND ON HEAD UNIT RCA CAMERA WITH REVERSE TRIGGER ONLY DIAGRAM 2 ...

Page 8: ...S NOT NEEDED IN THIS SET UP RCA PLUGS INTO CAMERA INPUT FOUND IF NO REVERSE TRIGGER IS FOUND PLEASE FOLLOW THE SECOND DIAGRAM IF YOU WOULD LIKE A CONSTANT CAMERA AS WELL A TRIGGER MUST BE BROUGHT FROM REVERSE LIGHT POWER TO CAMERA DIAGRAM 3 Wiring Diagram Reverse Camera cont ...

Page 9: ...it from reverse image to a forward facing image You can also disable the guidelines if you want by cutting the other control wire If you are using our black infrared camera as a front camera please remove the cap on the camera lead to change to a for ward facing image How to view the additional camera Reverse Gear When the vehicle is in reverse it will always default to your reverse camera To swit...

Page 10: ...ugged together We suggest plugging everything together as normal then find the Toyota original antenna adaptor and unplug see photos below 2 Find the beginning of the factory antenna adaptor 1 Plug the Polaris radio antenna adaptor into the Toyota radio antenna as normal 3 Unplug the factory antenna plug as shown above 4 Plug the original radio plug OEM straight into the back of the Toyota luxx an...

Page 11: ...re from the Radio Antenna adaptor on the Luxx harness and attach to the wire coming from this pin Mounting the unit The Toyota double din chassis will attach to most vehicle s OEM brackets Before putting your dash back together it is best to attach the screen and test all functions Some vehicles will require a fascia to fill the gap around the Toyota double din chassis Do not forget to remove the ...

Page 12: ... screen will appear You can select a different function for short click and long click For example if I have selected my mode button I can select the mode function as my short click and then I can choose the ok google function for my long click When I hold down my mode button ok google will appear Once you have your desired settings press ok in the top right hand corner You will then be taken back...

Page 13: ...olume down Mode Radio Mute Bluetooth Answer Hang Up Brightness Ok Google Skip Back Skip Forward Rewind Fast Forward On off Sound Equalizer Settings Steering Wheel Control functions Power standby Answer call Settings Home main menu Hang up call AV in Back to previous screen Brightness control Equaliser Widgets Ok Google Radio Scans through pre sets Volume Up Stop music movies files Radio Scans Volu...

Page 14: ...1300 555 514 14 Dimensions 20 5cm 10 5cm 15cm 17 5cm 10 cm 2cm ...

Page 15: ... settings or running a software update 2 If our technician has exhausted all options and determines that the unit needs to be sent back for assessment please visit www polarisgps com au warranty returns returns form Please print and fill out the return form and include a copy with the goods For a speedy return process please try and be as detailed as possible when describing the fault 3 Package th...

Reviews: