background image

3.21

ENGINE

3

NOTE: When using an interference angle, the seat
contact point on the valve will be very narrow, and is
a normal condition.  Look for an even and
continuous contact point on the black marker, all the
way around the valve face.

8.

Clean all filings from the area with hot soapy water, rinse,
and dry with compressed air.

9.

Lubricate the valve guides with clean engine oil, and apply
oil or water based lapping compound to the face of the
valve. Lapping is not required with an interference angle.

10. Insert the valve into its respective guide and lap using a

lapping tool or a section of fuel line connected to the valve
stem.

11. Rotate the valve rapidly back and forth until the cut sounds

smooth. Lift the valve slightly off of the seat, rotate 1/4 turn,
and repeat the lapping process. Do this four to five times
until the valve is fully seated, and repeat process for the
other valve.

12. Clean rocker assembly, cylinder head, valves, and camshaft

oil supply passages thoroughly.

13. Spray electrical contact cleaner into oil passages and dry

using compressed air.

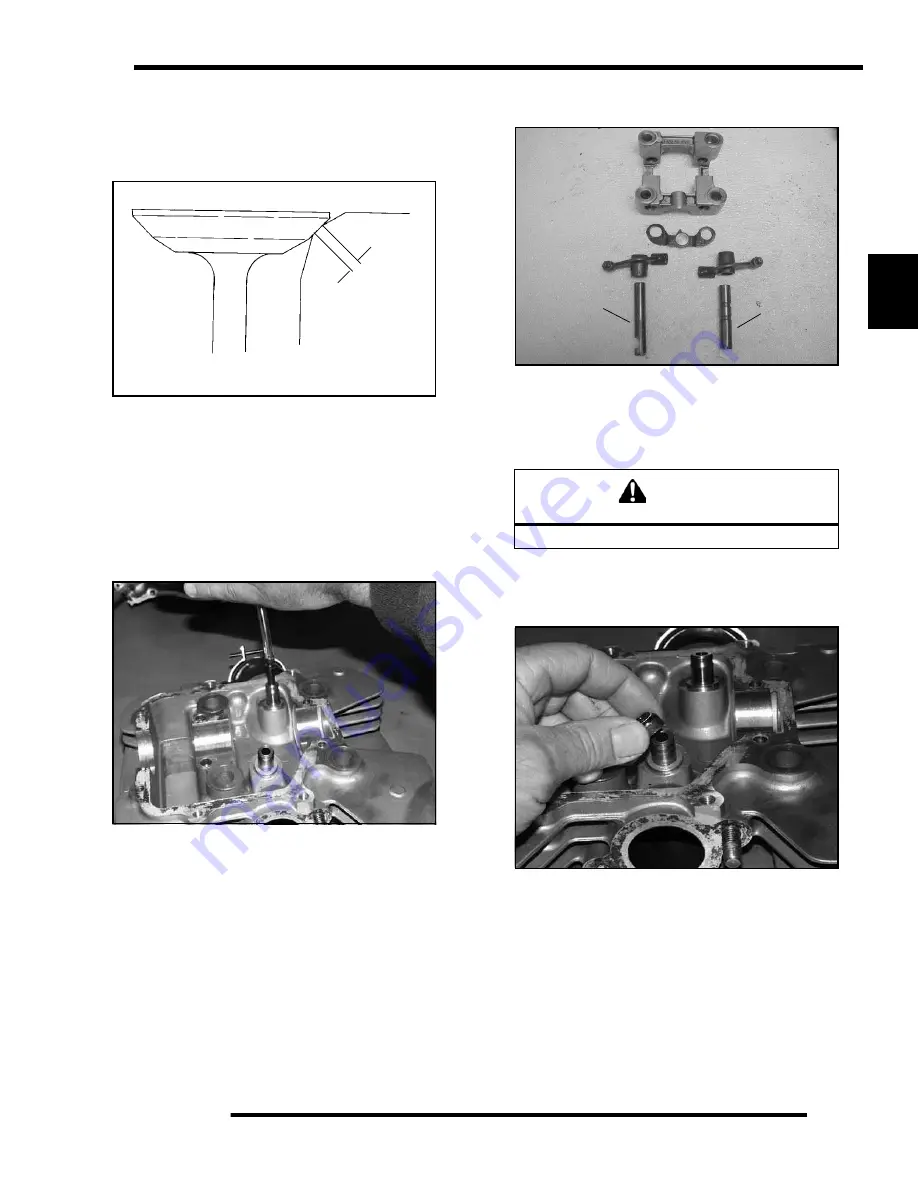
Cylinder Head Assembly

NOTE: Assemble the valves one at a time to
maintain proper order.

1.

Install new valve seals on valve guides.

2.

Apply engine oil to valve guides and seats.

3.

Coat valve stem with molybdenum disulfide grease.

4.

Install valve carefully with a rotating motion to avoid
damaging valve seal.

Seat
Width

CAUTION

Wear eye protection during assembly.

Intake

Exhaust

PartShark.com 

877-999-5686

Summary of Contents for R09VA17AA

Page 1: ...SSIONS DECAL LOCATIONS 1 3 VEHICLE INFORMATION 1 4 PUBLICATION NUMBERS 1 4 PAINT CODES 1 4 REPLACEMENT KEYS 1 4 SPECIAL TOOLS 1 4 GENERAL SPECIFICATIONS 1 5 MODEL 2009 RANGER RZR 170 1 6 MISC SPECIFIC...

Page 2: ...er and serial number This information can be found on the sticker applied to the clutch side engine case Machine Model Number Identification Model Year Designation Basic Chassis Designation Engine Des...

Page 3: ...hicle identification number VIN are important for identification The VIN number B is stamped on a portion of the front left frame rail close to the left front wheel The engine emissions decal C is att...

Page 4: ...red while servicing this vehicle Some of the tools listed or depicted are mandatory while other tools maybe substituted with a similar tool if available Polaris recommends the use of Polaris Special T...

Page 5: ...egory Dimension Capacity Length 85 in 216 cm Width 48 in 122 cm Height 55 in 139 7 cm Wheel Base 65 in 165 cm Ground Clearance 6 in 15 2 cm Dry Weight 500 lbs 227 kg Gross Vehicle Weight 840 lbs 381 k...

Page 6: ...nning Lamps DRL Tail Brake 5 Watts 21 Watts Starting System Electric Start Ignition System CDI Ignition Timing Non Adjustable Spark plug Gap NGK CR6HSA 024 028 in 0 6 0 7 mm Battery GTX12 BS Low Maint...

Page 7: ...1 7 GENERAL INFORMATION 1 MISC SPECIFICATIONS AND CHARTS Conversion Table C to F 9 5 C 32 F F to C 5 9 F 32 C P a r t S h a r k c o m 8 7 7 9 9 9 5 6 8 6...

Page 8: ...ifications are to be used only as a general guideline There are exceptions in the steering suspension and engine areas Always consult the exploded views or each manual section for torque values of fas...

Page 9: ...1 9 GENERAL INFORMATION 1 SAE Tap Drill Sizes Metric Tap Drill Sizes Decimal Equivalents P a r t S h a r k c o m 8 7 7 9 9 9 5 6 8 6...

Page 10: ...tational direction g Gram Unit of weight in the metric system gal Gallon ID Inside diameter in Inch inches Inch Pound In lb 12 in lbs 1 ft lb kg cm Kilograms per square centimeter kg m Kilogram meters...

Page 11: ...SCREW ADJUSTMENT 2 14 VENT LINES 2 15 FUEL SYSTEM 2 15 FUEL FILTER 2 15 FUEL VALVE LOCATION 2 16 CARBURETOR DRAINING 2 16 FUEL PUMP FUEL LINES 2 16 THROTTLE PEDAL INSPECTION 2 17 THROTTLE STOP SPEED...

Page 12: ...NGINE TO FRAME GROUND 2 29 STEERING 2 30 STEERING INSPECTION 2 30 STEERING WHEEL FREEPLAY 2 30 STEERING INSPECTION TIE ROD ENDS AND HUBS 2 30 TOE ALIGNMENT INSPECTION 2 31 TOE ADJUSTMENT 2 31 SUSPENSI...

Page 13: ...mmersion in mud water or sand Racing or race style high RPM use Prolonged low speed heavy load operation Extended idle Short trip cold weather operation Pay special attention to the oil level A rise i...

Page 14: ...Daily E Air Filter main element Daily Inspect clean often replace as needed CVT Housing Weekly Open CVT drain as needed check often if operating in wet conditions Brake Pad Wear 10 H 1 M 100 160 Insp...

Page 15: ...if necessary E Carburetor Air Intake Ducts Flange 50 H 6 M 500 800 Inspect for proper sealing air leaks Shift Cables 50 H 6 M 500 800 Inspect lubricate adjust Brake Pad Wear 50 H 6 M 500 800 Inspect r...

Page 16: ...IONS Front and Rear View Grease Steering Pivots Grease A arm Pivots Inspect Brake Pads Inspect Clean Air Filter Inspect Brake Pads Clean Lubricate Chain Inspect Exhaust Daytime Running Lamps Trail Bra...

Page 17: ...2 7 MAINTENANCE 2 RH and LH Side Views P a r t S h a r k c o m 8 7 7 9 9 9 5 6 8 6...

Page 18: ...12 Count 2870465 Oil Pump for 1 Gallon Jug Grease Specialized Lubricants 2871312 Grease Gun Kit 2871322 Premium All Season Grease 3 oz cartridge 24 Count 2871423 Premium All Season Grease 14 oz cartri...

Page 19: ...oil to proper level on dipstick Change after 10 hrs and then every 50 hours 6 months or 100 hours thereafter Change more often in extremely dirty conditions or short trip cold weather operation Brake...

Page 20: ...ener torques listed in each chapter Shift Cable Inspection Adjustment Shift cable adjustment may be necessary if symptoms include Ratcheting noise on deceleration Inability to engage into a gear Exces...

Page 21: ...lever assembly Replace parts as required if worn or damaged 8 Raise the vehicle and support it with jackstands in order to access the underside to remove the cables IMPORTANT Document location of cab...

Page 22: ...ter and the filter support screen 4 Inspect the air filter element for tears or damage NOTE Filter is washable Do not discard 5 Wash the filter in warm soapy water and allow it to air dry 6 Apply air...

Page 23: ...port it with jackstands in order to access the underside IMPORTANT Document location of cable ties and routing prior to removal This is important for reassembly 5 Pull the cable out from under the das...

Page 24: ...l engine idle RPM begins to decrease Stop turning at this point and note the screw setting 3 Slowly turn mixture screw counterclockwise until idle speed returns to Idle RPM Continue turning counterclo...

Page 25: ...es 5 Turn fuel valve to ON 6 Start engine and inspect for leaks WARNING Gasoline is extremely flammable and explosive under certain conditions Always stop the engine and refuel outdoors or in a well v...

Page 26: ...ne to drain completely 4 Tighten drain screw 5 Turn fuel valve to ON and check for fuel leaks 6 Start engine and re check for leaks Fuel Pump Fuel Lines NOTE Thoroughly clean the exterior of all fuel...

Page 27: ...in accordance with the Periodic Maintenance Chart and adjust if necessary Throttle Stop Speed Control Use the following procedure to control how far the throttle opens IMPORTANT This procedure should...

Page 28: ...ut 5 Re tighten the jam nut 6 Apply a small amount of grease to the inside of the boot and slide it over the cable adjuster to its original position Throttle Cable Replacement 1 Engine is off Place th...

Page 29: ...ide 11 Use cable ties to retain the throttle cable using the same locations they were previously removed NOTE Be sure to route the throttle cable inside the retainers 12 Install the new cable onto the...

Page 30: ...st of oil to enter the air box 6 Reinstall the dipstick Engine Oil Change 1 Position the vehicle on a level surface 2 Clean area around the drain plug 3 Run engine until warm 4 Stop the engine 5 Place...

Page 31: ...on System Inspection The engine is equipped with a crankcase ventilation Follow the breather hoses from the airbox to the engine and inspect the hoses for possible kinks or wear The hoses are form fit...

Page 32: ...orrect with locknut secured Exhaust Valve Clearance Adjustment 1 Remove the valve cover and secondary air pipe assembly 2 Verify cam lobes are pointed down 3 Insert the correct thickness feeler gauge...

Page 33: ...tall the arrestor and torque the fasteners to specification WARNING Do not clean spark arrestor immediately after the engine has been run as the exhaust system becomes very hot Serious burns could res...

Page 34: ...ucted 1 Position vehicle on a level surface 2 Remove the fill plug 3 Add the recommended fluid through the fill plug hole until it is at the bottom the check plug hole 4 Reinstall the check fill plug...

Page 35: ...wheel nuts slightly If wheel hub removal is required remove the cotter pin and loosen the hub nut slightly 4 Elevate the appropriate side of the vehicle by placing a suitable jack and stand under the...

Page 36: ...with improper rear drive chain deflection can result in severe damage to the transmission and drive components Always make sure the chain adjusted within the stated specifications 1 Check the amount...

Page 37: ...with dielectric grease or petroleum jelly NOTE Batteries must be fully charged before use or battery life will be reduced by 10 30 of full potential Charge battery for 3 5 hours at a current equivale...

Page 38: ...orage period and will automatically charge the battery if the voltage drops below a pre determined point Battery Charging Maintenance Free The sealed battery is already filled with electrolyte and has...

Page 39: ...g the side electrode 7 If necessary replace spark plug with proper type CAUTION Severe engine damage may occur if the incorrect spark plug is used 8 Apply anti seize compound to the spark plug threads...

Page 40: ...e following components Tie Rod Ends Steering Shaft U Joints Steering Gearbox Steering Inspection Tie Rod Ends and Hubs To check for play in the tie rod end grasp the steering tie rod and pull in all d...

Page 41: ...m wider than the measurement at the rear B Toe Adjustment If toe alignment is incorrect measure the distance between vehicle center and each wheel This will tell you which tie rod needs adjusting NOTE...

Page 42: ...id only Brake fluid should be changed every two years The fluid should also be changed anytime the fluid becomes contaminated the fluid level is below the minimum level or if the type and brand of the...

Page 43: ...ure the thickness of the front and rear brake discs 6 The disc s should be replaced if thickness is less than 170 4 32 mm Brake Hose and Fitting Inspection Check brake system hoses and fittings for cr...

Page 44: ...2 34 MAINTENANCE MAINTENANCE LOG Service Date Hours Miles km Service Performed Comments Dealer Technician P a r t S h a r k c o m 8 7 7 9 9 9 5 6 8 6...

Page 45: ...GINE REMOVAL INSTALLATION 3 13 FINDING TOP DEAD CENTER TDC 3 13 CAM CHAIN TENSIONER INSPECTION 3 13 ROCKER ASSEMBLY DISASSEMBLY AND INSPECTION 3 14 CAMSHAFT REMOVAL 3 15 CAMSHAFT INSPECTION 3 15 CYLIN...

Page 46: ...BEARING SEAL INSTALLATION 3 34 CRANKCASE REASSEMBLY 3 34 CHAIN GUIDE TENSIONER INSTALLATION 3 35 CRANKSHAFT BALANCE SHAFT AND STARTER DRIVE GEAR INSTALLATION 3 35 OIL PUMP AND CHAIN INSTALLATION 3 36...

Page 47: ...Tensioner Cap 6mm 5 7 7 9 Nm Carburetor Intake 6mm 7 8 9 11 Nm Cylinder Head Nuts 10mm 18 25 Nm Cylinder Base Screws 6mm 5 7 7 9 Nm Crankcase inner 6mm 14 15 19 21 Nm Crankshaft Slotted Nut 14mm 43 58...

Page 48: ...3 4 ENGINE ENGINE INFORMATION Engine Exploded Views Crankshaft Cylinder and Piston Cylinder Head Crankcase Valve Train P a r t S h a r k c o m 8 7 7 9 9 9 5 6 8 6...

Page 49: ...e letters IN must always be toward the intake side of the engine The other numbers are used for identification as to diameter length and design Four stroke engine rings are rectangular profile Any num...

Page 50: ...inder Head Surface warpage limit 002 05 mm Valve Clearance In Std 003 07 mm Ex Std 003 07 mm Valve Seat Angle Contacting width In Std 039 1 0 mm Limit 063 1 6 mm Ex Std 039 1 0 mm Limit 063 1 6 mm Val...

Page 51: ...f fit Piston Pin must be a push by hand fit at 68 F 20 C Piston Ring Piston Ring Installed gap Top ring Std 0059 013 15 35 mm Limit 0196 0 5 mm Second ring Std 0059 013 15 35 mm Limit 0196 0 5mm Oil r...

Page 52: ...3 8 ENGINE Oil Flow Diagram P a r t S h a r k c o m 8 7 7 9 9 9 5 6 8 6...

Page 53: ...ver and engine crankcase to the air box A one way valve A allows pulses from the crankcase to travel in one direction only thereby vacuuming the crankcase NOTE Over filling of crankcase will result in...

Page 54: ...e manifold which releases the air to the one way valve B to combine with the pull of the exhaust gas stream from the cylinder head Check the air control valve A one way valve B filter housing C and re...

Page 55: ...snap hooks and lift housings away from the engine INSTALLATION 8 Install the upper and lower housings C making sure the snap hooks are secure Install the housing screws and attaching bolt into the eng...

Page 56: ...engine out the rear of the vehicle Engine Installation Notes After the engine is installed in the frame review this checklist and perform all steps that apply General Items Install previously removed...

Page 57: ...cket hole is facing upward NOTE The sprocket marks should align with the gasket surface the cam lobes must be pointed downward and the rockers must have valve clearance at this point Cam Chain Tension...

Page 58: ...sembly 4 Inspect each rocker arm cam follower surface If there is any damage or uneven wear replace the rocker arm NOTE Always inspect camshaft lobes if rocker arms are worn or damaged 5 Remove each r...

Page 59: ...assembly with a non marring hammer to loosen and remove the assembly 3 Remove the cam chain from the sprocket by tilting the cam assembly and simultaneously lifting the chain 4 If not removing the cy...

Page 60: ...e the two 6mm cylinder head base screws 3 Loosen each of the four cylinder head nuts evenly 1 4 turn each time in a cross pattern until loose 4 Remove the nuts and tap the rocker assembly with a plast...

Page 61: ...eep all parts in order with respect to their location in the cylinder head NOTE Valves have inner and outer springs 1 Using a valve spring compressor compress the valve springs and remove the split ke...

Page 62: ...runout pitting and burned spots To check for bent valve stems mount valve in a drill or use V blocks and use a dial indicator 3 Check end of valve stem for flaring pitting wear or damage A 4 Inspect s...

Page 63: ...lve seats requires special tools and a thorough knowledge of reconditioning techniques Follow the manufacturers instructions provided with the valve cutting kit commercially available Abrasive stone s...

Page 64: ...y a thin coating of Prussian Blue paste to the valve seat If using an interference angle 46 apply black marker to the entire valve face A 6 Insert valve into guide and tap valve lightly into place a f...

Page 65: ...the valve rapidly back and forth until the cut sounds smooth Lift the valve slightly off of the seat rotate 1 4 turn and repeat the lapping process Do this four to five times until the valve is fully...

Page 66: ...luid with no leaking Cylinder Removal Follow engine disassembly procedures to remove the valve cover rocker assembly camshaft and cylinder head 1 Remove cam chain guide at front of cylinder 2 Tap cyli...

Page 67: ...lands 4 Repeat procedure for second ring 5 The oil control ring is a three piece design consisting of a top and bottom steel rail and a center expander section Remove the top rail first followed by t...

Page 68: ...en completed inspect cylinder for thinning or peeling IMPORTANT Clean the Cylinder After Honing It is very important that the cylinder be thoroughly cleaned after honing to remove all grit material Wa...

Page 69: ...cylinder should be measured for excessive taper and out of round 3 If the installed gap measurement exceeds the limit replace the rings If using new rings and the measurement is too small file the rin...

Page 70: ...gear slightly 5 Measure the OD of the starter drive shaft on both ends for out of round 6 Measure the ID of the bushing in the stator housing A and in the crankcase B in two directions 90 apart to det...

Page 71: ...has left hand threads which correspond with the left hand threads on PA 49936 Use caution to avoid thread damage to flywheel or tools 3 Inspect the flywheel for loose components cracks or other damag...

Page 72: ...hand thread 3 Remove the starter drive one way gear assembly A from the crankshaft 4 Remove drive sprocket D and woodruff key from the crankshaft 5 Inspect sprocket teeth of both gears for wear or dam...

Page 73: ...not serviceable Replace the component as an assembly 3 Do not add specialized lubricants or greases to the bearing or one way components as this may cause undesirable operation Balance Shaft Sprocket...

Page 74: ...y worn or damaged parts Oil Pump Removal Drive Chain Inspection NOTE Oil pump is a replace only assembly 1 Remove the oil pump galley cover pump gear nut and balancer shaft nut prior to chain and spro...

Page 75: ...ges with clean solvent 5 Install a new pump with the oil galley pointed down as shown 6 Torque screws to specification T Oil Pump Screw Torque 4 5 ft lbs 5 7 Nm Install with the oil galley pointing do...

Page 76: ...ase using a press or by pressing on the pto end of the crankshaft using special tool PA 46087 NOTE Tapping the pto end of the crankshaft with a soft face hammer may also separate the cases Use care no...

Page 77: ...r as part of any crankshaft repair Crankcase Bearing Inspection NOTE Removal and installation of new seals is recommended anytime the crankcase is disassembled 1 Inspect the bearings in the crankcase...

Page 78: ...er may also install the crankshaft Use care not to damage the crankshaft end 2 Install the balance shaft into the mag side of the crankcase 3 Install a new gasket onto the pto case half Applying a thi...

Page 79: ...2 Install and align the marks of the balance shaft gear and the crankshaft gear as shown 3 Install the oil pump drive sprocket washer and slotted nut onto the balance shaft 4 Using Slotted Nut Socket...

Page 80: ...t disassemble pump Replace entire component 1 Inspect the oil pump sealing surface on the crankcase Apply a liberal amount of engine oil to the surfaces and pump NOTE Do not use gasket sealer on the p...

Page 81: ...ith the end gap facing forward The expander has no up or down marking and can be installed either way The ends should butt squarely together and must not overlap 2 Install the oil ring top rail with t...

Page 82: ...ing up or down See note with Step 3 above Push the piston pin in both directions to make sure the clips are properly seated in the groove 5 Place the dowel pins in the PTO side of the crankcase and in...

Page 83: ...t edge tool while pushing the cylinder down This will help push the piston past the ring taper into the cylinder 5 Remove the support block once the piston rings are inside the cylinder Seat the cylin...

Page 84: ...hen the stator is removed and cam shaft drive sprocket is in view 1 Rotate the crankshaft until the keyway on the crankshaft is pointed UP keyway facing upward and the piston is at TDC 2 Align the cam...

Page 85: ...rankshaft Keyway UP Method 1 Camshaft Timing with Stator Housing Removed Sprocket marks aligned with gasket surface at TDC on compression stroke cam lobes facing downward P a r t S h a r k c o m 8 7 7...

Page 86: ...the chain does not fall off the crankshaft sprocket 3 Apply engine assembly lubricant to the camshaft main journals and cam lobes Lubricate automatic compression release mechanism with clean engine oi...

Page 87: ...rk Sprocket marks aligned with gasket surface at TDC on compression stroke cam lobes facing downward Single TDC Mark Aligned TDC Mark Rotation Cam Timing View through timing inspection hole Position c...

Page 88: ...engine lube to all components and assembly arms shafts and decompression components of the rocker assembly 2 Verify the cam is still in the TDC position before installing the rocker assembly onto the...

Page 89: ...ster screw 4 When clearance is correct hold adjuster screw and tighten locknut securely 5 Re check the valve clearance 6 Repeat adjustment procedure if necessary until clearance is correct with locknu...

Page 90: ...r clamp load when applying torque to the flywheel nut Verify spacer is installed before assembly of the stator housing to the crankcase Stator Installation NOTE The stator flywheel and starter drive c...

Page 91: ...n sequence to specification 3 Install the fan hub washer and flywheel nut Torque the flywheel nut to specification 4 Install the fan and fan bolts Tighten bolts evenly to specification 5 Install the c...

Page 92: ...rdance with the periodic maintenance table in Chapter 2 Replace the exhaust gasket and clean the spark arrestor anytime engine rebuilding is performed Torque all fasteners to specification 7 8 ft lbs...

Page 93: ...o Start No fuel Dirt in fuel line or filter Fuel will not pass through fuel valve Fuel pump inoperative restricted Tank vent plugged Carb starter circuit Engine flooded Low compression high cylinder l...

Page 94: ...worn Piston rings worn leaking broken or sticking Bent valve or stuck valve Valve spring broken or weak Valve not seating properly bent or carbon accumulated on valve area Rocker arm sticking Backfiri...

Page 95: ...ARM REPLACEMENT 5 13 FRONT HUB 5 14 HUB REMOVAL 5 14 HUB SEAL AND BEARING REPLACEMENT 5 14 HUB INSTALLATION 5 15 SHOCKS 5 16 SHOCK EXPLODED VIEW 5 16 SHOCK REMOVAL REPLACEMENT INSTALLATION 5 16 REAR...

Page 96: ...asteners Steering Pivot Tube Bolts 16 17 ft lbs 22 23 Nm Steering Wheel Adjustment Bolt 10 ft lbs 13 5 Nm Steering Shaft Pinch Bolts 29 37 ft lbs 39 50 Nm Tie Rod Plate Pinch Bolt 17 ft lbs 23 Nm Stee...

Page 97: ...uts to specification Front Bumper Removal Installation 1 Remove the 2 push rivets from each side of the front bumper 2 Remove the 4 screws retaining the front bumper to the frame 3 Disconnect the dayt...

Page 98: ...val 6 Carefully remove the front cab frame from the vehicle 7 Remove the 2 screws retaining the choke bracket 8 Disconnect the indicator lights and key switch harness connections under the dash as sho...

Page 99: ...retaining the rear bumper to the frame 3 Reverse this procedure to reinstall the rear bumper Tighten all fasteners securely Rear Cab Removal 1 Remove the driver and passenger seats from the vehicle se...

Page 100: ...nel from the vehicle Console Cover Removal 1 Remove the seats see Seat Removal 2 Remove the service panel see Service Panel Removal 3 Remove the 2 bolts retaining the seat support to the frame 4 Disco...

Page 101: ...Key Switch Indicator Light Replacement 1 Disconnect the key switch harness or indicator light connectors located under the dash as shown 2 If removing the key switch loosen and remove the retaining n...

Page 102: ...fter just a few seconds of flame treating Do not hold the torch too close to the surface 2 3 inches from the flame tip is recommended Keep the torch moving to prevent damage 2 Apply the decal on one e...

Page 103: ...5 9 BODY SUSPENSION STEERING 5 Body Exploded View P a r t S h a r k c o m 8 7 7 9 9 9 5 6 8 6...

Page 104: ...e front cab frame mounting hardware with the bolt and cam to the outside of the frame and the nut and washer to the inside 4 Install the side bars LH or RH frame to the mounting brackets at the rear f...

Page 105: ...5 11 BODY SUSPENSION STEERING 5 MAIN FRAME Exploded View 36 ft lbs 49 Nm 17 ft lbs 23 Nm 36 ft lbs 49 Nm P a r t S h a r k c o m 8 7 7 9 9 9 5 6 8 6...

Page 106: ...5 12 BODY SUSPENSION STEERING FRONT A ARMS Exploded View 30 ft lbs 41 Nm 30 ft lbs 41 Nm P a r t S h a r k c o m 8 7 7 9 9 9 5 6 8 6...

Page 107: ...er from the bolt attaching the A arm to the spindle 6 Carefully remove the spindle assembly from the A arm 7 Remove the front and rear A arm mounting fasteners refer to the Exploded View and remove th...

Page 108: ...2 bolts retaining the brake caliper and remove the caliper from the disc CAUTION Do not hang the caliper by the brake line Use a strap or mechanics wire to hang caliper to prevent damage to the brake...

Page 109: ...pecification 7 Reinstall outer spacer into the outer hub seal Hub Installation 1 Grease the spindle and reinstall the front hub assembly 2 Install the brake caliper and torque the mounting bolts to sp...

Page 110: ...2 Remove the spring and adjustment collar from the existing shock and install the components onto the new shock 3 Compress the shock spring and install the spring retainer Shock Installation 1 Instal...

Page 111: ...t lbs 98 Nm 72 ft lbs 98 Nm 72 ft lbs 98 Nm 72 ft lbs 98 Nm 16 ft lbs 22 Nm 16 ft lbs 22 Nm 16 ft lbs 22 Nm 16 ft lbs 22 Nm Replace if Removed 22 ft lbs 30 Nm 36 ft lbs 49 Nm 36 ft lbs 49 Nm 72 ft lbs...

Page 112: ...ake line Use a strap or mechanics wire to hang caliper to prevent damage to the brake line 4 Loosen all 4 axle housing bolts 5 Loosen the outer jam nut and back off the inner adjustment nut on each ch...

Page 113: ...ap to retain the brake lines 4 Line up the upper shock eyelets with the frame mounting holes and install the mounting bolts Torque the rear shock mounting bolts to specification 5 Install the rear bra...

Page 114: ...emove tension 6 Remove the 2 fasteners retaining the LH axle housing to the swing arm 7 Remove the LH axle housing and spacer from the axle see Axle Housing Service if replacing the bearing or seal 8...

Page 115: ...Install each axle housing and fasteners Do not torque the fasteners at this time NOTE Remember to install the chain adjusters onto the lower axle housing fasteners and install the spacer behind the LH...

Page 116: ...g the rear axle assembly from the swing arm 2 Remove the axle clamp bolts from each side and remove the clamp brackets to allow for axle removal 3 Remove the rear fastener and front lower fastener ret...

Page 117: ...eering Wheel Steering Shaft Steering Gearbox Assembly Exploded View 16 17 ft lbs 22 23 Nm 17 ft lbs 23 Nm 21 ft lbs 28 Nm 11 ft lbs 15 Nm 10 ft lbs 13 5 Nm 29 37 ft lbs 39 50 Nm 16 17 ft lbs 22 23 Nm...

Page 118: ...ll the shaft to the steering gearbox assembly and install the pinch bolt Torque the pinch bolt to specification 3 Ensure the wheels are pointing straight ahead Install the pivot tube stub shaft into t...

Page 119: ...nd remove the gearbox from the vehicle Steering Gearbox Installation 1 Install the steering gearbox and torque the 3 mounting bolts to specification 2 Install the brake line under the retainer and sec...

Page 120: ...5 26 BODY SUSPENSION STEERING TIE ROD Tie Rod End Tie Rod Steering Knuckle Assembly Exploded View 30 ft lbs 41 Nm 25 ft lbs 34 Nm P a r t S h a r k c o m 8 7 7 9 9 9 5 6 8 6...

Page 121: ...replacing the tie rod ends loosen the jam nut s and replace the end s 5 Install the tie rod and torque the castle nuts to specification Install a new cotter pin in each castle nut NOTE Refer to Chapte...

Page 122: ...5 28 BODY SUSPENSION STEERING WHEELS Front Wheel Exploded View Rear Wheel Exploded View P a r t S h a r k c o m 8 7 7 9 9 9 5 6 8 6...

Page 123: ...Place the wheel in the correct position on the wheel hub Be sure the valve stem is toward the outside and rotation arrows on the tire point toward forward rotation 4 Attach the wheel nuts and finger t...

Page 124: ...NOTES BODY SUSPENSION STEERING 5 30 P a r t S h a r k c o m 8 7 7 9 9 9 5 6 8 6...

Page 125: ...BRAKE PAD ASSEMBLY CALIPER INSTALLATION 6 12 FRONT BRAKE DISC 6 13 DISC INSPECTION 6 13 DISC REPLACEMENT 6 13 FRONT CALIPER 6 14 FRONT CALIPER REMOVAL 6 14 CALIPER INSTALLATION 6 14 REAR BRAKE PAD 6 1...

Page 126: ...54 mm Item Torque ft lbs Torque Nm Brake Disc to Hub Front 7 0 9 5 Brake Disc to Hub Rear 21 0 28 5 Brake Line Banjo Bolts Caliper and master cylinder 14 5 19 6 Brake Pad Guide Pins All 10 0 13 5 Brak...

Page 127: ...most common cause of brake noise squeal caused by vibration If cleaning does not reduce the occurrence of brake noise Permatex Disc Brake Quiet PN 2872113 can be applied to the back of the pads Follow...

Page 128: ...brake system parts expand and contract due to the heating and cooling during normal operation A very small hole called the compensating port located inside the master cylinder is opened and closed by...

Page 129: ...Caliper 2 RH Front Caliper 1 1 2 Caliper Mounting Bolts All 3 18 0 ft lbs 24 5 Nm Brake Pad Guide Pins 4 12 0 ft lbs 16 2 Nm 4 3 2 3 1 60 in lbs 6 8 Nm Adaptor Clamps 2 17 0 ft lbs 23 0 Nm 60 in lbs...

Page 130: ...ure builds then hold light pressure on the pedal 6 While assistant is holding light pressure open bleed screw until brake pedal travels to the end of its stroke and no more fluid moves into the clear...

Page 131: ...unt 5 Remove pedal assembly with bushings F and sleeve G Visually inspect pedal bushings and sleeve for wear and replace as required Pedal Installation 1 Apply Polaris Premium All Season grease to piv...

Page 132: ...fluid level in the reservoir inspect system for leaks inspect caliper mounting bolts disc mounting bolts to be sure they are tight and bleed the brake system See BRAKE BLEEDING FLUID CHANGE on page 6...

Page 133: ...vehicle to a lift that will allow access to the underside 6 Secure the vehicle in position and place jack stands under the front and rear areas of the frame 7 Note location of tie strap for assembly...

Page 134: ...Route cable to passenger side of shift cables and through holder on park brake lever bracket 3 Pull inner cable and attach it to parking brake lever arm 4 Refer to routing photos shown in the cable r...

Page 135: ...iper Remove excess fluid from reservoir as required 6 Remove brake pad guide pin loosened in Step 3 7 Push mounting bracket B inward toward piston side of caliper 8 Slide stationary pad out away from...

Page 136: ...onto front hub Torque both mounting bolts 5 Torque brake pad guide pin s that were loosened or removed 6 Slowly pump brake pedal until pressure builds Maintain at least 1 2 inch 12 7 mm of brake fluid...

Page 137: ...tall new disc on wheel hub 5 Install new bolts and torque to 7 ft lbs 9 5 Nm 6 Install wheel hub assembly Refer to Chapter 5 7 Install front brake caliper See Front Brake Pad Assembly Caliper Installa...

Page 138: ...contamination 6 Remove two caliper mounting bolts and caliper assembly from front hub Caliper Installation 1 Separate brake pads and slide over brake disc Align caliper mounting holes and install bol...

Page 139: ...removing caliper be careful not to damage brake line Support caliper so as not to kink or bend brake line 5 Push caliper piston into the caliper bore slowly using a C clamp or locking pliers with pads...

Page 140: ...r body until it clears the threaded stud Rotate pad and remove 9 Inspect caliper piston seals for signs of brake fluid leakage Replace caliper if leaking Rear Brake Pad Inspection 1 Measure the thickn...

Page 141: ...he guide pin will be fully tightened after caliper is installed Be sure boots C are seated on caliper and on bracket 4 Install caliper and torque mounting bolts to specification 5 Torque brake pad gui...

Page 142: ...sc and read total runout on the dial indicator Replace the disc if runout exceeds specifications Rear Brake Disc Replacement 1 Remove rear brake caliper See Rear Brake Pad Removal on page 6 15 2 Refer...

Page 143: ...e is routed and secured 4 Tie straps secure brake line with throttle cable in areas A Secure with parking brake cable to frame in area B 5 Front routing and clamp shown below 6 Remove two bolts and se...

Page 144: ...olts B to 12 ft lbs 16 Nm 4 Adjust parking brake See Parking Brake Adjustment on page 6 8 5 Verify fluid level in reservoir is up to the MAX line inside reservoir and install reservoir cap 6 Install w...

Page 145: ...not re use 5 Remove clip C and disconnect brake actuator rod clevis from brake pedal 6 Remove the two mounting fasteners D that secure the master cylinder to the frame Installation 1 Reverse Steps 1...

Page 146: ...amber of master cylinder Parking brake applied or misadjusted Brake pedal binding or unable to return fully Caliper piston s not returning properly binding Operator riding brakes Brakes Lock Mechanica...

Page 147: ...ELT INSPECTION 7 6 DRIVE BELT INSTALLATION 7 6 DRIVE CLUTCH SERVICE 7 7 DRIVE CLUTCH REMOVAL DISASSEMBLY AND INSPECTION 7 7 DRIVE CLUTCH ASSEMBLY 7 8 DRIVEN CLUTCH SERVICE 7 9 DRIVEN CLUTCH REMOVAL DI...

Page 148: ...8 8 11 Nm CVT Drain Plug 6mm 6 8 8 11 Nm Drive Clutch Nut 7 16 20 29 39 Nm Driven Clutch Nut 7 16 20 40 55 Nm Output Shaft Cover 6mm 6 8 8 11 Nm Output Shaft Housing Screws 8mm 12 16 Nm Oil Drain Bol...

Page 149: ...clutch overcome their return spring pressure and swing outward against the transmission drive hub and the vehicle if in gear begins to move At lower RPM the drive belt rotates low in the drive clutch...

Page 150: ...e moisture This will also air dry the belt and clutches 3 Allow engine RPM to settle to idle speed shift transmission to lowest available range and test for belt slippage Repeat as needed CVT Overheat...

Page 151: ...t binding Replace if rough if inner race is loose or if bearing is loose in the cover Be sure screws for air duct plate D are tight Clutch CVT Cover Installation 1 Clean gasket surfaces and install a...

Page 152: ...e belt if worn or glazed Drive Belt Installation 1 Do not attempt to install drive belt with drive clutch stationary sheave installed 2 Push moveable sheave and spacer sleeve of drive clutch fully inw...

Page 153: ...y and Inspection 1 Remove drive belt See Drive Belt Removal on page 7 6 2 Remove stationary sheave from splines of shaft holding moveable sheave and spacer inward 3 Hold moveable sheave spacer sleeve...

Page 154: ...ller tracks in moveable sheave for wear also 12 Replace drive clutch assembly if either sheave guide posts or roller tracks are worn Drive Clutch Assembly 1 Do not grease clutch components 2 Install r...

Page 155: ...g or damage Visually inspect splines B for wear 5 Measure inside diameter of drive hub 6 Secure driven clutch assembly in a soft jaw vise or clamp Loosen retaining nut counterclockwise about 1 turn Ho...

Page 156: ...t spring free length Replace if less than service limit 13 Measure thickness of friction shoe material Replace shoes as a set if worn beyond service limit 14 To replace friction shoes remove E clips t...

Page 157: ...ther with both hands aligning flats of hub with flats on threaded shaft With assembly compressed and threads exposed have assistant thread a new nut onto shaft 7 Secure clutch in a clamping device and...

Page 158: ...Remove shift cable bracket B and shift arm screw C 3 Mark shift shaft and shift cable arm orientation before removing the arm 4 Remove angle drive inspection oil fill cover NOTE Angle drive removal is...

Page 159: ...Assembly on page 7 20 9 Remove all transmission cover screws Tap lightly with a soft faced hammer Pry points E can be used carefully to help release cover and gasket 10 Remove retaining ring from dri...

Page 160: ...6 Push and release the spring loaded gear position switch plunger F Be sure it moves freely inward and extends under spring pressure when released 17 Remove shift fork shaft Pull fork out of shift dru...

Page 161: ...e end 24 Remove countershaft 25 Inspect input pinion gear for tooth damage Push on shaft to check for play in bearing Rotate the shaft to check for smooth bearing rotation 26 Inspect all bearings in c...

Page 162: ...G splined washer H gear with needle bearing I and thrust washer J 3 Inspect forward reverse dog gear Closely inspect outer corners of dogs for rounding or damage K 4 Inspect edges of slots L in forwar...

Page 163: ...ten the bolt Leave just enough tension on detent ball to keep shift drum from rotating out of Neutral Install gear position switch plunger E with spring in end of shift shaft Use light grease to hold...

Page 164: ...se lightly as shown with open end G pointing down 9 After installation in the frame adjust shift cables in the following manner Place gear selector in NEUTRAL Verify transmission shift arm is in NEUTR...

Page 165: ...ft Measure the gap with a feeler gauge and record 5 The specified pinion depth is 012 016 inch 0 3mm 0 4mm from the bottomed position Therefore you will need to install a shim pack with a thickness of...

Page 166: ...pinion gear 8 Apply grease to shaft oil seal then carefully slide shaft assembly through seal and into housing until bottomed in bearing bore 9 Install bearing E over splined end of shaft and push in...

Page 167: ...IGNITION SYSTEM 8 8 OVERVIEW 8 8 IGNITION SYSTEM TROUBLESHOOTING 8 8 IGNITION SYSTEM TESTING 8 9 RPM IGNITION LIMITER FUNCTIONS 8 10 RPM LIMITER SPECIFICATIONS 8 11 IGNITION COIL TEST 8 11 CDI OUTPUT...

Page 168: ...meter is acceptable for use when diagnosing electrical problems Readings obtained with other meters may differ Pay attention to the prefix on the multimeter reading K M etc and the position of the de...

Page 169: ...itch closes which signals the CDI to limit engine RPM 1 Locate the parking brake and brake pedal switches 2 Disconnect wire harness from each switch and connect an ohmmeter across the two switch wires...

Page 170: ...eturn back and depress the micro switch limiting engine rpm The ETC switch and throttle arm are located in a sealed throttle pedal assembly Switch or throttle cable replacement requires removing the a...

Page 171: ...LOW wire at the light connector and the YELLOW wire at the Generator Stator 3 If continuity is good Perform stator resistance tests by using the resistance chart located in the wiring diagram 4 Replac...

Page 172: ...lacement 1 The indicator lamps are located on the dash 2 Disconnect the indicator light wire connections from the harness 3 Remove the nut from the backside of the indicator lamp 4 Remove the lamp 5 I...

Page 173: ...ity between the switch leads and engine ground 2 First shift the transmission into neutral and test for continuity between the DG WH wire and ground 3 Then shift the transmission into reverse and test...

Page 174: ...related wiring connectors Timing is non adjustable on this ignition system Ignition System Troubleshooting No Spark Weak or Intermittent Spark No 12 volt power on brown BN wire at CDI box or no CDI b...

Page 175: ...y switch at ON position Replace key switch Check wiring between switch and CDI Check 15A fuse and battery NO YES NO YES NO Disconnect 4 wire plug from CDI Check the BLACK wire for continuity to ground...

Page 176: ...limit In reverse gear the CDI box retards ignition timing and limits RPM once it receives a ground path from the transmission switch dark blue DB wire indicating the vehicle is in reverse The CDI box...

Page 177: ...your meter and connect one meter lead to the dark blue black wire DB YEL and the other to engine ground Set meter to read DC Volts Crank engine and verify pulser coil output If readings are within spe...

Page 178: ...arness Battery voltage must be present on red wire terminal on harness side of voltage regulator connector Is it If all of the previous tests indicate a good condition but the charging voltage does no...

Page 179: ...the stator TEST 1 Measure resistance value of each stator leg 1 Measure the resistance value of the stator legs Use the following chart as a reference when testing TEST 2 Measure AC voltage output of...

Page 180: ...k Let battery set with the vent cap strip off for 30 minutes to allow full absorption of the electrolyte After 30 minutes install the battery seal strip onto the battery 5 Charge the battery initially...

Page 181: ...near a full charge as possible If the battery is stored or used in a partially charged condition crystal sulfation will form on the plates reducing the efficiency and service life of the battery Batte...

Page 182: ...PV 67030 available from tool provider SPX for charging batteries Always stop charging if the battery becomes warm to the touch Let it cool sufficiently before resuming charging Battery Storage Wheneve...

Page 183: ...clean starter motor parts Other solvents may leave a residue or damage internal parts and insulation NOTE Some starter motors may not be serviceable Replacement of entire assembly may be required Chec...

Page 184: ...e notch in the brush plate housing Armature Test 1 Inspect surface of commutator Replace if excessively worn or damaged 2 Using a digital multi tester measure the resistance between each of the commut...

Page 185: ...rm voltage drop tests on the starter system Starter System Troubleshooting Starter Motor Does Not Turn Battery discharged low specific gravity Loose or faulty battery cables or corroded connections se...

Page 186: ...nd DG RED wires Turn the key switch to the START position and push in the brake pedal Is battery voltage present Connect meter leads to RED lug to starter motor and engine ground and retest Is battery...

Page 187: ...WD 1 WIRE DIAGRAM 2009 RANGER RZR 170 P a r t S h a r k c o m 8 7 7 9 9 9 5 6 8 6...

Reviews: