TRANSMISSION
8.6
6.
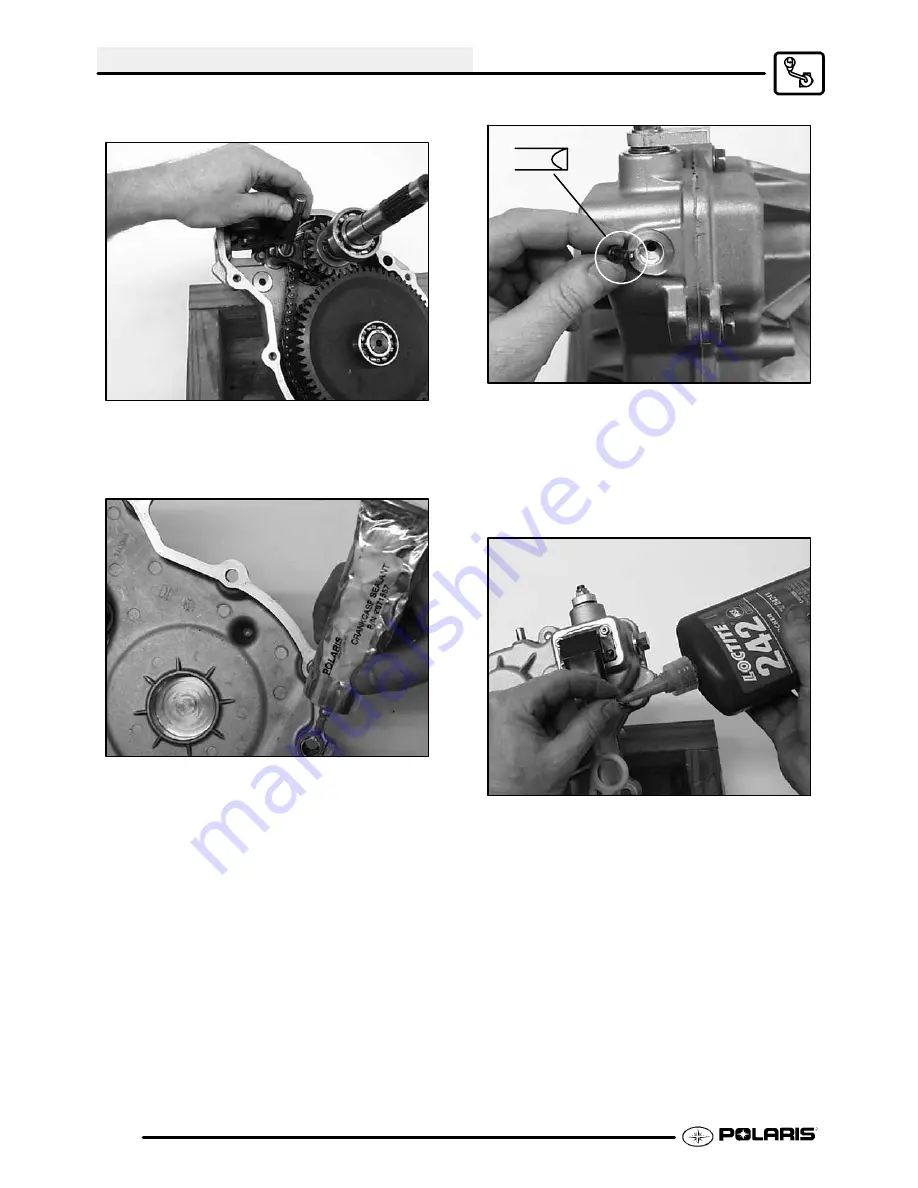
Insert fork guide pin.
7.
Prior to reinstalling the cover make sure the
mating cover surfaces are clean and dry. Apply
Crankcase Sealant (PN 2871557) to mating
surfaces.
8.
Reinstall cover and torque bolts in a criss-cross
pattern in 3 steps to 18 ft. lbs. (25 Nm).
9.
Install drain plug with a new sealing washer.
Torque drain plug to 14 ft. lbs. (19 Nm).
10. Insert shifting bullet with tip in position as shown.
Insert spring and plug. Torque plug to 14 ft. lbs.
(19 Nm).
11. Install transmission and add
Polaris
AGL
Gearcase
Lubricant
(PN
2873602)
in the
recommended amount. Refer to Maintenance
Chapter 2.
12. Install gear indicator switch. Apply Loctite
t
242
(PN 2871949) to threads of switch screws and
torque to 13-16 in. lbs. (1.5-1.9 Nm).
PartShark.com
877-999-5686
Summary of Contents for 2009 Trail Blazer 330
Page 94: ...ENGINE 3 48 NOTES P a r t S h a r k c o m 8 7 7 9 9 9 5 6 8 6 ...
Page 110: ...FUEL SYSTEM CARBURETION 4 16 NOTES P a r t S h a r k c o m 8 7 7 9 9 9 5 6 8 6 ...
Page 124: ...BODY STEERING SUSPENSION 5 14 NOTES P a r t S h a r k c o m 8 7 7 9 9 9 5 6 8 6 ...
Page 196: ...ELECTRICAL 10 4 REVERSE LIMIT SYSTEM P a r t S h a r k c o m 8 7 7 9 9 9 5 6 8 6 ...
Page 226: ...ELECTRICAL 10 34 NOTES P a r t S h a r k c o m 8 7 7 9 9 9 5 6 8 6 ...
Page 227: ...ELECTRICAL WIRING DIAGRAM 2009 TRAIL BOSS P a r t S h a r k c o m 8 7 7 9 9 9 5 6 8 6 ...
Page 228: ...ELECTRICAL WIRING DIAGRAM 2009 TRAIL BOSS P a r t S h a r k c o m 8 7 7 9 9 9 5 6 8 6 ...
Page 229: ...ELECTRICAL WIRING DIAGRAM 2009 TRAIL BLAZER P a r t S h a r k c o m 8 7 7 9 9 9 5 6 8 6 ...
Page 230: ...ELECTRICAL WIRING DIAGRAM 2009 TRAIL BLAZER P a r t S h a r k c o m 8 7 7 9 9 9 5 6 8 6 ...


