background image

STANDARD MENU

16

Recall Memory

The Smart Display stores the previous 25 speeds in the memory.  Each 
time a speed is collected, the most recent speed is stored, and the 
oldest of the 25 speeds is discarded.

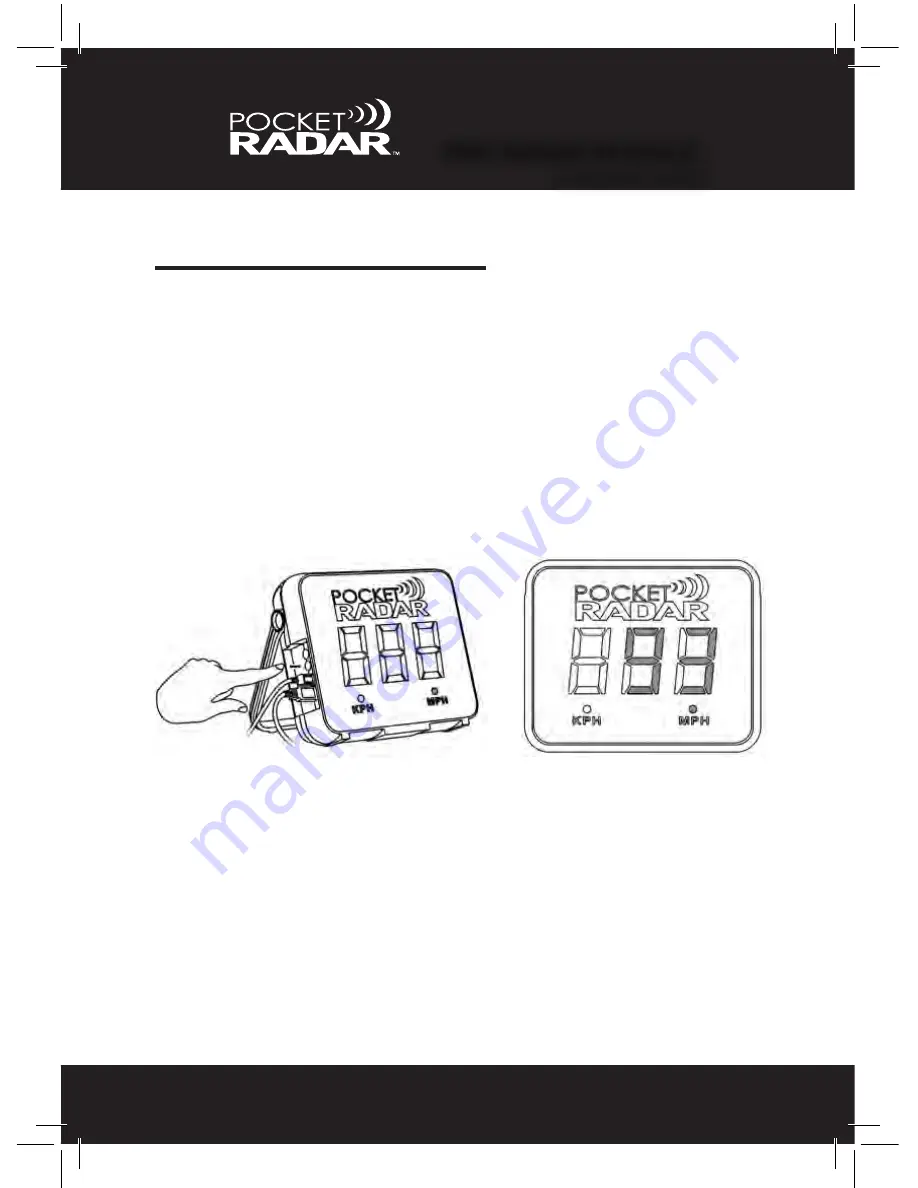
To access the Recall memory, “TAP” the Mode (black) button on the 
Smart Display.  The most recent speed will display.  Cycle through the 
previous 25 speeds by repeatedly TAPPING the button, as shown below.

If there are no speeds stored in the memory or you reach the end of 
the list, then it will display “

-

”.  To exit the Recall Memory menu, simply 

press the Power (red) button or else it will automatically exit after 45 

seconds of inactivity.

NOTE:  The Memory Recall list will be cleared automatically as soon as 

the Smart Display is turned off or any advanced settings are modified.

PRO RADAR MODULE

STANDARD MENU

Summary of Contents for SD2010

Page 1: ...Smart Display USER MANUAL GUIDE www PocketRadar com SD2010 For use with Pro Radar Module model RM1510 or with Smart Coach radar model SR1100 ...

Page 2: ...Pocket Radar Inc 3535 Industrial Dr Suite A4 Santa Rosa CA 95403 Toll Free 888 381 2672 Support Info PocketRadar com Website www PocketRadar com Preliminary ...

Page 3: ... Smart Coach radar 7 Pro Radar Module Pages 8 28 Getting Started 8 9 Set Up Instructions 8 Set Up Illustrations 9 Pairing 10 Aiming 11 12 Must Aim Radar at Release Point 11 Aiming Illustrations 12 Separate Accessories 13 MountingOptions 14 Power Options 15 Power On Self Test 15 Standard Batteries 15 USB Powered 15 Standard Menu 16 18 Recall Memory 16 Clear Memory 17 USB Battery Level 18 ...

Page 4: ... Default Settings 27 Specifications 28 Smart Coach radar Pages 29 46 Getting Started 29 30 Set Up Instructions 29 Set Up Illustrations 30 Pairing 31 Aiming 32 33 Must Aim Radar at Release Point 32 Aiming Illustrations 33 Separate Accessories 34 MountingOptions 35 Power Options 36 Power On Self Test 36 Standard Batteries 36 USB Powered 36 Standard Menu 37 38 Recall Memory 37 USB Battery Level 38 ...

Page 5: ... Brightness br 43 Display Version Uer 44 Factory Default Settings 45 Specifications 46 Troubleshooting 47 50 Interference 47 Ghost Readings 48 Tips to Eliminate Interference 48 Angles 49 Cosine Error 50 Error Codes 51 FCC Class B Statement 52 Product Label 52 User Manual 52 Warranty Information 53 54 ...

Page 6: ...le features proprietary ball tracking technology to provide the user with professional level accuracy of 1 MPH The rugged water resistant casing is built from the same high impact plastic as football helmets Flexible configuration features allow for customized set up options to best fit your speed measurement needs The Smart Coach radar is a one of a kind speed radar that can display speeds stand ...

Page 7: ... USB cables Type A to Micro B 3 Two carabiners The parts included with your Smart Display package are listed below See page 7 for Radar selection If you are missing any components please contact Pocket Radar Inc at 1 888 381 2672 or email Info PocketRadar com 1 2 3 Smart Display SD2000 ...

Page 8: ...cator or brightness sensor 11 USB out to radar 3 3 Digit 7 segment speed display 12 Adjustable handle 4 Battery door 13 Tripod mounting nut 5 Instruction label 14 Slots for tripod alignment pins 6 Cable slots for USB Power Packs 7 Power Selection button red 8 Recall Mode button black 9 USB power input 1 2 3 4 5 6 13 14 Side 7 8 11 10 9 12 ...

Page 9: ...icro B Two carabiners Included The cables are used to connect your radar device to the Smart Display as well as provide USB power The carabiners are used to hang the Smart Display onto a fence or camera tripod See Mounting Options on page 6 The AC power supply is used to provide power via USB ...

Page 10: ...amera Tripod A Deluxe Tripod may be purchased through the Pocket Radar online store 4 Alkaline C size batteries provide up to 14 hours of use with the Smart Display USB cables are only useful up to 6 feet 2 meters in length If you plan to set up the Smart Display more than 6 feet apart from your radar this Extender Kit is available through the Pocket Radar online store 50 foot USB Extender Cable K...

Page 11: ...he legs of a tripod with the carabiners sitting on a chair or table hung on a wall using the handle or even standing on the ground using the handle as a kickstand Please refer to the illustrations below Two carabiners Carabiners can be used to mount the Smart Display to a fence or the bottom of a camera tripod Camera Tripod See similar mounting steps on pages 14 and 35 Smart Display Kickstand Loca...

Page 12: ...lignment pins 3 Tripod mounting nut 4 Strain relief for USB cable pass USB cable under this strap 4 3 2 4 5 6 1 1 Speed display 2 Trigger button to capture speeds 3 Mode Recall button to enter Constant On mode or Recall previous 25 speeds 4 Micro USB Connector on the side of unit 5 Radar lens aimed at the ball in flight 6 Battery compartment ...

Page 13: ...ton on the Smart Display and you re ready to start capturing speeds See next page for illustrations If you plan on using standard Alkaline C size batteries or a USB Power Pack as your power source please refer to page 15 in this Manual IMPORTANT NOTE If the Pro Radar Module is not connected to the Smart Display no rdr will flash for 2 minutes until it powers off automatically To turn off the Smart...

Page 14: ...PRO RADAR MODULE 9 GETTING STARTED Set Up Illustrations GETTING STARTED ...

Page 15: ... connection 2 Hold down both the red and black buttons at the same time on the Smart Display for 2 seconds to enter the advanced menu 3 Release both buttons when BLE is displayed The display will continuously flash BLE while the pairing operation is in process 4 Once the BLE turns solid and stops flashing the Smart Display is then paired with the Radar Module and can be used wirelessly PRO RADAR M...

Page 16: ...inting on the Pro Radar Module When positioning the Pro Radar Module make sure it is set up and aimed directly in line with the release point of the ball This can either be from behind or in front of the path of where the ball is coming from see pg 49 to learn more about angles and how tilting down or up may affect a speed reading Make sure the beam of the Pro Radar Module is not blocked or obstru...

Page 17: ...commended Distance Set up the Pro Radar Module either in front or behind the path of the moving object If throwing or hitting into a net set up the Pro Radar Module at least 15 feet behind the net or the player PRO RADAR MODULE AIMING ...

Page 18: ...harge Alkaline C Size Batteries Camera Tripod A Deluxe Tripod may be purchased through the Pocket Radar online store 4 Alkaline C size batteries provide up to 14 hours of use with the Smart Display USB cables are only useful up to 6 feet 2 meters in length If you plan to set up the Pro Radar Module more than 6 feet apart from the Smart Display this Extender Kit is avail able through the Pocket Rad...

Page 19: ... Radar Module Insert the tripod shoe into the Pro Radar Module screw area with the alignment pin in the slot Using fingers or a coin screw the tripod shoe into the Pro Radar Module Attach the tripod shoe and Pro Radar Module back onto the tripod Questions Visit www PocketRadar com PRS for helpful video tutorials or call us toll free at 888 381 2672 ...

Page 20: ...ia USB or batteries the Smart Display will flash 888 for 2 seconds after pressing the Power red button That means the Self Test has passed and you are ready to start capturing speeds If the Self Test fails then an error code will be displayed The error code will include E where the specifies the error number example E 4 This error code will flash every second for 2 minutes until it powers off auto...

Page 21: ...d will display Cycle through the previous 25 speeds by repeatedly TAPPING the button as shown below If there are no speeds stored in the memory or you reach the end of the list then it will display To exit the Recall Memory menu simply press the Power red button or else it will automatically exit after 45 seconds of inactivity NOTE The Memory Recall list will be cleared automatically as soon as th...

Page 22: ...speeds that are stored in the Smart Display all you need to do is Press and Hold the Mode black button down for 2 seconds until the word CLr displays Once you see CLr release the button and a will appear That means the memory has been deleted and you are now ready to capture new speeds 1 2 3 PRO RADAR MODULE STANDARD MENU ...

Page 23: ...Once you see the word bat release the button You will either see the word USB showing that you are using USB power or you will see the Lo 1 2 3 or 4 showing how much battery life is left on your Alkaline C size batteries See table on page 15 for more details 1 2 3 NOTE If the Smart Display flashes Lo Bat immediately change the batteries There are less than 20 minutes of operation remaining PRO RAD...

Page 24: ...ent modes of the Pro Radar Module 3 Auto Off Power Off Timer tof see page 22 Allows the user to specify how long the Display should re main on before it automatically turns off 4 Auto On aon see page 23 Allows the user to have the system automatically turn on when external power is supplied Useful in permanent installations 5 Brightness br see page 24 Allows the user to manually adjust the visibil...

Page 25: ...er into the selection menu Current unit MPH or KPH LED will flash every 0 5 seconds Pressing the Power red button will cycle the user through MPH or KPH indicators Pressing the Mode black button locks in your choice and resumes normal operation Current selection on the display is saved as the new units Not cycling for 45 seconds will not update the current units and automatically exits the menu Th...

Page 26: ... user into the selection menu Sen and the selected value will alternate every 1 second Pressing the Power red button will cycle the user through levels 1 10 See page 26 for details Pressing the Mode black button locks in your choice and resumes normal operation Current selection on the display is saved as the new setting Not cycling for 45 seconds will not update the curent value and automatically...

Page 27: ...e selection menu tof and the selected time will alternate every 1 second Pressing the Power red button will cycle the user through the different timer options no 5 15 30 60 No means indefinitely while 5 60 are in minutes Pressing the Mode black button locks in your choice and resumes normal operation Current selection on the display is saved as the new timer value Not cycling for 45 seconds will n...

Page 28: ...and the selected mode will alternate every 1 second Pressing the Power red button will cycle the user through the different auto options Yes or No Yes means auto on is set up while No means auto on is not set up Pressing the Mode black button locks in your choice and resumes normal operation Current selection on the display is saved as the new auto on mode Not cycling for 45 seconds will not updat...

Page 29: ...he selected mode will alternate every 1 second Pressing the Power red button will cycle the user through three different brightness levels avt Lo and Hi avt means automatic while Lo is dim and Hi is very bright Pressing the Mode black button locks in your choice and resumes normal operation Current selection on the display is saved as the new brightness mode Not cycling for 45 seconds will not upd...

Page 30: ...is displayed will bring the user into the selection menu Dsp or rdr and the version number will alternate every 1 second Pressing the Power red button will cycle the user through Dsp and version number of the Display or rdr and version number of the Pro Radar Module Pressing the Mode black button or leaving untouched for 45 seconds will exit the menu This information is only necessary if you are c...

Page 31: ...ing a ball that travels at least 30 feet or more In this mode setting 9 is the most sensitive and setting 6 is the least sensitive Settings 5 to 4 These settings are a special mode to be used with dimpled practice balls or for measuring Ball Exit Speed Exit Velocity off the bat on a ball that travels at least 30 feet or more In this mode setting 5 is the most sensitive and setting 4 is the least s...

Page 32: ...utes of no activity while on batteries This is a good balance which ensures the system will not shut off prematurely but still maximizes the battery life available from a set of Alkaline C size batteries Auto On No Most users will find that they do not want the Pro Radar System to automatically power on when plugged in to a USB power source The Auto On setting is not for all users It is good for p...

Page 33: ...dar Module Height 5 75 inches Width 4 inches Depth 8 inches Weight Smart Display 2 lbs 6 oz without 4 Alkaline C size batteries 3 lbs 0 oz with 4 Alkaline C size batteries Pro Radar Module 2 lbs 2 oz Typical Battery Life 14 hours with 4 Alkaline C size batteries not included Operating Temperature Range 22 F to 140 F 30 C to 60 C Storage Temperature 40 F to 185 F 40 C to 85 C Memory Recall function...

Page 34: ...e Smart Display and activate the Smart Coach radar and you re ready to start capturing speeds See next page for illustrations If you plan on using standard Alkaline AAA batteries or a USB Power Pack as your power source please refer to page 36 in this Manual IMPORTANT NOTE If the Smart Coach radar is not connected to the Smart Display no rdr will flash for 2 minutes until it powers off automatical...

Page 35: ...GETTING STARTED Set Up Illustrations SMART COACH RADAR GETTING STARTED 30 ...

Page 36: ...mart Coach radar by wired connection 2 Hold down both the red and black buttons at the same time on the Smart Display for 2 seconds to enter the advanced menu 3 Release both buttons when BLE is displayed The display will continuously flash BLE while the pairing operation is in process 4 Once the BLE turns solid and stops flashing the Smart Display is then paired with the Smart Coach radar and can ...

Page 37: ...t the back end of the Smart Coach radar When positioning the Smart Coach radar make sure it is set up and aimed directly in line with the release point of the ball This can either be from behind or in front of the path of where the ball is coming from see pg 49 to learn more about angles and how tilting down or up may affect a speed reading Make sure the beam of the Smart Coach radar is not blocke...

Page 38: ... Aiming Illustrations Recommended Distance Set up the Smart Coach radar either in front or behind the path of the moving object If throwing or hitting into a net set up the Smart Coach radar at least 15 feet behind the net or the player ...

Page 39: ...rchased through the Pocket Radar online store USB cables are only useful up to 6 feet 2 meters in length If you plan to set up the Smart Coach radar more than 6 feet apart from the Smart Display this Extender Kit is avail able through the Pocket Radar online store 50 foot USB Extender Cable Kit Right Angled USB Cable A 6 ft Right Angled USB Cable may be purchased through the Pocket Radar online st...

Page 40: ...nting to a Tripod 6 Detach the tripod shoe that screws into the bottom of the Tripod Mount Screw tripod mount into the tripod shoe using a coin helps Clip tripod mount tripod shoe back into the tripod Flip tripod head to lateral position Incorrect set up Correct Set Up ...

Page 41: ...l be powered via the Display and not the internal AAA batteries Power On Self Test If powered via USB or batteries the Smart Display will flash 888 for 2 seconds after pressing the Power red button That means the Self Test has passed and you are ready to start capturing speeds If the Self Test fails then an error code will be displayed The error code will include E where the specifies the error nu...

Page 42: ...ack button down for 2 seconds Once you see the word bat release the button You will either see the word USB showing that you are using USB power or you will see the Lo 1 2 3 or 4 showing how much battery life is left on your Alkaline C size batteries See table on page 36 for more details 1 2 3 NOTE If the Smart Display flashes Lo Bat immediately change the batteries There are less than 20 minutes ...

Page 43: ...rt Display The most recent speed will display Cycle through the previous 25 speeds by repeatedly TAPPING the button as shown below If there are no speeds stored in the memory or you reach the end of the list then it will display To exit the Recall Memory menu simply press the Power red button or else it will automatically exit after 45 seconds of inactivity NOTE The Memory Recall list will be clea...

Page 44: ...H 2 Auto Off Power Off Timer tof see page 41 Allows the user to specify how long the Display should re main on before it automatically turns off 3 Auto On aon see page 42 Allows the user to have the system automatically turn on when external power is supplied Useful in permanent installations 4 Brightness br see page 43 Allows the user to manually adjust the visibility of the Display from Auto def...

Page 45: ...vnt is displayed will bring the user into the selection menu Current unit MPH or KPH LED will flash every 0 5 seconds Pressing the Power red button will cycle the user through MPH or KPH indicators Pressing the Mode black button locks in your choice and resumes normal operation Current selection on the display is saved as the new units Not cycling for 45 seconds will not update the current units a...

Page 46: ...f and the selected time will alternate every 1 second Pressing the Power red button will cycle the user through the different timer options no 5 15 30 60 No means indefinitely while 5 60 are in minutes Pressing the Mode black button locks in your choice and resumes normal operation Current selection on the display is saved as the new timer value Not cycling for 45 seconds will not update the curre...

Page 47: ...on and the selected mode will alternate every 1 second Pressing the Power red button will cycle the user through the different auto options Yes or No Yes means auto on is set up while No means auto on is not set up Pressing the Mode black button locks in your choice and resumes normal operation Current selection on the display is saved as the new auto on mode Not cycling for 45 seconds will not up...

Page 48: ... the selected mode will alternate every 1 second Pressing the Power red button will cycle the user through three different brightness levels avt Lo and Hi avt means automatic while Lo is dim and Hi is very bright Pressing the Mode black button locks in your choice and resumes normal operation Current selection on the display is saved as the new brightness mode Not cycling for 45 seconds will not u...

Page 49: ... displayed will bring the user into the selection menu Dsp or rdr and the version number will alternate every 1 second Pressing the Power red button will cycle the user through Dsp and version number of the Display or rdr and version number of the Smart Coach radar Pressing the Mode black button or leaving untouched for 45 seconds will exit the menu This information is only necessary if you are co...

Page 50: ...dar is connected to the App the App can turn it back on remotely for up to 30 minutes After which the Smart Display will shut down completely Auto On No Most users will find that they do not want the Smart Display and Smart Coach radar combo to automatically power on when plugged in to a USB power source The Auto On setting is not for all users It is good for permanent installations that want to h...

Page 51: ... inches Smart Coach Radar Height 4 7 inches Width 2 3 inches Depth 0 8 inches Weight Smart Display 2 lbs 6 oz without 4 Alkaline C size batteries 3 lbs 0 oz with 4 Alkaline C size batteries Smart Coach Radar 4 5 oz with 2 AAA Alkaline batteries included Typical Battery Life 14 hours in Constant On Mode or 4 000 manual button presses using 4 Alkaline C size batteries not included Operating Temperat...

Page 52: ...raffic or the movement of tree leaves can be detected by Radar device In some cases if you are measuring speeds on a field near a roadway you may pick up the speed of a car in the distance Electrical Cell phones cell towers wireless devices radio and TV transmitters computers fluorescent lights televisions walkie talkies etc can also possibly create a false reading Appliances Cell Phones Computers...

Page 53: ...nse If the speed doesn t make sense you may have a false reading An example would be if the Display flashes 107 mph when you know the ball speed shouldn t be any higher than 65 mph The radar devices have software designed to ignore most of these false ghost readings but in certain cases there may be things in your environment that may cause interference Tips to Eliminate Interference If you are ca...

Page 54: ...te speeds when the object is moving directly towards or away from the radar beam If you set up the radar s beam even a slight angle sideways to the path of the moving object you will measure a SLOWER speed than the object actually travels along its path At slight angles the error is very small however at larger angles the error can become substantial Please refer to the table below for speeds rela...

Page 55: ...us angle The measured speed will always read lower than the actual speed as you move off the centerline of the path of the moving object For small angles this error will be very small This is why you see police officers pointing their radar along the direction of the road not down a side street pointing sideways to the road Each degree from center will cause your speed to read the noted lower ...

Page 56: ... radar device Unsupported radar device connected to the Smart Display An issue has occurred in communication with the radar device Configuration value not correctly saved Connect supported radar device to Smart Display Contact support for help Disconnect reconnect radar device If not re solved contact support Disconnect reconnect all power If not resolved contact support Disconnect reconnect all p...

Page 57: ...nstalled and used in accordance with the instructions may cause harmful interference to radio communications However there is no guarantee that interference will not occur in a particular installation If this equip ment does cause harmful interference to radio or television reception which can be determined by turning the equipment off and on the user is encouraged to try to correct the interferen...

Page 58: ...r replacement product to be free from defects in material and workmanship on the same terms as the product originally purchased This warranty will be void if the product serial number or other identification marks have been defaced damaged or removed This war ranty does not cover wear and tear due to normal use or damage to the product as the result of improper usage neglect of care alteration acc...

Page 59: ...ry or for infringement of any other party s intellectual property rights irrespective of whether Pocket Radar Inc had advance notice of the possibility of any such damages including but not limited to loss of use revenue or profit In no event shall Pocket Radar Inc s total liability for all claims regarding the product exceed the price paid for the product Pocket Radar Inc neither assumes nor auth...

Page 60: ......

Reviews: