background image

9

22

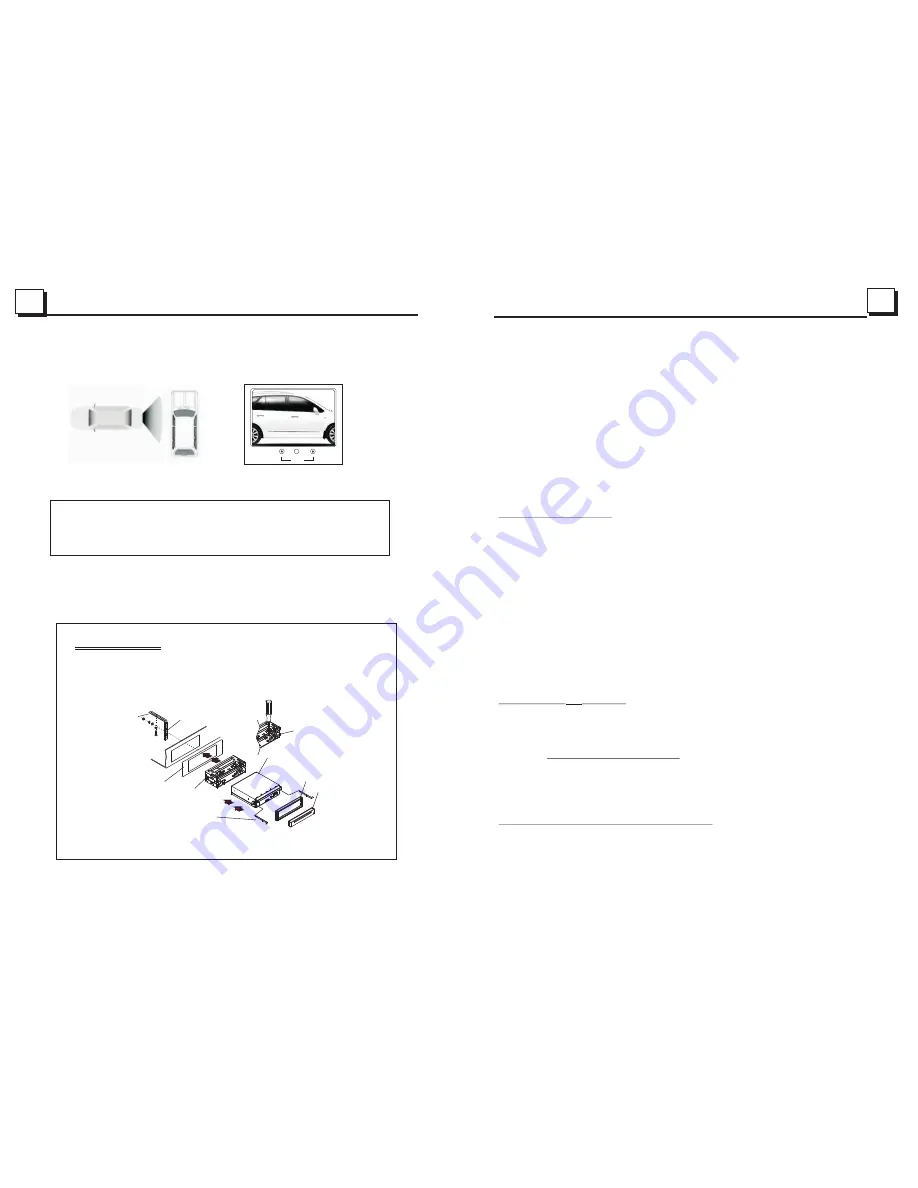
1.8  UNIT INSTALLATION

Rear View Camera

INSTALLATION INSTRUCTIONS

TO BOOST UP THE CAPABILITY OF 
ANTI-JAMMING, PLEASE FIX THE 
METAL STRAP ON THE METAL 
CONNECTED TO THE BOTTOM 
BRACKET OF THE CAR.

METAL STRAP

DASH BOARD

SLIDING METAL HOUSING

TO DRAW THE CHASSIS OUT OF 
THE SLIDING METAL HOUSING, 
INSERT THE LEFT AND RIGHT KEY 
PLATES INTO THE RIGHT POSITION 
OF THE 2 SIDES OF CHASSIS.

PLASTIC TRIM OUT

UNIT CHASSIS

SELECT THE PROPER TAB
FOR FIXING THE SLIDING 
METAL HOUSING.

The unit is installed to be an anti-theft one. The chassis 
of the unit wears a sliding metal housing. Please do the 
connection of the power, speakers and antenna according 
to the requirement of the Instruction Book , then install 
the sliding metal housing in the car as follows.

FRONT PANEL

 In any running mode, the video signal will switch to camera mode (if applicable)when car is in reverse.
 After taking the car out of reverse, it will resume to its previous mode.

Analog on-site backup

Analog on-site backup

P I C

A N G L E

Warning:
Always check the surrounding environment. Objects might be reversed. The rear view
camera is  designed only to assist while reversing. Due to the limitations of the camera
angle and range, it may cause accidents if the driver relies solely on the reverse camera
and display.

    When you select the IMAGE file sort icon, press the ^ or > button to select the 
     first IMAGE file, then press the v button to select the desired IMAGE file, finally
     press the OK or PLAY/PAUSE button to display the image in full screen from 
     the selected IMAGE file. 
3.  During IMAGE playback,  press one of the >/</^/v buttons to change the angle of 
     viewing picture that is displaying as follows:
     >: 90 deg cw; <: 90deg ccw; ^:UP<-->DOWN; v: LEFT<-->RIGHT
     During IMAGE playback, press the PROG button to change the mode of refresh 
     picture.  
     During IMAGE playback, press the STOP button to stop playing and return to the 
     root menu.     

*    During IMAGE playback, the following buttons are not available: SLOW-FWD,
     SUBTITLE, TITLE, ANGLE, AUDIO, RDM, INT and A-B.       
*    In IMAGE mode, the other operations are same as ones in MP3/WMA mode. 

5.21 Playback MP4 files

1.  The root menu is displayed on TV when beginning to switch on MP4 mode,
     then it will automatically play the first file.
     During playback, press the STOP button to stop playing and return to the 
     root menu.      
2.  When displaying the root menu, press the direction buttons to select your 
     desired FOLDER ,file or file sort icon, then press the OK or PLAY button to 
     open the FOLDER, open the files of the file sort icon or play the selected file.
     When displaying the root menu,  you can also use the number buttons to 
     select the serial number of the file and play the file.     

*    The ANGLE, PROG, RDM, INT and TITLE/PBC button are not valid.
*    The other functions are same as ones in DVD mode; but the RPT function is 
     same as one in MP3/WMA mode.

5.22 ESP and ID3 Function

     There is ESP function for all formats of discs.

     In MP3/WMA mode, during playback, the information of the file name, folder 
     name,  song s title, artist and album will be scrolling on the  LCD display.  
     As long as the current playing MP3 music contains relevant ID3 tag information
     in version 1.0/2.0 format, the 3 items underlined above will be scrolling on the 
     LCD display; otherwise,  they will not.

5.23 The DVD System Menu Setup Operation

1.  Press the SETUP button on the remote control to access the DVD System
     Menu on the monitor. 

Summary of Contents for PI9760

Page 1: ......

Page 2: ...30 1 To ensure safety while driving and to comply with laws drivers should not watch video or operate the video device while driving ...

Page 3: ...cians 5 Do not expose the unit under direct sunlight or nearby objects that radiate heat to avoid damage the unit 6 Do not place the unit in moist and humid conditions which effect the pick up of the unit lead to out of work 7 Place the unit on a flat surface and ventilative condition Please ensure the ventilation holes are not covered to avoid overheating and malfunction 8 Clear the panel and cas...

Page 4: ... PICTURE Ensure that the players audio output has a good connection with amplifierector is damaged Check whether you have turned down the volume Ensure that you have set the right AUDIO setup of the player Ensure that the audio is not under muted NO PICTURE BUT HAVE SOUND Ensure that the playertput has a good connection with monitorput Ensure that you have turned your monitor to the AV input chann...

Page 5: ...gion Code Q Why does the unit display REGION ERROR after inserting disc into disc compartment A Because the DVD player and disc has respective region code If the region codes of them do not match with each other the DVD player can not play the disc Appendix region code of DVD The Motion Picture Association of America MPAA divided the world into 6 regions and gave every region a code namely region ...

Page 6: ...tal Control The Parental Control function of a DVD player can control the playback of movie rated level in a disc You can set the DVD player to be a certain rating level with SETUP MENU on screen If the rating level in the disc is higher than one set in the DVD player the DVD player can not playback the disc The rating level setup can be protected by the password Therein if you select Unlock item ...

Page 7: ... stereo effect choose the item so it will output audio signal with vivid theatre effect STEREO If you choose this item when outputting audio signal with 5 1 channels it will output the left and right channels of signal when outputting audio signal with 2 channels it will output the common 2 channels of stereo signal VSS If you choose this item when playing a disc recorded with 5 1 channels the mai...

Page 8: ...OUT there is only ANALOG mode i e SPDIF OFF not optional KEY It is for selecting your desired basic music tone from low to high 5 23 4 VIDEO SETUP BRIGHTNESS It is for adjusting the brightness of the video output CONTRAST It is for adjusting the contrast of the video output HUE It is for adjusting the hue of the video output SATURATION It is for adjusting the saturation of the video output SHARPNE...

Page 9: ...gain then input a new password that you like and then press the OK button to make it effective Before the other persons see the Manual you should get the password in mind and cut out the part of PASSWORD in the Manual RATING The item is for setting a new rating level of the Parental Control 1 Select the PASSWORD item and then press the button to enter it then input the password mentioned above and...

Page 10: ...f the v buttons to change the angle of viewing picture that is displaying as follows 90 deg cw 90deg ccw UP DOWN v LEFT RIGHT During IMAGE playback press the PROG button to change the mode of refresh picture During IMAGE playback press the STOP button to stop playing and return to the root menu During IMAGE playback the following buttons are not available SLOW FWD SUBTITLE TITLE ANGLE AUDIO RDM IN...

Page 11: ...l and reset the player When the monitor or the small LCD display wrongly or some buttons are not available or sound is distorted press the REL button on the front panel to detach the front panel and then pull it rightward and then leftward to remove it then press the RESET button to rehabilitate the distorted program to zero 5 19 Program Playback It allows you to enter the order in which you want ...

Page 12: ...e of scanning it will resume broadcasting on the M1 It can store 3x6 stations for FM and 2x6 stations for AM in all 2 When briefly pressing the APS button the radio will scan each preset station for 5 seconds in FM or AM band from M1 After finishing a circle of scanning it will resume broadcasting on the M1 NOTE In FM band FM1 FM2 FM3 is checked one at a time In AM band AM1 AM2 is checked one at a...

Page 13: ...ted and the AF switching mode is displayed by AF segment in display Segment off AF switching mode off Segment on AF switching mode on and has RDS information Segment flashing AF switching mode on but RDS information is not received yet 5 11 Playback in Scan Mode 1 When playing VCD PBC OFF CD discs MP3 WMA press the INT button to play the previous 15 seconds part of each track on the disc Press the...

Page 14: ...e it will automatically switch modes and display the menu on touch screen as right You can also use MODE button or Mode Menu to enter the model 2 Play audio files Tap it can pause playback Tap it can stop playback Tap one of them can switch on between the speed levels of fast backward or forward Tap one of them can select next or previous track Tap it to turn volume up and down Tap it to change th...

Page 15: ... previous setting VIDEO mode Control icons 2 Press the direction buttons to select your desired title and then press the OK or PLAY button to open the root menu of the selected title 3 Press the direction buttons to select your desired chapter finally press the OK or PLAY button to play the selected chapter During playback pressing the MENU button can directly display the root menu of the title th...

Page 16: ...pause the playback press the PLAY button to resume normal playback 5 3 Stop Playback When playing DVD VCD MP3 WMA CD press the STOP button once to pause the playback then press the PLAY button to resume the normal playback press the STOP button twice to full stop the playback then press the PLAY button to start playing from the beginning of the first chapter track 5 4 Select Chapter Track with the...

Reviews: