background image


3

For Your Safety


Before operating the monitor, please read this manual thoroughly. This 

manual should be retained for future reference. 


FCC Class B Radio Frequency Interference Statement  

WARNING: (FOR FCC CERTIFIED MODELS) 


NOTE: 

This equipment has been tested and found to comply with the limits for 

a Class B digital device, pursuant to Part 15 of the FCC Rules. These limits 

are designed to provide reasonable protection against harmful interference in 

a residential installation. This equipment generates, uses and can radiate 

radio frequency energy, and if not installed and used in accordance with the 

instructions, may cause harmful interference to radio communications. 

However, there is no guarantee that interference will not occur in a particular 

installation. If this equipment does cause harmful interference to radio or 

television reception, which can be determined by turning the equipment off 

and on, the user is encouraged to try to correct the interference by one or 

more of the following measures: 

1.  Reorient or relocate the receiving antenna. 

2.  Increase the separation between the equipment and receiver. 

3.  Connect the equipment into an outlet on a circuit different from that to 

which the receiver is connected. 

4.  Consult the dealer or an experienced radio/TV technician for help. 


NOTICE: 


1.  The changes or modifications not expressly approved by the party 

responsible for compliance could void the user's authority to operate the 

equipment. 

2.  Shielded interface cables and AC power cord, if any, must be used in 

order to comply with the emission limits. 

3.  The manufacturer is not responsible for any radio or TV interference 

caused by unauthorized modification to this equipment. It is the  

responsibilities of the user to correct such interference. 

WARNING: 


To prevent fire or shock hazard, do not expose the monitor to rain or moisture. 

Dangerously high voltages are present inside the monitor. Do not open the 

cabinet. Refer servicing to qualified personnel only. 


Important Recycle Instruction: 


   LCD Lamp(s) inside this product contain mercury. This product 

may contain other electronic waste that can be hazardous if not 
disposed  of properly. Recycle or dispose in accordance with local, 
state, or federal Laws. For more information, contact the Electronic    
Industries Alliance at WWW.EIAE.ORG.  For lamp specific  disposal  
information check WWW.LAMPRECYCLE.ORG. 

Summary of Contents for PL1520M

Page 1: ...PL1520M ...

Page 2: ... documentation view answers to frequently asked questions FAQs and get troubleshooting advice or email Planar your support question Talk to a Customer Service Representative To contact Planar s Customer First TM Technical Support Service call 1 866 PLANAR 1 866 752 6271 This service is available 5am 5pm Pacific Time 8am 8pm Eastern Time Monday through Friday Contact Us 24x7 Online Technical Suppor...

Page 3: ......
Page 4: ...ights are reserved No part of this document may be reproduced translated to another language or stored in a retrieval system or transmitted by any means electronic mechanical photocopying recording or otherwise without prior written permission Windows is a registered trademark of Microsoft Inc Other brand or product names are trademarks of their respective holders ...

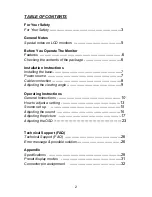
Page 5: ... Installing the base 7 Power source 7 Cable connection 8 Adjusting the viewing angle 9 Operating Instructions General Instructions 10 How to adjust a setting 13 Source set up 15 Adjusting the sound 16 Adjusting the picture 17 Adjusting the OSD 23 Technical Support FAQ Technical Support FAQ 26 Error message possible solution 26 Appendix Specifications 28 Preset display modes 31 Connector pin assign...

Page 6: ...n between the equipment and receiver 3 Connect the equipment into an outlet on a circuit different from that to which the receiver is connected 4 Consult the dealer or an experienced radio TV technician for help NOTICE 1 The changes or modifications not expressly approved by the party responsible for compliance could void the user s authority to operate the equipment 2 Shielded interface cables an...

Page 7: ...less proper ventilation is provided z The monitor should be operated only from the type of power source indicated on the label If you are not sure of the type of power supplied to your home consult your dealer or local power company z Unplug the unit during a lightening storm or when it will not be used for long period of time This will protect the monitor from damage due to power surges z Do not ...

Page 8: ...attern you use The LCD screen has effective pixels of 99 99 or more It may include blemishes of 0 01 or less such as a missing pixel or a pixel lit all of the time Due to the nature of the LCD screen an afterimage of the previous screen may remain after switching the image when the same image is displayed for hours In this case the screen is recovered slowly by changing the image or turning off th...

Page 9: ...omposite Video Cable Register Your Planar Products Today Thank you for choosing Planar To assure you receive all the benefits of your Planar product and services register your Planar product today Visit our website to register your product at http www planar com support product_registration html Cables Replacement Lamps and Accessories To find cables replacement lamps and accessories for your Plan...

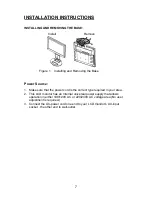
Page 10: ...Make sure that the power cord is the correct type required in your area 2 This LCD monitor has an Internal universal power supply that allows operation in either 100 120V AC or 220 240V AC voltage area No user adjustment is required 3 Connect the AC power cord one end to your LCD monitor s AC input socket the other end to wall outlet ...

Page 11: ...t located on the back of the monitor Connecting the S Video Cable Plug one end of the S video cable not included to the LCD monitor s S Video port and the other end to a video source output eg DVD player video recorder a film camara with S Video connection or a PC Connecting the Video Cable Plug one end of the composite video cable to the LCD monitor s composite video port and the other end to a v...

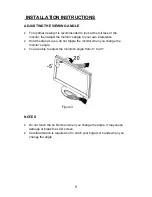
Page 12: ... to your own preference Hold the stand so you do not topple the monitor when you change the monitor s angle You are able to adjust the monitor s angle from 5 to 20 Figure 3 NOTES Do not touch the LCD screen when you change the angle It may cause damage or break the LCD screen Careful attention is required not to catch your fingers or hands when you change the angle ...

Page 13: ...l preferences The power cord should be connected Connect the Signal cable from the monitor to the VGA card Connect video S video cable from the monitor to a video source Press the power button to turn on the monitor The power indicator will light up Figure 4 External Control Button EXTERNAL CONTROLS 1 AUTO Adjustment Exit 2 Vol Decrease Select menu item 3 Power Button LED 4 Vol Increase Select men...

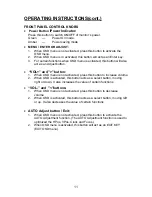
Page 14: ...enu is not activated press this button to increase volume 2 When OSD is activated this button acts as a select button moving right or down It also increases the value of certain functions VOL and buttons 1 When OSD menu is not activated press this button to decrease volume 2 When OSD is activated this button acts as a select button moving left or up It also decreases the value of certain functions...

Page 15: ...r excessive dust or mechanical vibration or shock Save the original shipping box and packing materials as they will come in handy if you ever have to ship your monitor For maximum protection repackage your monitor as it was originally packed at the factory To maintain the cleanness of your LCD display wipe it periodically with clean and soft cloth The screen may be damaged by any liquid splash To ...

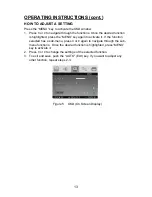
Page 16: ... the MENU key again to activate it If the function selected has a sub menu press or again to navigate through the sub menu functions Once the desired function is highlighted press MENU key to activate it 2 Press or to change the settings of the selected function 3 To exit and save push the AUTO Exit key If you want to adjust any other function repeat steps 2 3 Figure 5 OSD On Screen Display ...

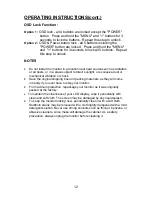
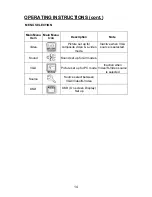
Page 17: ...n Note Video Picture set up for composite video s video mode Inactive when VGA source is selected Sound Sound set up for all modes VGA Picture set up for PC mode Inactive when Video S Video source is selected Source Source select between VGA Video S Video OSD OSD On screen Display Set up ...

Page 18: ...u 2 Press or key to select Source set up option 3 Press MENU key to Select submenu VIDEO 1 Press or key to select VIDEO option 2 Press MENU key to activate composite video mode S VIDEO 1 Press or key to select S VIDEO option 2 Press MENU key to activate S video mode VGA 1 Press or key to select VGA option 2 Press MENU key to activate VGA PC mode ...

Page 19: ...ress MENU key to Select submenu VOLUME 1 Press or key to select VOLUME option 2 Press MENU key to Select submenu 3 Press or key to adjust volume value 4 After adjustment press AUTO key to exit RESET 1 Press or key to select RESET option 2 Press MENU key to recall to factory defaut value It is used to reset the volume settings to the factory default mode 3 After adjustment press AUTO key to exit ...

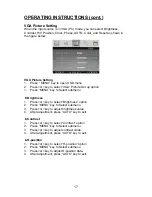
Page 20: ... Select submenu Brightness 1 Press or key to select Brightness option 2 Press MENU key to Select submenu 3 Press or key to adjust brightness value 4 After adjustment press AUTO key to exit Contrast 1 Press or key to select Contrast option 2 Press MENU key to Select submenu 3 Press or key to adjust contrast value 4 After adjustment press AUTO key to exit H position 1 Press or key to select H positi...

Page 21: ...ubmenu 3 Press or key to adjust CLOCK value 4 After adjustment press AUTO key to exit PHASE 1 Press or key to select Phase option 2 Press MENU key to Select submenu 3 Press or key to adjust PHASE value 4 After adjustment press AUTO key to exit AUTO ADJUST 1 Press or key to select AUTO Adjust option 2 Press MENU key to select submenu to recall to factory defaut value This will AUTOmatically adjust ...

Page 22: ...n the USER model you could personalize the R G B values A Press or key to select R G or B B Press Menu button to select submenu C Press or key to adjust R G B value D Press AUTO key to exit submenu 5 After adjustment press AUTO key to exit RESET 1 Press or key to select RESET option 2 Press MENU key to select submenu ro recall to factory defaut value It is used to reset the picture settings to the...

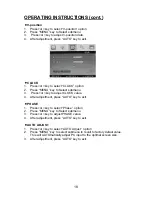
Page 23: ...Picture Set up option 3 Press MENU key to Select submenu Brightness 1 Press or key to select Brightness option 2 Press MENU key to Select submenu 3 Press or key to adjust brightness value 4 After adjustment press AUTO key to exit Contrast 1 Press or key to select Contrast option 2 Press MENU key to Select submenu 3 Press or key to adjust contrast value 4 After adjustment press AUTO key to exit HUE...

Page 24: ... to exit SHARPNESS 1 Press or key to select SHARPNESS option 2 Press MENU key to Select submenu 3 Press or key to adjust Sharpness value 4 After adjustment press AUTO key to exit PICTURE MODE 1 Press or key to select PICTURE MODE option 2 Press MENU key to adjust picture mode data There are four options of PICTURE MODE provided CUSTOM STANDARD SOFT VIVID After adjustment press AUTO key to exit ...

Page 25: ...U key to turn On or Off black level 3 After adjustment press AUTO key to exit RESET 1 Press or key to select RESET option 2 Press MENU key to select submenu ro recall to factory defaut data It is used to reset the picture settings to the factory default mode 3 After adjustment press AUTO key to exit ...

Page 26: ...tment press AUTO key to exit H position 1 Press or key to select H position option 2 Press MENU key to move the OSD to the right To move the OSD to the left continue to push Menu key until it loops to the left of the display 3 After adjustment press AUTO key to exit V position 1 Press or key to select V position option 2 Press MENU key to move the OSD down To move the OSD to the top continue to pu...

Page 27: ...ncy of OSD view 4 After adjustment press AUTO key to exit INFORMATION 1 Press or key to select INFORMATION option 2 Press MENU key to display current input Information 3 After adjustment press AUTO key to exit RESET 1 Press or key to select RESET option 2 Press MENU key to select submenu ro recall to factory defaut data 3 After adjustment press AUTO key to exit ...

Page 28: ...NPUT SIGNAL This monitor meets the Green monitor standards as set by the Video Electronics Standards Association VESA and or the United States Environmental Protection Agency EPA and The Swedish Confederation Employees NUTEK This feature is designed to conserve electrical energy by reducing power consumption when there is no video input signal present When there is no video input signal this monit...

Page 29: ... Card should be snugly seated in its slot Make sure monitor s video cable is properly connected to the computer Inspect monitor s video cable and make sure none of the pins are bent Make sure computer is operational by hitting the CAPS LOCK key on the keyboard while observing the CAPS LOCK LED The LED should either turn ON or OFF after hitting the CAPS LOCK key Missing one of the primary colors RE...

Page 30: ...pixel clock signal With a wrong phase adjustment the picture has horizontal disturbances in light picture For FOCUS and CLOCK adjustment use dot pattern or win 95 98 shut down mode pattern ERROR MESSAGE POSSIBLE SOLUTION NO SIGNAL 1 Check that the signal cables are proper connected If the connector is loose tighten the connector s screws 2 Check the signal cable s connection pins for damage UNSUPP...

Page 31: ...0 297mm Display colors 16 7 million Contrast Ratio 450 1 Brightness 250cd Viewing Angle 120 Horizontal 100 Vertical Response Time 16ms Lamp Type Life 50000 hr LCD Panel Color Temperature 6500k 7800k User RCA x 1 Composite Video S Video S Video x 1 Video Input Video Systems NTSC PAL Audio Input Audio mini jack In x1 Headphone Ouput Headphone Ouput x1 ...

Page 32: ...e Mini jack for stereo 3 5ø OSD language English Simplified Chinese French Spanish Wall Mount VESA 75 x 75 mm Power Supply AC100V 240V 50 60Hz Power Power Consumption 25W Panel Tilt Forwards Backwards 5 20 operating 5 C 40 C storage 25 C 60 C Environment Operating 10 85 Dimension W x H x D with stand 362 W x 357 5 H x 144 D mm Weight net Kg w o Accessories 3 Kg Accessories Power Cord VGA cable Aud...

Page 33: ...POSITION CLOCK PHASE AUTO ADJUST COLOR RESET OSD LANGUAGE H POSITION V POSITION OSD TIMER TRANSPARENCY INFORMATION RESET VIDEO BRIGHTNESS CONTRAST HUE SATURATION SHARPNESS PICTURE MODE BLACK LEVEL RESET SOURCE VIDEO S VIDEO VGA Functions SOUND VOLUME RESET ...

Page 34: ...x480 37 861 72 8 800X600 35 156 56 3 800X600 37 879 60 0 800X600 48 077 72 2 SVGA 800X600 46 875 75 0 1024X768 48 363 60 0 1024X768 56 476 70 0 XGA 1024 768 60 02 75 0 IBM MODES DOS 640x400 31 469 70 087 DOS 720X400 31 469 70 087 XGA 1024x768 57 515 72 1 MAC MODES VGA 640X480 35 66 667 SVGA 832X624 49 725 74 551 1024x768 48 780 60 001 XGA 1024x768 60 241 74 927 ...

Page 35: ...NT 1 5 6 10 11 15 15 Pin Color Display Signal Cable PIN NO DESCRIPTION PI N NO DESCRIPTION 1 Red 9 5V 2 Green 10 VGA CON 3 Blue 11 TXD 4 RXD 12 DDC Serial Data 5 Ground 13 H Sync 6 R Ground 14 V Sync 7 G Ground 15 DDC Serial Clock 8 B Ground ...

Page 36: ...ww planar com 2006 Planar Systems Inc Planar is a registered trademark of Planar Systems Inc Other brands and names are the property of their respective owners Technical information in this document is subject to change without notice Q41T5000935 2C ...

Reviews: