background image

Connecting your equipment

03

19

En

3

If the device can output digital audio, connect an 

optical-type

1

 digital audio output from the recorder to 

the OPTICAL IN 2 (DVR1) input.

Use an optical cable for the connection.

2

• For a second recorder, use the 

OPTICAL IN 3

 (

DVR2

)


inputs.

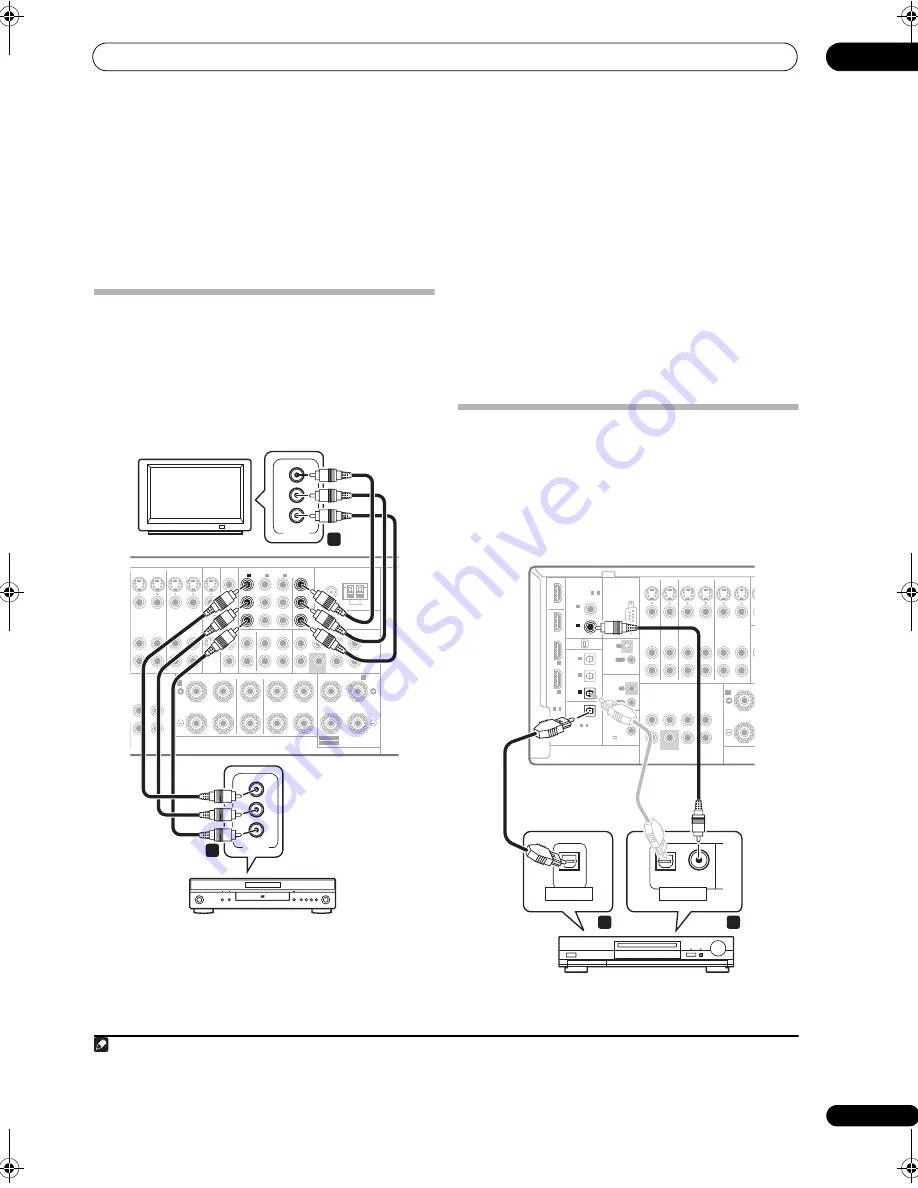
Using the component video jacks

Component video should give superior picture quality 
when compared to composite or S-Video. You can also 
take advantage of progressive scan video (if your source 
and TV are both compatible), which delivers a very stable, 
flicker-free picture. See the manuals that came with your 
TV and source component to check whether they are 
compatible with progressive-scan video.

1

Connect the component video outputs of your 

source to a set of ASSIGNABLE COMPONENT VIDEO 
inputs.

Connect using a three-way component video cable.

• Since they are assignable, it doesn’t matter which 

component video inputs you use for which source. 
After connecting everything, you’ll need to assign the 
component video inputs—see 

The Input Setup menu


on page 70.

2

Connect the COMPONENT VIDEO MONITOR OUT 

jacks to the component video inputs on your TV or 
monitor.

Use a three-way component video cable.

Connecting digital audio sources 

This receiver has both digital inputs and outputs, 
allowing you to connect digital audio components for 
playback and for making digital recordings.

Most digital components also have analog connections. 
See 

Connecting analog audio sources

 on page 20 if you 

want to connect these too.

Note

1 • In order to record, you must connect the analog audio cables (the digital connection is for playback only).

• If your video component doesn’t have a digital audio output, you can skip this step.

2 If your recorder only has a coaxial digital output, you can connect it to one of the coaxial inputs on this receiver using a coaxial digital audio cable. When 
you set up the receiver you’ll need to tell the receiver which input you connected the recorder to (see also 

The Input Setup menu

 on page 70).

TI CH IN

SPEAKERS

B

A

CD

CD-R

ANTENNA

PRE OUT

DVR1

IN

IN

IN

Y

IN

OUT

OUT

DVR2

ZONE 2

IN

IN

OUT

MONITOR

OUT

MONITOR

OUT

FM UNBAL 75

COMPONENT VIDEO

OUT

OUT

OUT

OUT

FRONT

CENTER

FRONT

CENTER

SURROUND

SURROUND BACK /

R

L

R

L

R

L
(Single)

SURROUND SURROUND BACK

SUBWOOFER

SURROUND SURROUND BACK

(Single)

1

IN

2

IN

3

IN

ASSIGNABLE

3

1

-

AM LOOP

IN

SIRIUS

PB

PR

SELECTABLE 

SEE INSTRUCTION MANUAL

SELECTABLE 

VOIR LE MODE D'EMPLOI

Y

MONITOR

OUT

COMPONENT VIDEO

1

IN

PB

PR

Y

P

B

P

R

COMPONENT

VIDEO

Y

P

B

P

R

COMPONENT

VIDEO

2

1

VSX-03TXH

TV

DVD player

DIGITAL

ASSIGNABLE

ASSIGN-

ABLE

OPTICAL

RS-232C

MULTI CH IN

SPEAKERS

A

DVD

TV SAT

DVR1

CON-
TROL

IR

ZONE2

COAXIAL

HDMI

OUT

OUT

BD IN

3

3

1

-

ASSIGNABLE

2

1

-

2

1

-

IN

(DVR2)

2

IN

(DVR1)

1

IN

1

IN

2

IN

(TV SAT)

1

IN

S-
VIDEO

AUDIO

L

R

L

R

IN

IN

IN

IN

IN

IN

OUT

OUT

DVR2

IN

IN

OUT

MO

OUT

FRONT

F

R

CENTER SURROUND SURROUND BACK

SUBWOOFER

VIDEO

(DVD)

2

IN

(CD)

OUT

OUT

IN

IN

S

XM 

IN

1

2

12 V TRIGGER

(OUTPUT
 12 V 

 TOTAL

 50 mA MAX)

OUT

3

IN

(DVR2)

2

IN

(CD)

OPTICAL

COAXIAL

OPTICAL

COAXIAL

DIGITAL OUT

OPTICAL

DIGITAL IN

1

2

VSX-03TXH

CD-R, MD,

DAT, etc.

VSX-03TXH_KU.book  19 ページ  2008年4月16日 水曜日 午後1時19分

Summary of Contents for VSX03TXH - Elite AV Receiver

Page 1: ...Operating Instructions audio video multi channel receiver ...

Page 2: ...connections D8 10 3a_En FEDERAL COMMUNICATIONS COMMISSION DECLARATION OF CONFORMITY This device complies with part 15 of the FCC Rules Operation is subject to the following two conditions 1 This device may not cause harmful interference and 2 this device must accept any interference received including interference that may cause undesired operation Product Name AUDIO VIDEO MULTI CHANNEL RECEIVER M...

Page 3: ...xit from the apparatus 1 2 3 4 5 6 7 8 9 10 Only use attachments accessories specified by the manufacturer Use only with the cart stand tripod bracket or table specified by the manufacturer or sold with the apparatus When a cart is used use caution when moving the cart apparatus combination to avoid injury from tip over Unplug this apparatus during lightning storms or when unused for long periods ...

Page 4: ...ualified service personnel If connected to an AC outlet the cut off plug can cause severe electrical shock Make sure it is properly disposed of after removal The equipment should be disconnected by removing the mains plug from the wall socket when left unused for a long period of time for example when on vacation D3 4 2 2 1a_A_En WARNING Handling the cord on this product or cords associated with a...

Page 5: ...Display 27 Remote control 28 Sub remote control unit 30 05 Listening to your system Auto playback 31 Listening in surround sound 31 Standard surround sound 31 Using the Home THX modes 32 Using the Advanced surround effects 32 Listening in stereo 33 Using Front Stage Surround Advance 33 Using Stream Direct 34 Selecting MCACC presets 34 Choosing the input signal 34 Using surround back channel proces...

Page 6: ...nized amp mode operations 69 Canceling synchronized amp mode 69 About HDMI Control 69 10 Other Settings The Input Setup menu 70 Input function default and possible settings 71 The Other Setup menu 71 Multi Channel Input Setup 72 ZONE Audio Setup 72 SR Setup for Pioneer flat panel TVs 73 OSD Adjustment 73 11 Using other functions Setting the Audio options 74 Setting the Video options 75 Making an a...

Page 7: ... with the addition of a surround back speaker you can take advantage of the built in Dolby Digital EX and DTS ES decoders for six channel surround sound Furthermore Dolby Digital Plus and Dolby TrueHD which are designed for the next generation high definition media such as Blu ray Disc and HD DVD support up to 7 1 channels and 8 channels respectively DTS EXPRESS is a low bitrate encoding technolog...

Page 8: ...ace Don t install it on the following places on a color TV the screen may distort near a cassette deck or close to a device that gives off a magnetic field This may interfere with the sound in direct sunlight in damp or wet areas in extremely hot or cold areas in places where there is vibration or other movement in places that are very dusty in places that have hot fumes or oils such as a kitchen ...

Page 9: ...ur speakers as shown below for the best surround sound effect Also see Placing the speakers on page 22 for more on this 3 Plug in the receiver and switch it on followed by your DVD player your subwoofer and the TV Plug the power cable into the AC outlet and switch on the receiver 1 Make sure you ve set the video input on your TV to this receiver Check the manual that came with the TV if you don t ...

Page 10: ...ase you don t need to select OK and press ENTER in step 6 With error messages such as Too much ambient noise or Check Microphone select RETRY after checking for ambient noise see Problems when using the Auto MCACC Setup on page 11 and verifying the mic connection If there doesn t seem to be a problem you can simply select GO NEXT and continue DVD BD TV HDMI DVR 1 DVR 2 CD XM SIRIUS CD R FM AM INPU...

Page 11: ...r system on page 31 for information on different ways of listening to sources It is possible to check on the display whether or not multi channel playback is being performed properly When using a surround back speaker 2D PL IIx MOVIE is displayed when playing Dolby Digital signals and DTS Neo 6 is displayed when playing DTS 5 1 channel signals When not using a surround back speaker DOLBY DIGITAL i...

Page 12: ...NTROL to switch on phase correction The PHASE CONTROL indicator on the front panel lights Front speaker Subwoofer Sound source Sound muffled due to a delay in time Listening position Front speaker Subwoofer Sound source Original sound preserved with no loss of clarity Listening position Note 1 Phase matching is a very important factor in achieving proper sound reproduction If two waveforms are in ...

Page 13: ... that you can control all your equipment from a single IR remote sensor See Operating other Pioneer components with this receiver s sensor on page 82 7 Remote input output MULTI ZONE Use for connection to an external remote control sensor for use in a MULTI ZONE setup for example See Connecting an IR receiver on page 64 8 12 V trigger jacks total 50 mA max x2 Use to switch components in your syste...

Page 14: ...ng on page 62 15 Component video connections x4 Use the inputs to connect any video source that has component video output such as a DVD recorder Use the output for connection to a monitor or TV See Using the component video jacks on page 19 16 Stereo analog audio source inputs outputs x3 Use for connection to audio sources such as CD players tape decks turntables etc See Connecting analog audio s...

Page 15: ... OFF Note 1 If the video signal does not appear on your TV or flat panel TV try adjusting the resolution settings on your component or display Note that some components such as video game units have resolutions that may not be converted In this case try switching Digital Video Conversion in Setting the Video options on page 75 OFF The ZONE 2 video input can also be converted For details see Settin...

Page 16: ...es HDMI was developed to provide the technologies of High Bandwidth Digital Content Protection HDCP as well as Digital Visual Interface DVI in one specification HDCP is used to protect digital content transmitted and received by DVI compliant displays HDMI has the capability to support standard enhanced or high definition video plus standard to multi channel surround sound audio HDMI features incl...

Page 17: ...sc player offers multi channel analog audio outputs see Using XM Radio on page 56 Connect an HDMI output on your Blu ray disc player to the BD HDMI input Connect using an HDMI cable DIGITAL ASSIGNABLE ASSIGN ABLE OPTICAL RS 232C MULTI CH IN SPEAKERS A DVD TV SAT DVR1 CON TROL IR ZONE2 COAXIAL HDMI OUT OUT BD IN 3 3 1 ASSIGNABLE 2 1 2 1 IN DVR2 2 IN DVR1 1 IN 1 IN 2 IN TV SAT 1 IN S VIDEO AUDIO L R...

Page 18: ... can connect it to one of the coaxial inputs on this receiver using a coaxial digital audio cable When you set up the receiver you ll need to tell the receiver which input you connected the set top box to see The Input Setup menu on page 70 2 If your satellite cable receiver doesn t have a digital audio output you can skip this step DIGITAL ASSIGNABLE ASSIGN ABLE OPTICAL RS 232C MULTI CH IN SPEAKE...

Page 19: ...nalog audio sources on page 20 if you want to connect these too Note 1 In order to record you must connect the analog audio cables the digital connection is for playback only If your video component doesn t have a digital audio output you can skip this step 2 If your recorder only has a coaxial digital output you can connect it to one of the coaxial inputs on this receiver using a coaxial digital ...

Page 20: ...pressing VIDEO or using INPUT SELECT remote to select VIDEO Note 1 If your digital component only has an optical digital output you can connect it to one of the optical inputs on this receiver using an optical cable When you set up the receiver you ll need to tell the receiver which input you connected the component to see also The Input Setup menu on page 70 The digital outputs from other compone...

Page 21: ...all the bare speaker wire is twisted together and inserted fully into the speaker terminal If any of the bare speaker wire touches the back panel it may cause the power to cut off as a safety measure Note 1 When using only one surround back speaker connect it to the SURROUND BACK L Single terminals To use a 5 1 channel speaker set use the surround speakers for the surround channel not the surround...

Page 22: ...g speakers near the TV we recommend using magnetically shielded speakers to prevent possible interference such as discoloration of the picture when the TV is switched on If you do not have magnetically shielded speakers and notice discoloration of the TV picture move the speakers farther away from the TV If you re using a center speaker place the front speakers at a wider angle If not place them a...

Page 23: ... Home THX modes page 32 Connecting antennas Connect the AM loop antenna and the FM wire antenna as shown below To improve reception and sound quality connect external antennas see Connecting external antennas on page 24 1 Pull off the protective shields of both AM antenna wires 2 Push open the tabs then insert one wire fully into each terminal then release the tabs to secure the AM antenna wires 3...

Page 24: ...rt circuit or electric shock Do not place the unit a piece of furniture or other object on the power cord or pinch the cord in any other way Never make a knot in the cord or tie it with other cables The power cords should be routed so that they are not likely to be stepped on A damaged power cord can cause a fire or give you an electric shock Check the power cord once in a while If you find it dam...

Page 25: ...to select the multichannel analog inputs page 60 6 MASTER VOLUME dial 7 Input source buttons Press to select an input source 8 VIDEO INPUT See Connecting a component to the front panel inputs on page 20 9 iPod DIRECT USB terminal Use to connect your Apple iPod as an audio source page 53 or connect a USB audio device for playback page 55 MASTER VOLUME INPUT SELECTOR STANDBY ON VSX 03TXH PHONES DVD ...

Page 26: ...en the various surround modes page 32 STEREO A L C Switches between stereo playback Auto level control stereo mode and Front Stage Surround Advance modes page 33 13 MULTI ZONE controls If you ve made MULTI ZONE connections see MULTI ZONE listening on page 62 use these controls to control the sub zone from the main zone see Using the MULTI ZONE controls on page 63 14 SPEAKERS Use to change the spea...

Page 27: ...to stereo mode MONO Lights when the mono mode is set using the MPX button 10 SOUND Lights when any of the Midnight Loudness or bass treble controls feature is selected page 74 11 Master volume level 12 SR Lights when the SR mode is switched on page 66 13 STREAM DIRECT Lights when Direct Pure Direct is selected page 34 14 Speaker indicators Indicate the current speaker system A and or B page 60 15 ...

Page 28: ...atedly to select a channel then use to adjust the level page 50 Press FM AM first to access D ACCESS After pressing you can access a radio station directly using the number buttons page 37 CLASS Switches between the three banks classes of radio station presets page 37 4 TV CONTROL buttons These buttons are dedicated to control the TV assigned to the TV CTRL button Thus if you only have one TV to h...

Page 29: ...TATUS Press to check selected receiver settings page 77 PHASE Press to switch on off Phase Control page 12 SIGNAL SEL Use to select an input signal page 34 Press TV first to access ANT Use to select the VHF UHF antennas or Cable TV Press FM AM first to access MPX Switches between stereo and mono reception of FM broadcasts If the signal is weak then switching to mono will improve the sound quality ...

Page 30: ... station presets and radio frequencies Press FM AM first to access MPX Switches between stereo and mono reception of FM broadcasts If the signal is weak then switching to mono will improve the sound quality page 37 Press XM or SIRIUS first to access MEMORY Use to register a song title you are currently listening to 7 Number buttons These are available for FM AM XM SIRIUS and iPod USB and used to d...

Page 31: ...l DTS or Dolby Surround encoded the proper decoding format will automatically be selected and shows in the display 4 With two channel sources you can select from 2 Pro Logic IIx MOVIE Up to 7 1 channel sound especially suited to movie sources 2 Pro Logic IIx MUSIC Up to 7 1 channel sound especially suited to music sources5 2 Pro Logic IIx GAME Up to 7 1 channel sound especially suited to video gam...

Page 32: ... 1 channel playback with 5 1 channel sources 2 Pro Logic IIx MUSIC THX MUSIC THX SELECT2 MUSIC This mode is suited not only for sources recorded in Dolby Digital and DTS but also to all multi channel music sources DVD Audio etc THX SELECT2 GAMES This mode is suited to playing the sound of games Using the Advanced surround effects The Advanced surround effects can be used for a variety of additiona...

Page 33: ... controls A L C Listening in Auto level control stereo mode F S SURR FOCUS See Using Front Stage Surround Advance below for more on this F S SURR WIDE See Using Front Stage Surround Advance below for more on this Using Front Stage Surround Advance The Front Stage Surround Advance function allows you to create natural surround sound effects using just the front speakers and the subwoofer While list...

Page 34: ...ough the options as follows AUTO This is the default setting The receiver selects the first available signal in the following order HDMI DIGITAL ANALOG ANALOG Selects an analog signal DIGITAL Selects an optical or coaxial digital signal Note 1 There are cases where a brief noise is heard before playback of sources other than PCM Please select AUTO SURROUND or DIRECT if this is a problem AUTO DIREC...

Page 35: ...or which it was originally encoded you can have the receiver only apply this effect to 6 1 encoded sources like Dolby Digital EX or DTS ES 3 The table indicates when you will hear the virtual surround back channel Virtual surround back channel is active Press SBch repeatedly to cycle the virtual surround back channel options Each press cycles through the options as follows VirtualSB ON Virtual Sur...

Page 36: ...dio DTS HD DTS EXPRESS encoded stereo sources ON AUTO a Only applicable when using the Virtual Surround Back mode b Not applicable when using the Virtual Surround Back mode c Sound is output from the surround back speakers only when THX SELECT2 CINEMA THX SELECT2 MUSIC or THX SELECT2 GAMES is selected d Advanced surround mode may not be available depending on the input signal e Only applicable whe...

Page 37: ...the frequency directly using the number buttons on the remote control 1 Press the FM AM button to select the tuner 2 Use the FM AM button to change the band FM or AM if necessary Each press switches the band between FM and AM 3 Press D ACCESS Direct Access 4 Use the number buttons to enter the frequency of the radio station For example to tune to 106 00 FM press 1 0 6 0 0 If you make a mistake hal...

Page 38: ...qrstuvwxyz 0123456789 _ space Use to select a character to set the position and ENTER to confirm your selection Tip To erase a station name simply repeat steps 1 to 3 and input four spaces instead of a name Once you have named a station preset you can press DISPLAY when listening to a station to switch the display between name and frequency Listening to station presets You will need to have some p...

Page 39: ...C Expert If your setup requires more detailed settings than those provided in Automatically setting up for surround sound Auto MCACC on page 10 you can customize your setup options below You can calibrate your system differently for up to six different MCACC presets3 which are useful if you have different listening positions depending on the type of source for example watching movies from a sofa o...

Page 40: ...chair 4 Follow the instructions on screen Make sure the microphone is connected If you re using a subwoofer it is automatically detected every time you switch on the system Make sure it is on and the volume is turned up Note 1 If you are planning on bi amping your front speakers or setting up a separate speaker system in another room read through Surround back speaker setting on page 42 and make s...

Page 41: ... go back to the System Setup menu The settings made in the Auto MCACC Setup should give you excellent surround sound from your system but it is also possible to adjust these settings manually using the System Setup menu starting on page 39 2 You can also choose to view the settings by selecting individual parameters from the MCACC Data Check screen Speaker Setting The size and number of speakers y...

Page 42: ...are output at high volume Important You will need to first specify the MCACC preset you want to adjust by pressing MCACC before pressing SETUP step 2 in Making receiver settings from the System Setup menu on page 39 When Manual MCACC is selected while MCACC is set to OFF the selection screen for the MCACC memory appears Select a memory to adjust manually For some of the settings below you ll have ...

Page 43: ...el For comparison purposes the reference speaker will change depending on which speaker you select If you want to go back and adjust a channel simply use to select it 4 When you re finished press RETURN You will return to the Manual MCACC setup menu Fine Speaker Distance Default setting 10 00 all speakers For proper sound depth and separation with your system it is necessary to add a slight bit of...

Page 44: ...setup menu Acoustic Calibration EQ Adjust Default setting ON2 0 0dB all channels bands Acoustic Calibration Equalization is a kind of room equalizer for your speakers excluding the subwoofer It works by measuring the acoustic characteristics of your room and neutralizing the ambient characteristics that can color the original source material providing a flat equalization setting If you re not sati...

Page 45: ...ight line indicates a flat response room no reverb whereas a sloping line indicates the presence of reverberation when outputting test tones The sloping line will eventually flatten out when the reverberant sound stabilizes this usually takes about 100 ms or so By analyzing the graph you should be able to see how your room is responding to certain frequencies Differences in channel level and speak...

Page 46: ...w and Output PC Data Management EQ OFF You will see the reverb characteristics of your listening area without the equalization performed by this receiver before calibration EQ ON You will see the reverb characteristics of your listening area with the equalization performed by this receiver after calibration 2 Note that the EQ response may not appear entirely flat due to adjustments necessary for y...

Page 47: ...u to calibrate your system for different listening positions or frequency adjustments for the same listening position 1 This is useful for alternate settings to match the kind of source you re listening to and where you re sitting for example watching movies from a sofa or playing a video game close to the TV From this menu you can check your current settings copy from one preset to another name p...

Page 48: ...m then specify where you want to copy them To Make sure you don t overwrite an MCACC preset you re currently using this can t be undone 4 Select Copy to confirm and copy the settings Completed shows in the OSD to confirm the MCACC preset has been copied then you automatically return to the Data Management setup menu Clearing MCACC presets If you are no longer using one of the MCACC presets stored ...

Page 49: ...elect LARGE if your front speakers reproduce bass frequencies effectively or if you didn t connect a subwoofer Select SMALL to send the bass frequencies to the subwoofer Center Select LARGE if your center speaker reproduces bass frequencies effectively or select SMALL to send bass frequencies to the other speakers or subwoofer If you didn t connect a center speaker choose NO the center channel is ...

Page 50: ...ss RECEIVER then press CH LEVEL and then using on the remote control Note 1 If you have a subwoofer and like lots of bass it may seem logical to select LARGE for your front speakers and PLUS for the subwoofer This may not however yield the best bass results Depending on the speaker placement of your room you may actually experience a decrease in the amount of bass due low frequency cancellations I...

Page 51: ...HX Loudness Plus function is used sound can be played with the full surround effect even when the volume is low For the most effective results when using the THX SELECT2 Cinema THX SELECT2 Music and THX SELECT2 Games listening modes see Using the Home THX modes on page 32 with the Advanced Speaker Array ASA system see About THX on page 94 it is required that you make the setting See Placing the sp...

Page 52: ...Surround speakers within 1 foot apart best for THX surround sound 1 4 ft Surround speakers between 1 and 4 feet apart 4 ft Surround speakers more than 4 feet apart 4 When you re finished press RETURN You will return to the Manual SP Setup menu 5e THX Audio Setting Loudness Plus ON SB SP Position 0 1 ft Finish ...

Page 53: ...ding what you want to play When your iPod is connected to this receiver you can browse songs stored on your iPod by playlist artist album name song name genre or composer similar to using your iPod directly Note 1 This system is compatible with the audio of iPod nano iPod fifth generation iPod classic iPod touch not supported iPod shuffle and iPhone However that some of the functions may be restri...

Page 54: ...hen paused Press and hold during playback to start scanning Press to skip to previous next track Press repeatedly to switch between Repeat One Repeat All and Repeat Off Press repeatedly to switch between Shuffle Songs Shuffle Albums and Shuffle Off DISPLAY Press repeatedly to change the song playback information displayed in the front panel display When browsing press to move to previous next leve...

Page 55: ... data that may occur when connected to this receiver With large amounts of data it may take longer for the receiver to read the contents of a USB device 3 Make sure the receiver is in standby when disconnecting the USB device 4 If the file selected cannot be played back this receiver automatically skips to the next file playable When the file currently being played back has no title assigned to it...

Page 56: ...his receiver plays back WMA files encoded using Windows Media Player bearing the extension wma Note that DRM protected files will not play and files encoded with some versions of Windows Media Player may not play Windows Media and the Windows logo are trademarks or registered trademarks of Microsoft Corporation in the United States and or other countries Using XM Radio XM is North America s number...

Page 57: ...nd C of 10 channels each 1 Select the channel you want to memorize See Selecting channels and browsing by genre above 2 Press T EDIT The display shows a blinking memory class 3 Press CLASS to select one of the three classes then press to select the channel preset you want You can also use the number buttons to select a preset The default for all presets is XM001 4 Press ENTER After pressing ENTER ...

Page 58: ... tuner 2 Press SIRIUS to switch to the SIRIUS input For best reception you may need to move the SiriusConnect tuner antenna near a window refer to the manual for the SiriusConnect Home tuner for antenna placement recommendations If after pressing SIRIUS the display shows Antenna Error try disconnecting the antenna and reconnecting 2 If the display shows Check Sirius Tuner check the connection of t...

Page 59: ...formation 2 Listening to channel presets You will need to have some presets stored to do this 1 Press CLASS to select the class in which the channel is stored Press repeatedly to cycle through classes A B and C 2 Press to select the channel preset you want You can also use the number buttons on the remote control to recall the channel preset Using the SIRIUS Menu The SIRIUS Menu provides additiona...

Page 60: ...ce of less than 8 Ω After selecting Speaker B in Surround back speaker setting on page 42 you can use the speakers connected to the surround back B speaker terminals on the rear panel to listen to stereo playback in another room See Switching the speaker system below for the listening options with this setup 1 Connect a pair of speakers to the surround back speaker terminals on the rear panel Conn...

Page 61: ...same audio it doesn t matter which set front or surround back is powering which part High or Low of the speaker Make sure that the connections are properly inserted 2 Select the Front Bi Amp setting from the Surround Back System menu See Surround back speaker setting on page 42 to specify how you re using the surround back speaker terminals Caution Most speakers with both High and Low terminals ha...

Page 62: ...sub zones have independent power the main zone power can be off while the sub zone is on and the sub zone can be controlled by the remote or front panel controls However you may need to specify the volume settings in ZONE Audio Setup on page 72 Making MULTI ZONE connections It is possible to make these connections if you have a separate TV and speakers for your sub zone ZONE 2 1 You will also need...

Page 63: ...b Zone Input sources available ZONE2 iPod XM or SIRIUS Radio the built in tuner and other analog audio sources a With video sources only composite video is possible a With the MULTI CH IN input sound is output only from the front L R channels The USB audio cannot be output to ZONE 2 SPEAKERS A CD CD R 1 IN IN IN IN DVR2 ZONE 2 IN IN OUT MONITOR OUT MONITO OUT COMPONENT VIDEO OUT OUT OUT OUT FRONT ...

Page 64: ...ating other Pioneer components with this receiver s sensor on page 82 to connect to the CONTROL jacks instead of the IR ZONE2 OUT jack Note 1 If the receiver is in standby the display is dimmed and ZONE 2 continues to show in the display 2 The tuner cannot be tuned to more than one station at a time Therefore changing the station in one zone also changes the station in the other zone Please be car...

Page 65: ...o a Pioneer flat panel TV using an SR cable you will need to point the remote control at the flat panel TV remote sensor to control the receiver In this case you won t be able to control the receiver using the remote control if you switch the flat panel TV off Before you can use the extra SR features you need to make a few settings in the receiver See The Input Setup menu on page 70 and SR Setup f...

Page 66: ...at the flat panel TV and this receiver are switched on and that they are connected with the SR cable See Using this receiver with a Pioneer flat panel TV on page 65 for more on connecting these components Make sure you have also selected the display input to which you ve connected the receiver in The Input Setup menu on page 70 2 To switch SR mode on off press RECEIVER then press the SR button The...

Page 67: ...ected components are switched off and disconnected from the power outlet when you do this 1 Use a commercially available cable to connect the RS 232C jack on your computer to the 9 pin RS 232C jack on this receiver See the documentation provided with the Advanced MCACC application for more information Advanced MCACC output using your PC Before continuing make sure you have completed step 1 in Data...

Page 68: ... the wall socket After connecting this receiver to an AC outlet a 15 second initialization process begins You cannot carry out any operations during initialization The HDMI indicator on the display unit blinks during initialization and you can turn this receiver on once it has stopped blinking To get the most out of this function we recommend that you connect your HDMI component not to a flat pane...

Page 69: ... mute or adjust the volume of this receiver The input of this receiver is automatically changed when playback occurs on a connected component Even if you change this receiver s input to a device that is not connected by HDMI the synchronized amp mode remains in effect This receiver s input switches automatically when the channel is switched on an HDMI control compatible flat panel TV By pressing G...

Page 70: ...en The second screen of the Input Setup has three optional settings Input Name You can choose to rename the input function for easier identification Select Rename to do so or Default to return to the system default 12V Trigger 1 2 After connecting a component to one of the 12 volt triggers see Switching components on and off using the 12 volt trigger on page 65 select MAIN ZONE 2 or OFF for the co...

Page 71: ...ting for a MULTI ZONE setup see ZONE Audio Setup on page 72 SR Setup Specifies how you want to control your Pioneer flat panel TV see SR Setup for Pioneer flat panel TVs on page 73 HDMI Control Setup Synchronizes this receiver with your Pioneer component supporting HDMI Control see Setting the HDMI Control mode on page 68 OSD Adjustment Adjusts the position of the on screen display on your TV see ...

Page 72: ...adjust the volume Fixed Use this setting if you ve connected a fully integrated amplifier such as another Pioneer VSX receiver in the sub room and want to use that receiver s volume controls This setting is not available if the surround back system setting is set to ZONE 2 With the Fixed setting the source is sent from this receiver at maximum volume so make sure the volume is quite low in the sub...

Page 73: ...ith a numbered video input on the flat panel TV For example assign DVD to input 2 if you have connected the your DVD video output to video input 2 on the flat panel TV The Monitor Out Connect should be set to the input that you ve used to connect this receiver to your flat panel TV 4 When you re finished press RETURN You will return to the Other Setup menu OSD Adjustment Use this feature to adjust...

Page 74: ...By adding a bit of delay you can adjust the sound to match the presentation of the video 0 0 to 6 0 frames 1 second 30 frames NTSC Default 0 0 MIDNIGHT Allows you to hear effective surround sound of movies at low volumes MID LDN OFF MIDNIGHT ON LOUDNESS Used to get good bass and treble from music sources at low volumes LOUDNESS ON BASS Adjusts the amount of bass 6 to 6 dB Default 0 dB TREBLE Adjus...

Page 75: ...nel between the front right and left speakers making it sound wider higher settings or narrower lower settings 0 to 7 Default 3 DIMENSIONh Adjusts the depth of the surround sound balance from front to back making the sound more distant minus settings or more forward positive settings 3 to 3 Default 0 PANORAMAh Extends the front stereo image to include the surround speakers for a wraparound effect ...

Page 76: ...htness 10 to 10 Default 0 CONTRAST Adjusts the contrast between light and dark 10 to 10 Default 0 HUE Adjusts the red green balance 10 to 10 Default 0 CHROMA Adjusts saturation from dull to bright 10 to 10 Default 0 RESa Resolution a When a resolution value is selected in this setting and the analog signals input are converted and output as HDMI signals images may not appear depending on the video...

Page 77: ... this you switch between the impedance settings Speaker 6 Ω Use this setting if your speakers are rated at 6 Ω Speaker 8 Ω Use this setting if your speakers are rated at 8 Ω or more Checking your system settings Use the status display screen to check your current settings for features such as surround back channel processing and your current MCACC preset 1 Press RECEIVER then press STATUS to check...

Page 78: ...Crossover 80 Hz X Curve OFF THX Audio Setting 0 1 ft Inputs See Input function default and possible settings on page 71 MULTI ZONE Zone 2 Volume Type Variable Zone 2 Volume 60 dB SR SR Control On Off OFF SR Volume Control On Off OFF Monitor Out OFF DSP Surround back channel Processing ON Phase Control ON Sound Retriever OFF Sound Delay 0 0 frame Dual Mono CH1 DRC OFF SACD Gain 0 dB LFE Attenuate 0...

Page 79: ...e Preset code list You should have no problem controlling a component if you find the manufacturer in this list but please note that there are cases where codes for the manufacturer in the list will not work for the model that you are using There are also cases where only certain functions may be controllable after assigning the proper preset code Note 1 You can t assign the RECEIVER FM AM iPod US...

Page 80: ...SUNSTAR 441 SUNTRONIC 441 TASHIKO 441 TATUNG 414 417 441 TELEAVIA 417 TELEFUNKEN 417 428 TENSAI 441 THOMSON 417 428 THORN 417 TOSHIBA 405 409 414 417 426 428 UNIVERSUM 411 414 441 ZENITH 403 404 417 CATV Manufacturer Code GENERAL INSTRUMENT 701 JERROLD 701 702 703 704 711 712 713 714 715 716 PIONEER 700 718 PVP STEREO VISUAL MATRIX 701 S ATLANTA 705 706 708 709 ZENITH 707 710 717 TAPE Manufacturer...

Page 81: ...cimal point when selecting a TV channel DTV ENTER CLASS Use to enter a channel Cable TV Satellite TV TV DTV MENU Select different menus from the DTV functions DTV Select the menu screen Cable TV Satellite TV TV ENTER Select adjust and navigate items on the menu screen Cable TV Satellite TV TV DTV Button s Function Components Button s Function Components SOURCE Press to switch the component between...

Page 82: ...e tape Cassette deck ENTER Navigates DVD menu options DVD DVR player CH Selects channels VCR DVD DVR player AUDIO Changes the audio language or channel DVD BD DVR player DISPLAY Press to display information DVD BD DVR player HDD Switches to the hard disk controls when using a DVD HDD recorder DVR player DVD Switches to the DVD controls when using a DVD HDD recorder DVR player Note 1 If you want to...

Page 83: ...SAFETY 2 ON turn down the volume With SAFETY 1 ON or SAFETY 2 ON on some features may be unavailable The unit does not respond when the buttons are pressed Try switching the receiver off then back on again Try disconnecting the power cable then connect again AMP ERR blinks in the display then the power automatically switches off The MCACC blinks and the power does not turn on The receiver may have...

Page 84: ...Setting on page 49 If there is very little low frequency information in the source material change your speaker settings to Front SMALL Subwoofer YES or Front LARGE Subwoofer PLUS see Speaker Setting on page 49 Check that the LFE channel is not set to OFF or a very quiet setting see Setting the Audio options on page 74 Check the speaker level settings see Channel Level on page 50 No sound from one...

Page 85: ...cting analog audio sources on page 20 Subwoofer output is very low To route more signal to the subwoofer set it to PLUS or set the front speakers to SMALL see Speaker Setting on page 49 Everything seems to be set up correctly but the playback sound is odd The speakers may be out of phase Check that the positive negative speaker terminals on the receiver are matched with the corresponding terminals...

Page 86: ...play device Switch off the video converter and reconnect the source and display device using the same type of connection component S Video or composite then start playback again Symptom Remedy The Auto MCACC Setup continually shows an error The ambient noise level may be too high Keep the noise level in the room as low as possible see also Problems when using the Auto MCACC Setup on page 11 If the...

Page 87: ...o a PC is cleared Symptom Remedy The display is dark or off Press DIMMER on the remote control repeatedly to select a different brightness After making an adjustment the display goes off Press DIMMER on the remote control repeatedly to select a different brightness You can t get DIGITAL to display when using the SIGNAL SEL button Check the digital connections and make sure that the digital inputs ...

Page 88: ...no obstacles between the receiver and the remote control Make sure that there is no fluorescent or other strong light shining on to the remote sensor Check the connections of the CONTROL IN jack see Operating other Pioneer components with this receiver s sensor on page 82 Other components can t be operated with the system remote If the battery ran down the preset codes may have been cleared Re ent...

Page 89: ...or use an HDMI cable high speed HDMI cable to connect this receiver to a component or TV with the DeepColor feature No picture Try changing the Resolution setting in Setting the Video options on page 75 No sound or sound suddenly ceases Check that the HDMI AV setting is set to AMP THROUGH If the component is a DVI device use a separate connection for the audio If analog video is being output over ...

Page 90: ... you must adjust the volume on the display every time you switch input sources XM radio messages Symptom Cause Action Check XM Tuner The XM Mini Tuner is not installed or not fully seated in the XM Mini Tuner Dock or the XM Mini Tuner dock is not connected to this receiver Confirm the XM Mini Tuner is fully seated in the dock and check the XM Mini Tuner dock cable is connected to this receiver Che...

Page 91: ...is receiver s model name and CNP 1000 XM Radio ID number ready beforehand and explain that this receiver is displaying the message Upgrade XM Tuner If you already have an XM Mini Tuner connected and you see this message turn off this receiver make sure the XM Mini Tuner is properly seated in the Mini Tuner Dock and then turn this receiver On again If the message reappears contact XM Listener Care ...

Page 92: ... decoder can then use for enhanced surround listening with greater sound detail Dolby Digital Plus Dolby Digital Plus is the next generation audio technology for all high definition programming and media It combines the efficiency to meet future broadcast demands with the power and flexibility to realize the full audio potential expected in the upcoming high definition era Built on Dolby Digital t...

Page 93: ...hannel decoder DTS EXPRESS DTS EXPRESS is a low bitrate encoding technology supporting up to 5 1 channels with fixed data transfer rates This format is incorporated with sub audio on HD DVD and secondary audio on Blu ray Disc while boasting the potential applicability to upcoming broadcasts and memory audio contents DTS HD Master Audio DTS HD Master Audio is a technology that delivers master audio...

Page 94: ...HX Select2 Plus requirements cover every aspect of the product including pre amplifier and power amplifier performance and operation and hundreds of other parameters in both the digital and analog domain THX Surround EX THX Surround EX Dolby Digital Surround EX is a joint development of Dolby Laboratories and the THX Ltd In a movie theater film soundtracks that have been encoded with Dolby Digital...

Page 95: ...processing is applied to the surround channels of all 5 1 encoded music sources such as DTS Dolby Digital and DVD Audio to provide a wide stable rear soundstage THX Select2 Games For the playback of stereo and multi channel game audio the THX Select2 Games mode should be selected In this mode THX ASA processing is applied to the surround channels of all 5 1 and 2 0 encoded game sources such as ana...

Page 96: ...ice only available in the 48 contiguous United States 2008 XM Satellite Radio Inc All rights reserved XM Ready Subscription Once you have installed the XM Mini Tuner Home Dock inserted the XM Mini Tuner connected the XM Mini Tuner Home Dock to your XM Ready audio system and installed the antenna you are ready to subscribe and begin receiving XM programming There are three places to find your eight...

Page 97: ...ack THX CINEMA THX MUSIC THX GAMES As above Dolby Digital Surround 2 Pro Logic llx MOVIE 2 Pro Logic llx MUSIC 2 Pro Logic llx GAME 2 PRO LOGICa Neo 6 CINEMA Neo 6 MUSIC 2 Pro Logic IIx MOVIE THX 2 Pro Logic llx MUSIC THX MUSIC 2 Pro Logic llx GAME THX GAMES Neo 6 CINEMA THX THX Select2 GAMESb Neo 6 MUSIC THX MUSIC 2 PRO LOGIC THX CINEMAa 2 Pro Logic llx MOVIE DTS Surround As above As above Neo 6 ...

Page 98: ...o Logic ll MOVIE DTS Surround As above As above Neo 6 CINEMA SACD As above Neo 6 MUSIC THX MUSIC 2 PRO LOGIC ll MUSIC THX MUSIC Stereo playback XM Radio 2 Pro Logic llx MOVIE 2 Pro Logic llx MUSIC 2 Pro Logic llx GAME 2 PRO LOGIC Neo 6 CINEMA Neo 6 MUSIC XM HD Surround 2 Pro Logic IIx MOVIE THX 2 PRO LOGIC THX Neo 6 CINEMA THX XM HD Surround Other stereo sources 2 Pro Logic ll MOVIE 2 Pro Logic ll...

Page 99: ...hannel As above Straight decoding As above DTS EXPRESS DTS HD DTS HD Master Audio 5 1 channel Straight decoding THX CINEMAb THX Select2 CINEMAa THX Select2 MUSICa THX Select2 GAMESa THX MUSICb THX GAMESb Straight decoding Dolby Digital EX 6 1 channel flagged Dolby Digital EX 2 Pro Logic IIx MOVIEa 2 Pro Logic llx MUSIC THX SURROUND EX 2 Pro Logic IIx MOVIE THXa THX Select2 CINEMAa THX Select2 MUSI...

Page 100: ...Dolby TrueHD DTS HD DTS HD Master Audio WMA9 Pro PCM 6 1 7 1 channel Straight decoding THX CINEMA Straight decoding Dolby TrueHD 176 4 kHz 192 kHz 5 1 channel As above Straight decoding As above Dolby Digital EX 6 1 channel flagged Dolby Digital EX 2 Pro Logic llx MOVIEa THX SURROUND EX Dolby Digital EX 2 Pro Logic llx MOVIEa DTS ES 6 1 channel sources 6 1 channel flagged DTS ES Matrix Discrete DT...

Page 101: ...g sources As above ANALOG DIRECT stereo Not connected Dolby Digital Surround 2 Pro Logic llx MOVIE 2 Pro Logic llx MOVIE DTS Surround Neo 6 CINEMA Neo 6 CINEMA Other stereo sources Stereo playback Stereo playback Analog sources As above ANALOG DIRECT stereo Surround Back speaker s Input signal format DIRECT PURE DIRECT Connected Dolby Digital EX 6 1 channel flagged Dolby Digital EX 2 Pro Logic llx...

Page 102: ...n x 3 Output 19 pin 5 V 100 mA FM Tuner Section Frequency Range 87 5 MHz to 108 MHz Usable Sensitivity Mono 13 2 dBf IHF 1 3 µV 75 Ω 50 dB Quieting Sensitivity Mono 20 2 dBf Stereo 38 6 dBf Signal to Noise Ratio Mono 73 dB at 85 dBf Stereo 70 dB at 85 dBf Distortion Stereo 0 5 1 kHz Alternate Channel Selectivity 60 dB 400 kHz Stereo Separation 40 dB 1 kHz Frequency Response 30 Hz to 15 kHz 1 dB An...

Page 103: ...able sound level Set the dial and leave it there Taking a minute to do this now will help to prevent hearing damage or loss in the future After all we want you listening for a lifetime We Want You Listening For A Lifetime Used wisely your new sound equipment will provide a lifetime of fun and enjoyment Since hearing damage from loud noise is often undetectable until it is too late this manufacture...

Page 104: ...essories please call the number shown below 1 8 0 0 4 2 1 1 4 0 4 Please do not ship your product to Pioneer without first calling the Customer Support at the above listed number for assistance Pioneer Electronics Service Inc P O BOX 1760 Long Beach CA 90801 1760 U S A For warranty information please see the Limited Warranty sheet included with your product Should this product require service in C...

Reviews: