background image


Getting started

04


29


En


1

If the system isn’t already on, press 


 STANDBY/ON to switch it on.

2

Press ROOM SETUP.


• If you have previously set up the room type 

and seating position, the display will show 
the current room settings.


3

Press ENTER.

4

Use the 


/


 (cursor up/down) 

buttons to select a room type then press 
ENTER.


Choose one of the following depending on 
your room size:


S


 – Smaller than average room


M


 – Average room


L


 – Larger than average room


5

Use the 


/


 (cursor up/down) 

buttons to select a seating position 
setting, then press ENTER.


Choose one of the following depending on 
where your main listening position is:


Fwd


 – If you are nearer to the front 

speakers than the surround speakers


Mid


 – If you are equal distance from the 

front and surround speakers


Back


 – If you are nearer to the surround 

speakers than the front speakers

• The Room Setup automatically sets up 

channel levels and channel delay. If you 
have already set the channel levels 
manually (see 


Setting the channel levels


on page 63), you will see 


Room Set?


 in 

the display when you first press the 


ROOM SETUP


 button. If you continue, the 

previous settings will be overwritten.

• For more detailed surround sound setup, 

see 


Setting up surround sound


 on 

page 62.


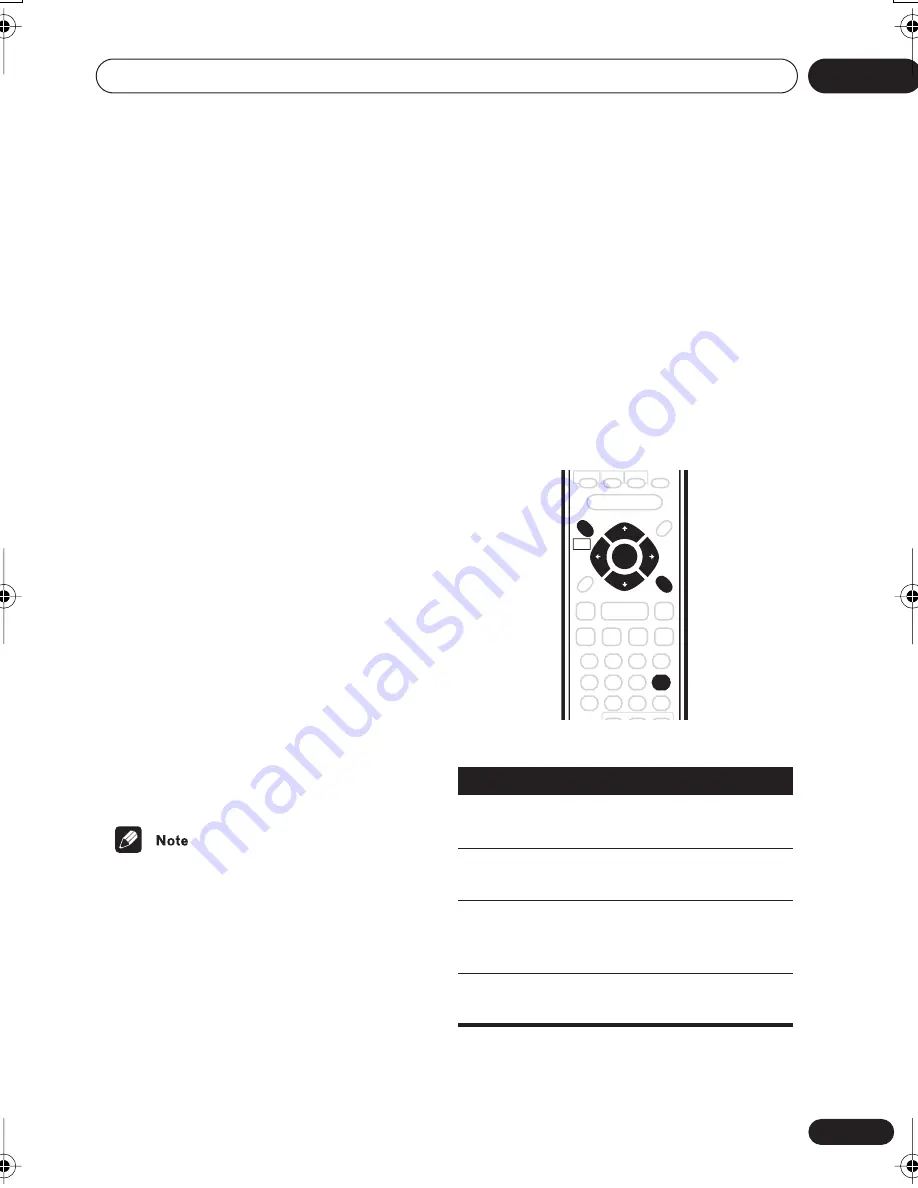
Using the on-screen displays


For ease of use, this system makes extensive 
use of graphical on-screen displays (OSDs). 
You should get used to the way these work as 
you’ll need to use them when setting up the 
system, using some of the playback features, 
such as program play, and when making 
more advanced settings for audio and video.

All the screens are navigated in basically the 
same way, using the cursor buttons to 
change the highlighted item and pressing 


ENTER


 to select it.


Button

What it does


HOME 
MENU


Displays/exits the on-screen 
display


Changes the highlighted menu 
item


ENTER


Selects the highlighted menu 
item (both 


ENTER


 buttons work 

in exactly the same way)


RETURN


Returns to the main menu 
without saving changes

HOME

MENU

RETURN

ENTER

ENTER

XV-HDT7.book 29 ページ 2003年5月12日 月曜日 午後7時56分

Summary of Contents for S-HTD7

Page 1: ...01 1 En DVD CD Receiver XV HTD7 Speaker System S HTD7 Operating Instructions ...

Page 2: ...VASE FLOWER POT COSMETICS CONTAINER AND MEDICINE BOTTLE ETC H001A_En VENTILATION When installing this unit make sure to leave space around the unit for ventilation to improve heat radiation at least 15 cm at top 10 cm at rear and 10 cm at each side WARNING Slot and openings in the cabinet are provided for ventilation and to ensure reliable operation of the product and to protect it from overheatin...

Page 3: ...ct the interference by one or more of the following measures Reorient or relocate the receiving antenna Increase the separation between the equipment and receiver Connect the equipment into an outlet on a circuit different from that to which the receiver is connected Consult the dealer or an experienced radio TV technician for help H010_En Information to User Alteration or modifications carried ou...

Page 4: ...y must be authorized by Macrovision Corporation and is intended for home and other limited viewing uses only unless otherwise authorized by Macrovision Corporation Reverse engineering or disassembly is prohibited This product is for general household purposes Any failure due to use for other than household purposes such as long term use for business purposes in a restaurant or use in a car or ship...

Page 5: ...em 18 Connecting the supplied antennas 19 Assembling the loop antenna 19 AM loop antenna 19 FM wire antenna 20 Connecting the power 20 03 Controls and displays Front panel 21 Display 22 Remote control 24 04 Getting started Switching on and setting up 27 Setting the clock 28 Using the Room Setup 28 Using the on screen displays 29 Playing discs 30 Basic playback controls 31 Resume and Last Memory 32...

Page 6: ...on off 60 Setting the sleep timer 60 09 Surround sound setup Setting up surround sound 62 System Setup menu options 62 Setting the channel levels 63 10 Video Adjust menu Video Adjust 65 Creating your own presets 65 11 Initial Settings menu Using the Initial Settings menu 67 Video Output settings 67 TV Screen 67 Component Out 68 S Video Out 69 Language settings 69 Audio Language 69 Subtitle Languag...

Page 7: ...rding mode 80 Troubleshooting 81 General 81 DVD CD Video CD player 82 WMA MP3 JPEG discs 83 Tuner 83 Error Messages 84 Screen sizes and disc formats 85 Widescreen TV users 85 Standard TV users 85 Selecting languages using the language code list 85 Language code list 86 Country code list 86 Glossary 87 Specifications 89 ...

Page 8: ...el source material with surround sound playback PureCinema progressive scan When connected to a progressive scan compatible TV or monitor using the component video outputs you can enjoy extremely stable flicker free images with the same frame refresh rate as the original movie Picture zoom While a DVD or Video CD Super VCD is playing you can zoom in on any part of the picture at up to 4x magnifica...

Page 9: ...remote control 1 Open the battery compartment cover on the back of the remote control 2 Insert two AA R6P batteries into the battery compartment following the indications inside the compartment 3 Close the cover Incorrect use of batteries can result in hazards such as leakage and bursting Please observe the following Don t mix new and old batteries together Don t use different kinds of battery tog...

Page 10: ...ment located close to this system Replace the batteries when you notice a fall off in the operating range of the remote Disc content format playback compatibility General disc compatibility This system was designed and engineered to be compatible with software bearing one or more of the following logos KODAK Picture CD is a trademark of Fuji Photo Film Co Ltd Other formats including but not limite...

Page 11: ...W shows in the display when a VR format DVD RW disc is loading When playing a VR format DVD RW discs that was edited on a DVD recorder the screen may go momentarily black at edited points and or you may see scenes from immediately before the edited point This system unit cannot record DVD R RW discs Unfinalized DVD R RW discs cannot be played in this system PC created disc compatibility If you rec...

Page 12: ...e both compatible with this system Use CD R or CD RW media for recording your files The disc must be finalized i e the session must be closed in order to play in this system unit This system is not compatible with multi session discs Only the first session of a multi session disc will be recognized This system only plays tracks that are named with the file extension mp3 MP3 wma or WMA When naming ...

Page 13: ...A Form1 Romeo and Joliet file systems are both compatible with this system This system can recognize up to 999 files JPEG and up to 499 folders If a disc exceeds these limits only files and folders up to these limits will be playable Files and folders are read displayed in alphabetical order Note that if the file structure is very complex you may not be able to read play all the files on the disc ...

Page 14: ...he power supply Connecting the speakers Connect each speaker using the color coded speaker cable Match them to the colored labels above the speaker terminals AUDIO PB Y ONENTVIDEOOUT LINE 2 COAXIA IN CENTER SUB WOOFER L R L R FRONT SURROUND S VIDEO OUT VIDEO OUT SPEAKERS Front right Surround right Surround left Front left Subwoofer Center Gray Blue White Red Purple Green ...

Page 15: ...tab and the other wire with the black tab 3 Connect to the speaker terminals on the rear of the speakers in the same way Remove the supplied non skid pads from the paper and stick four onto the base of each satellite speaker Actual speakers supplied may differ from those shown Placing the speakers Where you put your speakers in the room has a big effect on the quality of the sound The following gu...

Page 16: ...ose to a television may result in color distortion on the screen If this happens move the speakers a little further away and switch off the television for 15 30 minutes The subwoofer is not magnetically shielded and so should not be placed near a TV or monitor Wall mounting the center and surround speaker system Before mounting Remember that the speaker system is heavy and that its weight could ca...

Page 17: ...e the system unit away from the TV Connecting using the S video output If your TV has an S video input you can use this instead of the standard video output for a better quality picture Use an S video cable not supplied to connect the S VIDEO OUT to an S video input on your TV Line up the small triangle below the jack with the same mark on the plug before plugging in The S video ouptut is switchab...

Page 18: ... on page 68 for more on this Listening to TV audio through this system You can connect the audio output of your TV to this system so that broadcast TV sound is played through this system Connect a stereo audio cable not supplied from the audio outputs of your TV to the TV IN jacks on this system If you find that the TV audio is distorting when played through this system you can set the input atten...

Page 19: ...stand AM loop antenna 1 Pull off the protective shields of both AM antenna wires 2 Press the antenna terminal tabs to open and insert one wire into each terminal 3 Release the tabs to secure the AM antenna wires 4 Place the AM antenna on a flat surface and point in the direction giving the best reception Avoid placing near computers television sets or other electrical appliances and do not let it ...

Page 20: ...eave coiled up The signal ground is designed to reduce noise that occurs when an antenna is connected It is not an electrical safety ground Connecting the power Before connecting the power and switching on for the first time make sure that everything is connected properly 1 Plug one end of the supplied power cable into the AC INLET 2 Plug the other end into a household power outlet See Connecting ...

Page 21: ...e to stations or select presets 6 Press to stop playback 7 Press to start or resume playback During playback press to pause press again to restart playback 8 DIRECT PLAY buttons page 31 Press to start playback of any disc in the player 9 DISC SKIP page 30 33 During playback press to start playing the next disc in the player If the disc tray is open while no disc is playing the tray rotates one dis...

Page 22: ...emote sensor 18 Timer indicator page 59 Lights when the timer is set 19 This mark indicates compatibility with DVD RW discs recorded on a DVD recorder in Video Recording VR mode 20 Mic jack 21 MIC volume 22 PHONES jack Headphone jack Display 1 Tuner indicators page 36 Lights when a broadcast is being received Lights when a stereo FM broadcast is being received in auto stereo mode Lights when FM mo...

Page 23: ...ing playback of a Dolby Digital source 14 Speaker indicators These show which speakers are being used to output the current source The illustrations below show some example displays When headphones are connected none of the speaker indicators are lit 15 PRGSVE page 68 Lights when progressive scan video output is selected 16 ADV SURR page 40 Lights when one of the Advanced Surround listening modes ...

Page 24: ...ons AUTO page 38 Press to select the default decoding for the current source SURROUND page 38 Use to select a Surround mode ADVANCED page 40 Use to select an Advanced Surround mode 6 ROOM SETUP page 28 Press to start Room Setup 7 Sound enhancement buttons BASS MODE page 42 Use to select a Bass Mode VIR SB page 41 Press to switch the Virtual Surround Back speaker effect on off DIALOGUE page 41 Use ...

Page 25: ...E QUIET MIDNIGHT Use to adjust the tone and effect level pages 39 42 Use with SHIFT for QUIET MIDNIGHT Use to select the Quiet and Midnight modes page 41 14 RETURN Press to return to a previous menu screen 15 Playback controls Press to start or resume playback and Use for reverse slow motion playback frame reverse and reverse scanning and Use for forward slow motion playback frame advance and forw...

Page 26: ...R button in 12 above 17 Disc selection buttons DISC select buttons page 30 Use to select discs in the player DISC SKIP CD MODE During playback press to start playing the next disc in the player If the disc tray is open while no disc is playing the tray rotates one disc space If the disc tray was opened using the EXCHANGE button front panel only then pressing DISC SKIP rotates the disc tray two dis...

Page 27: ...e screen displayed 2 Press ENTER to move on to the next screen 3 Use the cursor left right buttons to select either Wide screen or Standard size screen according to the kind of TV you have then press ENTER See also Screen sizes and disc formats on page 85 if you re not sure which one to choose ENTER ENTER STANDBY ON ROOM SETUP SYSTEM SETUP SHIFT TIMER Welcome to Pioneer DVD Thank you for purchasin...

Page 28: ...splay press or cursor left or right until you see it 3 Press ENTER 4 Use the cursor up down buttons to set the hour 5 Press ENTER 6 Use the cursor up down buttons to set the minute 7 Press ENTER to confirm The display flashes to indicate the clock is set Press TIMER SHIFT 6 anytime to display the clock If you unplug the system from the wall outlet or there is a power outage you will need to set th...

Page 29: ...channel delay If you have already set the channel levels manually see Setting the channel levels on page 63 you will see Room Set in the display when you first press the ROOM SETUP button If you continue the previous settings will be overwritten For more detailed surround sound setup see Setting up surround sound on page 62 Using the on screen displays For ease of use this system makes extensive u...

Page 30: ...oad a disc with the label side facing up in the front most disc space using the disc tray guide to align the disc If you re loading a double sided DVD disc load it with the side you want to play face down If you want to load more discs press DISC SKIP remote or front panel to rotate the disc tray You can load up to five discs at once Do not place discs in the two partially accessible disc spaces a...

Page 31: ...l start See Viewing JPEG discs on page 56 for more on playing these discs See also PhotoViewer on page 73 if the disc contains both WMA MP3 audio files and JPEG picture files 5 Use the VOLUME button or the front panel VOLUME knob to adjust the volume Basic playback controls The table below shows the basic controls on the remote for playing discs You can find other playback features in Playing audi...

Page 32: ...em and you can resume playback this works for up to five discs If you want to clear the resume last memory point press stop while Resume or Last Mem is displayed When a Video CD is loaded the Resume point is lost if the system is switched off For the Last Memory function to work you must press stop to stop playback before opening the disc tray or changing the disc The Last Memory function doesn t ...

Page 33: ... disc tray after exchanging discs Never push the disc tray shut by force After I load a DVD disc it ejects automatically after a few seconds Most likely the disc is the wrong region for your system The region number should be printed on the disc check it against the region number of the system which you can find on the rear panel See also DVD Video regions on page 76 If the region number is OK it ...

Page 34: ...such as subtitle and audio language selection or special features such as slideshows See the disc packaging for details Sometimes DVD Video menus are displayed automatically when you start playback others only appear when you press DVD MENU or TOP MENU TOP MENU DVD MENU RETURN SHIFT ENTER ENTER Button What it does TOP MENU SHIFT DVD MENU Displays the top menu of a DVD disc this varies with the dis...

Page 35: ...cated on the front panel If the microphone has an on off switch make sure it s on 3 Load a karaoke backing disc You can also use the radio or a component connected to the auxiliary inputs as source material for a backing track 4 To change the mix CD or VCD only press AUDIO Pressing repeatedly switches between these modes STEREO Use for backing tracks with no vocals L CH Left channel only Use for t...

Page 36: ...epeatedly to change the displayed frequency Auto tuning Press and hold TUNE until the frequency display starts to move then release The tuner will stop on the next station it finds Repeat to search for other stations High speed tuning Press and hold TUNE until the frequency display starts to move rapidly Keep the button held down until you reach the frequency you want If necessary fine tune the fr...

Page 37: ... is unplugged from the power supply completely saved stations will remain for several days after which you ll have to save them again Listening to station presets 1 Make sure the TUNER function is selected 2 Use the ST buttons to select a station preset If you are using the front panel controls press TUNER FM AM ST until you re in station preset mode then use the and buttons to select a station pr...

Page 38: ...ning in surround sound You can listen to any source stereo or multichannel analog or digital in surround sound Surround sound is generated from stereo sources using one of the Dolby Pro Logic decoding modes Press SURROUND repeatedly to select a listening mode or press SURROUND then use the cursor up down buttons The listening mode choices that appear in the display will vary according to the type ...

Page 39: ...ons to select C Width Dimen or Pnrm C Width Center Width Makes the center channel wider higher settings or narrower lower settings Dimen Dimension Makes the sound more distant minus settings or more forward positive settings Pnrm Panorama Creates more spacious surround sound 3 Use the cursor up down buttons to adjust the setting Center Width is adjustable between 0 and 7 Dimension between 3 and 3 ...

Page 40: ...rces ExPwrSurr Extra Power Surround Gives additional energy and width to stereo sources Virtual Creates the impression of surround sound from just the front speakers 5ch Stereo Designed to give powerful surround sound to stereo music sources You can t use the Advanced Surround modes with high sampling rate 88 2 96 kHz sources You can use any of the above Advanced Surround modes with any type of so...

Page 41: ...hind you creating more cohesive and realistic surround sound Press VIR SB repeatedly to switch between Vir SB On and Vir SB Off You can t use Virtual Surround Back when listening in Stereo or Virtual listening modes If there is no surround channel Virtual Surround Back has no effect You can t use the Virtual Surround Back effect with high sampling rate 88 2 96 kHz sources or with headphones Using ...

Page 42: ... level There are three bass modes you can use to enhance the bass in a source Press BASS MODE repeatedly to choose an option that fits the source you re listening to Music Can be used with music to give a deeper bass sound Cinema Good for action movies or movies with lots of sound effects P Bass Can be used with music sources to bring the beat of the music or soundtrack to the forefront Off You ca...

Page 43: ... skipping over any DVDs and Video CDs loaded This may be useful if you have a mixture of discs loaded but only want to play music you don t have to keep track of what kind of disc is where in the disc tray 1 Press CD MODE SHIFT DISC SKIP to switch CD mode on The indicator on the front panel lights when CD mode is on 2 Press play to start playback The first CD loaded automatically starts to play On...

Page 44: ...hows a list of tracks The screen for a WMA MP3 disc shows the folder names on the left and the track names on the right note that any folder and track names that contain accented or non roman characters will show up with generic names F_033 T_035 etc Select a folder or a track within a folder Playback starts after you press ENTER You can t use the Disc Navigator when there are no discs loaded Play...

Page 45: ... on a DVD disc Playing in slow motion You can play DVDs and Video CD Super VCDs at four different forward slow motion speeds DVD discs can also be played at two reverse speeds With Video CD Super VCDs and VR format DVD RWs you can only use forward slow motion playback 1 During playback press pause 2 Press and hold or until slow motion playback starts The slow motion speed is shown on screen There ...

Page 46: ...Start Point to set the loop start point 4 Press ENTER on B End Point to set the loop end point After pressing ENTER playback jumps back to the start point and plays the loop The minimum loop time is 2 seconds 5 To resume normal playback select Off from the menu Using repeat play There are various repeat play options depending on the kind of disc loaded It s also possible to use repeat play togethe...

Page 47: ...osing from the Play Mode menu If you switch camera angle during repeat play repeat play is canceled Using random play With a DVD you can choose to play titles or chapters within a title in a random order With CDs Video CD Super VCDs MP3 or WMA discs you can play all the discs at random or just the contents of a single disc You can set the random play option when a disc is playing or stopped You ca...

Page 48: ...he end then stop During random play the and buttons function a little differently to normal returns to the beginning of the current track chapter You can t go back further than this selects another track chapter at random from those remaining You can t use random play together with program play Creating and editing a DVD program list This feature lets you program the play order of titles and chapt...

Page 49: ...gram list can contain up to 24 steps To clear a step in the program list move to the Program Step column highlight the step to clear and press CLEAR To insert a step in the program list move to the Program Step column and highlight the step where you want a new step to appear After you select a title chapter all the program steps will move down one to make space for the new one 8 To play the progr...

Page 50: ...ng from one of the other discs loaded With WMA MP3 discs you can select a folder or an individual track in a folder With CDs and Video CD Super VCDs select a track Any DVDs loaded are shown grayed out and can t be selected If the system has not yet determined the type of disc in a tray position is displayed as the disc type If you select it 1 500 is displayed in the middle column and 1 999 in the ...

Page 51: ...while stopped to erase the program list The current playlist is erased if you change the type of disc in the play position DVD or non DVD or select Program Delete from the Play Mode menu DVD playback follows commands recorded on the disc There may be cases where program play is automatically cancelled or may not work This is not a malfunction With Video CD Super VCDs that feature PBC playback make...

Page 52: ...search mode 4 Use the number buttons to enter a title chapter folder or track number or a time For a time search enter the number of minutes and seconds into the currently playing title DVD or track Video CD you want playback to resume from For example press 4 5 0 0 to have playback start from 45 minutes into the disc For 1 hour 20 minutes and 30 seconds press 8 0 3 0 5 Press ENTER to start playba...

Page 53: ...ou can switch between stereo just the left channel or just the right channel Super VCD supports four channels of audio You can switch the playback channel between Stereo 1 Left 1 Right 1 Stereo 2 Left 2 and Right 2 note that not all Super VCDs have a second soundtrack Press AUDIO repeatly to select an audio channel option Zooming the screen Using the zoom feature you can magnify a part of the scre...

Page 54: ... transmission rate for DVD discs can be displayed on screen while a disc is playing To show switch the information displayed press DISPLAY SHIFT 8 When a disc is playing the information appears at the top of the screen Press DISPLAY SHIFT 8 repeatedly to change the displayed information DVD displays VR format DVD RW displays CD and Video CD displays WMA MP3 disc displays Audio 1 French Dolby Digit...

Page 55: ...apsed title time Disc no Title no Remaining title time Disc no Chapter no Remaining chapter time Play JPEG File File Name FL000001 1 40 Current Total Play JPEG Folder Folder Name Holiday 2 6 Current Total 2 2 8 4 9 2 T 1 1 0 7 0 0 2 2 0 4 2 CD and Video CD displays Disc no Track no Elapsed track time Disc no Track no Remaining track time Disc no Remaining disc time WMA MP3 disc displays Disc no Tr...

Page 56: ... contains JPEG picture files you should first set the Photoviewer option to Off See PhotoViewer on page 73 Using the JPEG Disc Navigator and Photo Browser Use the JPEG Disc Navigator to find a particular folder or picture by filename on the disc in the play position use the Photo Browser to find a picture within a folder by thumbnail image 1 Press DVD MENU to display the Disc Navigator screen Butt...

Page 57: ...R The Photo Browser screen opens with the first nine pictures displayed as thumbnails 2 Use the cursor buttons to highlight a thumbnail picture Use the track skip buttons and to see the previous next page of thumbnails Keep the button pressed if you want to skip several pages release when you reach the page you want To return to the Disc Navigator screen press RETURN 3 Press ENTER to display the s...

Page 58: ...Viewing JPEG discs 07 58 En 2 Use the cursor buttons to change the zoomed area You can change the zoom factor and the zoomed area freely 3 To resume the slideshow press play ...

Page 59: ...ed 3 Set the volume 4 Press TIMER SHIFT 6 twice to reach the timer menu 5 Use the cursor left right buttons to select WAKE UP then press ENTER 6 Use the cursor left right buttons to select TIMER EDIT then press ENTER 7 Set the switch on time Use the cursor up down buttons to set the hour then press ENTER Set the minute in the same way pressing ENTER when you re done 8 Set the switch off time Use t...

Page 60: ... left right buttons to select WAKE UP then press ENTER 3 Use the cursor left right buttons to select TIMER ON or TIMER OFF You must have the timer set see above to select ON The wake up timer switches on and off according to your previous settings 4 Press ENTER The wake up timer will automatically be canceled if the clock is reset Setting the sleep timer The sleep timer switches off the system aft...

Page 61: ...ess ENTER Choose between the following options Auto Available only in CD mode the system switches off automatically after the currently playing disc has finished Sleep 90 System switches off after 90 minutes Sleep 60 System switches off after an hour Sleep 30 System switches off after 30 minutes Off cancels the sleep timer 4 To check how much time is left repeat steps 1 and 2 The remaining time is...

Page 62: ...ch option as you cycle through the display See below for a full list and description of each 3 Use the cursor up down buttons to adjust the setting 4 Repeat steps 2 and 3 to make other settings 5 When you re done press ENTER to leave the System Setup menu The System Setup menu is exited automatically after 5 minutes of inactivity System Setup menu options Below are all the available settings in th...

Page 63: ...wo separate soundtracks L Ch1 R Ch2 Both channels are played through the front speakers Ch1 Mono Only channel 1 is played Ch2 Mono Only channel 2 is played On the Ch1 Mono and Ch2 Mono settings the sound comes only from the center speaker or from the front speakers if listening in STEREO mode This setting works only with dual mono encoded Dolby Digital or DTS soundtracks See the disc packaging for...

Page 64: ...same volume from each speaker when seated in the main listening position The channel level range is 10 dB 5 When you re done press ENTER to exit test tone setup The speaker volume can be adjusted while listening to any sound source you want by pressing CH LEVEL SHIFT 5 and then using the cursor up down buttons to adjust the channel levels After you re finished with one channel use the cursor left ...

Page 65: ... see the effect clearly Creating your own presets You can create up to two presets of your own 1 Select one of the Memory presets see above 2 Press cursor down to select Detailed Settings then press ENTER 3 Adjust the picture quality settings Use the cursor up down buttons to select a setting Use the cursor left right buttons to adjust the current setting Press DISPLAY SHIFT 8 to switch between fu...

Page 66: ...l of the following picture quality settings Contrast Adjusts the contrast between light and dark Brightness Adjusts the overall brightness Chroma Level Adjusts how saturated colors appear 4 Press ENTER to save the preset and exit the Video Adjust screen ...

Page 67: ...utput settings TV Screen Default setting 4 3 Letter Box If you have a widescreen TV select the 16 9 Wide setting widescreen DVD software is then shown using the full screen area When playing software recorded in conventional 4 3 format the settings on your TV will determine how the material is presented see the manual that came with your TV for details on what options are available If you have a c...

Page 68: ...n signal and switch the system to progressive you will not be able to see any picture at all In this case press STANDBY ON to put the system in standby then press and hold the front panel stop button for about 8 seconds until the display shows Mem Clr Press the front panel or button so that the display shows Interlace Press the front panel button to set to interlace and switch the system back on W...

Page 69: ... audio language automatically when loaded overriding the audio language you set in the Initial Settings menu Discs with two or more audio languages usually allow you to select the audio language from the disc menu Press DVD MENU to access the disc menu Subtitle Language Default setting English This setting is your preferred subtitle language for DVD discs If the language you specify here is record...

Page 70: ...ent languages Select Other Language if you want to specify a language other than those listed See also Selecting languages using the language code list on page 85 Subtitle Display Default setting On When set to On the system displays subtitles according to the Subtitle Language setting Set to Off to switch subtitles off altogether Display settings OSD Language Default setting English This sets the...

Page 71: ...ode you must register a password As the password owner you can change the Parental Lock level or Country Code whenever you like You can also change the password Not all discs that you may consider inappropriate for your children use the Parental Lock feature These discs will always play without requiring the password first If you forget your password you ll need to reset the system to its factory ...

Page 72: ...ER 3 Select a new level Press cursor left repeatedly to lock more levels more discs will require the password press cursor right to unlock levels You can t lock level 1 4 Press ENTER to set the new level and return to the Options menu screen Video Output Language Display Options Parental Lock PhotoViewer Password Change Level Change Country Code Initial Settings Video Output Language Display Optio...

Page 73: ...les and JPEG picture files The default On setting allows you to view only the JPEG files on this kind of disc Set to Off to be able to play the WMA MP3 audio files Note that when this setting is changed discs already loaded other than in the play position that contain both WMA MP3 audio files and JPEG picture files will show up as in the Disc Navigator and program list screens until they are reloa...

Page 74: ...istortion with some discs set the TV system to match your country or region s system Doing this however may restrict the kinds of disc you can watch The table below shows what kinds of disc are compatible with each setting AUTO PAL and NTSC Default setting Auto 1 Switch the system into standby 2 Press SYSTEM SETUP SHIFT HOME MENU 3 Use the cursor left right buttons to select TV System then press E...

Page 75: ...tting 12 Hour You can choose to display the clock in either 12 or 24 hour formats 1 Switch the system into standby 2 Press SYSTEM SETUP SHIFT HOME MENU 3 Use the cursor left right buttons to select 12 24 Hour then press ENTER 4 Use the cursor up down buttons to select either 12 Hour or 24 Hour 5 Press ENTER to confirm Changing the frequency step Except for Saudi Arabia model Default setting FM50 A...

Page 76: ... regions of the world Handling discs When holding discs of any type take care not to leave fingerprints dirt or scratches on the disc surface Hold the disc by its edge or by the center hole and edge Damaged or dirty discs can affect playback performance Take care also not to scratch the label side of the disc Although not as fragile as the recorded side scratches can still result in a disc becomin...

Page 77: ... damaging the player This system is designed for use with conventional fully circular discs only Use of shaped discs is not recommended for this product Pioneer disclaims all liability arising in connection with the use of shaped discs Proper installation and maintenance of this system Hints on installation We want you to enjoy using this system for years to come so please bear in mind the followi...

Page 78: ...ear from the display then unplug the power cable Never lift or move the system unit during playback discs rotate at a high speed and may be damaged Unplugging the system before Good Bye disappears from the display may cause the system to return to the factory settings Power cable caution Handle the power cable by the plug part Do not pull out the plug by tugging the cable and never touch the power...

Page 79: ...l playback component These include components such as a VCR or cassette deck Connect using RCA pin plug stereo cables See also Reducing the TV and line signal levels below Connect the LINE 1 OUT jacks to the analog inputs of an external recording component These include components such as a cassette deck VCR MD or another recorder with analog inputs Connect using RCA pin plug stereo cables ANTENNA...

Page 80: ...E MENU 3 Use the cursor left right buttons to select TV ATT or LINE1 ATT then press ENTER 4 Use the cursor up down buttons to select ATT OFF ATT 6dB or ATT 10dB If the ATT 6dB setting still results in distorted sound try the ATT 10dB setting 5 Press ENTER to confirm Recording mode The Recording mode allows you to make analog recordings from the LINE 1 OUT jacks When Recording mode is on most sound...

Page 81: ...nnect the power plug from the outlet and insert again Make sure there are no loose strands of speaker wire touching the rear panel This could cause the system to shut off automatically No sound is output when a function is selected If you re using the line input make sure the component is connected correctly see Connecting auxiliary components on page 79 Press MUTE on the remote control to turn mu...

Page 82: ...loading Clean the disc Align the disc properly in the disc guide If the region number on a DVD video disc does not match the number on the system unit the disc cannot be used see DVD Video regions on page 76 Allow time for any condensation inside the system unit to evaporate Avoid using the system near an air conditioning unit Playback is not possible If the disc is loaded upside down reload the d...

Page 83: ...nces between discs and disc content and are not malfunctions of this system Noticeable difference in DVD and CD volume DVDs and CDs use different recording methods This is not a malfunction Problem Remedy Problem Remedy CD ROM disc is not recognized by the system Make sure that the CD ROM was recorded using the ISO 9660 disc format See Disc content format playback compatibility on page 10 for othe...

Page 84: ...ntry or region Try switching the tuning interval frequency step see Changing the frequency step on page 75 Problem Remedy Message Description Child Lock This message appears when the front panel buttons are pressed when the child lock feature is active See Child Lock on page 75 for more on switching on off the child lock Rec Mode On Blinks rapidly for 2 seconds when an operation is prohibited beca...

Page 85: ...setting page 67 of this system should be set to 4 3 Letter Box or 4 3 Pan Scan depending on which you prefer Set to 4 3 Letter Box widescreen discs are shown with black bars top and bottom Set to 4 3 Pan Scan widescreen discs are shown with the left and right sides cropped Although the picture looks larger you don t actually see the whole picture Please note that many widescreen discs override the...

Page 86: ...1318 Malay ms 1319 Maltese mt 1320 Burmese my 1325 Nauru na 1401 Nepali ne 1405 Norwegian no 1415 Occitan oc 1503 Oromo om 1513 Oriya or 1518 Panjabi pa 1601 Polish pl 1612 Pashto Pushto ps 1619 Portuguese pt 1620 Quechua qu 1721 Rhaeto Romance rm 1813 Kirundi rn 1814 Romanian ro 1815 Kinyarwanda rw 1823 Sanskrit sa 1901 Sindhi sd 1904 Sangho sg 1907 Serbo Croatian sh 1908 Sinhalese si 1909 Slovak...

Page 87: ...ound effects hence 5 1 channels Dolby Pro Logic II is a matrix decoding system that extracts 4 1 Dolby Pro Logic or 5 1 Dolby Pro Logic II channel surround sound from a two channel source DRM DRM Digital Rights Management is a type of server software developed to enable secure distribution of paid content over the Web recently incorporated by WMA Windows Media Audio DTS DTS stands for Digital Thea...

Page 88: ...D through on screen menus recorded onto the disc Especially good for discs that you would normally not watch from beginning to end all at once karaoke discs for example Regions DVD Video only These associate discs and players with particular areas of the world This system will only play discs that have compatible region codes You can find the region code of your system by looking on the rear panel...

Page 89: ...V 60Hz 0 58 W 127V 50 60Hz Dimensions 420 W x 125 H x 448 D mm Weight 9 8 kg Accessories DVD CD receiver Remote control 1 AA R6P dry cell batteries 2 Video cable yellow plugs 1 AM loop antenna 1 FM antenna 1 Power cable 1 Central and South American model x2 Power plug adapter 1 Central and South American model PX model and Duty free model within Japan only Warranty card 1 Australian and New Zealan...

Page 90: ...fer Enclosure Bass reflex floor type System 16 cm 1 way system Speaker 16 cm cone type Nominal impedance 6 Ω Frequency range 35 Hz to 2 kHz Maximum Input Power 100 W Dimensions 190 W x 360 H x 327 D mm Weight 5 0 kg Accessories Speaker system Speaker cables 6 non skid pads 1 sheet Specifications and design subject to possible modification without notice due to improvements This product includes Fo...

Page 91: ...Additional information 12 91 En ...

Page 92: ... PIONEER EUROPE NV Haven 1087 Keetberglaan 1 B 9120 Melsele Belgium TEL 03 570 05 11 PIONEER ELECTRONICS ASIACENTRE PTE LTD 253 Alexandra Road 04 01 Singapore 159936 TEL 656 472 1111 PIONEER ELECTRONICS AUSTRALIA PTY LTD 178 184 Boundary Road Braeside Victoria 3195 Australia TEL 03 9586 6300 PIONEER ELECTRONICS DE MEXICO S A DE C V Blvd Manuel Avila Camacho 138 10 piso Col Lomas de Chapultepec Mex...

Reviews: