background image

18

PRA-BD11 / PRA-BD12
En

Installation

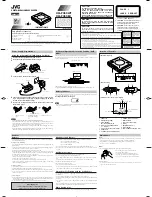
17. Operation check to verify connections

1

Connect the video monitor to the video output and audio output connectors of the
DVD recorder (consult the Operating Instructions for the DVD recorder).

2

Connect the DVD recorder’s power plug to an electrical outlet, and set the power
switch (rear panel) to ON, the press the front panel’s 

STANDBY/ON

 button to turn

the unit on.

[PRA-BD11 input board operation check]

1

Use a BNC cable (see page 6) to
connect the 

SDI 

input and 

AES/

EBU 

input connectors on the

input board installed in the DVD
recorder to equipment with SDI
and AES/EBU output connectors.

2

Output SDI and AES/EBU signals
from equipment connected in
Step 

1

.

3

Set the input on the DVD
recorder to 

SDI

 and 

AES/EBU

.

÷

Press the 

FUNCTION

button on the DVD recorder
to open the Function Menu
on the video monitor. Use
the 

CURSOR

 and 

ENTER

button to select “

SDI

” as [

V

Input

] and “

AES/EBU

” as

[

A Input

].

Select “SDI” as [V Input] on the Function Menu.

Front panel of DVD recorder

Attach model
number label here

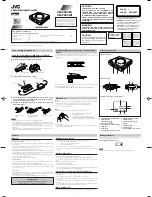
16. Apply the supplied model number

labels to the front panel of the DVD
recorder and to the user registration
card.

1

Apply one of the two supplied labels to
the top left of the DVD recorder (see
accompanying illustration).

2

Attach the other model number label in
the model number label field on the US
user registration card (USA only).

Notes:

÷

Clean the area on the top of the front panel before attaching the model number label.

÷

The model numbers on the labels are unique for each unit, so be sure to apply the
correct label for the DVD recorder in which the unit is actually installed.

Summary of Contents for PRA-BD11

Page 1: ...EBU SDI AES EBU Eingangskarte SDI AES EBUインプットボード PRA BD11 Operating Instructions Mode d emploi Bedienungsanleitung SDI AES EBU Output Board Carte d extension pour sortie SDI AES EBU SDI AES EBU Ausgangskarte SDI AES EBUアウトプットボード PRA BD12 English Français Deutsch ...

Page 2: ...Bedienungs und Wartungsanweisungen in den Dokumenten hin die dem Gerät beiliegen D3 4 2 1 1_Ge Das Blitzsymbol in einem Dreieck weist den Benutzer darauf hin dass eine Berührungsgefahr mit nicht isolierten Teilen im Geräteinneren die eine gefährliche Spannung führen besteht Die Spannung kann so hoch sein dass sie die Gefahr eines elektrischen Schlages birgt WICHTIG ACHTUNG UM SICH NICHT DER GEFAHR...

Page 3: ...Operation of this equipment in a residential area is likely to cause harmful interference in which case the user will be required to correct the interference at his own expense D8 10 1 1_En This Class A digital apparatus complies with Canadian ICES 003 Cet appareil numérique de la Classe A est conforme à la norme NMB 003 du Canada D8 10 1 4_EF Information to User Alteration or modifications carrie...

Page 4: ...ions products and systems listed herein even when the or symbols are omitted should be considered the registered trademarks of their respective owners Thank you for buying this Pioneer product Please read through these operating instructions so you will know how to operate your model properly This product is an optional board designed for model PRV LX1 or PRV LX10 DVD recorder This product cannot ...

Page 5: ...mpletely dry Do not attempt to inspect or modify internal parts If unusual smells or sounds are detected from the unit during use immediately disconnect power to the DVD recorder and have the component inspected by professional service personnel Confirm Supplied Accessories Input terminal cover 1 FFC cable L 1 FFC cable M 1 4 pin cable M 1 Cable clamp 1 Screws with washers 2 Silver screws without ...

Page 6: ... PRA BD11 SDI AES EBU input board DVD recorder Note Note Note Note Note Use 5C 2V characteristic impedance 75 ohm or equivalent coaxial cable with a BNC plug to connect PRA BD11 and PRA BD12 to industrial VTR or video monitor equipment The AES EBU connectors on this unit are 75 ohm unbalanced BNC connectors Use an audio line converter or the equivalent capable of appropriate impedance conversion w...

Page 7: ...his connector to the designated connector inside the DVD recorder 5 30 pin connector This connector transmits signals between the PRA BD11 and the the DVD recorder Use the FFC cable L furnished with the PRA BD11 to connect this connector to the designated connector inside the DVD recorder 1 SDI output connector Output connector for SDI signals Connect to an SDI input connector on an industrial VTR...

Page 8: ... recorder before installation to prevent fire electric shock and equipment damage The PRA BD11 input board and the PRA BD12 output board look similar as do the their accessories Make sure that the accessories are connected to the correct board and that the boards are correctly connected Attempting to operate this unit or the DVD recorder when it has been installed or connected incorrectly may caus...

Page 9: ...blind plate on the left as seen from the rear to install the PRA BD11 input board Blind plate Remove the blind plate on the right as seen from the rear to install the PRA BD12output board Note Make sure that the removed screws are not mixed up with the screws supplied with this unit Note Be careful since installation procedures differ for the PRV LX1 and PRV LX10 1 Remove the cover panel PRV LX10 ...

Page 10: ...x type 1 screws four type 2 screws and three type 3 screws then remove inner cover F Save the screws carefully since they will be necessary in Step 13 to reinstall the inner cover F Remove the six screws four type 4 screws and two type 5 screws then disconnect the tab on the inner cover R from the slot in the DVD recorder and remove inner cover R Save the screws carefully since they will be necess...

Page 11: ...re below PRA BD11 input board connections Connect the 4 pin cable M to connector A Unlock connector B and D by raising the stopper Insert the FFC cable M in connector B and lock by lowering the stopper See figure and note below Insert the FFC cable L in connector D and lock by lowering the stopper See figure and note below PRA BD12 output board connections Connect the 4 pin cable L to connector E ...

Page 12: ...oard mounting location PRA BD11 input board mounting location 7 Bend the two DVD recorder FFC cables When installing the PRA BD12 output board bend both DVD recorder FFC cables beyond the reinforced end section away from the output board at a 90 angle relative to the reinforcement to ensure that they do not bulge and come into contact with the output board See figure below Note Make sure that the ...

Page 13: ... their stoppers Insert the FFC cable M already connected to connector B in connector b and lock by lowering the stopper See figure and note below Insert the FFC cable L already connected to connector D in connector d and lock by lowering the stopper See figure and note below Note Connect the FFC cable to the unit with the blue reinforced side facing up PRA BD11 input board or PRA BD12 output board...

Page 14: ...ear bridge removed in Step 4 on the DVD recorder Insert the rear bridge below the arms 4 in the PRA BD11 input board and the PRA BD12 output board Locate the rear bridge so that tabs 3 in the DVD recorder enter the square holes 2 one each on the right and left side in the bridge Use the four screws 1 removed in Step 4 to secure the bridge Install the four screws in the following order a b c d Note...

Page 15: ...gle angle as shown in the figure to route the FFC cable as close to the f connector as possible Screw with washer Nylon rivet Core opening Core unit Rear bridge Contact surface See Step 4 FFC cable L PRA BD12 output board 2 Unlock connector f 3 Route the FFC cable L through the opening in the core insert the cable in connector f and lock by lowering the stopper See figure and note below Arm recess...

Page 16: ...r cover F into the two holes in the rear bridge and reinstall the inner cover F as it was before step 3 then insert and tighten the thirteen mountain screws removed earlier six type 1 screws first insert two type 1 screws in order 1 a 1 b then the remaining four type 1 screws four type 2 screws and three type 3 screws Note When reinstalling inner covers F and R be careful that the gasket see figur...

Page 17: ...e rear of the DVD recorder Input terminal cover or output terminal cover Installation 15 Reinstall the top panel PRV LX1 Use the seven screws removed in Step 1 Note Check that the FFC cables and the 4 pin cables are connected to the PRA BD11 input board and the PRA BD12 output board before installing the top panel Top panel Cover panel Reinstall using the nineteen screws removed in step 1 Fasten t...

Page 18: ... input on the DVD recorder to SDI and AES EBU Press the FUNCTION button on the DVD recorder to open the Function Menu on the video monitor Use the CURSOR and ENTER button to select SDI as V Input and AES EBU as A Input Select SDI as V Input on the Function Menu Front panel of DVD recorder Attach model number label here 16 Apply the supplied model number labels to the front panel of the DVD recorde...

Page 19: ...s a signal to prevent unauthorized copying will not display a picture and produce any sound the screen remains black and there is no sound 18 This completes the installation procedure 1 Press the STANDBY ON button on the front panel of the DVD recorder and wait for the DVD recorder to enter the standby mode 2 When the DVD recorder enters the standby mode set the rear panel power switch to OFF and ...

Page 20: ...nstructions Note SDI audio input is available only when SDI video input has been selected When SDI is selected on A Input V Input is automatically set to SDI When V Input is set to something other than SDI A Input is automatically set to RCA even if SDI is selected for A Input Selecting SDI video input Display the DVD recorder s Function Menu and select SDI from V Input on the STATUS section The S...

Page 21: ...nal Selecting AES EBU input Display the DVD recorder s Function Menu and select AES EBU from A Input on the STATUS section The SDI menu and AES EBU menu are added to A Input and becomes available for selection when this unit is installed Note When AES EBU is selected as input be sure that only AES EBU signals synchronized to the video signal set with V Input are actually input Inputting a non sync...

Page 22: ...ns are required on the DVD recorder once the PRA BD12 is installed The PRA BD12 outputs video audio data encoded on the DVD recorder video audio data from DVD Video discs or projects from HDD played back Also supports DVD recorder Function Menu output Video audio data is not output when playing back content containing signals preventing unauthorized copying to protect copyright holders etc The PRA...

Page 23: ...r cables are correctly connected and if the input signal is the correct format This unit does not support VITC The above message may be output for a signal containing VITC Should this happen set VITC to OFF Check whether A Input is set to SDI on the DVD recorder Check whether preview recording or other encode operation is running on the DVD recorder If the No SDI_V Input error message appears an S...

Page 24: ...cannot be output via the AES EBU connectors Cause Remedy Check whether the unit is correctly connected to the industrial VTR Check that the DVD recorder is in the playback preview or recording mode Video audio inputs are not output when the DVD recorder is idle Video audio output from the output connectors of this board operate in the same way as the DVD recorder s monitor output connectors Decode...

Page 25: ...ected 3 Compressed audio cannot be input 4 Digital audio input of the CP 1201 consumer format is not supported PRA BD12 SDI output connectors 1 Connector configuration BNC 1 Output impedance 75 Ω Supported video standard SMPTE 259 M C compliant 270 Mb S 525i 625i 4 2 2 component output Supported audio standard SMPTE 272 M compliant Linear PCM 48 kHz 20 bit channel 1 2 2 3 AES EBU output connectors...

Page 26: ...ans cette brochure même si les symboles et sont omis doivent être considérés comme indiquant les marques déposées de leurs propriétaires respectifs Nous vous remercions de votre achat de cet appareil Pioneer Veuillez lire attentivement les explications de ce mode d emploi afin de pouvoir utiliser correctement votre appareil Cet article est une carte en option pour le graveur de DVD du modèle PRV L...

Page 27: ... composants internes Si l appareil produit une odeur ou des sons inhabituels pendant son utilisation débranchez immédiatement l alimentation à l enregistreur DVD et faites inspecter le composant par un spécialiste du service Confirmation des accessoires fournis Précautions relatives à l utilisation Cache de borne d entrée 1 Câble FFC L 1 Câble FFC M 1 Câble à 4 broches M 1 Serre câble 1 Vis avec r...

Page 28: ...ée SDI AES EBU Enregistreur DVD Remarque Remarque Remarque Remarque Remarque Utilisez un câble coaxial 5C 2V Impédance caractéristique 75 ohms ou équivalent muni d une fiche BNC pour raccorder le PRA BD11 et le PRA BD12 au magnétoscope industriel ou au moniteur vidéo Les connecteurs AES EBU de cet appareil sont des connecteurs BNC asymétriques de 75 ohms Utilisez un convertisseur de ligne audio ou...

Page 29: ...ce connecteur au connecteur spécifié à l intérieur de l enregistreur DVD 5 Connecteur à 30 broches Ce connecteur transmet les signaux entre la PRA BD11 et l enregistreur DVD Utilisez le câble FFC L fourni avec la PRA BD11 pour raccorder ce connecteur au connecteur spécifié à l intérieur de l enregistreur DVD 1 Connecteur de sortie SDI Connecteur de sortie pour signaux SDI A raccorder à un connecte...

Page 30: ...ts aux équipements débranchez tous les câbles et le cordon d alimentation au niveau de l enregistreur DVD avant l installation La carte d entrée PRA BD11 et la carte de sortie PRA BD12 se ressemblent tout comme leurs accessoires Veillez à connecter les accessoires appropriés sur la carte correcte et à ne pas confondre les cartes lors de leur connexion Si vous essayez d utiliser cette carte ou l en...

Page 31: ...plaque aveugle de gauche vue de l arrière pour installer la carte d entrée PRA BD11 Plaque aveugle Déposez la plaque aveugle de droite vue de l arrière pour installer la carte de sortie PRA BD12 Remarque Veillez à ne pas confondre les vis déposées avec les vis fournies avec cet appareil Remarque Soyez prudent car les démarches d installation sont différentes pour le PRV LX1 et le PRV LX10 Panneau ...

Page 32: ...t sur le couvercle interne R au niveau de la fente de l enregistreur DVD et déposez le couvercle interne R Conservez soigneusement ces vis car elles seront nécessaires à l Étape 13 pour réinstaller le couvercle interne R Remarque Veillez à ne pas confondre les vis déposées avec les vis fournies avec cet appareil 4 Déposez le pont arrière Déposez les 4 vis d installation et le pont arrière Ces vis ...

Page 33: ...in ci dessous Branchement de la carte d entrée PRA BD11 Branchez le câble M à 4 broches sur le connecteur A Débloquez les connecteurs B et D en relevant la butée Insérez le câble FFC M dans le connecteur B et bloquez le en abaissant la butée Voir la figure et la remarque ci dessous Insérez le câble FFC L dans le connecteur D et bloquez le en abaissant la butée Voir la figure et la remarque ci dess...

Page 34: ...arte d entrée PRA BD11 7 Courbez les deux câbles FFC de l enregistreur DVD Lors de l installation de la carte de sortie PRA BD12 courbez les deux câbles FFC de l enregistreur DVD au delà de la section renforcée en les écartant de la carte de sortie à un angle de 90 par rapport au renforcement de manière qu ils ne fassent pas saillie et n entrent pas en contact avec la carte de sortie Voir la figur...

Page 35: ...levant leur butée Insérez dans le connecteur b le câble FFC M déjà raccordé au connecteur B et immobilisez le en abaissant la butée Voir la figure et la remarque ci dessous Insérez dans le connecteur d le câble FFC L déjà raccordé au connecteur D et immobilisez le en abaissant la butée Voir la figure et la remarque ci dessous Remarque Branchez le câble FFC en dirigeant sa face renforcée bleue vers...

Page 36: ...reur DVD le pont arrière déposé à l Étape 4 Insérez le pont arrière sous les bras 4 de la carte d entrée PRA BD11 et de la carte de sortie PRA BD12 Placez le pont arrière de telle sorte que les taquets 3 de l enregistreur DVD se logent dans les orifices carrés 2 du pont arrière un taquet à gauche et un à droite Servez vous des 4 vis 1 déposées à l Étape 4 pour immobiliser le pont Installez les qua...

Page 37: ...e PRA BD12 2 Débloquez le connecteur f 3 Cheminez le câble FFC L par l ouverture du noyau insérez le câble dans le connecteur f et immobilisez le en abaissant la butée Voir la figure et la remarque ci dessous Remarque Lors du branchement et du cheminement du câble FFC L faites attention aux bords tranchants sur les bras et le pont arrière par exemple Cavité du bras Noyau Câble FFC L Unité de noyau...

Page 38: ...rifices du pont arrière et réinstallez le couvercle intérieur F tel qu il était avant l Étape 3 insérez ensuite et serrez les 13 vis de fixation déposées auparavant 6 vis de type 1 insérez d abord 2 vis de type 1 dans l ordre 1 a 1 b puis insérez les 4 vis de type 1 restantes puis 4 vis de type 2 et 3 vis de type 3 Remarque Lors de la remise en place des couvercles intérieurs F et R veillez à ce q...

Page 39: ... à l arrière de l enregistreur DVD Cache de borne d entrée ou cache de borne de sortie Installation 15 Réinstallez le panneau supérieur PRV LX1 Servez vous des 7 vis déposées à l Étape 1 Remarque Assurez vous que les câbles FFC et les câbles à 4 broches sont bien branchés sur la carte d entrée PRA BD11 et sur la carte de sortie PRA BD12 avant d installer le panneau supérieur 15 Réinstallez le pann...

Page 40: ... SDI et AES EBU Appuyez sur la touche FUNCTION de l enregistreur DVD pour ouvrir la page des fonctions Function Menu sur le moniteur vidéo Sélectionnez SDI comme V Input sur le Menu de Fonction Servez vous des touches CURSOR et ENTER pour choisir SDI comme V Input et AES EBU comme A Input 16 Fixez les étiquettes du numéro de modèle fournies sur le panneau avant de l enregistreur DVD et sur la cart...

Page 41: ...aux interdisant les copies piratées n afficheront aucune image et ne produiront aucun son l écran reste noir et le son est inaudible 18 Les démarches d installation sont ainsi terminées 1 Appuyez sur la touche STANDBY ON du panneau avant de l enregistreur DVD et attendez que ce dernier se place en mode d attente 2 Lorsque l enregistreur DVD est en mode d attente réglez l interrupteur d alimentatio...

Page 42: ...r DVD Remarque L entrée audio SDI est disponible uniquement quand l entrée vidéo SDI a été sélectionnée Si SDI a été sélectionné comme A Input alors V Input sera automatiquement réglé sur SDI Si V Input est réglé à un paramètre autre que SDI alors A Input sera automatiquement réglé sur RCA même si SDI a été sélectionné pour A Input Sélection d une entrée vidéo SDI Ouvrez le Menu de Fonction de l e...

Page 43: ...o Sélection de l entrée AES EBU Ouvrez le Menu de Fonction de l enregistreur DVD et sélectionnez AES EBU à partir de A Input dans la section STATUS Le menu SDI et le menu AES EBU sont ajoutés à A Input et ils peuvent être sélectionnés lorsque cette unité est installée Remarque Lorsque AES EBU est sélectionné comme entrée veillez à ce que seuls des signaux AES EBU synchronisés au signal vidéo avec ...

Page 44: ...la carte PRA BD12 a été installée La carte PRA BD12 fournit des données audiovisuelles codées sur l enregistreur DVD des données audiovisuelles provenant de disques DVD Vidéo ou des projets provenant de la lecture du disque dur La sortie via le Menu de Fonction de l enregistreur DVD est également prise en compte Les données audiovisuelles ne sont pas fournies à la lecture d un contenu comportant d...

Page 45: ...rdés et si le format du signal d entrée est correct Cet appareil ne prend pas en compte le code temporel vertical VITC Le message précédent peut apparaître dans le cas d un signal contenant le code VITC Dans ce cas réglez VITC sur OFF désactivé Vérifiez si A Input est réglé sur SDI sur l enregistreur DVD Vérifiez si le prévisionnage l enregistrement ou une autre opération codée fonctionne sur l en...

Page 46: ...ection Vérifiez si l appareil est correctement raccordé au magnétoscope industriel Vérifiez si l enregistreur DVD est en mode de lecture de prévisionnage ou d enregistrement Les entrées audiovisuelles ne sont pas sorties lorsque l enregistreur DVD est au repos La sortie audiovisuelle provenant des connecteurs de sortie sur cette carte agit de la même façon que les connecteurs de sortie du moniteur...

Page 47: ... audio comprimés ne peuvent pas être entrés 4 L entrée audio numérique du format grand public CP 1201 n est pas prise en compte PRA BD12 Connecteurs de sortie SDI 1 Configuration de connecteur BNC 1 Impédance de sortie 75 ohms Norme vidéo prise en compte Conforme à SMPTE 259 M C 270 Mo s 525i 625i sortie à composant 4 2 2 Norme audio prise en compte Conforme à SMPTE 272 M PCM linéaire 48 kHz 20 bi...

Page 48: ...h bei allen in dieser Anleitung erwähnten Firmennamen Produkt und Systembezeichnungen um eingetragene Warenzeichen der betreffenden Unternehmen Wir danken Ihnen für den Kauf dieses Pioneer Produktes Bitte lesen Sie diese Bedienungsanleitung vollständig durch damit Sie Ihr neues Gerät fehlerfrei bedienen können Bei diesen Produkten handelt es sich um Erweiterungskarten für den DVD Recorder PRV LX1 ...

Page 49: ...abgibt trennen Sie den DVD Recorder unverzüglich vom Netz und bringen Sie das Gerät zur Untersuchung zu einer Pioneer Kundendienststelle Vorsichtshinweise zum Gebrauch Überprüfen des mitgelieferten Zubehörs Eingangsbuchsen Abdeckung 1 Stck FFC Kabel L 1 Stck FFC Kabel M 1 Stck Kabelmit4 poligenSteckverbindern M 1Stck Kabelhalter 1 Stck Schrauben mit Unterlegscheiben 2 Stck Silberne Schrauben ohne ...

Page 50: ... AES EBU Eingangskarte Hinweis Hinweis Verwenden Sie ein Koaxialkabel 5C 2V Wellenwiderstand 75 Ω oder ein gleichwertiges Koaxialkabel mit BNC Stecker um die Karte PRA BD11 bzw PRA BD12 an einen Videorecorder für den industriellen Einsatz oder an einen Videomonitor anzuschließen Die AES EBU Buchsen dieser Karten besitzen eine BNC Ausführung 75 Ω unsymmetrisch Falls eine Umwandlung zwischen symmetr...

Page 51: ... der im Inneren des DVD Recorders dafür vorgesehenen Buchse 5 30 polige Buchse Diese Buchse dient zur Übertragung von Signalen zwischen der PRA BD11 und dem DVD Recorder Verbinden Sie diese Buchse über das FFC Kabel L im Lieferumfang der PRA BD11 mit der im Inneren des DVD Recorders dafür vorgesehenen Buchse 1 SDI Ausgangsbuchse Von dieser Buchse können SDI Signale ausgegeben werden VerbindenSiedi...

Page 52: ... Netzkabel vom DVD Recorder abzutrennen um die Gefahr von Brand elektrischem Schlag und einer Beschädigung der Ausrüstung zu vermeiden Die Eingangskarte PRA BD11 und die Ausgangskarte PRA BD12 sowie ihr jeweiliges Zubehör sind sich sehr ähnlich so dass Verwechslungen sorgfältig vermieden werden müssen Vergewissern Sie sich dass die richtigen Zubehörteile an die jeweilige Karte angeschlossen werden...

Page 53: ...nbau der Eingangskarte PRA BD11 entfernen Sie die linke Blende von hinten aus gesehen Blende Zum Einbau der Ausgangskarte PRA BD12 entfernen Sie die rechte Blende von hinten aus gesehen Hinweis Achten Sie darauf die beiden entfernten Schrauben nicht mit den Schrauben im Lieferumfang zu vermengen Hinweis Gehen Sie bei der Installation mit großer Sorgfalt vor da das Verfahren beim Modell PRV LX1 and...

Page 54: ... Schrauben des Typs 2 und 3 Schrauben des Typs 3 und entfernen Sie dann die innere Abdeckung F Bewahren Sie diese Schrauben sorgfältig auf da sie in Schritt 13 zur erneuten Befestigung der inneren Abdeckung F benötigt werden Entfernen Sie die 6 Schrauben 4 Schrauben des Typs 4 sowie 2 Schrauben des Typs 5 trennen Sie die Lasche an der inneren Abdeckung R vom Schlitz im DVD Recorder und entfernen S...

Page 55: ... hoch um Buchse B und D freizugeben Schließen Sie einen Steckverbinder des FFC Kabels M an Buchse B an und klappen Sie die Arretierung nach unten um den Steckverbinder in der Buchse zu sichern Siehe die Abbildung und den Hinweis unten Schließen Sie einen Steckverbinder des FFC Kabels L an Buchse D an und klappen Sie die Arretierung nach unten um den Steckverbinder in der Buchse zu sichern Siehe di...

Page 56: ...sition der Ausgangskarte PRA BD12 Einbauposition der Eingangskarte PRA BD11 7 Biegen Sie die beiden FFC Kabel des DVD Recorder Beim Einbau der Ausgangskarte PRA BD12 biegen Sie die beiden FFC Kabel des DVD Recorder jeweils jenseits ihres verstärkten Endes in einem Winkel von 90 gegenüber der Verstärkung von der Ausgangskarte weg damit sie sich nicht nach oben wölben und die Ausgangskarte berühren ...

Page 57: ...ten um den Steckverbinder in der Buchse zu sichern Siehe die Abbildung und den Hinweis unten Schließen Sie den freien Steckverbinder des bereits an Buchse D angeschlossenen FFC Kabels L an Buchse d an und klappen Sie die Arretierung nach unten um den Steckverbinder in der Buchse zu sichern Siehe die Abbildung und den Hinweis unten Hinweis Schließen Sie das FFC Kabel so an die Karte an dass die bla...

Page 58: ...igen Sie die in Schritt 4 entfernte hintere Brücke wieder am DVD Recorder Setzen Sie die hintere Brücke unterhalb der Arme 4 der Eingangskarte PRA BD11 und der Ausgangskarte PRA BD12 ein Richten Sie die hintere Brücke so aus dass die Laschen 3 am DVD Recorder jeweils in das viereckige Loch 2 an der rechten und linken Seite der Brücke eingepasst sind Verwenden Sie die in Schritt 4 entfernten 4 Schr...

Page 59: ...e das FFC Kabel L durch die Öffnung in Kerneinheit schließen Sie es an Buchse f an und klappen Sie die Arretierung nach unten um den Steckverbinder in der Buchse zu sichern Siehe die Abbildung und den Hinweis unten Hinweis Achten Sie beim Anschließen und Verlegen des FFC Kabels L sorgfältig auf scharfe Kanten z B an den Armen und an der hinteren Brücke Armvertiefung Kerneinheit Hinweis Um eine Bel...

Page 60: ...e dann die 13 vorher entfernten Befestigungsschrauben 6 Schrauben des Typs 1 befestigen Sie zunächst 2 Schrauben des Typs 1 in der Reihenfolge 1 a 1 b und dann die restlichen 4 Schrauben des Typs 1 gefolgt von den 4 Schrauben des Typs 2 und den 3 Schrauben des Typs 3 Hinweis Achten Sie bei der erneuten Befestigung der inneren Abdeckungen F und R sorgfältig darauf dass sich die Dichtung siehe nachs...

Page 61: ...g Installation 15 Bringen Sie die obere Platte beim Modell PRV LX1 wieder an Verwenden Sie dazu die in Schritt 1 entfernten 7 Schrauben Hinweis Vergewissern Sie sich vor dem Anbringen der oberen Platte dass die FFC Kabel und die Kabel mit 4 poligen Steckverbindern einwandfrei an die Eingangskarte PRA BD11 und die Ausgangskarte PRA BD12 angeschlossen sind obere Platte Deckplatte 15 Bringen Sie die ...

Page 62: ... und AES EBU Ausgangssignale des in Schritt 1 angeschlossenen Gerätes zu 3 Stellen Sie den Eingang am DVD Recorder auf SDI und AES EBU ein Drücken Sie die FUNCTION Taste am DVD Recorder um das Funktionsmenü auf dem Videomonitor anzuzeigen Wählen Sie SDI im Eintrag V Input des Funktionsmenüs 16 Bringen Sie jeweils einen der mitgelieferten Modellbezeichnungs Aufkleber an der Frontplatte des DVD Reco...

Page 63: ...n Kopierschutzsignal enthält erscheint kein Bild auf dem Videomonitor der Bildschirm bleibt schwarz und es erfolgt keine Tonausgabe 18 Damit ist das Installationsverfahren abgeschlossen 1 Drücken Sie die STANDBY ON Taste an der Frontplatte des DVD Recorders und warten Sie bis der DVD Recorder in den Bereitschaftszustand umgeschaltet hat 2 Wenn sich der DVD Recorder im Bereitschaftszustand befindet...

Page 64: ...ht nur dann zur Verfügung wenn das SDI Videoeingangssignal gewählt worden ist Nach Wahl von SDI im Eintrag A Input wird der Eintrag V Input automatisch auf SDI eingestellt Wenn eine andere Einstellung als SDI im Eintrag V Input gewählt ist wird der Eintrag A Input selbst dann automatisch auf RCA eingestellt wenn SDI im Eintrag A Input gewählt wurde Wahl des SDI Videoeingangssignals Rufen Sie das F...

Page 65: ...ie das Funktionsmenü des DVD Recorders auf und wählen Sie dann AES EBU im Eintrag A Input des STATUS Bereichs aus Nach Installation dieser Karte werden die Menüs SDI und AES EBU dem Eintrag A Input hinzugefügt und können gewählt werden Hinweis Achten Sie bei Wahl von AES EBU als Eingang unbedingt darauf dem Gerät ausschließlich AES EBU Signale zuzuleiten die mit dem im Eintrag V Input gewählten Vi...

Page 66: ...m DVD Recorder erforderlich Die PRA BD12 ist zur Ausgabe von Video und Audiodaten die am DVD Recorder codiert wurden der auf DVD Video Discs aufgezeichneten Video und Audiodaten sowie der auf der Festplatte aufgezeichneten Projekte während der Wiedergabe im Stande Eine Signalausgabe über das Funktionsmenü des DVD Recorders wird unterstützt Bei Wiedergabe von urheberrechtlich geschütztem Material d...

Page 67: ...geleitet Überprüfen Sie ob die Kabel korrekt angeschlossen sind und das Eingangssignal das unterstützte Format besitzt Diese Karte bietet keine Unterstützung von VITC Die obige Meldung wird daher möglicherweise bei einem Signal ausgegeben das VITC enthält In einem solchen Fall schalten Sie VITC aus Überprüfen Sie ob der Eintrag A Input im Funktionsmenü des DVD Recorder auf SDI eingestellt ist Über...

Page 68: ...cht über die AES EBU Ausgangsbuchse ausgegeben werden Ursache Abhilfemaßnahme Überprüfen Sie ob das Gerät einwandfrei an den Videorecorder für den industriellen Einsatz angeschlossen ist Überprüfen Sie ob der DVD Recorder momentan auf den Wiedergabe Vorschau oder Aufzeichnungsmodus geschaltet ist Wenn sich der DVD Recorder im Leerlaufbetrieb befindet werden zugeleitete Video Audiosignale nicht aus...

Page 69: ...leitung komprimierter Audiodaten ist nicht möglich 4 Digitale Audio Eingangssignale des Verbraucherformats CP 1201 werden nicht unterstützt PRA BD12 SDI Ausgangsbuchse 1 Buchsenausführung BNC 1 Ausgangsimpedanz 75 Ω Unterstützte Videonorm SMPTE 259 M C 270 MBit s 525i 625i 4 2 2 Komponenten Ausgangssignal Unterstützte Audionorm SMPTE 272 M Linear PCM 48 kHz 20 Bit Kanal 1 2 2 3 AES EBU Ausgangsbuc...

Page 70: ...LX1 および PRV LX10 の専用 オプションボードです 本機単体での使用や PRV LX1またはPRV LX10以外の機器に取り付けての使用はできません PRV LX10 は PRV LX1 の欧州向けモデルです 取り付け上の注意 本機の取り付けは高度な専門知識が必要です また安全のため 取り付けは弊社サービス が行います 詳しくは本機の取扱店にお尋ねください 使用上の注意 本製品の使用により または故障により生じたデータの損失ならびに その他直接 間接 の損害につきましては 当社は一切責任を負いかねますので あらかじめご了承ください 重要なデータに関しては 万一に備えてバックアップ 複製 を行ってください ご使用にあたっては 各国の著作権法に抵触しないようご注意ください 本機を使用して著作物の記録を行う場合には 各著作権者 著作隣接権者の許諾を得る必 要があります 各権利者の許諾...

Page 71: ... を示しています 絵表示について 注意 本機を使用するときは 警告 注意表 示を厳守してください 本機を分解したり 改造したりしな いでください 金属類や燃えやすい ものなどが入ると火災 感電の原因 となります 内部の点検 整備 修理 は販売店にご依頼ください 注意 本機の取り付けは本体 PRV LX1 のコンセントを抜いてから行ってく ださい 取付ねじにゆるみ等があるとディス クの回転による振動でビリつき音が 発生することがあるので確実に取り 付けてください 本機を使用中にデータなどが消失し た場合でも データなどの保証はい たしかねます 故障に備えてバック アップをしてください 安全上のご注意 警告 警告 万一煙が出ている 変なにおいや音 がするなどの異常状態のまま使用す ると火災 感電の原因となります すぐに機器本体の電源スイッチを切 り 必ず電源プラグをコンセントか ら抜いてくださ...

Page 72: ... 内部点検や改造はお止めください ご使用中に本機から異常な音やにおいがしたときは 必ずレコーダー本体の電源を切ってから 点検を受けてください 使用上のご注意 インプット端子カバー 1枚 FFCケーブル L 1本 FFCケーブル M 1本 4ピンケーブル M 1本 ケーブルクランプ 1個 ネジ ワッシャー付き 2本 ネジ 銀色 ワッシャーなし 2本 ナイロンリベット 1本 注 PRA BD11 インプットボード では付属 のナイロンリベットは使用しません 保証書 日本国内用 1枚 保証書 米国内用 1枚 取り付け時のご注意 1枚 取扱説明書 本書 1冊 機種ラベル 2枚 ユーザー登録シート 米国内用 1枚 付属品の確認 PRA BD11 アウトプット端子カバー 1枚 FFCケーブル L 1本 4ピンケーブル L 1本 ケーブルクランプ 1個 コアユニット 1個 ネジ ワッシャー付き 2本 ネ...

Page 73: ...V モニタ SDI 入力付 PRA BD11 SDI AES EBU インプットボード PRA BD12 SDI AES EBU アウトプットボード 注 注 注 注 注 PRA BD11 および PRA BD12 と業務用 VTR や TV モニタを接続する際は 5C 2V 特性インピーダンス75Ω 相当のBNCプラグ付き同軸ケーブルを使用してください また 本機の AES EBU 端子は 75 Ωアンバランス BNC 端子 です 接続に際して バランス アンバランス変換が必要な場合は 適切なインピーダンス変換ができるオー ディオラインコンバータ等をご使用ください SDI Serial Digital Interface の略 SMPTE 259M 規格に基づくデジタルビデオ伝送用シリア ルインターフェース AES EBU Audio Engineering Society Europea...

Page 74: ...コネクターです PRA BD11に付属のFFCケーブル M を 本 コネクターと レコーダー本体内部の指定され たコネクターに接続します 5 30 ピンコネクター PRA BD11と レコーダー本体内部との信号 接続用コネクターです PRA BD11に付属のFFCケーブル L を 本 コネクターと レコーダー本体内部の指定され たコネクターに接続します 1 SDI 出力端子 SDI 信号の出力端子です 業務用VTR等の SDI入力端子と接続します 重畳音声は圧縮音声の出力には対応していま せん 2 AES EBU 出力端子 AES EBU 信号の出力端子です 業務用 VTR 等の AES EBU 入力端子と接続 します 民生用フォーマット CP 1201 および圧 縮音声の出力には対応していません 3 電源コネクター PRA BD12への電源供給用コネクターです PRA BD12 に付属の...

Page 75: ...製品が損傷を受ける場合があります PRA BD11 インプットボード と PRA BD12 アウトプットボード とは 外観も付 属品も類似しておりますので 互いの付属品どうしが混ざり合って誤取り付けや誤配線をし ないように注意して作業してください 誤取り付けや誤配線した状態で製品を動作させると 本機またはレコーダー本体が損傷を受 ける場合があります 取り付けかた 付属の 4 ピンケーブルについて PRA BD11 インプットボード とPRA BD12 アウトプットボード には 異なっ た長さの4ピンケーブルが付属しています 取付作業で間違えないように注意してくだ さい 線長が短い 約 90mm 線長が長い 約 130mm PRA BD11 用 4 ピンケーブル M PRA BD12 用 4 ピンケーブル L 付属の FFC ケーブルについて PRA BD11 インプットボード に付属す る...

Page 76: ... は ずしたネジは 手順 14 で端子カバーを取り付けるときに使用します PRA BD11 インプットボード を取り 付けるときは 後から見て左側のブライ ンドプレートを取り外してください PRA BD12 アウトプットボード を取り 付けるときは 後から見て右側のブラインド プレートを取り外してください ブラインドプレート 注 はずしたネジは 本機に付属されて いるネジと混ざらないように保管し てください PRV LX1 と PRV LX10 では取り付け手順が異なりますのでご注意ください 1 ボンネットをはずす PRV LX10 止めネジ 19 本 天面 7 本 右側面 4 本 左側面 4 本 後面 4 本 をはずし ボン ネットをはずします はずしたネジは 手 順 15 で再びボンネットを取り付けると きに使用します ボンネット ...

Page 77: ...り付けかた 3 インナーカバー F およびインナーカバー R をはずす PRV LX10 のみ 止めネジ 13 本 1 のネジ 6 本 2 のネ ジ4本および3のネジ3本 をはずし イ ンナーカバー F をはずします はずした ネジは 手順 13 で再びインナーカバー F を取り付けるときに使用します 止めネジ 6 本 4 のネジ 4 本および 5 の ネジ2本 をはずします その後 インナー カバー R のフック部をレコーダー本体の 穴からはずして インナーカバーRをはず します はずしたネジは 手順 13 で再 びインナーカバーRを取り付けるときに使 用します インナーカバー R インナーカバー F フック部 注 はずしたネジは 本機に付属されているネジ と混ざらないように保管してください ...

Page 78: ...4 ピンケーブルをレコーダー本体に接続する 本機に付属のFFCケーブルと4ピンケーブルをレコーダー本体の所定のコネクターに接続します 取り付けかた PRA BD11 インプットボード の接続 4 ピンケーブル M をコネクター A に接続する コネクター B とコネクター D をアンロック状態にする ストッパーを立てる FFCケーブル M をコネクターBに差し込みロックする ストッパーを倒す 下図 注記参照 FFC ケーブル L をコネクター D に差し込みロックする ストッパーを倒す 下図 注記参照 FFC ケーブル L FFC ケーブル L FFC ケーブル M 4 ピンケーブル M 4 ピンケーブル L PRA BD12 アウトプットボード の接続 4 ピンケーブル L をコネクター E に接続する コネクター F をアンロック状態にする ストッパーを立てる FFC ケーブル L を...

Page 79: ...違えないようにしてください PRA BD11 インプットボード のときの取付位置 PRA BD12 アウトプットボード のときの取付位置 7 レコーダー本体の 2ヵ所の FFC ケーブルを折り曲げる PRA BD12 アウトプットボード を取り付けるときは レコーダー本体の2ヵ所のFFCケー ブルを その補強板との境界から補強板面側とは反対方向に90度程度折り曲げます FFCケー ブルがアウトプットボードに触らないように湾曲の膨らみをつぶす 下図参照 注 FFCケーブルを折り曲げる際は レコーダー本体からFFCケーブルを外さないでください また FFCケーブルを折り曲げる際は きつく何度も折り曲げたり 曲げ部をしごいたりしないでくださ い 2ヵ所の FFC ケーブル 青色の補強板 ...

Page 80: ...を倒す 下図 注記参照 コネクターDに接続したFFCケーブル L をコネクターdに差し込みロックする ストッパー を倒す 下図 注記参照 注 FFC ケーブルを本機に接続する際は 青色の補強板面を上側に向けて接続してください FFC ケーブル L FFC ケーブル M 4 ピンケーブル M ケーブルクランプ PRA BD11 インプットボード 8 本機をレコーダー本体の後面パネルに取り付ける ラベル面を 上側にする PRA BD11 インプットボード または PRA BD12 アウトプットボード レコーダー本体後面パネル拡張スロット部 取り付けかた 1 2 青色の補強板面 アンロック状態 ロック状態 本機の2ヵ所の凸形穴に レコーダー本体の2ヵ所 のフックをはめ込み 本機に付属のネジ2本 銀色 ワッシャーなし で 1 2 の順に固定します PRA BD11 インプットボード は 後側から見...

Page 81: ...ーブル L ここでは接続しない ケーブルクランプ PRA BD12 アウトプットボード A E 10 手順 4 で外したリアブリッジをレコーダー本体に取り付ける PRA BD11 インプットボード および PRA BD12 アウトプットボード のアーム部 4 の下側にリアブリッジが入るように差し込み リアブリッジの四角穴2 左右に1ヵ所ずつ にレコーダー本体のツメ部 3 が入るように置いて 手順 4 で外したネジ 1 4 本を a b c d の順に取り付けます 注 コネクター A および E に接続した 4 ピンケーブルが 必ずリアブリッジの下を通るようにスタ イリングしてください PRA BD11 インプットボード およびPRA BD12 アウトプットボード のアーム部 4が リアブリッジの上に乗るようにしてください リアブリッジ PRA BD11 インプットボード PRA BD12 ...

Page 82: ...ットは頭が密着するまで完全に 押し込んでください コアユニット取り付け時はシャープエッジ アーム部およびリアブリッジ に充分注意 してください PRA BD12 アウトプットボード FFC ケーブル L リアブリッジ コアユニット 11 コアユニットをレコーダー本体に取り 付ける コンタクト面 手順 5 参照 ネジ ワッシャー付き ナイロンリベット コアの穴部 注 FFC ケーブル L の接続時はシャープエッジ アーム部およびリアブリッジ に充分注意して ください コア部 アーム くびれ部 注 コアユニット取り付け時は FFCケーブル L に 負荷が加わらないようにするために コア部が アームくびれ部の横で さらにできるだけコネ クターfの近くを通るように 斜めに 右図 方 向に 倒しながら取り付けてください コアユニット PRA BD12 アウトプットボード FFC ケーブル L ナイロ...

Page 83: ...り付けられていたようにインナーカバー R を取り付け 5 のネジ 2 本を 5 a 5 b の順番に取り付けてから 4 のネジ 4 本を取り付けます インナーカバー F の 2ヵ所の突起をリアブリッジの 2ヵ所の穴に差し込んでから 手順 3 で レコーダー本体に取り付けられていたように取り付け 止めネジ13本 1のネジ6本 1 a 1 b の順番で先にその 2 本のネジを止めてから残りの 4 本を止める 2 のネジ 4 本および 3 のネジ 3 本 を取り付けます 注 インナーカバーFおよびインナーカバーRを取り付ける際 レコーダー本体側面のガスケット 下 図参照 が外れないように注意してください インナーカバー F インナーカバー R インナーカバー R レコーダー本体の後面パネル 2ヵ所のフックを後面パネル の穴に入れる ガスケット 反対側にもあり リアブリッジ 2ヵ所の突起をリアブリ...

Page 84: ...り付けてから 天面7本 右側面4本 左側面4本 残りの後面2本の順番に取り 付けてください 注 天板を取り付ける前に PRA BD11 インプッ トボード および PRA BD12 アウトプット ボード にFFCケーブルおよび4ピンケーブル が各コネクターに確実に接続されていることを 確認してください 天板 取り付けかた 14 インプット端子カバー またはアウトプット端子カバー を後面パネルに取り付ける レコーダー本体の後面パネルに 本機に付属のインプット端子カバー またはアウトプット端 子カバー を 手順 2 で外したネジ 2 本 黒色 で 1 2 の順に固定します 注 インプット端子カバーは 後側から見て左側の拡張スロット部 レコーダー本体の取扱説明書 各 部の名称 参照 に取り付けます アウトプット端子カバーは 後側から見て右側の拡張スロット 部に取り付けます インプット端子カバー ...

Page 85: ...機器からSDI および AES EBU 信号を出力しま す 3 レコーダー本体の入力先を SDI お よび AES EBU にします レコーダー本体の FUNCTION ボタンを押して TV モニタに ファンクションメニューを表示 させ CURSOR ボタンと EN TERボタンを使って V Inputに SDIを選択し A InputにAES EBU を選択します ファンクションメニューの V Input で SDI を選択する 16 レコーダー本体のフロントパネル とユーザー登録シートに 付属の機 種ラベルを貼り付ける 1 本機に付属の機種ラベル 2枚のうちの 1枚 をレコーダー本体のフロントパネ ルの天面部左側 右図参照 に貼り付け ます 2 もう 1 枚の機種ラベルを本機に付属の ユーザー登録シート 米国内用 の 機 種ラベル の欄に貼り付けてください 米国内向けのみの対応 機種ラ...

Page 86: ...11 3 でのケーブルの接続を再度確認してください また 著作権者などによって複製を制限する旨の信号が記録されているコンテンツの再生時は 映 像 音声信号は出力されません 黒画面 無音状態になる 18 取付作業を終了する 1レコーダー本体の前面パネルのSTANDBY ONボタンを押し レコーダー本体がスタンバイ 状態になるまで待ちます 2レコーダー本体がスタンバイ状態になったら レコーダー本体の後面パネルの電源スイッチを OFF にして 電源プラグを AC コンセントから抜いてください ファンクションメニューの A Input で AES EBU を選択する 4 FUNCTIONボタンを押してファン クションメニューを終了させます 5 レコーダー本体の PREVIEW ボタ ンを押し 手順 3 でレコーダー 本体に入力した信号の映像 音声を TV モニタに出力させます 6 TV モニタで映...

Page 87: ...説明書を参照してく ださい SDI 映像入力の選択 レコーダー本体のファンクションメ ニューを表示させ STATUS 部 V Input から SDI を選択します 本製品を取り付けることで V Input に SDI メニューが追加表示され 入力選 択することが可能になります STATUS 部 V Input SDI 音声入力の選択 レコーダー本体のファンクションメ ニューを表示させ STATUS 部 A Input から SDI を選択します 本製品を取り付けることで A Input に SDIおよびAES EBUメニューが追加 表示され 入力選択することが可能に なります STATUS 部 A Input 注 SDI音声入力はSDI映像入力選択時のみ設定可能です A Input でSDIを設定した場合 V Input は自動的に SDI が設定されます また A Input で SD...

Page 88: ...の垂直ブランキングエリアに情報が付加された信号を入力した場合にも 上記 エラーメッセージが表示される場合があります AES EBU 入力の選択 レコーダー本体のファンクションメ ニューを表示させ STATUS 部 A Input からAES EBUを選択します 本製品を取り付けることで A Input に SDIおよびAES EBUメニューが追加 表示され 入力選択することが可能に なります 注 AES EBUを入力設定した場合は 必ず V Input で設定した映像信号に同期したAES EBU信号 を入力してください 非同期な信号が入力された場合 レコーダー本体の安定した動作を保証でき ません 注 入力選択でAES EBUが設定されている場合 下記の状態でレコーダー本体のプレビュー 録画等 の動作を行うと TV モニタに AES EBU 信号の入力がありません というエラーメッセージが ...

Page 89: ...続するだけでSDI出力端子 AES EBU出力端子 の使用が可能になります PRA BD12 の取り付けによるレコーダー本体での追加操作はありません レコーダー本体でエンコード処理後の映像 音声データや DVD Video ディスクあるいは HDD 上のプロジェクト再生時に映像 音声データを出力します レコーダー本体のファンクションメニュー出力にも対応しています 著作権者などによって複製を制限する旨の信号が記録されているコンテンツの再生時には映像 音声データの出力は行われません PRA BD11 SDI AES EBU インプットボード に入力された SDI 信号 AES EBU 信号の スルー出力には対応していません ...

Page 90: ...本機は VITC をサポートしておりません VITC を付加 した信号を入力した場合 上記のエラーメッセージが表 示されることがありますので その際はVITCをOFFに して使用してください レコーダー本体の A Input がSDIに設定されているか 確認してください レコーダー本体がプレビュー 録画等のエンコード動作 をしているか確認してください SDI Video 信号の入力がありません というエラー メッセージが出ている場合は SDI信号が本機のサポー トフォーマットで入力されていないことが考えられま す ケーブルが正しく接続されているか また入力信号 形式に問題がないかを確認してください 本機は VITC をサポートしておりません VITC を付加 した信号を入力した場合 上記のエラーメッセージが表 示されることがありますので その際はVITCをOFFに して使用してください S...

Page 91: ...力はされません 本機 の出力端子への映像 音声出力はレコーダー本体の各モ ニタ出力端子同等の動作 Decoder Out になります 著作権者によって複製を制限する旨の信号が記録され ているコンテンツの映像 音声データは出力できませ ん PRA BD11 に入力された SDI 信号 AES EBU 信 号のスルー出力はできません 本機と業務用 VTR が正しく接続されているかを確認し てください 著作権保護された DVD ディスクの再生映像 音声を SDI 出力端子 AES EBU 出力端子に出力することは できません 本機の音声出力は圧縮音声には対応していません レコーダー本体のデジタル音声出力端子を使用してくだ さい PRA BD11 続き 症 状 AES EBU 入力した音声が レコーダー本体の出力で途切れ る等正常に出力されない 原因 対策 レコーダー本体で入力選択している映像に同...

Page 92: ...いません SDI 音声は SDI 映像選択時のみ入力可能となります 単独での選択はできません 3 圧縮音声の入力には対応していません 4 民生用フォーマット CP 1201 のデジタル音声入力には対応していません SDI 出力端子 1 コネクター形状 BNC 1 出力インピーダンス 75 Ω 対応する映像規格 SMPTE 259M C 準拠 270 Mb S 525i 625i 4 2 2 コンポーネント出力 対応する音声規格 SMPTE 272M 準拠 リニア PCM 48 kHz 20 bit Ch1 2 2 3 AES EBU 出力端子 1 コネクター形状 BNC 1 出力インピーダンス 75 Ω 対応する音声規格 AES 3ID 1995 準拠 リニア PCM 48 kHz 20 bit 業務用フォーマット 2 3 一般 使用電源 DC 5 V レコーダー本体内部より供給 本体質量...

Page 93: ...Dominguez St Long Beach CA 90810 U S A TEL 1 310 952 3076 PIONEER ELECTRONICS OF CANADA INC Industrial Products Department 300 Allstate Parkway Markham Ontario L3R OP2 Canada TEL 1 905 479 4411 PIONEER ELECTRONICS AUSTRALIA PTY LTD 178 184 Boundary Road Braeside Victoria 3195 Australia TEL 61 39 586 6300 PIONEER ELECTRONICS ASIACENTRE PTE LTD 253 Alexandra Road 04 01 Singapore 159936 TEL 65 6472 1...

Reviews: