En
19
Advanced
Operation
2 Press the [PARAMETER
c
] or [PARAMETER
d
] button while
pressing the [SHIFT] button.
Set the slicer’s “SLICE LENGTH”.
The setting value of SLICE LENGTH changes each time the button is pressed while
pressing the [
SHIFT
] button.
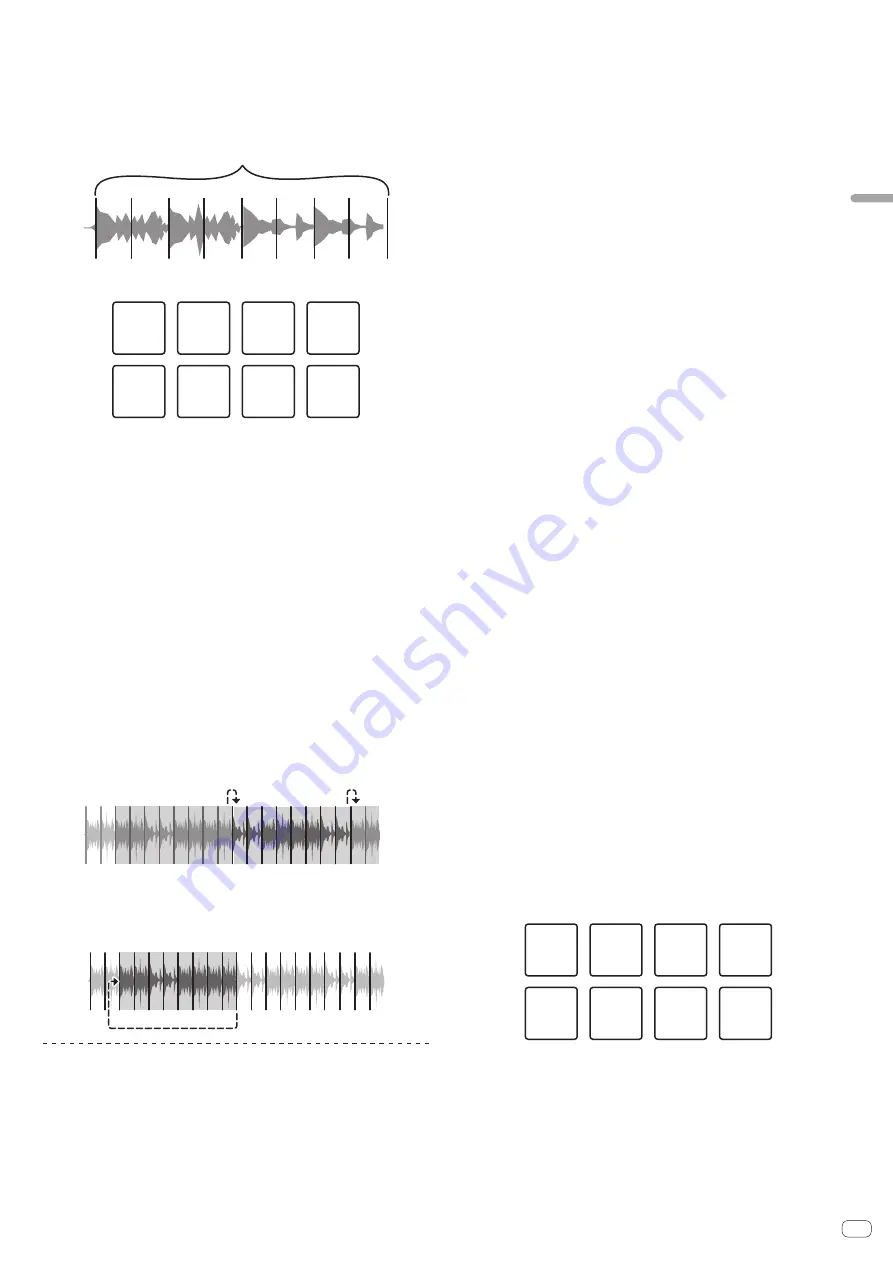
Equally-divided eight sections of the range specified with “SLICE LENGTH” are
assigned to the respective performance pads as shown below.
Sliced sections 1 to 8
SLICE LENGTH
1
2
3
4
5
6
7
8
Section 1
Section 2
Section 3
Section 4
⑤
Section 5
⑥
Section 6
Section 7
Section 8
3 Press the [PARAMETER
c
] or [PARAMETER
d
] button.
Set slicer’s “
SLICE ROLL
”. The setting value of
SLICE ROLL
changes each time the
button is pressed.
The loop playback length while the pad is pressed can be changed with the “
SLICE
ROLL
” setting. For example, when “1/4” is set to “
SLICE ROLL
”, only the first quarter
of the section assigned to the pad is played in a loop.
4 Press pad 5 or pad 6 while pressing the [SHIFT] button.
If pad 5 is pressed while pressing the [
SHIFT
] button, the slicer’s target area moves
to the left.
Also, if pad 6 is pressed while pressing the [
SHIFT
] button, the slicer’s target area
moves to the right (slice shift).
5 Press and hold one of the performance pads.
When the pad is pressed and held, the sound is played in a loop.
!
The loop playback length differs depending on the “SLICE ROLL” setting.
When the pad is released, the track returns to the position that is playing in the
background.
About slicer mode and slicer loop mode
Slicer mode
When the playback position advances to the end of the range that has been sliced
into eight equal sections, the range shown on the display switches to the next eight
sliced sections, and these sliced sections are assigned to the respective pads,
replacing the previously assigned sections.
1 2 3 4 5 6 7 8
1
1
2
2
…
3 4 5 6 7 8
Slicer loop mode
When the playback position advances to the end of the range that was sliced into
eight equal parts, the playback position returns to the beginning of the range that
was sliced into eight equal parts.
1 2 3 4 5 6 7 8
Using the sampler function
This procedure can be used to play tracks loaded in the sampler’s sampler slots
using the performance pads.
Preparing to use the sampler
%
Press the [FX PANEL] button while pressing the [SHIFT]
button.
The sampler panel appears on the rekordbox dj screen.
A track, loop, and slicer target area can be loaded in sampler slots.
Load the track in a sampler slot.
1 Press the [SAMPLER] mode button.
Switches to the sampler mode.
2 Press the rotary selector or [BACK] button to move the
cursor to the track list.
3 Turn the rotary selector.
Select the track you wish to load in a sampler slot.
4 Press the performance pad while pressing the [SHIFT]
button.
The selected track is loaded into the sample slot.
!
Loading by overwriting an already loaded sampler slot may not be possible
depending on the [
Preferences
] of rekordbox.
Loading a loop in a sampler slot.
1 Press the [AUTO BEAT LOOP] button, or press the [LOOP IN]
button and then the [LOOP OUT] button during track
playback.
Loop playback starts.
2 Press a performance pad while pressing the [CAPTURE]
button.
The pad mode is temporarily switched to the sampler mode and the loop is loaded in
a sampler slot.
!
Loading by overwriting an already loaded sampler slot may not be possible
depending on the [
Preferences
] of rekordbox.
Loading the slicer target area in sampler slots
1 Press the [SLICER] mode button while pressing the [SHIFT]
button during track playback.
The mode switches to the slicer loop mode.
!
Alternatively, press the [
SLICER
] mode button to switch to the slicer mode.
2 Press the [CAPTURE] button while pressing the [SHIFT]
button.
Each of the sections of the slicer target area is loaded in a separate sampler slot.
!
It is loaded to the sampler bank 4 by default.
If there is even one sampler slot already loaded in sampler bank 4, loading
may not be possible.
Using the performance pads to play the sampler
1 Press the [SAMPLER] mode button.
Switches to the sampler mode.
2 Press the [PARAMETER
c
] or [PARAMETER
d
] button.
The sampler bank is switched. The sampler has four banks and each bank has
sixteen slots.
3 Move the [SAMPLER VOLUME] fader to the far side.
4 Press a performance pad.
The sound for the slot assigned to the pad that was pressed is played.
!
When the pad mode of deck 1 or deck 3 is the sampler mode, sampler slots
are assigned to the respective performance pads as shown below. (The slots in
parentheses are for when the pad mode of deck 2 or deck 4 is the sampler mode)
Slot 1
(slot 9)
Slot 2
(slot 10)
Slot 3
(slot 11)
Slot 4
(slot 12)
Slot 5
(slot 13)
Slot 6
(slot 14)
Slot 7
(slot 15)
Slot 8
(slot 16)
5 During playback, press a performance pad.
Playback continues by returning to the beginning.
6 Press a performance pad while pressing the [SHIFT] button
during playback.
The sound of the slot that is currently playing stops.


