92
AVIC-W8400NEX/XNUC
1
2
3
4
A
B
C
D
E
F
1
2
3
4
1
2
3
4
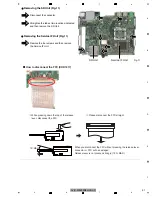
Remove the two screws.
Slide the Bracket to the rear side of the product
and then remove the Bracket.
Disconnect the connector.
Remove the five screws and then remove
the AV Unit.
- Removing the
AV Unit
(Fig.12 to Fig.14)
Bracket (R)
Bracket (L)
LEFT SIDE VIEW
RIGHT SIDE VIEW
Fig.14
Fig.13
Fig.12
When attaching the bracket, securely insert
the dowel of the chassis unit into the slit of
the bracket.
Attention at assembly
1
1
2
2
4
4
4
4
4
3
AV Unit


