background image

Black plate (91,1)

You can play a DVD-Video using the built-in
drive of the navigation system. This section de-
scribes operations for playing a DVD-Video.

Starting procedure

1

Display the AV operation screen.

=

For details of the operations, refer to

Dis-

playing the AV operation screen

on page 76.

2

Insert the disc you want to play into

the disc-loading slot.

The source changes and then playback will
start.

=

For details, refer to

Inserting and ejecting a

disc

on page 17.

p

If the disc is already set, touch [

Disc

] on the

left edge of the screen.

=

For details, refer to

Selecting a source

on

page 76.

3

Use the touch panel keys on the screen

to control the disc.

=

For details, refer to

Using the touch panel

keys

on page 91.

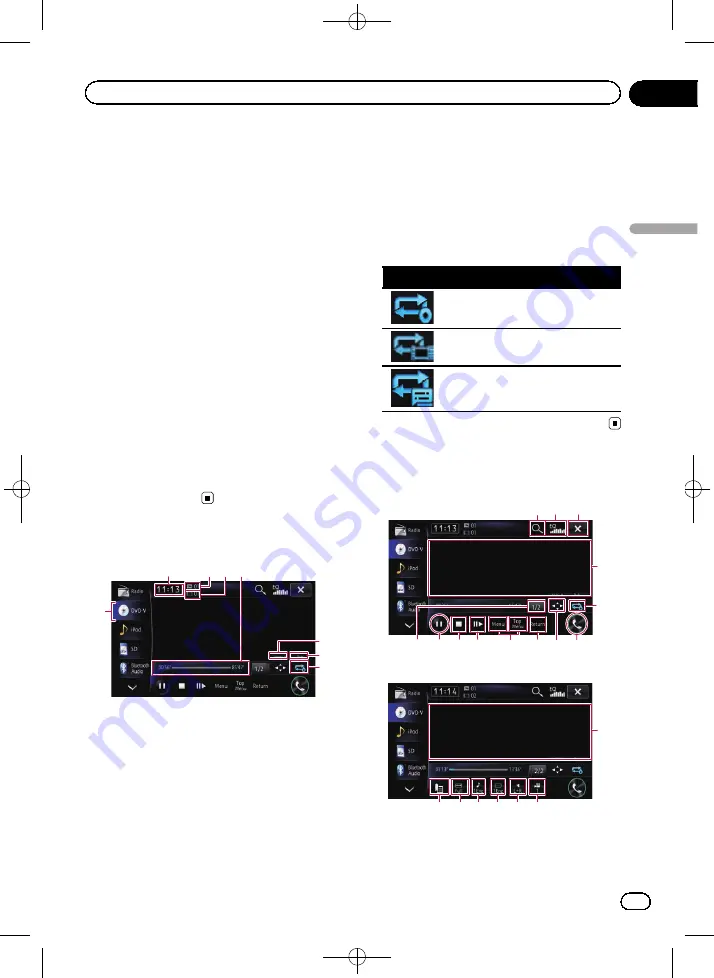
Reading the screen

1

3 4

2

5

7

6

8

1

Source icon

Shows which source has been selected.

2

Current time

3

Title number indicator

Shows the title number currently playing.

4

Chapter number indicator

Shows the chapter number currently playing.

5

Play time indicator

Shows the elapsed playing time within the
current title.

6

Digital sound format indicator

Shows which digital sound format (surround
sound format) has been selected.

7

Audio channel indicator

Shows the current audio channel type, such
as

Mch

(Multi-channel).

8

Repeat range indicator

Shows which repeat range has been selected.

Setting a repeat play range

Indicator

Meaning

Plays the whole of the current disc.

Repeats just the current chapter.

Repeats just the current title.

Using the touch panel keys

Playback screen (page 1)

1 2 3

5

7

9

c

d

b a

8

6

4

Playback screen (page 2)

f

e

g h i j

4

p

With some discs, the icon

9

may be dis-

played, meaning that the operation is inva-
lid.

<CRB4228-A>91

Engb

91

Chapter

16

Playing

a

DVD-Vid

eo

Playing a DVD-Video

Summary of Contents for AVIC-F850BT

Page 1: ...AVIC F50BT AVIC F950DAB AVIC F950BT AVIC F850BT Be sure to read Important Information for the User first Important Information for the User includes the important information that you must understand before using this navigation system English CRB4228 A 1 ...

Page 2: ...VIC F50BT 17 Ejecting a disc for AVIC F50BT 17 Inserting a disc for AVIC F950DAB AVIC F950BT and AVIC F850BT 18 Ejecting a disc for AVIC F950DAB AVIC F950BT and AVIC F850BT 18 Inserting and ejecting an SD memory card 18 Inserting an SD memory card for AVIC F50BT 18 Ejecting an SD memory card for AVIC F50BT 18 Inserting an SD memory card for AVIC F950DAB AVIC F950BT and AVIC F850BT 19 Ejecting an S...

Page 3: ...earching for a nearby POI 44 Selecting destination from stored locations 44 Selecting a location you searched for recently 44 Searching for a location by coordinates 45 After the location is decided Setting a route to your destination 46 Displaying multiple routes 46 Checking and modifying the current route Displaying the route overview 47 Checking the current itinerary 47 Modifying the route calc...

Page 4: ... a call automatically 74 Setting the automatic rejection function 74 Notes for hands free phoning 75 Basic operations of the AV source Displaying the AV operation screen 76 Selecting a source 76 Turning off the AV source 76 AV source plate display 76 Using the radio Starting procedure 77 Reading the screen 77 Using the touch panel keys 78 Storing broadcast frequencies 78 Storing the strongest broa...

Page 5: ...99 DVD Video or DivX setup Displaying DVD DivX Setup menu 100 Setting the top priority languages 100 Setting the angle icon display 100 Setting the aspect ratio 101 Setting the parental lock 101 Setting the code number and level 101 Setting the auto play 102 Setting the subtitle file for DivX 102 Language code chart for DVDs 103 Playing music files from USB or SD Starting procedure 104 Reading the...

Page 6: ...nnections of leads 131 Checking sensor learning status and driving status 132 Clearing status 133 Checking the device number 133 Checking the version information 133 Registering your home 133 Displaying the adjustment and correction screen 134 Switching the muting attenuation timing 134 Switching the muting attenuation level 135 Setting the Volume for Guidance and Phone 135 Correcting the current ...

Page 7: ...isplay output 147 Displaying the screen for AV system settings 147 Setting video input 1 AV1 148 Setting video input 2 AV2 148 Changing the screen size of SD USB video 148 Displaying your DivX VOD registration code 149 Displaying your DivX VOD deregistration code 149 Setting the iPod connection 149 Switching Auto PI seek 149 Setting the FM tuning step 150 Displaying the screen for AV sound setting...

Page 8: ...ly to cause noticeable positioning errors 181 Route setting information 183 Route search specifications 183 Handling and care of discs 183 Built in drive and care 184 Ambient conditions for playing a disc 184 Playable discs 184 DVD Video and CD 184 AVCHD recorded discs 185 Playing DualDisc 185 Dolby Digital 185 Detailed information for playable media 185 Compatibility 185 Media compatibility chart...

Page 9: ...Black plate 9 1 App settings menu 199 System Settings menu 199 Bluetooth Settings menu 200 Glossary 201 Specifications 204 CRB4228 A 9 Engb 9 Contents ...

Page 10: ... letter ing e g HOME button MODE button Menu items screen titles and functional components are described in bold with double quotation marks e g Destination screen or Phone screen Touch panel keys that are available on the screen are described in bold in brackets e g Destination AV Source Extra information alternatives and other notes are presented in the following for mat e g p If the home locati...

Page 11: ...oad casting streaming via internet intranets and or other networks or in other electronic con tent distribution systems such as pay audio or audio on demand applications An indepen dent licence for such use is required For de tails please visit http www mp3licensing com iPod compatibility This product supports only the following iPod models and iPod software versions Others may not work correctly ...

Page 12: ... due to the resulting high temperatures p When using a mobile phone keep the aer ial of the mobile phone away from the LCD screen to prevent disruption of the video in the form of spots coloured stripes etc p To protect the LCD screen from damage be sure to touch the touch panel keys only with your finger and do so gently Notes on internal memory Before removing the vehicle battery If the battery ...

Page 13: ...Black plate 13 1 CRB4228 A 13 Engb 13 Chapter 01 Introduction Introduction ...

Page 14: ...nctions This chapter gives information about the names of the parts and the main features using the buttons AVIC F50BT with the LCD panel closed 1 2 3 4 5 6 7 AVIC F50BT with the LCD panel open 8 9 CRB4228 A 14 Engb 14 Chapter 02 Basic operation ...

Page 15: ... the re sponse positions of the touch panel touch panel calibration on page 145 4 HOME button Press the HOME button to display the Top Menu screen while the map screen the AV operation screen or the application menu screen is displayed Press to switch the application operation screen to the application menu screen For details of the operations refer to How to use the navigation menu screens on pag...

Page 16: ...ached from the navigation system to discourage theft as described below CAUTION Do not expose the detachable faceplate to ex cessive shock or disassemble it Never grip the buttons tightly or use force when removing or attaching Keep the detachable faceplate out of reach of small children to prevent them from placing it in their mouths After removing the detachable faceplate keep it in a safe place...

Page 17: ...ime the LCD panel is opened or closed Inserting and ejecting a disc Inserting a disc for AVIC F50BT WARNING Keep hands and fingers clear of the unit when opening closing or adjusting the LCD panel Be especially cautious of children s hands and fingers Do not use with the LCD panel left open If the LCD panel is left open it may result in injury in the event of an accident CAUTION Do not open or clo...

Page 18: ...ility for damages costs or expenses arising from data loss or corruption Do not insert anything other than SD memory cards p This system is not compatible with the Multi Media Card MMC p Compatibility with all SD memory cards is not guaranteed p This unit may not achieve optimum perfor mance with some SD memory cards Inserting an SD memory card for AVIC F50BT CAUTION Do not press the h button when...

Page 19: ...and AVIC F850BT Insert an SD memory card into the SD card slot Insert the SD memory card with the terminal contacts face down and press the card until it clicks and locks completely Ejecting an SD memory card for AVIC F950DAB AVIC F950BT and AVIC F850BT 1 Press the middle of the SD memory card gently until it clicks 2 Pull the SD memory card out straight CRB4228 A 19 Engb 19 Chapter 02 Basic opera...

Page 20: ...d with this navigation system by using a USB interface cable for iPod iPhone CD IU201N sold separately and a Lightning to 30 pin Adapter Apple Inc products sold separately However functions related to iPod video files are not available For iPod with Lightning connector users who use an HDMI USB interface cable for iPod iPhone To play music and or video files on your iPod with this navigation syste...

Page 21: ... while data is being transferred Pioneer cannot guarantee compatibility with all USB mass storage devices and assumes no responsibility for any loss of data on media players iPhone smartphone or other devices while using this product p This navigation system may not achieve op timum performance with some USB sto rage devices p Connection via a USB hub is not possible p A USB interface cable for iP...

Page 22: ...n from damage be sure to touch the touch panel keys only with your finger and do so gently 2 Turn off the vehicle engine to termi nate the system The navigation system is also turned off On first time startup When you use the navigation system for the first time select the language that you want to use 1 Start the engine to boot up the system After a short pause the splash screen comes on for a fe...

Page 23: ...uch the message to close it or it will dis appear automatically after eight sec onds Demonstration images If you do not operate this navigation system for five minutes demonstration images are displayed p The demonstration images will not be dis played if you drive after mounting this navi gation system Temporarily clearing the screen navigation system in standby mode You can temporarily clear the...

Page 24: ... when an iPhone or a smartphone is connected to this na vigation system 2 Shortcut Menu p If you press the HOME button the screen of either Top Menu or Shortcut Menu which was being displayed last time is displayed 3 AV operation screen This is the screen that normally appears when you play the AV source 4 Map screen You can use this screen to check the current vehicle position information and rou...

Page 25: ...een You can access the screen that is related to hands free phoning Shortcut Menu Registering your favourite menu items in shortcuts allows you to quickly jump to the re gistered menu screen by a simple touch on the Shortcut Menu screen Selecting the shortcut p Up to 10 menu items can be registered in shortcuts 1 Display the Shortcut Menu screen For details of the operations refer to How to use th...

Page 26: ...the right of the item allows you to see the remain ing characters Operating the on screen keyboard b 1 4 3 2 7 5 6 a 9 8 1 Keyboard Touching the keys enters the characters in the text box 2 You can switch between capital and lower case letters 3 ABC You can enter letters and numbers 4 Space You can leave spaces A space equivalent to the number of touches is inserted 5 Others You can enter other ch...

Page 27: ... audio functions by sliding your fingers vertically and horizontally while touching the screen 1 Touch and hold the swipe response area p The swipe response area varies depending on the displayed screen Example CD Swipe response area j Operation guide The operation guide appears 2 While touching the screen slide your finger toward the function you want to execute and release j The selected functio...

Page 28: ...e Selects the current route App view map Displays the turning direction at the next guide point and the distance and gives a voice announcement The sound mix function is dis abled The sound mix function is en abled 1 Displays the AppRadio Mode screen 1 Displays this screen after releasing your finger from the circle The intersection guidance display and the interchange guidance display Swipe respo...

Page 29: ... to the next chapter Unmutes the sound Mutes the sound Disc DivX video files SD USB Skips to the previous file Skips to the next file Unmutes the sound Mutes the sound iPod Skips to the previous chapter or song Skips to the next chapter or song Unmutes the sound Mutes the sound Operation screen Action Aha Radio Skips to the previous content Skips to the next content Unmutes the sound Mutes the sou...

Page 30: ...an set the view mode and the map orientation appears For details of the operation refer to Switching the view mode on page 34 For details refer to Switching the map or ientation on page 34 4 Current position Indicates the current location of your vehicle The apex of the triangular mark indicates your orientation and the display moves automati cally as you drive p The apex of the triangular mark is...

Page 31: ... the upcom ing street If you touch the street name is scrolled and hidden letters appear d Estimated time of arrival at your destina tion or waypoint The estimated time of arrival is an ideal value calculated based on the value set for Minor Ordinary Road Major Ordinary Road or Motorway and the actual driving speed The estimated time of arrival is only a reference value and does not guarantee arri...

Page 32: ... Turn by turn routable roads contain full attri bute data and can be used for full route gui dance Pioneer navigation will display full route guidance including turn by turn voice directions and arrow icons Roads without turn by turn instructions Routable roads the route displayed and high lighted in pink have only basic data and can only be used to plot a navigable route Pioneer navigation will d...

Page 33: ...e direction arrows disappear by touching Adju again p Pressing the MAP button returns the map to the current position Viewing information about a specified location For the locations you have searched using the destination menu you can display the detailed information as long as the information related to the location is stored in the system 1 Search for a location using the Desti nation screen Fo...

Page 34: ...or the iPhone or smartphone on the right side of the screen and the map on the left side of the screen If you touch the map the map is scrolled on the whole screen And if you touch the screen of an application for the iPhone or smartphone the AppRadio Mode screen appears For details refer to Scrolling the map to the position you want to see on page 32 For details refer to Swipe action on page 27 R...

Page 35: ...w mode on page 34 2 Touch 1 way at 100m Each touch of the key turns on or off the one way street display on the 100 metres 0 1 mile scale Displaying POI on the map Displays icons for the surrounding facilities POI on the map p POI icons are not displayed when the map scale is 1 kilometre 0 75 mile or more p Up to 200 items or 100 preinstalled POIs are displayed on the map Displaying preinstalled P...

Page 36: ... screen returns to the map screen and the logo of the selected POI appears Registering a scale You can register a scale for each map accord ing to the display method You can see the map in the registered scale by pressing the MAP button even if you switch the view mode 1 Adjust the map scale to the scale you want to register 2 Display the View screen For details of the operation refer to Switch in...

Page 37: ...oute 1 Park your vehicle in a safe place and apply the handbrake j 2 Display the Destination screen For details of the operations refer to How to use the navigation menu screens on page 24 j 3 Select the method of searching for your destination j 4 Enter the information about your destina tion to calculate the route j 5 Confirm the location on the map For details refer to Setting a route to your d...

Page 38: ... will automatically search the database for all possible options Only the characters you enter are active p If the search candidates number reaches 20 or less the screen automatically changes to the search result screen 1 Display the Destination screen For details of the operations refer to How to use the navigation menu screens on page 24 2 Touch Address 3 Touch Country 4 Touch one of the items o...

Page 39: ... the database for all possible options Only the characters you enter are active p If the search candidates number reaches 20 or less the screen automatically changes to the search result screen 1 Display the Destination screen For details of the operations refer to How to use the navigation menu screens on page 24 2 Touch Address The Address Search screen appears 3 Touch City If you touch History ...

Page 40: ...screen returns to the previous screen 5 Touch Postcode The Enter Postcode screen appears 6 Input the postcode A list of cities with the specified postcode is shown except for the following cases British postcode The searched location appears on the map screen Netherlands postcode If you input a partial postcode 4 digits or a complete postcode 6 digits and touch OK a list of cities is shown 7 Touch...

Page 41: ...hout entering the house number a representative location on the street in the selected city appears 8 Touch the desired house number range The searched location appears on the map screen For subsequent operations refer to Setting a route to your destination on page 46 Setting up a route to your home If your home location is stored the route to your home can be calculated by touching a single key 1...

Page 42: ... use the navigation menu screens on page 24 2 Touch Near Me POIs are divided into several categories p The Category history screen appears if you have searched for POIs before p The history can be stored up to 10 genres You can delete the stored histories collec tively p If you want to delete the histories touch Delete All p If you want to search for a genre other than displayed touch Other The PO...

Page 43: ...cted city history on page 41 6 Enter the city name and then touch OK The Select City screen appears 7 Touch the desired city name POIs are divided into several categories p The Category history screen appears if you have searched for POIs before p The history can be stored up to 10 genres You can delete the stored histories collec tively p If you want to delete the histories touch Delete All p If ...

Page 44: ...ppears on the map screen For subsequent operations refer to Setting a route to your destination on page 46 You can switch the list display between Fa vourites and History by touching the tabs If you touch Sort you can sort the entry by following order By date default Sorts the list in chronological order of regis tration or call up By distance Sorts the list in order by distance from the vehicle p...

Page 45: ...How to use the navigation menu screens on page 24 2 Touch Coordinates 3 Touch East or West and then enter the longitude To enter W 50 1 2 5 for example touch West 0 5 0 0 1 0 2 and 5 4 Touch North or South and then enter the latitude To enter N 5 1 2 5 for example touch North 0 5 0 1 0 2 and 5 5 Touch OK The searched location appears on the map screen For subsequent operations refer to Setting a r...

Page 46: ...ypoints List screen appears For details refer to Editing waypoints on page 49 When there are multiple routes following a search Oth route appears If you touch Oth route you can select a route with conditions that may differ from those of the currently selected route For details refer to Displaying multiple routes on page 46 When there is only one route Route map ap pears If you touch Route map the...

Page 47: ...ute from the demon stration of the driving of the route from the starting point and final destination For details refer to Using the demonstra tion guidance on page 50 Demo OFF While the demonstration guidance is run ning Demo OFF appears Touching the key finishes the demonstration guidance 5 Cancel Route You can delete the current route For details refer to Cancelling the route guidance on page 5...

Page 48: ...ates a route with the shortest travel time to your destination as a priority Short Calculates a route with the shortest distance to your destination as a priority Main Road Calculates a route that passes major arterial roads as a priority Toll road This setting controls whether toll roads in cluding toll areas should be taken into ac count Use Calculates a route that may include toll roads includi...

Page 49: ... on page 24 2 Touch Options and then touch Way points The Waypoints List screen appears If you touch the pop up menu is disap peared 3 Touch Add The Add screen appears 4 Search for a location For details refer to Chapter 4 5 Touch OK on the Waypoints List screen The route is recalculated and the Route con firmation screen appears 6 Touch OK A map of the current position appears p If you set waypoi...

Page 50: ... use the navigation menu screens on page 24 2 Touch Options and then touch Way points The Waypoints List screen appears 3 Touch Sort and then touch Manual You can specify the order of waypoints to sort If you touch Automatic the waypoints are sorted in the order of the nearest one from the current location 4 Touch the waypoint or destination Put them in the desired order 5 Touch OK The Waypoints L...

Page 51: ...u screens on page 24 2 Touch Demo OFF The demonstration guidance is finished p You can also finish the demonstration gui dance by touching and then touch ing Yes while the demonstration guidance is running Cancelling the route guidance If you no longer need to travel to your destina tion follow the steps below to cancel the route guidance 1 Display the editing route screen For details of the opera...

Page 52: ... appears 3 Touch Edit favorite The Edit Favourite screen appears 4 Touch Edit The Edit Favourite screen appears p Home location is displayed on the top of the list 5 Touch the location that you want to edit 6 Touch the item you want to configure 2 3 1 4 5 1 Name You can enter the desired name p Up to 40 characters can be input for the name 2 Phone You can edit the registered phone number The maxim...

Page 53: ... 1 Display the Edit Settings screen For details of the operations refer to How to use the navigation menu screens on page 24 2 Touch Edit Data The Edit Data screen appears 3 Touch Delete search history The History screen appears 4 Select the location you want to delete A tick mark appears next to the selected loca tion If you touch All you can select all entries If you want to deselect all entries...

Page 54: ...n page 24 2 Touch Edit Data The Edit Data screen appears 3 Touch Delete learned routes A confirmation message appears 4 Touch Yes Deletes the learned routes Deleting track logs You can delete track logs displayed on the map screen p You can also automatically delete track logs 1 Display the Edit Settings screen For details of the operations refer to How to use the navigation menu screens on page 2...

Page 55: ...raffic information Traffic information is displayed on a screen in the form of a list This allows you to check how many traffic incidents have occurred their lo cation and their distance from your current po sition 1 Display the Information screen For details of the operations refer to How to use the navigation menu screens on page 24 2 Touch Traffic Information The Traffic information menu screen...

Page 56: ...vent information displayed on the map is as follows p A line is displayed only when the map scale is 5 km 2 5 miles or lower p Icons appear only when the scale on the map is 20 km 10 miles or lower If the scale is changed the icons are resized ac cording to the selected scale Traffic event icon with yellow line Slow and queuing traffic with red line Stationary traffic with black line Closed blocke...

Page 57: ... tives function on page 141 If you touch Current route while the recom mended route is displayed the screen switches to the current route displayed and route gui dance starts If you touch Scroll map you can switch the map scale or the map orientation and confirm the route Selecting the preferred RDS TMC service provider manually A default preferred TMC service provider for each country has been se...

Page 58: ...ing Bluetooth wireless technology when you con nect it for the first time A total of 5 devices can be registered Two registration methods are available Searching for nearby Bluetooth devices Pairing from your Bluetooth devices p If you try to register more than 5 devices the system will ask you to select one of the registered devices to delete For details refer to Deleting a registered device on p...

Page 59: ...r registering a confirmation message ap pears 8 Touch OK The registration is complete and the device is connected as a hands free phone You can perform the following setting depend ing on the Bluetooth device registered Transferring the phone book You can transfer the phone book to the navi gation system if the registered Bluetooth device features PBAP Phone Book Access Profile If you touch Yes yo...

Page 60: ... cannot find the Bluetooth device that you want to connect check that the device is waiting for the Bluetooth wireless tech nology connection 6 Touch the Bluetooth device name you want to register If you touch Search the system starts searching for Bluetooth devices waiting for con nection and displays them in the list format when any devices are detected 7 Pair this navigation system with your Bl...

Page 61: ... 12 Touch OK For Bluetooth device other than iPod users p Only the Android device can perform the smartphone cooperation function AppRadio Mode and aha via Bluetooth wireless technology 1 Activate the Bluetooth wireless tech nology on your devices For some Bluetooth devices no specific action is necessary to activate Bluetooth wireless technology For details refer to the instruction manual of your...

Page 62: ...one book to the navigation system and then the message that transfer is fin ished appears Selecting whether to use the Bluetooth audio You can select whether to use the Bluetooth audio function if the registered Bluetooth device features Bluetooth audio The message Is this Android appears 9 Touch Yes if the Bluetooth device you connected is an Android device Yes Allows you to proceed to the next s...

Page 63: ...ether to use the Bluetooth audio function if the registered Bluetooth device features Bluetooth audio The message Is this Android appears 8 Touch No The message Is this device equipped with a Digital AV Connector appears 9 Touch No The device is registered in the navigation sys tem After the device is successfully regis tered the Bluetooth connection is established from the navigation system For i...

Page 64: ...less technology For details refer to the instruction manual of your devices 2 Display the Phone screen For details of the operations refer to How to use the navigation menu screens on page 24 3 Touch Bluetooth Settings The Bluetooth Settings screen appears 4 Touch Registration The Device list screen appears 5 Touch Register from device The navigation system waits for a Bluetooth wireless technolog...

Page 65: ...s The device is deleted p If the device you deleted was set for the priority connecting as a hands free phone Bluetooth audio player or smartphone this navigation system needs to set another de vice for priority connecting Connecting a registered Bluetooth device manually The navigation system automatically connects the Bluetooth device selected as the target of connection However connect the Blue...

Page 66: ...ection method on page 157 For details refer to Setting the iPod con nection on page 149 When a connection is successfully estab lished a connection complete message ap pears and the map screen returns by touching OK p To cancel the connection to your device touch Cancel p If connection fails check whether your de vice is waiting for a connection and then retry 8 Touch OK Setting for priority conne...

Page 67: ... utilisation For details refer to Chapter 9 1 Press the HOME button to display the Top Menu screen 2 Touch Phone The Phone screen appears 2 1 3 4 5 1 Reception status of the mobile phone 2 Network name of the mobile phone com pany 3 Battery status of the mobile phone 4 Strength of the Bluetooth connection be tween the navigation system and the device 5 Name of the connected mobile phone Making a p...

Page 68: ...laying the phone menu on page 67 2 Touch Contacts List The Contacts List screen appears 3 Touch alphabet tabs The screen jumps to the top of the page dis playing the entries that start with the selected letter or number p Touching the alphabet tabs displays all en tries that start with symbols p Touching Num displays all entries that start with numbers p Touching Oth displays the page including en...

Page 69: ...tored in the call history list You can browse the call history list and call numbers from it p Each call history saves 30 calls per regis tered mobile phone If the number of calls exceeds 30 the oldest entry will be deleted 1 Display the Phone screen For details refer to Displaying the phone menu on page 67 2 Touch Call history 3 Touch Received Dialed or Missed The selected call history list appea...

Page 70: ... free answering by using the navigation system Answering an incoming call The system informs you that it is receiving a call by displaying a message and producing a ring sound p You can set the system to automatically an swer incoming calls If not set to automati cally answer incoming calls you will have to answer the calls manually For details refer to Answering a call automatically on page 74 p ...

Page 71: ...will not be transferred p Each entry can hold up to 5 phone num bers If more than one number is registered for one person such as work place and home each number may be counted separately p Depending on the mobile phone that is connected to this navigation system via Bluetooth technology this navigation sys tem may not be able to display the phone book correctly Some characters may be garbled p If...

Page 72: ...gistered contacts 1 Touch Edit Delete on the Phone screen The Edit Delete screen appears For details refer to Displaying the phone menu on page 67 2 Touch Contacts The Contacts List screen appears 3 Touch Delete The Delete screen appears 4 Touch the entry you want to delete A tick mark appears next to the entry If you touch All you can select all entries If you want to deselect all entries touch N...

Page 73: ...ed on your mobile phone Default is PIONEER NAVI 1 Display the Phone screen For details refer to Displaying the phone menu on page 67 2 Touch Bluetooth Settings The Bluetooth Settings screen appears 3 Touch Device Name The keyboard to enter the name appears 4 Touch to delete the current name and enter the new name using the key board p Up to 20 characters can be entered for a de vice name 5 Touch O...

Page 74: ... Incoming call settings screen appears 3 Touch Auto Answer Preference The Auto Answer Preference screen ap pears 4 Touch the desired option On this screen you can select the following items Off default No automatic response Respond manually Immediately Answers immediately After 3 seconds Answers after three seconds After 6 seconds Answers after six seconds After 10 seconds Answers after ten second...

Page 75: ... conversation due to an echo decrease the volume level for hands free phoning This may reduce the echo With some mobile phones even if you press the accept button on the mobile phone when a call comes in hands free phoning may not be performed The registered name appears if the phone number of the received call is already regis tered in the phone book When one phone number is registered under diff...

Page 76: ...rce icon you want to se lect on the left edge of the screen The operation screen of the selected source appears p If seven or more sources can be selected appears p If you touch the AV source icons will be switched and hidden icons will ap pear Turning off the AV source Turn off the AV source to stop playing or re ceiving the AV source Touch Source Off on the left edge of the screen The AV source ...

Page 77: ...4 3 7 8 6 9 d 1 Source icon Shows which source has been selected 2 Programme service name indicator Shows the programme service name station name of the current station p When AM is selected this indicator is not shown 3 PTY indicator Shows the programme type of the current sta tion when available p When AM is selected this indicator is not shown 4 Current time 5 Band indicator Shows which band th...

Page 78: ...ning touch and hold or for about one second and then release The tuner will scan frequencies until it finds a broadcast strong enough for good reception p You can cancel seek tuning by touching either or briefly p If you keep holding or you can skip broadcasting frequencies Seek tuning will start when you release the keys 9 Displays preset channels Touching this key displays the preset channel lis...

Page 79: ...e currently broadcast song and the name of the artist p The tuner automatically memorises the three latest radio text broadcasts received replacing text from the least recent recep tion with new text when it is received p When no radio text is received No Text is displayed Viewing the three latest radio text You can display the currently received radio text and the three most recent radio text tra...

Page 80: ... The preset number may disappear on the display if the tuner tunes into a regional sta tion that differs from the originally set sta tion p The regional function can be turned on or off independently for each FM band Searching for an RDS station by PTY information p This function can only be used on the FM band You can search for general types of broadcast ing programmes 1 Touch on the Radio scree...

Page 81: ...me re sumes 1 Touch on the Radio screen The Function menu appears 2 Touch News 3 Touch On or Off Off default Turns the News function off On Turns the News function on p A news programme can be cancelled by touching Cancel p You can also cancel the news programme by changing the source or band Tuning into alternative frequencies p This function can only be used on the FM band If you are listening t...

Page 82: ...gramme interruption on page 81 p The interruption icon is displayed on all AV source operation screens TRFC indicator Indicator Meaning Information interruption is activated but you will not receive data since there is none Information interruption is activated and data currently being received No dis play Information interruption is deactivated NEWS indicator Indicator Meaning Information interru...

Page 83: ...Component Primary Service Component Primary Service Component Starting procedure 1 Display the AV operation screen For details of the operations refer to Dis playing the AV operation screen on page 76 2 Touch Digital Radio on the left edge of the screen to display the Digital Radio screen 3 Use the touch panel keys on the screen to control the radio For details refer to Using the touch panel keys ...

Page 84: ...stening to a recent broadcast on page 85 a Performs manual tuning To tune manually touch or briefly The frequencies move up or down one step at a time Performs seek tuning To perform seek tuning touch and hold or for about one second and then release The tuner will scan frequencies until it finds a broadcast strong enough for good reception p You can cancel seek tuning by touching either or briefl...

Page 85: ...lassics or Others Service Component You can select a Service Component from the list of all components 3 Touch the item you want It changes to the selected channel p If you touch Update you can update the channel list p ABC may appear depending on the list If you touch ABC you can search by alphabet Listening to a recent broadcast You can listen to the service component that has been broadcasted t...

Page 86: ...nel is switched if the origin ally channel regains good receiving sensi tivity the system switches back to the original channel automatically 1 Touch on the Digital Radio screen The Function menu appears 2 Touch Service follow The Service follow screen appears 3 Touch On Automatic channel switching is enabled p If you touch Off setting for switching the channel automatically is disabled Operating ...

Page 87: ... which source has been selected 2 Track number indicator Shows the number of the track currently play ing 3 Current time 4 Current track information Track title Shows the title of the track currently playing when available Artist name Shows the artist name of the track cur rently playing when available Album title Shows the title of the album of the cur rent track when available Play time Shows th...

Page 88: ...layback is automatically cancelled For details refer to Playback condition indicator on page 87 5 Displays the Phone screen For details refer to Displaying the phone menu on page 67 6 Plays tracks in random order All tracks in the disc can be played at random by only touching a single key p If you turn the random play on when the repeat play range is set to the repeat play range changes to automat...

Page 89: ...n selected 2 Track number indicator Shows the number of the track currently play ing 3 Current time 4 File type indicator Shows the type of audio files 5 Current file information Track title Shows the title of the track currently playing when available p If the title of a track is not available the file name appears Artist name Shows the artist name currently playing when available Folder name Alb...

Page 90: ...fast reverse or fast for ward during the repeat play range changes to p When is selected it is not possible to playback a subfolder of that folder For details refer to Playback condition indicator on page 89 5 Displays the Phone screen For details refer to Displaying the phone menu on page 67 6 Plays files in random order The files in the current repeat play range can be played at random by only t...

Page 91: ...icon Shows which source has been selected 2 Current time 3 Title number indicator Shows the title number currently playing 4 Chapter number indicator Shows the chapter number currently playing 5 Play time indicator Shows the elapsed playing time within the current title 6 Digital sound format indicator Shows which digital sound format surround sound format has been selected 7 Audio channel indicat...

Page 92: ...u You can display the menu by touching Menu or Top Menu while a disc is playing Touch ing either of these keys again lets you start playback from the location selected from the menu For details refer to the instructions pro vided with the disc a Frame by frame playback or slow motion playback For details refer to Frame by frame play back on page 94 For details refer to Slow motion playback on page...

Page 93: ...ing a title or chapter and the time p Chapter search and time search are not available when disc playback has been stopped 1 Touch and then touch Title title Chapter chapter Time time 2 Touch the keys to input the target num ber or time and then touch Enter For titles chapters To select 3 touch 3 and Enter in order To select 10 touch 1 and 0 and Enter in order For time time search To select 5 minu...

Page 94: ... time you touch it If you touch Hide the touch panel keys dis appear and the icon is displayed You can se lect a menu item by touching it Frame by frame playback This lets you move ahead one frame at a time during pause Touch r during pause Each time you touch r you move ahead one frame p To return to normal playback touch d or e p With some discs images may be unclear during frame by frame playba...

Page 95: ...ized wide screen picture where captions lie outside the frame Zoom A 4 3 picture is enlarged in the same pro portion both vertically and horizontally ideal for a cinema sized wide screen pic ture Normal A 4 3 picture is displayed normally giving you no sense of disparity since its propor tions are the same as those of the normal picture p Images may be unclear when Cinema or Zoom is selected p Rem...

Page 96: ... indicator Shows the folder number currently playing 5 Current file name indicator Shows the file name currently playing 6 Current folder name indicator Shows the folder name currently playing 7 Digital sound format indicator Shows the digital sound format surround sound format currently selected 8 Audio channel indicator Shows the current audio channel type such as Mch Multi channel 9 Repeat rang...

Page 97: ... scene and starts playback from a specified time For details refer to Starting playback from a specified time on page 98 8 Switches the subtitle language You can switch the subtitle language while the disc is playing when a disc has multilingual data multi subtitle p Each time you touch this key changes the subtitle language For details refer to Setting the top prior ity languages on page 100 9 Sw...

Page 98: ...ting is Full 1 Touch on the DivX screen p The appearance of this key changes accord ing to the current setting 2 Touch the desired mode Full A 4 3 picture is enlarged in the horizontal direction only enabling you to enjoy a 4 3 TV picture normal picture without any omissions Just The picture is enlarged slightly at the centre and the amount of enlargement increases horizontally toward the ends of ...

Page 99: ...sc into your player and play the con tent as often as you like and no message will be displayed p In order to play DivX VOD content on this unit you first need to register the unit with your DivX VOD content provider For infor mation about your registration code refer to Displaying your DivX VOD registration code on page 149 p DivX VOD content is protected by a DRM Digital Rights Management system...

Page 100: ...ach language menu is displayed and the cur rently set language is selected 3 Touch the desired language When you select Others a language code input display is shown Input the four digit code of the desired language then touch OK For details refer to Language code chart for DVDs on page 103 p If the selected language is not recorded on the disc the default language specified on the disc is output ...

Page 101: ...ions may be dis played In this case playback will begin when the correct code number is input Setting the code number and level When you first use this function register your code number If you do not register a code number the parental lock will not operate 1 Display the DVD DivX Setup screen For details refer to Displaying DVD DivX Setup menu on page 100 2 Touch Parental Level 3 Touch 0 to 9 to ...

Page 102: ... for DivX You can select whether to display DivX exter nal subtitles or not p If no DivX external subtitle files exist the original DivX subtitles are displayed even when Custom is selected 1 Display the DVD DivX Setup screen For details refer to Displaying DVD DivX Setup menu on page 100 2 Touch Subtitle File 3 Touch Original or Custom p Up to 42 characters can be displayed on one line If more th...

Page 103: ...214 Lingala sv 1922 Swedish da 0401 Danish lo 1215 Lao sw 1923 Swahili de 0405 German lt 1220 Lithuanian ta 2001 Tamil dz 0426 Dzongkha lv 1222 Latvian te 2005 Telugu el 0512 Greek mg 1307 Malagasy tg 2007 Tajik en 0514 English mi 1309 Maori th 2008 Thai eo 0515 Esperanto mk 1311 Macedonian ti 2009 Tigrinya es 0519 Spanish ml 1312 Malayalam tk 2011 Turkmen et 0520 Estonian mn 1314 Mongolian tl 201...

Page 104: ...the screen to display the USB or SD screen 4 Use the touch panel keys on the screen to control the external storage device USB SD For details refer to Using the touch panel keys Music on page 105 Reading the screen 1 3 4 2 6 7 5 p This unit may not achieve optimum perfor mance with some external storage devices p You can play back the files on a USB sto rage device compliant with the Mass Sto rage...

Page 105: ...ching a folder on the list shows its content You can play a file on the list by touching it 3 Recalls equaliser curves For details refer to Using the equaliser on page 151 4 Operates some functions by swipe action For details refer to Swipe action on page 27 5 Sets a repeat play range The repeat play range can be changed by only touching a single key p If you skip the file forward or backward when...

Page 106: ... hardware buttons Pressing the TRK button You can skip files forward or backward Pressing and holding the TRK button You can perform fast reverse or fast for ward CRB4228 A 106 Engb 106 Chapter 19 Playing music files from USB or SD ...

Page 107: ...there are no play able files in folder 01 root folder playback starts from folder 02 3 Touch USB or SD on the left edge of the screen to display the USB or SD screen 4 Touch the screen to display the touch panel keys 5 Use the touch panel keys on the screen to control the external storage device USB SD For details refer to Using the touch panel keys Video on page 108 Reading the screen 5 4 1 3 2 6...

Page 108: ...he current video Touching shows only the current video p If you want to display the touch panel keys and information of the current video again touch anywhere on the LCD screen 5 Operates some functions by swipe action p When the video is displayed in full screen mode the whole screen be comes a swipe response area For details refer to Swipe action on page 27 6 Sets a repeat play range The repeat ...

Page 109: ...To select 100 minutes 05 seconds touch 1 0 0 5 sec and Enter in order p To cancel an input number touch To cancel the input numbers touch and hold Operating by hardware buttons Pressing the TRK button You can skip files forward or backward Pressing and holding the TRK button You can perform fast reverse or fast for ward CRB4228 A 109 Engb 109 Chapter 20 Playing video files from USB or SD Playing v...

Page 110: ...e a USB interface cable for iPod iPhone CD IU201N sold separately to connect your iPod For details refer to Connecting your iPod on page 20 Starting procedure 1 Set iPod Connection Settings to 30 pin Connector For details refer to Selecting the device con nection method on page 157 For details refer to Setting the iPod connec tion on page 149 2 Display the AV operation screen For details of the op...

Page 111: ...information Song title episode Shows the title of the current song When a podcast is played the episode is displayed when available Artist name podcast title Shows the artist name currently playing When a podcast is played the podcast title is displayed when available Album title podcast producer Shows the title of the album for the song When a podcast is played the podcast producer is displayed w...

Page 112: ... displayed in full screen mode the whole screen be comes a swipe response area For details refer to Swipe action on page 27 5 Sets a repeat play range The repeat play range can be changed by only touching a single key For details refer to Playback condition indicator on page 111 6 Displays the Phone screen For details refer to Displaying the phone menu on page 67 7 Sets the shuffle play The shuffl...

Page 113: ...the vertical direction ideal for a cinema sized wide screen picture where captions lie outside the frame Zoom A 4 3 picture is enlarged in the same pro portion both vertically and horizontally ideal for a cinema sized wide screen pic ture Normal A 4 3 picture is displayed normally giving you no sense of disparity since its propor tions are the same as those of the normal picture p Images may be un...

Page 114: ... ahamobile com A specific version of the Aha Radio applica tion must be installed on your iPhone or smartphone to enjoy Aha Radio content on this navigation system Because the application for the iPhone or smartphone is not provided by Pioneer the re quired version of the application may not yet be available at the time of purchase of the na vigation system Availability version and update informat...

Page 115: ...nec tion on page 149 2 Register your iPhone and connect it to this product via the Bluetooth wireless technology p The registered device must be selected as the priority device For details refer to Registering your Bluetooth devices on page 58 3 Unlock your iPhone 4 Connect your iPhone For details refer to Connecting your iPod on page 20 5 Display the AV operation screen For details of the operati...

Page 116: ...icon Shows which source has been selected 2 Current time 3 Current station information Shows which source has been selected Station name Shows the name of the Aha Radio sta tion to which navigation system is cur rently tuned Detailed information Shows the information on the content currently being played p is displayed if there is no corresponding information Rating information Shows the rated val...

Page 117: ...f the current content for 30 seconds Touching the key sends you to the Location confirmation screen of the selected POI to search for the de sired route For subsequent operations refer to Setting a route to your destina tion on page 46 Touching the key likes the current content p Depending on the content touching or cancels likes Touching the key dislikes the cur rent content p Depending on the co...

Page 118: ...tent that includes POI loca tion information a maximum of 30 POI icons are displayed on the map screen p The POI icons on the map will not disap pear even when the smartphone is re moved The icons will disappear with the following operations Turning off the ignition switch ACC OFF Initialising user data Updating the display of the Aha POI icons p Aha POI icons are updated at the following interval...

Page 119: ... listening to a song on your Bluetooth audio player the song playback continues p Depending on the Bluetooth audio player you connected to this navigation system operations on this navigation system to control the player may differ from those ex plained in this manual p When you are talking on a mobile phone connected to this unit via Bluetooth wire less technology song playback from your Bluetoot...

Page 120: ... title Shows the title of the track currently playing when available Artist name Shows the artist name currently playing when available Album title Shows the title of the album of the cur rent file when available Play time indicator Shows the elapsed playing time within the current file p In the following cases file information will only be displayed after a file starts or resumes playing You conn...

Page 121: ... play range can be played at random by only touching a single key p This function is only available when the connected Bluetooth audio player sup ports AVRCP 1 3 For details refer to Playback condition indicator on page 120 8 Connects and disconnects the Bluetooth audio player The Bluetooth audio player is disconnected when you touch Disconnect p If the Bluetooth audio player is not con nected tou...

Page 122: ... connected to video input 2 1 Turn on the setting of video input 2 AV2 For details refer to Setting video input 2 AV2 on page 148 2 Display the AV operation screen For details of the operations refer to Dis playing the AV operation screen on page 76 3 Touch AV2 on the left edge of the screen The image is displayed on the screen Using the touch panel keys 1 2 5 4 3 1 Recalls equaliser curves For de...

Page 123: ... A picture is enlarged by the same propor tion as Full or Zoom in the horizontal di rection and by an intermediate proportion between Full and Zoom in the vertical direction ideal for a cinema sized wide screen picture where captions lie outside the frame Zoom A 4 3 picture is enlarged in the same pro portion both vertically and horizontally ideal for a cinema sized wide screen pic ture Normal A 4...

Page 124: ...tails refer to Using app based con nected content on page 194 Pioneer is not liable for any issues that may arise from incorrect or flawed app based content The content and functionality of the sup ported applications are the responsibility of the App providers In AppRadio Mode functionality through the product is limited while driving with available functions determined by the App providers Avail...

Page 125: ...e and iPod Connection Settings to 30 pin Connector For details refer to Selecting the device con nection method on page 157 For details refer to Setting the iPod connec tion on page 149 2 Connect your iPhone For details refer to Connecting your iPod on page 20 3 Press the HOME button to display the Top Menu screen 4 Touch Apps A message which notifies you that your iPhone can launch the applicatio...

Page 126: ...n operation screen appears on this navigation system 7 Touch the desired application icon The desired application is launched and the application operation screen appears 8 Operate the application 9 Press the HOME button to go back to the application menu screen p If you press the HOME button while the ap plication menu screen is displayed the Top Menu screen appears For smartphone users 1 Set App...

Page 127: ...ess the HOME button to go back to the application menu screen p If you press the HOME button while the ap plication menu screen is displayed the Top Menu screen appears p To use AppRadio Mode with an Android device connected to this product you should adjust the size of the Android win dow on the screen of this product Setting the display size for the Android video playback p This function is only...

Page 128: ...ne letter at a time beginning at the end of the text 3 Confirms the entry and allows you to proceed to the next step 4 Hides the keyboard and text can now be entered using the keyboard of iPhone 5 Changes the iPhone keyboard layout p The iPhone keyboard layouts that can be selected by tapping depends on the setting of Hardware Keyboard Layout of your iPhone 6 Switches to a keyboard offering nu mer...

Page 129: ...the image of your application iPhone with Lightning connector You can set an image of the application for smartphone which is not compatible with AppRadio Mode to be shown on the screen p Depending on the type of application you may not be able to see the image on screen p When you use this function do not connect other devices via Bluetooth wireless tech nology Be sure to disconnect your Bluetoot...

Page 130: ...s de pending on your device For details of the operations refer to the In stallation Manual 2 Press the HOME button to display the Top Menu screen 3 Touch Apps The image in your smartphone appears on the screen 4 Launch an application on your smart phone An image of the application appears on the screen 5 Press the HOME button to return to the Top Menu screen CRB4228 A 130 Engb 130 Chapter 25 Usin...

Page 131: ...ystem is shown 0 is shown while the vehicle is stationary 2 Illumination When the headlights or small lamps of a ve hicle are on On is displayed When the small lamps of a vehicle are off Off is dis played If the orange white lead is not con nected Off appears 3 Back Signal When the gear stick is shifted to R the signal switches to High or Low One of these is displayed depending on the vehi cle 4 H...

Page 132: ... product and the Bluetooth device is shown in the illus tration a Bluetooth 3 The name of the connected Bluetooth de vice Bluetooth device address and name of the profile in use are displayed The electric wave condition between this product and the Bluetooth device is shown in the illus tration Checking sensor learning status and driving status p The navigation system can automatically use its sen...

Page 133: ...d Checking the device number 1 Display the Information screen For details refer to Displaying the informa tion screen on page 131 2 Touch Navigation Info The device number of your navigation system is displayed 3 Check the device number Checking the version information 1 Display the Information screen For details refer to Displaying the informa tion screen on page 131 2 Touch Version Information T...

Page 134: ...nfigure Switching the muting attenuation timing You can mute the AV source volume or attenu ate the output signal 1 Display the Volume Position adjust ment screen For details refer to Displaying the adjust ment and correction screen on page 134 2 Touch Volume Mute settings The Volume Mute settings screen appears 3 Touch Mute 4 Touch the item you want to configure Guide Tel The volume is muted or a...

Page 135: ...ch Volume Mute settings The Volume Mute settings screen appears 3 Touch Volume Settings The Volume Settings screen appears 4 Touch or to set their volume On this screen you can operate the following items Guidance This setting controls the guidance volume of navigation Phone volume This setting controls the incoming voice vo lume Ringtone This setting controls the incoming ring tone volume p Ringt...

Page 136: ... Displaying the screen for navigation function settings 1 Press the HOME button to display the Top Menu screen 2 Touch The Edit Settings menu appears 3 Touch Navi settings The Navi Settings menu appears 4 Touch the item you want to configure 5 Touch to end the setup Setting the speed limit display Selects whether to display or hide the speed limit of the current road Speed Limit 1 Display the Navi...

Page 137: ... is set to 200 m 0 25 mile or lower 1 Display the Navi Settings screen For details refer to Displaying the screen for navigation function settings on page 136 2 Touch Map Display 3 Touch 3D Land Mark The setting screen appears 4 Touch the item you want to set On default Displays the 3D landmark on the map Off Hides the 3D landmark on the map Setting the detailed city map p This function is only av...

Page 138: ...en mode Setting the map colour change between day and night To improve the visibility of the map during the evening you can set the timing for changing the combination of the map colour 1 Display the Navi Settings screen For details refer to Displaying the screen for navigation function settings on page 136 2 Touch Map Display 3 Touch Day Night Display The setting screen appears 4 Touch the item y...

Page 139: ...ngitude Setting the criteria of route calculation You can predefine the route calculation criter ia This setting controls how the route should be calculated by taking into account the time distance or main road Determines which con dition takes priority for route calculation 1 Display the Navi Settings screen For details refer to Displaying the screen for navigation function settings on page 136 2...

Page 140: ... calculation allowing for time restrictions This setting controls whether streets or bridges that have traffic restrictions during a certain time should be taken into account CAUTION If the time difference is not set correctly the navi gation system cannot consider traffic regulations correctly Set the time difference correctly For details refer to Setting the time difference on page 144 1 Display...

Page 141: ...screen For details refer to Displaying the screen for navigation function settings on page 136 2 Touch Guide 3 Touch Distance ETA The setting screen appears 4 Touch the item you want to set Destination default Displays the distance and the progress to the destination elapsed time and the esti mated time of arrival Waypoint Displays the distance and the progress to the next waypoint elapsed time an...

Page 142: ...ting the App operation screen interruption You can set whether to automatically switch to the navigation screen from the AppRadio Mode screen 1 Display the Navi Settings screen For details refer to Displaying the screen for navigation function settings on page 136 2 Touch Guide 3 Touch App Guide Mode The setting screen appears 4 Touch the item you want to set On default Switches from the App opera...

Page 143: ...tting screen appears 4 Touch the item you want to set km default Shows distance in kilometres mile Shows distance in miles Mile Yard Shows distance in miles and yards Displaying the traffic notification icon Selects whether to display or hide the traffic notification icons on the map when incidents occur on your route 1 Display the Navi Settings screen For details refer to Displaying the screen fo...

Page 144: ...P or HOME but ton the setting procedure is cancelled Setting the time difference Adjusts the system s clock Set the time differ ence from the time originally set in your navigation system 1 Display the System Settings screen For details refer to Displaying the screen for system settings on page 143 2 Touch Time Settings The Time Settings screen appears 3 To set the time difference touch or On or O...

Page 145: ... SD card slot For details of the operation refer to Insert ing and ejecting an SD memory card on page 18 4 Display the System Settings screen For details refer to Displaying the screen for system settings on page 143 5 Touch Splash Screen Setting The Select Splash Screen screen appears 6 Touch Load from SD A message confirming whether to start load ing files appears Yes Starts importing the files ...

Page 146: ...n For details refer to Displaying the screen for system settings on page 143 2 Touch Illumi Colour Setting The Illumi Colour Setting screen appears 3 Touch the colour you want Available options Coloured keys Selects the desired preset colour Memory Selects the registered colour in the mem ory Scan Shifts gradually between the five default colours in sequence Custom Displays the Illumination Color ...

Page 147: ...erse AC Display The Reverse AC Display screen appears 3 Touch On or Off Off default The climate control status display is not re versed On The climate control status display is re versed Displaying the icon for setting the rear display output You can display the icon to select which source will be displayed on the rear display Icon of output to select which setting of the rear display For details ...

Page 148: ...his setting applies to RCA inputs AUDIO INPUT and VIDEO INPUT on the back of the system 1 Display the Setting according to source screen For details refer to Displaying the screen for AV system settings on page 147 2 Touch AV Input 3 Touch AV2 Input 4 Touch On The connected component is enabled If you touch Off the setting is turned off Changing the screen size of SD USB video Changes the screen s...

Page 149: ...Touch DivX VOD A screen where you can choose to display a re gistration code or deregistration code is dis played p If a registration code has not been acti vated the deregistration code is not dis played 3 Touch Deregistration Code Your eight digit deregistration code is dis played p Make a note of the code as you will need it when you deregister with a DivX VOD provi der Setting the iPod connect...

Page 150: ...em settings on page 147 2 Touch Radio settings 3 Touch FM Step 4 Touch 50kHz or 100kHz 100kHz default The FM tuning step is switched to 100 kHz 50kHz The FM tuning step is switched to 50 kHz p The tuning step remains at 50 kHz during manual tuning Displaying the screen for AV sound settings 1 Press the HOME button to display the Top Menu screen 2 Touch The Edit Settings screen appears 3 Touch AV S...

Page 151: ...Mid High Using the equaliser The equaliser lets you adjust equalisation to match the vehicle interior acoustic character istics as desired Recalling equaliser curves There are seven stored equaliser curves that you can easily recall at any time Here is a list of the equaliser curves Equaliser curve S Bass Super Bass is a curve in which only low pitched sound is boosted Powerful is a curve in which...

Page 152: ...f you make adjust ments when a curve S Bass Super Bass Powerful Natural Vocal Flat or Custom1 is selected the equaliser curve settings will be memorised in Custom1 A Custom2 curve can be created com mon to all sources If you make adjust ments when the Custom2 curve is selected the Custom2 curve will be up dated The Custom1 curve is applied to each of the sources selected but you can apply the same...

Page 153: ...ich remains unchanged p You cannot select SLA when the FM tuner is selected as the AV source 1 Compare the FM tuner volume level with the level of the source you wish to ad just 2 Display the AV Sound Settings screen For details refer to Displaying the screen for AV sound settings on page 150 3 Touch SLA 4 Touch or to adjust the source vo lume 8 dB to 8 dB is displayed as the source volume is incr...

Page 154: ...s Booster You can enhance bass sounds that are often muted by driving noise 1 Display the AV Sound Settings screen For details refer to Displaying the screen for AV sound settings on page 150 2 Touch Bass Booster 3 Touch or to adjust the range from 0 to 6 Using sonic centre control Sound that is suited for the listening position can easily be created with this function 1 Display the AV Sound Setti...

Page 155: ...s navigation system is connected to a power amp with input level control Auto EQ may be impossible if the power amp s input level is set below the standard level When this navigation system is connected to a power amp with an LPF low pass fil ter turn the LPF off before performing Auto EQ Also set the cut off frequency for the built in LPF of an active subwoofer to the highest frequency The distan...

Page 156: ...ng the AV operation screen on page 76 6 Set the video setting for the rear dis play to Mirror AV For details of the operations refer to Select ing the video for rear display on page 160 7 Press the HOME button to display the Top Menu screen 8 Touch The Edit Settings screen appears 9 Touch AV Settings The AV Settings menu appears 10 Touch Auto EQ Measurement The Auto EQ Measurement screen ap pears ...

Page 157: ...onditions are met The AV source is turned off All iPod smartphone and external storage devices are not connected to this naviga tion system For iPhone with 30 pin connector users 1 Display the App settings screen For details of the operations refer to Dis playing the screen for app settings on page 157 2 Touch App connection settings The App connection settings screen ap pears 3 Touch iPhone The c...

Page 158: ...vigation system s rear output can be used for a full range speaker or subwoofer connection If you switch Rear SP to Sub W you can connect a rear speaker lead directly to a subwoofer without using an auxili ary amp Initially the navigation system is set for a rear full range speaker connection Full p Both rear speaker leads output and RCA rear output are switched simultaneously in this setting When...

Page 159: ...when your vehicle s headlights are off daytime and when your vehicle s headlights are on nighttime These are switched automati cally depending on whether the vehicle s headlights are on or off p The adjustments of Dimmer is stored se parately when your vehicle s headlights are off daytime and when your vehicle s head lights are on nighttime Dimmer is switched automatically only when the value of n...

Page 160: ...he rear display Off Nothing is output to the rear display p Touching closes the pop up screen p When Mirror AV is selected the following restrictions are applied to rear display When selecting Rear View in the map display nothing is displayed All sounds cannot be output for the rear display When playing back video files on the ex ternal storage device USB SD the video image is not output The pictu...

Page 161: ...y the camera is not viewable For details refer to Setting for rear view camera on page 161 Setting for rear view camera CAUTION Pioneer recommends the use of a camera which outputs mirror reversed images otherwise the screen image may appear reversed p Immediately verify whether the display changes to a rear view camera image when the gearstick is moved to REVERSE R from another position p When th...

Page 162: ...g guidelines on the rear view image CAUTION When adjusting the guidelines be sure to park the vehicle in a safe place and apply the handbrake Before getting out of the car to place the markings be sure to turn the ignition switch off ACC OFF The range projected by the rear view camera is limited Also the vehicle width and distance guidelines displayed on the rear view camera image may differ from ...

Page 163: ...osition If you touch the display returns to the set ting screen for guidelines without reflecting the setting Setting the safe mode For safety reasons you can limit the functions that are available while your vehicle is in mo tion 1 Display the Edit Settings screen For details of the operations refer to How to use the navigation menu screens on page 24 2 Touch Safe Mode The Safe Mode screen appear...

Page 164: ...arking Assist screen p This function is only available for vehicles equipped with a parking sensor system p The Parking Assist screen is not dis played until the navigation screen has started 3 2 1 1 Displays the position of detected obstacles 2 The previous screen returns 3 Switches the display to the rear view camera image p The display switches only when the rear view camera setting is set to O...

Page 165: ... the right seat 7 Displays the internal temperature setting for the right seat 8 Displays the fan direction 9 Displays the fan speed a Displays the internal temperature setting for the left seat b Displays the seat heating setting for the left seat c The previous screen returns p If you do not operate the climate control panel for a few seconds the previous screen is displayed automatically CRB422...

Page 166: ...rs p If you want to change the password cur rently set enter the current password and then enter the new one 8 Check the password and then touch Entering the password On the password input screen you must enter the current password 1 Enter the password 2 Touch OK If you enter the correct password the naviga tion system will be unlocked Deleting the password The current password can be deleted 1 Di...

Page 167: ...t or factory settings p Be sure to read Setting items to be deleted before you perform this operation For details refer to Setting items to be deleted on page 168 1 Display the System Settings screen For details refer to Displaying the screen for system settings on page 143 2 Touch Restore defaults 3 Touch the item you want to initialise A message confirming whether to erase the data appears 4 Tou...

Page 168: ...1 1 All settings in the Edit Data screen 1 1 All settings in the AV Settings screen 1 Source Settings AV Input 1 1 Other settings 1 Vol Pos Adj Volume Set tings 1 1 Other settings 1 All settings in the Language settings screen 1 All settings in the Time Settings screen 1 All settings in the Select Splash Screen screen 1 1 All settings in the Illumi Colour Setting screen 1 All settings in the Rever...

Page 169: ... the View screen 1 1 Track log 1 All settings in the AV Sound Settings screen 1 1 Wide screen mode 1 1 Sound mix function 1 Playback method of AV source 1 1 All settings in the Function screen 1 1 Picture Adjustment Dimmer 1 Other settings 1 1 LCD panel angle 1 1 Standby mode 1 1 Output setting of the rear display 1 1 CRB4228 A 169 Engb 169 Chapter 28 Other functions Other functions ...

Page 170: ...GPS satellites is poor impairing positioning accuracy Check the GPS signal reception and the posi tion of the GPS aerial if necessary Obstacles are blocking signals from the satellites The quality of signals from the GPS satellites is poor causing reduced positioning accu racy Check the GPS signal reception and the position of the GPS aerial if necessary or con tinue driving until reception improv...

Page 171: ...Automatic is selected Page 138 The orange white lead is not con nected Check the connection The screen is too bright The picture quality adjustment of the display is incorrect Adjust the picture quality Page 159 The display is very dim The vehicle s light is turned ON and Automatic is selected on Day Night Display Read about Day Night Display setting and if desired select Day Page 138 The picture ...

Page 172: ...e and turn the power to the navigation system back on The screen becomes freezes An error has occurred Park your vehicle in a safe place and turn off the engine Turn the ignition key back to off ACC OFF Then restart the engine and turn the power to the navigation system back on The smartphone was not charged Charging stopped because the tem perature of the smartphone rose due to prolonged use of t...

Page 173: ...yback is not possible The parental lock is on Turn the parental lock off or change the level Page 101 The parental lock for DVD play back cannot be cancelled The code number is incorrect Input the correct code number Page 101 Playback is not with the audio language and subtitle language settings selected in DVD DivX Setup The DVD playing does not feature dialogue or subtitles in the lan guage sele...

Page 174: ...d now Perform the connection process Problems with the AppRadio Mode screen Symptom Cause Action Reference A black screen is displayed While operating an application the application was ended on the smart phone side Press the HOME button to display the Top Menu screen The smartphone OS may be await ing screen operation Stop the vehicle in a safe place and check the screen on the smartphone The scr...

Page 175: ...int s on roads Reset the destination after you drive the ve hicle to any road Unable to find any road lead ing to destination The destination or waypoint s are in an isolated island etc without a ferry and the route calculation is im possible If there is no road con nected to your starting point or destination this message will ap pear Change the destination Failed to make the route pro file In ra...

Page 176: ...stem is out of the normal operat ing range Wait until the unit s temperature returns with in normal operating limits Tracks that cannot be played back will be skipped FILE SKIPPED Files that are protected by digital rights management DRM The protected files are skipped Cannot play back all tracks PROTECTED DISC All the files on the inserted disc are secured by DRM Replace the disc Flash write erro...

Page 177: ...storage device consumes more than the maximum allowable current Disconnect the USB storage device and do not use it Turn the ignition switch to off then turn ACC back on or turn the ignition switch on and then connect the compliant USB sto rage device The USB interface cable for iPod iPhone is short circuited Confirm that the USB interface cable for iPod iPhone or USB cable is not caught in some t...

Page 178: ...ectable mobile phones featuring Bluetooth wireless technology Activate the target phone s Bluetooth wire less technology Check whether your mobile phone is acti vated and whether the distance to your mo bile phone is too far Unable to search for available devices This navigation system is trying to search for available device while performing following operations Registering the Bluetooth device S...

Page 179: ... connect ing the speed pulse the system will become more accurate than no connection of speed pulse So you connect the speed pulse without fail to get the accuracy of positioning p The position of the speed detection circuit vary depending on the vehicle model For details consult your authorised Pioneer dealer or an installation professional p Some types of vehicles may not output a speed signal w...

Page 180: ...can not be received from more than two GPS satellites In some driving conditions signals from GPS satellites may not reach your vehicle In this case it is impossible for the system to use GPS positioning In tunnels or en closed parking garages Under elevated roads or similar structures When driving among high build ings When driving through a dense forest or tall trees If a car phone or mobile pho...

Page 181: ...d on the map screen If you make a slight turn If there is a parallel road If there is another road very nearby such as in the case of an elevated motorway If you take a recently opened road that is not on the map If you drive in zigzags If the road has a series of hairpin bends If there is a loop or similar road configura tion If you take a ferry If you are driving on a long straight road or a gen...

Page 182: ...in such as on a rough track or in snow If you put on chains or change your tyres for ones with a different size If trees or other obstacles block the GPS signals for a considerable period If you drive very slowly or in a start and stop manner as in a traffic jam If you join the road after driving around a large car park When you drive around a roundabout When starting driving immediately after sta...

Page 183: ...ver if you pass intersections turns and other guidance points in rapid succes sion some may delay or not be announced It is possible that guidance may direct you off a motorway and then back on again In some cases the route may require you to travel in the opposite direction to your current heading In such cases you are in structed to turn around so please turn around safely by following the actua...

Page 184: ...y result in damage to the equipment To clean a disc wipe it with a soft cloth moving outward from the centre Condensation may temporarily impair the built in drive s performance Leave it to ad just to the warmer temperature for about one hour Also wipe any damp discs with a soft cloth Playback of discs may not be possible be cause of disc characteristics disc format recorded application playback e...

Page 185: ... about DualDiscs Dolby Digital This product will down mix Dolby Digital sig nals internally and the sound will be output in stereo p Manufactured under licence from Dolby Laboratories Dolby and the double D sym bol are trademarks of Dolby Laboratories Detailed information for playable media Compatibility Common notes about disc compatibility Certain functions of this product may not be available f...

Page 186: ...e vice USB SD with complex folder hierar chies Operations may vary depending on the kind of an external storage device USB SD It may not be possible to play some music files from SD or USB because of file char acteristics file format recorded applica tion playback environment storage conditions and so on USB storage device compatibility For details about USB storage device com patibility with this...

Page 187: ... DivX file before the extension are associated with the DivX file The character strings before the extension must be exactly the same However if there is only one DivX file and one subtitle file in a single folder the files are associated even if the file names are not the same The subtitle file must be stored in the same folder as the DivX file Up to 255 subtitle files may be used Any more subtit...

Page 188: ...ck time of audio file stored in the disc 60 h Maximum playback time of audio file stored on an external storage device USB SD 7 5 h 450 minutes MP3 compatibility Media CD R RW DVD R R SL R DL DVD RW USB storage de vice SD memory card File extension mp3 Bit rate 8 kbps to 320 kbps CBR VBR Sampling frequency 16 kHz to 48 kHz 32 kHz 44 1 kHz 48 kHz for emphasis 8 kHz to 48 kHz ID3 tag ID3 tag Ver 1 0...

Page 189: ...age de vice SD memory card File extension WAV files on the CD R RW DVD R RW R SL R DL cannot be played wav Format Linear PCM LPCM Sampling frequency 16 kHz to 48 kHz Quantisation bits 8 bits and 16 bits Note The sampling frequency shown in the display may be rounded AAC compatibility Media CD R RW DVD R R SL R DL DVD RW USB storage de vice SD memory card File extension m4a Bit rate 8 kbps to 320 k...

Page 190: ...pixels Maximum file size 4 GB Notes The navigation system is not compatible with the following DivX Ultra format DivX files without video data DivX files encoded with LPCM Linear PCM audio codec Depending on the file information composition such as the number of audio streams there may be a slight delay in the start of playback on discs If a file contains more than 4 GB playback stops before the e...

Page 191: ...es album names and other text information may not be correctly displayed There may be a slight delay when starting playback of audio files encoded with image data The navigation system is not compatible with packet write data transfer This navigation system can recognise up to 32 characters beginning with the first char acter including extension for the file and folder name Depending on the displa...

Page 192: ... without display ing the folder number Bluetooth The Bluetooth word mark and logos are re gistered trademarks owned by Bluetooth SIG Inc and any use of such marks by PIONEER CORPORATION is under licence Other trademarks and trade names are those of their respective owners SD and SDHC logo SD Logo is a trademark of SD 3C LLC SDHC Logo is a trademark of SD 3C LLC microSD Logo is a trademark of SD 3C...

Page 193: ...d used with MPEG 2 and MPEG 4 Sev eral applications can be used to encode AAC files but file formats and extensions differ de pending on the application which is used to encode This unit plays back AAC files en coded by iTunes Android Android is a trademark of Google Inc Detailed information regarding connected iPod devices CAUTION Pioneer accepts no responsibility for data lost from an iPod even ...

Page 194: ...r iPhone to the Pioneer navigation system Limitations Access to app based connected content will depend on the availability of cellular and or Wi Fi network coverage for the purpose of al lowing your smartphone to connect to the In ternet Service availability may be geographically lim ited to the region Consult the connected con tent service provider for additional information Ability of this prod...

Page 195: ...e cooler may cause moist ure to form inside the navigation unit re sulting in possible damage Small black dots or white dots bright dots may appear on the LCD screen These are due to the characteristics of the LCD screen and do not indicate a malfunction The LCD screen will be difficult to see if it is exposed to direct sunlight When using a mobile phone keep the aer ial of the mobile phone away f...

Page 196: ...e 41 Near Me 42 Near dest 42 Around City 43 Coordinates 45 Phone menu Page Dial Pad 67 Contacts List 68 Call history 69 Redial 69 Bluetooth Settings 73 Incoming call settings 73 74 Edit Delete 71 Information menu Page Traffic Information 55 Version Information 133 Navigation Info 131 132 CRB4228 A 196 Engb 196 Appendix Appendix ...

Page 197: ...earned routes 54 Delete travel log 54 Navi settings menu Map Display Page Show Speed Limit 136 Road Colour 136 2D locked scroll 137 3D Land Mark 137 City Map 137 City Map Barrier 138 Day Night Display 138 Display travel log 138 Trav Log Auto Del 139 Current location info 139 Guide Page Route Condition 139 Toll road 139 Ferry 140 Learning Route 140 Traffic avoidance 141 Time restrictions 140 Motorw...

Page 198: ...nor Ordinary Road 142 Major Ordinary Road 142 Motorway 142 km mile 143 Traffic Info Page Traffic 143 AV Settings menu Page AV Sound Settings 150 FAD BAL Balance 150 Loudness 151 EQ Menu 151 SLA 153 HPF 153 Sub Woofer 154 Bass Booster 154 Sonic Center Control 154 Auto EQ Measurement 154 Rear SP 158 CRB4228 A 198 Engb 198 Appendix Appendix ...

Page 199: ...tion Code 149 Deregistration Code 149 Radio settings Auto PI 149 FM Step 150 iPod Settings iPod Connection Settings 149 App settings menu Page App connection settings 157 App keyboard settings 157 Android Video Adj 127 System Settings menu Page Bluetooth Settings 73 Regional settings Voice Language Program Language 144 Time Settings 144 Splash Screen Setting 144 Illumi Colour Setting 146 Reverse A...

Page 200: ...Black plate 200 1 Bluetooth Settings menu Page Registration 58 Change device 65 Delete device 65 Device Name 73 Password 73 Bluetooth On Off 74 CRB4228 A 200 Engb 200 Appendix Appendix ...

Page 201: ...ular media technology created by DivX LLC a subsidiary of Rovi Corporation DivX media files contain highly compressed video with high visual quality that maintains a relatively small file size DivX files can also in clude advanced media features like menus subtitles and alternate audio tracks Many DivX media files are available for download on line and you can create your own using your personal c...

Page 202: ...u choose your viewing angle as desired Multi audio Multilingual dialogue Some videos feature dialogue recorded in mul tiple languages or audio recorded in multiple tracks For example dialogue in up to eight languages can be recorded on a single DVD Video letting you choose the language as desired Multi session Multi session is a recording method that al lows additional data to be recorded later Wh...

Page 203: ...other functions Track log Your navigation system logs routes that you al ready passed through if the track logger is ac tivated This recorded route is called a track log It is handy when you want to check a route travelled or if returning along a complex route VBR VBR is short for variable bit rate Generally speaking CBR constant bit rate is more widely used But by flexibly adjusting the bit rate ...

Page 204: ...nnel reception system Reception frequency 1 575 42 MHz Sensitivity 140 dBm typ Position update frequency Approx once per second GPS aerial Aerial Micro strip flat aerial right handed helical polarisation Aerial cable 3 55 m Dimensions W H D 33 mm 14 7 mm 36 mm Weight 73 7 g Display Screen size aspect ratio AVIC F50BT 7 inch wide 16 9 AVIC F950DAB 6 1 inch wide 16 9 AVIC F950BT 6 1 inch wide 16 9 A...

Page 205: ...Distortion 0 008 1 kHz Output level Video 1 0 Vp p 75 W 0 2 V Audio 1 0 V 1 kHz 0 dB Number of channels 2 stereo MP3 decoding format MPEG 1 2 2 5 Audio Layer 3 WMA decoding format Ver 7 8 9 AAC decoding format MPEG 4 AAC only encoded by iTunes m4a DivX decoding format Home Theater Ver 3 11 Ver 4 X Ver 5 X Ver 6 X avi divx USB USB standard spec USB 2 0 High Speed Max current supply 1 A File system ...

Page 206: ...IEC A network DAB tuner AVIC F950DAB Frequency range Band C 174 928 MHz to 239 200 MHz 5A 13F L Band 1 452 960 MHz to 1 490 624 MHz LA LW Usable sensitivity 100 dBm S N ratio 85 dB Note Specifications and design are subject to possible modifications without notice due to im provements CRB4228 A 206 Engb 206 Appendix Appendix ...

Page 207: ...Black plate 207 1 CRB4228 A 207 Engb 207 ...

Page 208: ...a 90801 1540 U S A TEL 800 421 1404 PIONEER EUROPE NV Haven 1087 Keetberglaan 1 B 9120 Melsele Belgium Belgique TEL 0 3 570 05 11 2012 2013 PIONEER CORPORATION All rights reserved CRB4228 A EU To keep up to date with the latest navigational data you can periodically update your navigation system For further details please visit our website KMZZ13D CRB4228 A 208 ...

Reviews: