background image

JUST

(just)

The picture is enlarged slightly at the center and
the amount of enlargement increases horizontally
to the ends, enabling you to enjoy a 4:3 picture
without sensing any disparity even on a wide
screen.

CINEMA

(cinema)

The picture is enlarged by the same proportion as

FULL

or

ZOOM

in the horizontal direction and by

an intermediate proportion between

FULL

and

ZOOM

in the vertical direction; ideal for a cine-

ma-sized picture (wide screen picture) where cap-
tions lie outside.

ZOOM

(zoom)

A 4:3 picture is enlarged in the same proportion
both vertically and horizontally; ideal for a cine-
ma-sized picture (wide screen picture).

NORMAL

(normal)

A 4:3 picture is displayed as it is, giving you no
sense of disparity since its proportions are the
same as that of the normal picture.

Notes

!

Different settings can be memorized for each
video source.

!

When video is viewed in a wide screen mode
that does not match its original aspect ratio, it
may appear different.

!

Remember that using the wide mode feature
of this system for commercial or public view-
ing purposes may constitute an infringement
on the author

s rights protected by the Copy-

right Law.

!

The video image will appear coarser when
viewed in

CINEMA

or

ZOOM

mode.

Changing the picture
adjustment

You can adjust the

BRIGHTNESS

(brightness),

CONTRAST

(contrast),

COLOR

(color) and

HUE

(hue) for each source.

!

The adjustments of

BRIGHTNESS

,

CONTRAST

and

A. CONTRAST

are stored

separately for light ambient (daytime) and
dark ambient (nighttime) conditions. A sun

or moon

is displayed next to

BRIGHTNESS

and

CONTRAST

, respectively,

as the ambient light sensor determines
brightness or darkness.

!

You can adjust the

HUE

only for NTSC

video.

!

When

VCR1 [COMPONENT]

is selected as

the source, you cannot adjust the

HUE

.

1

Press WIDE/MENU and hold to display

the picture adjustment menu.

The adjustment function names are displayed.

2

Press WIDE/MENU to select the desired

item.

Press

WIDE/MENU

repeatedly to switch be-

tween the following adjustment functions:

BRIGHTNESS

(brightness)

CONTRAST

(con-

trast)

COLOR

(color)

HUE

(hue)

COLOR TEMP

(color temperature)

A. CONTRAST

(active contrast)

DIMMER

(dimmer)

3

Press VOL DOWN or VOL UP to adjust

the selected item.

Each time

VOL DOWN

or

VOL UP

is pressed,

the level of selected item is increased or de-
creased.

!

BRIGHTNESS

Adjusts the black intensity

!

CONTRAST

Adjusts the contrast

!

COLOR

Adjusts the color saturation

!

HUE

Adjusts the tone of color (red is em-

phasized or green is emphasized)

!

COLOR TEMP

Adjusts the color tempera-

ture, resulting in a better white balance

Operating this unit

En

10

Section

03

Summary of Contents for AVD-W9000

Page 1: ...Owner s Manual Руководство пользователя 9 INCH WIDE XGA DISPLAY 9 ДЮЙМОВЫЙ XGA ДИСПЛЕЙ AVD W9000 English Русский ...

Page 2: ...unit 5 Installing the display unit 6 Removing the display unit 7 Resetting the microprocessor 7 Operating this unit What s What 8 Display unit 8 Basic Operations 9 Power ON OFF 9 Selecting a source 9 Adjusting the volume 9 Changing the wide screen mode 9 Changing the picture adjustment 10 Adjusting the dimmer 11 Setup 11 Setting the component video 11 Selecting the video format 12 Setting the powe...

Page 3: ...r seat belt is not properly buckled WARNING Do not attempt to install or service your display by yourself Installation or servi cing of the display by persons without training and experience in electronic equipment and automotive accessories may be dangerous and could expose you to the risk of electric shock or other ha zards WARNING NEVER install this display in a location where it is visible by ...

Page 4: ...f a display to enable passengers in the rear seats to watch the DVD or TV WARNING NEVER install the rear display in a location that enables the driver to watch the DVD or TV while driving To avoid battery exhaustion Be sure to run the vehicle engine while using this unit Using this unit without running the engine can result in battery drainage Precautions En 4 Section 01 ...

Page 5: ...an result in LCD screen malfunction due to the resulting high temperatures When using a cellular phone keep the an tenna of the cellular phone away from the display to prevent disruption of the video by the appearance of spots colored stripes etc For viewing the LCD comfortably Due to its construction the viewing angle of the screen size is limited You can adjust it by changing either screen size ...

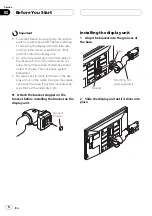
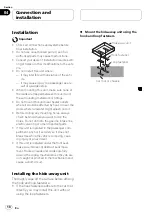
Page 6: ...ed by a metal object or the like This can cause system breakdown Be careful not to touch terminals on the dis play unit or on the cable Doing so may cause connection failures If any terminals are dirty wipe them with a clean dry cloth Attach the bracket stopper on the bracket before installing the bracket on the display unit Bracket stopper Installing the display unit 1 Align the bracket into the ...

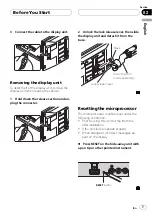
Page 7: ...it and detach it from the base Mounting arm sold separately Base Lock release lever Resetting the microprocessor The microprocessor must be reset under the following conditions Prior to using this unit for the first time after installation If the unit fails to operate properly When strange or incorrect messages ap pear on the display Press RESET on the hide away unit with a pen tip or other pointe...

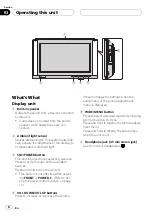
Page 8: ... Press and hold to turn the unit off This button is not effective when select ing FRONT in POWER C Refer to Set ting the power control function on page 12 4 VOL DOWN VOL UP buttons Press to increase or decrease the volume Press to change the settings when the setup menu or the picture adjustment menu is displayed 5 WIDE MENU button Press to select a desired mode for enlarging a 4 3 picture to a 16...

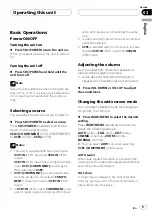
Page 9: ...s given priority over RCA input when both inputs are connected at the same time A video input terminal which is not connected cannot be selected VCR1 is selected when no connection is made for both VCR1 IN VCR1 input and VCR2 IN VCR2 input Adjusting the volume You can adjust both the built in speaker vo lume and the headphone volume Audio does not output from the built in speaker when headphones a...

Page 10: ...arser when viewed in CINEMA or ZOOM mode Changing the picture adjustment You can adjust the BRIGHTNESS brightness CONTRAST contrast COLOR color and HUE hue for each source The adjustments of BRIGHTNESS CONTRAST and A CONTRAST are stored separately for light ambient daytime and dark ambient nighttime conditions A sun or moon is displayed next to BRIGHTNESS and CONTRAST respectively as the ambient l...

Page 11: ...ght ambient light daytime Red sun Adjust the brightness for inter mediate brightness evening Blue moon Adjust the brightness for dark ambient light nighttime 3 Press VOL DOWN or VOL UP to adjust the brightness Each time VOL DOWN or VOL UP is pressed the cursor moves towards the left or right The level indicates the brightness of the screen being adjusted The farther the cursor moves to the right t...

Page 12: ...nary display To return to the ordinary display press WIDE MENU and hold Setting the power control function When connecting with a head unit which has a power control function such as AVH P7900DVD you can turn this display unit ON or OFF using the head unit When this function is set to FRONT a 26pin component cable e g CD CP300 is required 1 Press SRC POWER and hold until the unit turns off 2 Press...

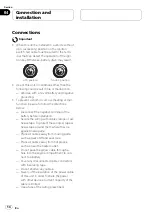
Page 13: ...ow cable of the dis play unit to the vehicle battery Engine vibration may eventually cause the insulation to fail at the point where the wire passes from the passenger compartment into the engine compartment Take extra care in securing the wire at this point Make sure that cables will not interfere with moving parts of the vehicle such as the gear shift parking brake or seat sliding mechan ism Do ...

Page 14: ...sconnect the negative terminal of the battery before installation Secure the wiring with cable clamps or ad hesive tape To protect the wiring wrap ad hesive tape around them where they lie against metal parts Place all cables away from moving parts such as gear shift and seat rails Place all cables away from hot places such as near the heater outlet Do not pass the yellow cable through a hole into...

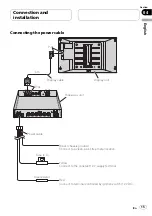
Page 15: ...ree metal location Fuse resistor Red Connect to terminal controlled by ignition switch 12 V DC Fuse 4 A Yellow Connect to the constant 12 V supply terminal Power cable Display unit 4 m Pink Pink Display cable Hide away unit Connection and installation En 15 English Section 04 ...

Page 16: ...nect to video input Connect to audio inputs Hide away unit Connect with RCA cables sold separately Connect with RCA cables sold separately VCR2 IN VCR2 input VCR1 IN VCR1 input VCR OUT VCR output The signal from COMPONENT OUT com ponent output and VCR OUT VCR output is not output when power to this display unit is turned off Connection and installation En 16 Section 04 ...

Page 17: ...ut COMPONENT OUT component output 26pin component cable e g CD CP300 sold separately Blue Blue White COMPONENT component input When you watch a DVD built in DVD player of AVH P7900DVD on both AVH P7900DVD and this display unit audio is not output from the built in speaker of this display unit The signal from COMPONENT OUT com ponent output and VCR OUT VCR output is not output when power to this di...

Page 18: ...heck behind where you want to drill the holes Do not drill into the gas line brake line electrical wiring or other important parts If this unit is installed in the passenger com partment anchor it securely so it does not break free while the vehicle is moving caus ing injury or an accident If this unit is installed under the front seat make sure it does not obstruct seat move ment Route all leads ...

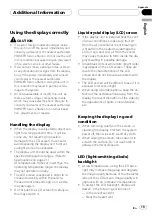
Page 19: ...hin the vehicle Please do not press strongly on it as this may damage it Do not push the LCD screen forcefully as this may scratch it Liquid crystal display LCD screen If the display unit is installed near the vent of an air conditioner make sure that air from the air conditioner is not blowing on it Heat from the heater may damage the LCD screen and cool air from the cooler may cause moisture to ...

Page 20: ...se if used in high temperatures If the LED backlight reaches the end of its product lifetime the screen will become dark and the image will no longer be pro jected In this case please consult your dealer or the nearest authorized PIONEER Service Station Additional Information En 20 Appendix ...

Page 21: ...1080i 60 720p 60 NTSC PAL SECAM compati ble Built in speaker 40 mm 15 mm Oval type 2 Headphone output level 8 mW 8 mW 16 W Operating temperature range 10 C to 50 C Hide away unit Dimensions W H D 178 mm 157 mm 30 mm Weight 0 68 kg Video input level 1 0 Vp p 75 W Max audio input level 1 5 Vrms 22 kW Video output level 1 0 Vp p 75 W Max audio output level 1 5 Vrms 1 kW Component input level Y 1 0 Vp...

Page 22: ...а и демонтаж дисплея 26 Установка дисплея 26 Снятие дисплея 27 Перезагрузка микропроцессора 27 Управление данным устройством Описание элементов устройства 29 Дисплей 29 Основные операции 30 Включение и выключение питания 30 Выбор источника сигнала 30 Регулировка громкости 30 Изменение формата экрана 30 Изменение настроек изображения 31 Настройка регулятора освещенности 32 Настройка 33 Настройка ви...

Page 23: ...димо остановить автомобиль в безопасном месте 7 Всегда пристегивайте ремень безопас ности при управлении автомобилем Если ремень не пристегнут надлежа щим образом то в случае аварии по следствия могут быть намного тяжелее ПРЕДУПРЕЖДЕНИЕ Не пытайтесь самостоятельно произ водить установку или ремонт дисплея Установка или ремонт дисплея лицами не обладающими специальными навы ками и опытом работы с э...

Page 24: ...ченного к COMPONENT OUT компонентному выходу или VCR OUT видеовыходу Разъемы COMPONENT OUT компонент ный выход и VCR OUT видеовыход дан ного устройства служат для подключения дисплея предназначенного для просмотра DVD или ТВ программ пассажирами на за дних сиденьях ПРЕДУПРЕЖДЕНИЕ ЗАПРЕЩАЕТСЯ устанавливать дисплей в местах доступных обзору водителя для про смотра DVD или ТВ программ во время управл...

Page 25: ...этого изделия свяжитесь с торговым представителем компании производителя или с ближайшим сервисным пунктом Pioneer Защита жидкокристал лического экрана Не допускайте попадания прямых солнечных лучей на экран дисплея если устройство не используется Про должительное воздействие прямых солнечных лучей на ЖК экран может стать причиной его выхода из строя вследствие перегрева При использовании мобильно...

Page 26: ... возникновения неисправно стей прежде чем приступить к установке или демонтажу дисплея убедитесь что за жигание и питание системы отключены Будьте осторожны не прикладывайте из лишнего усилия к экрану или кнопкам и не роняйте дисплей Не допускайте попадания воды на клеммы дисплея или кабеля и не допускайте корот кого замыкания клемм металлическими или иными токопроводящими предметами Это может выв...

Page 27: ...2 Установите рычаг снятия блокиров ки в положение снятия блокировки затем сдвиньте дисплей в сторону и снимите его с основания Перезагрузка микропроцессора Микропроцессор следует перезагружать в следующих случаях Перед первым использованием этого устройства после установки Если устройство работает неправильно Если на дисплее появляются странные или неверные сообщения Перед началом эксплуатации Ru ...

Page 28: ... Нажмите RESET на скрытом ус тройстве кончиком карандаша или дру гим заостренным предметом Кнопка RESET Перед началом эксплуатации Ru 28 Раздел 02 ...

Page 29: ...ерживайте чтобы выклю чить устройство При выборе FRONT в POWER C дан ная кнопка неактивна См Настройка функции управления питанием на стр 34 4 Кнопки VOL DOWN VOL UP Нажмите чтобы увеличить или умень шить громкость С помощью этих кнопок производится из менение настроек при отображении на экране установочного меню или меню настройки изображения 5 Кнопка WIDE MENU Нажмите эту кнопку чтобы выбрать не...

Page 30: ...произведения аудио видеоданных подключенного к COMPONENT компонентный вход входа VCR1 IN видеовход 1 В VCR1 IN видеовход 1 вход COMPONENT компонентный вход имеет приоритет перед входом RCA в случае если од новременно подключены оба входа Неподключенный разъем видеовхода не может быть выбран через меню Автоматически выбирается VCR1 если от сутствуют устройства подсоединенные к VCR1 IN видеовход 1 и...

Page 31: ...3 отображается в реальном масштабе не создавая ощущения диспропорции поскольку сохраняются про порции нормального изображения Примечания Для каждого источника видеосигнала могут сохраняться различные настройки При просмотре видео в широкоформатном режиме не совпадающем с его исходным форматом изображение может выглядеть искаженным Помните что использование функции ши рокоформатного изображения в к...

Page 32: ...ь дисплей в исходный режим нажмите и удерживайте WIDE MENU Настройка регулятора освещенности Настройки DIMMER сохраняются отдельно для каждого типа внешнего освещения дневного вечернего и ночного Яркость ЖК панели автоматически регулируется до оптимального уровня в зависимости от внешнего освещения на основании зна чений настройки Значки показывающие текущий уровень яркости окружающего освещения и...

Page 33: ...PONENT Нажимайте кнопку WIDE MENU чтобы вы брать один из следующих параметров VCR1 COMPONENT видеокомпонент VCR1 система цветопередачи видео 1 VCR2 система цветопередачи видео 2 POWER C управление питанием 4 Нажмите VOL DOWN или VOL UP чтобы выбрать требуемую настройку Каждое нажатие VOL DOWN или VOL UP переключает настройки между MODE1 и MODE2 Если Вы не воспользуетесь функцией в течение 30 секун...

Page 34: ... удерживайте кнопку SRC POWER пока устройство не выклю чится 2 Чтобы отобразить на экране устано вочное меню нажмите и удерживайте кнопку WIDE MENU На дисплее появится надпись SETUP MENU 3 Нажмите WIDE MENU чтобы вы брать POWER C Нажимайте кнопку WIDE MENU чтобы вы брать один из следующих параметров VCR1 COMPONENT видеокомпонент VCR1 система цветопередачи видео 1 VCR2 система цветопередачи видео 2...

Page 35: ...для подключения желто го провода дисплея к аккумуляторной батарее автомобиля С течением времени от вибрации двигателя может нарушится изоляция провода в точке выхода из пасса жирского отсека и входа в отсек двигателя Особое внимание необходимо уделить креплению провода Убедитесь что кабели не касаются движу щихся частей автомобиля например механизма переключения передач стоя ночного тормоза или ме...

Page 36: ... соблюдайте следующие указания Перед установкой отсоедините отри цательную клемму аккумулятора Закрепите провода при помощи зажи мов или изоляционной ленты Для за щиты проводки заизолируйте провода в местах их соприкосновения с метал лическими деталями Разместите все кабели в удалении от подвижных деталей таких как рычаг переключения передач и направляю щие сидений Разместите все кабели в удалении...

Page 37: ...Подключение шнура питания Установка и подключение Ru 37 Раздел Русский 04 ...

Page 38: ...Подсоединение с помощью кабелей RCA Если питание дисплея выключено то сигнал с COMPONENT OUT компонент ного выхода и VCR OUT видеовыхода не поступает Установка и подключение Ru 38 Раздел 04 ...

Page 39: ...тель DVD AVH P7900DVD на AVH P7900DVD и данном дисплее звук из встроенного громкоговорителя дан ного дисплея выводиться не будет Если питание дисплея выключено то сигнал с COMPONENT OUT компонент ного выхода и VCR OUT видеовыхода не поступает Установка и подключение Ru 39 Раздел Русский 04 ...

Page 40: ...строя или рядом с дверями где на него может попасть вода Перед тем как просверлить монтажные от верстия всегда проверяйте место сверления Не сверлите бензопровод тор мозную магистраль электропроводку и другие важные узлы Если это устройство устанавливается в салоне автомобиля надежно закрепите его чтобы оно не отсоединилось во время движения транспортного средства что может стать причиной получени...

Page 41: ...е сти к повреждению ЖК экрана Не по двергайте дисплей воздействию прямых солнечных лучей Эксплуатируйте дисплей в указанном ниже диапазоне температур См Технические характеристики на стр 43 В случае эксплуатации при температу рах за пределами указанного диапазона в работе дисплея могут быть сбои ЖК экран данного устройства открыт чтобы его было лучше видно внутри ав томобиля Во избежание поврежден...

Page 42: ...нию качества изображе ния ЖК экрана По мере роста температуры качество изображения должно улучшиться Для защиты светодиодной подсветки дисплей будет затемняться в следую щих условиях При попадании прямого солнечного света Рядом с вентиляционным от верстием Срок службы светодиодной подсветки составляет более 10 000 часов работы Однако использование устройства при высоких температурах может привести...

Page 43: ...асса 0 68 кг Пиковая амплитуда входного видеосигнала 1 0 В 75 W Максимальная амплитуда входного аудиосигнала по напряжению 1 5 В 22 kW Пиковая амплитуда выходного видеосигнала 1 0 В 75 W Максимальная амплитуда выходного аудиосигнала по напряжению 1 5 В 1 kW Уровень входного компонентного сигнала Y 1 0 Vp p 75 W Cb Cr 0 7 Vp p 75 W Уровень выходного компонентного сигнала Y 1 0 Vp p 75 W Cb Cr 0 7 V...

Page 44: ...oundary Road Braeside Victoria 3195 Australia TEL 03 9586 6300 PIONEER ELECTRONICS OF CANADA INC 300 Allstate Parkway Markham Ontario L3R 0P2 Canada TEL 1 877 283 5901 TEL 905 479 4411 PIONEER ELECTRONICS DE MEXICO S A de C V Blvd Manuel Avila Camacho 138 10 piso Col Lomas de Chapultepec Mexico D F 11000 TEL 55 9178 4270 先鋒股份有限公司 總公司 台北市中山北路二段44號13樓 電話 02 2521 3588 先鋒電子 香港 有限公司 香港九龍尖沙咀海港城世界商業中心 9樓...

Reviews: