background image

En

25

Additional 

information

Additional information

Troubleshooting

!

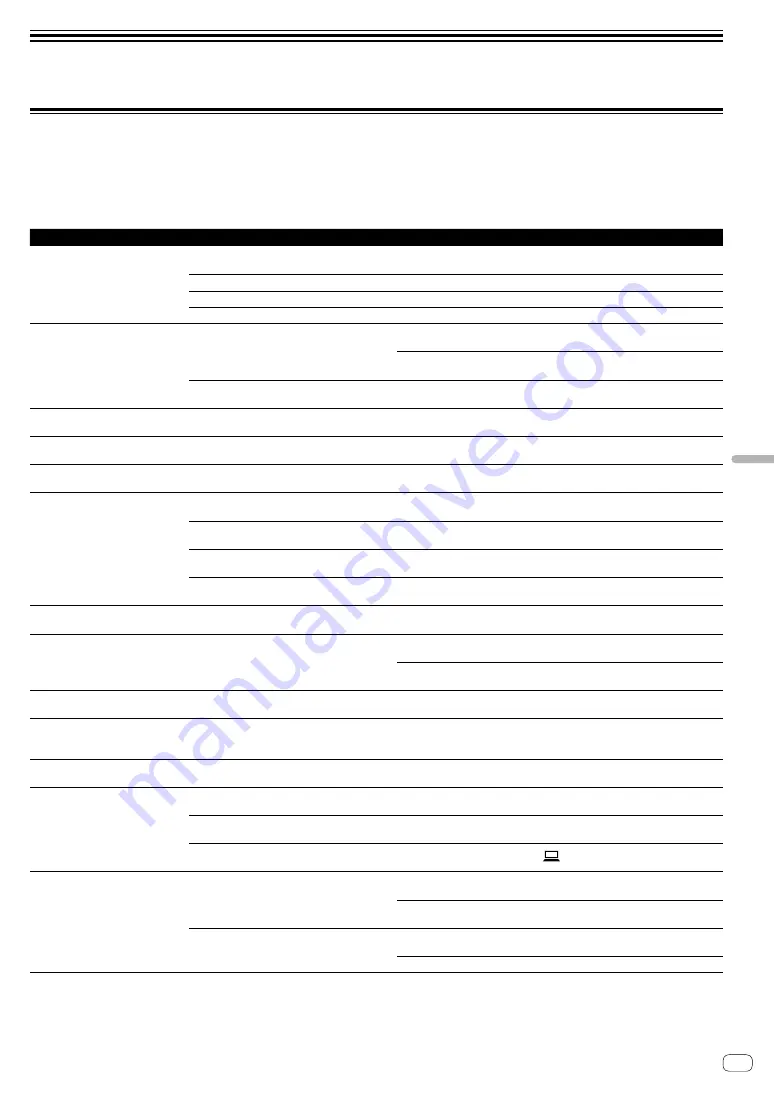
  If you think that there is something wrong with this unit, check the items below, and check [

FAQ

] for [

DJM-450

] on the Pioneer DJ site.

 http://pioneerdj.com/support/
 

Also, check the connected devices. If the problem cannot be resolved, ask your nearest Pioneer authorized service center or your dealer to carry out 
repair work.

!

  This unit may not operate properly due to static electricity or other external influences. In such cases, normal operation may be restored by 

unplugging the power cord then plugging it back in.

Problem

Check

Remedy

There is no sound or the volume is 
too low.

Is the input selector switch set to the proper 
position?

Set the input selector switch to the input source for the channel. (page  9 )

Are the connection cables properly connected?

Connect the connection cables properly. (page  7 )

Are the terminals and plugs dirty?

Clean the terminals and plugs before making connections.

Is [

ATT.

] of [

MASTER OUT

] set to [

-6 dB

], etc.?

Set [

ATT.

] of [

MASTER OUT

] on the [

UTILITY

] screen. (page  22 )

Sound is distorted.

Is the sound level output from the [

MASTER

channel appropriately set?

Adjust the [

MASTER LEVEL

] control so that the master channel level indicator 

lights at around [

0 dB

] at the peak level. (page  9 )

Set [

ATT.

] of [

MASTER OUT

] on the [

UTILITY

] screen to [

-6 dB

] or [

-12 dB

]. 

(page   22 )

Is the level of audio input to each channel properly 
set?

Adjust the [

TRIM

] control so that the channel level indicator lights at about [

dB

] at the peak level.

Cross fade does not work.

Is the [

CROSS F. CURVE

] selector switch set 

properly?

If [

THRU

] is selected, cross fader does not work. Set the [

CROSS F. CURVE

selector switch properly. (page  9 )

BEAT FX does not work.

Is the effect channel selector switch set to the 
proper position?

Turn the effect channel selector switch to select the channel to which you want 
to apply the effect.

SOUND COLOR FX does not work.

Is the [

COLOR

] control set to an appropriate 

position?

Turn the [

COLOR

] control clockwise or counterclockwise. (page  10 )

SEND/RETURN on the mobile device 
does not work.

Is the effect channel selector switch set to the 
proper position?

Turn the effect channel selector switch to select the channel to which you want 
to apply the effect.

Is the [

SEND/RETURN


ON/OFF

] button set to 

[

ON

]?

Press the [

SEND/RETURN ON/OFF

] button to turn on the SEND/RETURN 

function.  (page   10 )

Is the mobile device connected to the mobile 
device connection terminal correctly?

Connect the mobile device to the mobile device connection terminal and launch 
a compatible application.

Is the [

RETURN TYPE

 (

AUX

INSERT

)] selector 

switch set correctly?

Set the [

RETURN TYPE

 (

AUX

INSERT

)] switch to the correct position.

Sound on SEND/RETURN is distorted. Is the external effector’s audio output level set to 

an appropriate level?

Adjust the external effector’s audio output level.

Tempo (

BPM

) cannot be measured or 

measurement value of tempo (

BPM

) is 

implausible.

Is the audio input level too high or too low?

Adjust the [

TRIM

] control so that the channel level indicator lights at about [

dB

] at the peak level. (page  9 )

For some tracks, it may not be possible to measure the tempo (

BPM

). Use the 

[

TAP

] button to input the tempo manually.

Measured tempo (

BPM

) differs from 

tempo indicated on CD.

The values may differ slightly due to the different ways in which the 

BPM

 is 

measured.

MIDI control does not work.

Are the MIDI settings properly set?

To operate software with this unit, this unit’s MIDI messages must be assigned 
to the software you are using. For the assignment method, see your software’s 
operating instructions.

This unit is not recognized after it has 
been connected to a computer.

Is the driver software properly installed on your 
computer?

Install the driver software. If it is already installed, reinstall it. (page 19)

Sound of a computer cannot be 
output from this unit.

Are this unit and computer properly connected?

Connect this unit and the computer directly using the included USB cable. (page  
7 )

Are the audio output device settings properly set?

Select this unit with the audio output device settings. For instructions on making 
settings for your application, see your application’s operating instructions.

Is the input selector switch set to the proper 
position?

Set the input selector switch to the [

] position. (page  9 )

Sound is distorted when an analog 
player is connected to this unit’s 
[

PHONO

] terminals.

Or, lighting of the channel level 
indicator does not change even when 
the [

TRIM

] control is turned.

Have you connected an analog player with a 
built-in phono equalizer?

Connect the analog player with built-in phono equalizer to the [

LINE

] input 

terminals.  (page   7 )

If the analog player with built-in phono equalizer has a PHONO/LINE selector 
switch, set it to PHONO.

Is an audio interface for computers connected 
between the analog player and this unit?

If the output of the audio interface for computers is line level, connect it to the 
[

LINE

] input terminals. (page  7 )

If the analog player has a PHONO/LINE selector switch, set it to PHONO.

Summary of Contents for rekordbox DJM-450

Page 1: ...structions http pioneerdj com support http rekordbox com The Pioneer DJ site shown above offers FAQs information on software and various other types of information and services to allow you to use you...

Page 2: ...n the screens of the software describes in this guide may differ from the language on your screens Before start Features 3 Part names and functions Rear panel 4 Control Panel 5 Connections Connecting...

Page 3: ...sing the DJM 900NXS2 in clubs SOUND COLOR FX The unit has 4 types of effects You can adjust the sound of a track to your favorite quality by turning the COLOR controls Additionally turning the PARAMET...

Page 4: ...t your equipment such as a power speaker or a power amplifier to the analog input terminal Use these terminals as balanced output Do not accidentally insert the power cord of the supplied AC adaptor o...

Page 5: ...phone plugs and 3 5 mm stereo mini plugs 2 HEADPHONES LEVEL control page 9 Adjust the sound level output from the headphones 3 HEADPHONES MIXING control page 9 Adjust the monitor volume balance of th...

Page 6: ...or switch page 9 This switches the cross fader curve characteristics l CROSS F REVERSE switch page 9 Turn on off the cross fader reverse function m Cross fader page 9 Sound outputs following the curve...

Page 7: ...ave been completed Be sure to use the included power cord Refer to the operating instructions for the component to be connected Connect this unit and the computer directly using a USB cable Use USB ca...

Page 8: ...converter adapter etc may lower the sound quality and or result in noise For connection with an unbalanced input such as RCA use the MASTER2 output terminals 2 Be careful not to accidentally insert th...

Page 9: ...e left channel and the MASTER channel sound is output to the right channel STEREO The sound of the channels for which the CUE button is pressed is output in stereo 4 Turn the HEADPHONES MIXING control...

Page 10: ...ashes In this case press the TAP button to enter the BPM manually 2 Turn the beat effect selector switch Select the type of effect For the types of effects see Types of BEAT FX on page 12 3 Turn the e...

Page 11: ...nd level When changing RETURN TYPE during the SEND RETURN function the SEND RETURN function is turned off In the following cases the SEND RETURN ON OFF button light is turned off The SEND RETURN funct...

Page 12: ...se The cutoff frequency of the high pass filter is increased slowly Turn to the right to increase resonance Types of BEAT FX DELAY1 A delay sound is output once according to the beat fraction set with...

Page 13: ...beats with respect to 1 beat of BPM time TIME control parameter 2 Use this to set the cycle by which the flanger effect moves 10 to 32000 ms LEVEL DEPTH control parameter 3 The further the control is...

Page 14: ...saving settings etc the CPU and hard disk may not provide sufficient processing capabilities For notebook computers in particular make sure the computer is in the proper conditions to provide constant...

Page 15: ...click Disagree to cancel the installation 4 When the screen for completing the installation appears click Close to end the installation Installing Windows Log into your computer as administrator befo...

Page 16: ...ekordbox com Choose the method you will use Click DJ performance icon Enter the license key to activate rekordbox dj Enter the license keys which are shown on the license key card included with this u...

Page 17: ...Follow the instruction screens to install the software If the Windows Security screen is displayed during the installation click Install this driver software anyway to continue When the installation i...

Page 18: ...up Guide on the following web site https rekordbox com en support manual php Setting the control signals Set the control signals depending on whether your device is an analog player or DJ player Set t...

Page 19: ...ATION WHETHER EXPRESS IMPLIED STATUTORY OR ARISING OUT OF COURSE OF PERFORMANCE COURSE OF DEALING OR USAGE OF TRADE INCLUDING ANY WARRANTIES OF MERCHANTABILITY FITNESS FOR A PARTICULAR PURPOSE SATISFA...

Page 20: ...eement carefully before installing this unit s proprietary driver software Before installing the driver software terminate all other programs running on your computer The driver software is compatible...

Page 21: ...r license agreement click Cancel and stop installation 3 Proceed with installation according to the instructions on the screen If Windows Security appears on the screen while the installation is in pr...

Page 22: ...hanging the settings press the TAP button 6 Press the SEND RETURN ON OFF button The UTILITY screen closes About the auto standby function When AUTO STANDBY is set to ON the unit automatically enters t...

Page 23: ...of the audio data output from this unit Note that the sound will be distorted if the volume is raised too high FX SEND and Control Tone can be used with supported software Adjusting the buffer size w...

Page 24: ...R A 2 CROSS FADER B2 CROSS FADER B 2 CROSS FADER B 2 MIC MIC MIC AUX AUX AUX REC OUT REC OUT 1 Can be used with compatible software The audio data is output with the same volume at which it is input t...

Page 25: ...ile device connection terminal correctly Connect the mobile device to the mobile device connection terminal and launch a compatible application Is the RETURN TYPE AUX INSERT selector switch set correc...

Page 26: ...En 26 Block Diagram...

Page 27: ...sed in accordance with the contract concluded with the download site Software license notice The licenses for the open source software used on this player are shown below For accuracy purposes here we...

Reviews: