3
Getting Started
Charging Your Ping Device(s)
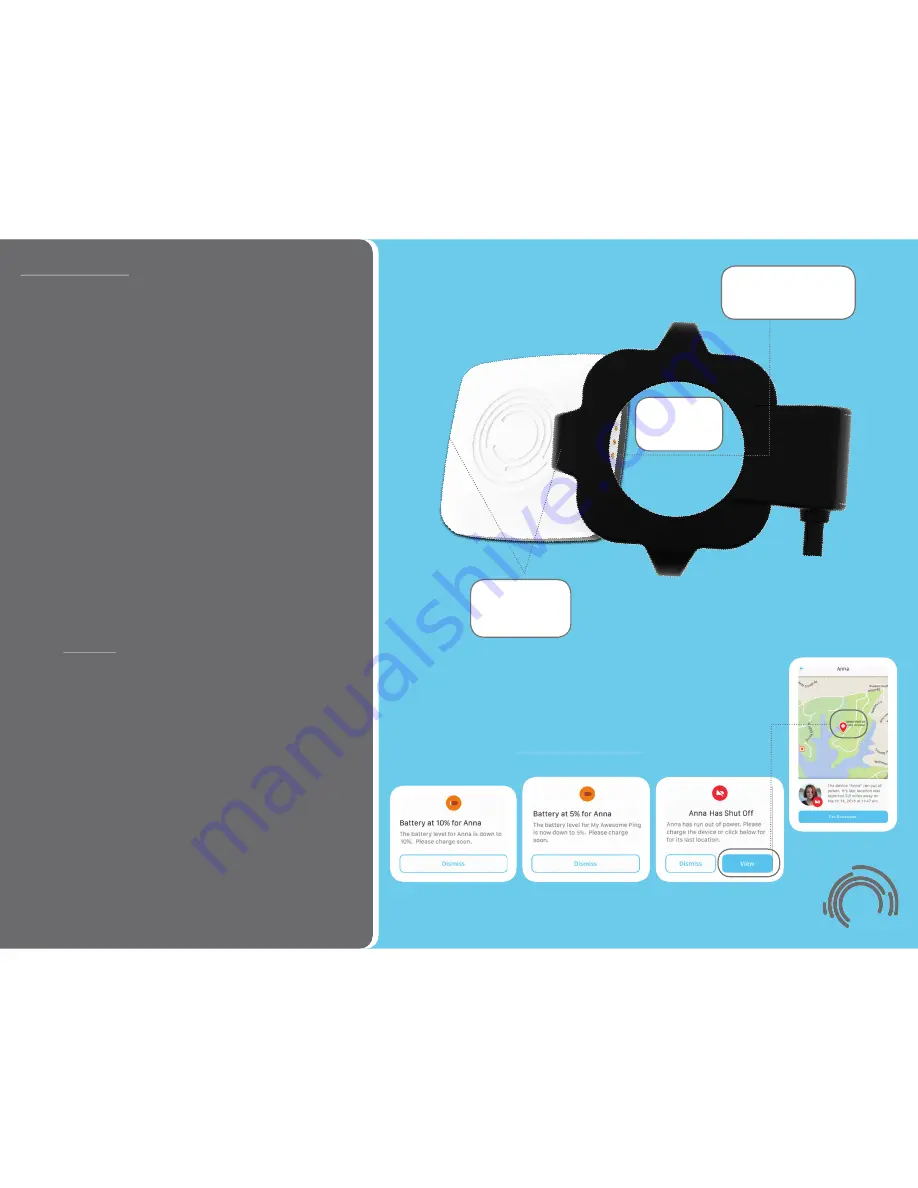
Each Ping device includes a custom charging cradle
that is compatible with most USB ports, allow for
charging via computers, A/C chargers
*
, or vehicle USB
ports. To attach the charging cradle, locate the contact
pins on the side of the Ping device and align them with
the charging pins on the cradle. Then lock the charging
cradle into place over the TOP of the device (LED rings
will be centered within the circular hole in the charger).
The alignment arms on the non-locking sides of the
charger will ensure proper alignment as you attach the
charging cradle. Please see Img 3.1 for clarification of
this process. The charger can be attached whether the
Ping device is in the pocket clip or out of it.
When charging, the LEDs will blink on and o
ff
as follows:
- LEDs blink red if battery is <10%.
- LEDs blink blue when battery is between 10
−
99%.
- LEDs remain lit solidly blue when fully charged.
*Note:
DO NOT
use rapid-charge type A/C adapters to
charge your Ping device(s). Make sure that the voltage
rating on any A/C charger used is rated 5V or less.
Your Ping device(s) will report battery life every time it
communicates with the app. You will see prompts from
the app when the battery is at 10% remaining (Img 3.2),
5% remaining (Img 3.3), or if a device powers o
ff
due to
battery depletion (Img 3.4). In the event that a device
powers o
ff
due to battery depletion, the prompt from
the app includes the option of viewing its last location
so it can be easily located if it is not nearby.
Additionally, you can check the battery level on any
device that is powered on by pressing the button once.
The LEDs will flash blue one time for every 25% of
battery life (i.e 4 flashes = 75% - 100%, 3 flashes = 50%
- 74 %, 2 flashes = 25% - 49%, 1 flash = < 25%).
Img 3.1
Img 3.2
Img 3.3
Img 3.4
Low Battery Prompts
3. Snap charger
down over the
top of the Ping
2. Align pins
with contacts
on the Ping
1. The pins are located
on the cable-side of
the charger.


