


5
AM440D USB-K
English
Channel Controls
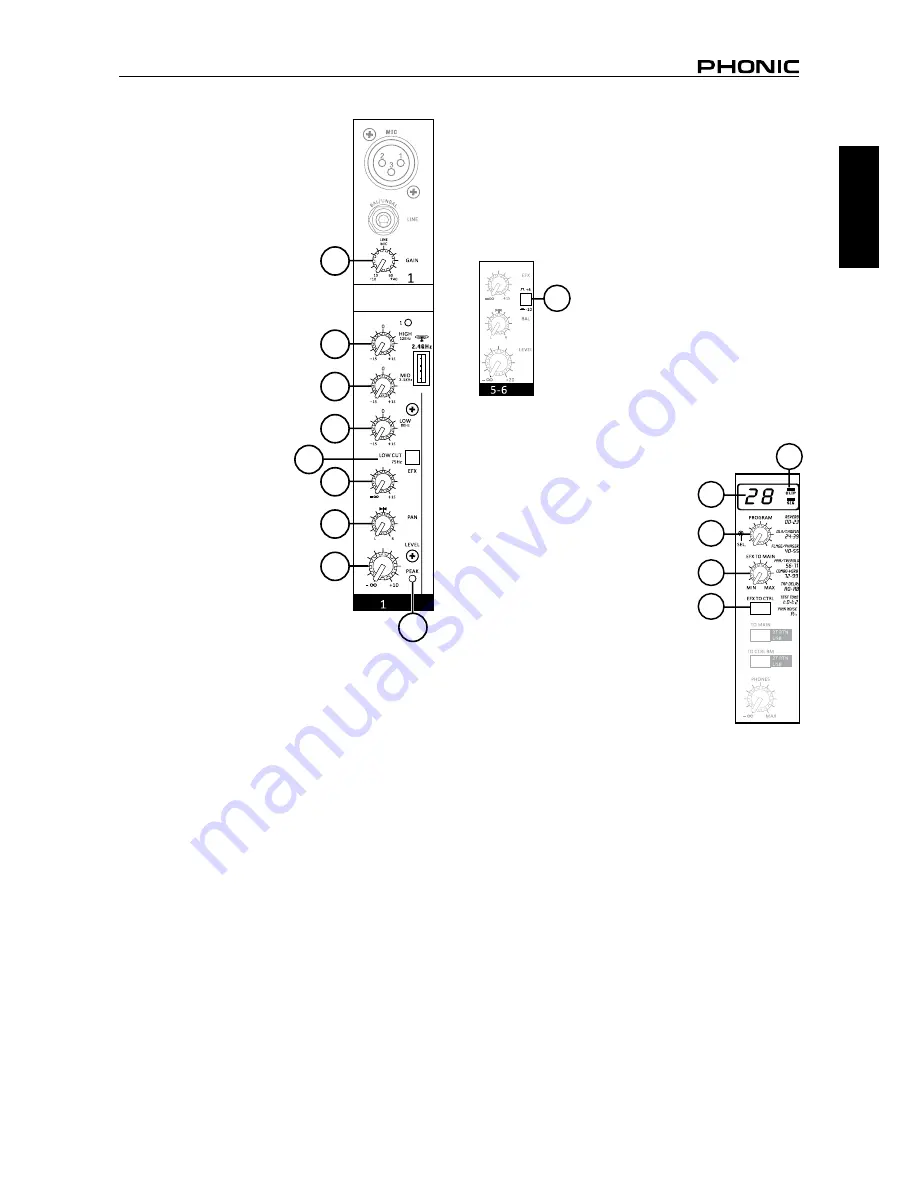
14. Line/Mic Gain Control
This controls the sensitivity of the
input signal of the Line/Micro-
phone input. The gain should be
adjusted to a level that allows the
maximum use of the audio, while
still maintaining the quality of the
feed. This can be accomplished
by adjusting it to a level that will
allow the peak indicator occa-
sionally illuminate. All 4 mono
channels feature this control.
15. High Frequency Control
This control is used to give a
shelving boost or cut of ±15 dB to
high frequency (12 kHz) sounds.
This will adjust the amount of
treble included in the audio of
the channel, adding strength and
crispness to sounds such as gui-
tars, cymbals, and synthesizers.
16. Middle Frequency Control
This control is used to provide
a peaking style of boost and cut
to the level of middle frequency
(2.5 kHz) sounds at a range
of ±15 dB. Changing middle
frequencies of an audio feed
can be rather difficult when used
in a professional audio mix, as
it is usually more desirable to
cut middle frequency sounds
rather than boost them, thereby
soothing overly harsh vocal and
instrument sounds in the audio.
17. Low Frequency Control
This control is used to give a shelving boost or cut of ±15 dB
to low frequency (80 Hz) sounds. This will adjust the amount
of bass included in the audio of the channel, and bring more
warmth and punch to drums and bass guitars.
18. Low Cut Filter (75 Hz)
This button, located on channels 1 through to 4, will activate a
low-cut / high-pass filter that reduces all frequencies below 75
Hz at 18 dB per Octave, helping to remove any unwanted ground
noise or stage rumble.
19. EFX Control
The EFX control alters the signal level that is sent to the EFX
mixing bus, which makes its way to the built-in Digital Effects
Processor and is in-turn sent through the EFX send output.
These controls are pre-fader, therefore any changes made to the
corresponding channel level control are not applied to the AUX
or EFX signals.
20. Pan / Balance Controls
This alternates the degree or level of audio that the left and right
side of the main mix should receive. On mono channels, this
control will adjust the level that the left and right should receive
(pan), where as on a stereo channel, adjusting the BAL control
will increase the left or right audio signals accordingly (balance).
21. Level Control
This rotary control will alter the signal level that is sent from the
corresponding channel to the main mix.
22. Peak Indicator
This LED indicator will illuminate when the device hits high
peaks, 6 dB before overload occurs. It is best to adjust the gain
of the channel so that the PEAK indicator lights up on intervals
only, if at all. This will ensure a greater dynamic range of audio.
23. +4 / -10 Switch
This button, located on all stereo channels, is used adjust the
input sensitivity of the corresponding channels, which will adapt
the AM440D USB-K to external devices which may use different
operating levels. If the input source is -10 dBV (consumer
audio level), it is best to engage the switch,
allowing the signal to be heard. The +4
dBu level is suitable for Professional Audio
signals, which are considerably higher than
the consumer level. However, if you are
unsure of the source’s operating level, we
suggest leaving the switch disengaged until
you test the source’s signal. You can then
engage if necessary (if the level of the input
signal is obviously too low).
Digital Effect Section
24. Digital Effect Display
This 2-digital numeric display shows
the program number that is currently
applied to your EFX audio signal. When
you rotate the Program control, you can
scroll through different program numbers;
however the display will revert back to the
original program if a new program is not
selected within a few seconds. For a list
of available effects, please observe the
Digital Effect Table.
25. Sig and Clip Indicators
Located within the Digital Effect Display
are Clip and Sig LEDs. The Sig LED will
light up when any signal is received by
the effect processor, and the Clip LED will
light up shortly before excessive signals
are dynamically clipped. If the Clip LED
lights up too often, it may be advisable to
turn down one or all EFX controls on input
channels to ensure the signal level is not
too high.
26. Program Control
This control is used to scroll through the various effects. Turning
the control clockwise will allow users to ascend into higher
program numbers, and turning it counter-clockwise will allow
users to descend into lower program numbers. Pushing this
control will apply the new effect. When a tap-delay effect is
selected, pressing this control will allow users to select the tap-
delay time.
By pushing the button several times, the effect processor
interprets the time between last two pushes and remembers this
as the delay time, until the button is pushed again (this is kept,
even after the power is turned off). When the tap delay effect is
selected, a small LED will flash within the digital effect display
window at the selected intervals.
27. EFX “to Main” Control
This will adjust the level of the Digital Effect signal that will be
sent to the Main left and right mixing bus to be applied to your
main feed.
28. EFX Routing Button
This button allow users to send the EFX signal to the Control
Room / Phones mix for monitoring.
14
15
16
17
19
20
21
22
18
24
25
26
27
28
23
Summary of Contents for AM440D
Page 1: ...User s Manual Manual de Usuario AM440D USB K1 AM440D USB K2...
Page 14: ...AM440D USB K 2 Espa ol...
Page 28: ......


