Changing the Separator Filter
To ensure that your dry ice cleaning system operates correctly and continues to provide
reliable performance levels, the separator needs to be inspected regularly. Poor filtering
leads to excessive moisture being passed into the control system, airlock, blast gun, and
ultimately to the targeted surface. A discolored filter element should be replaced. Follow
this simple procedure:
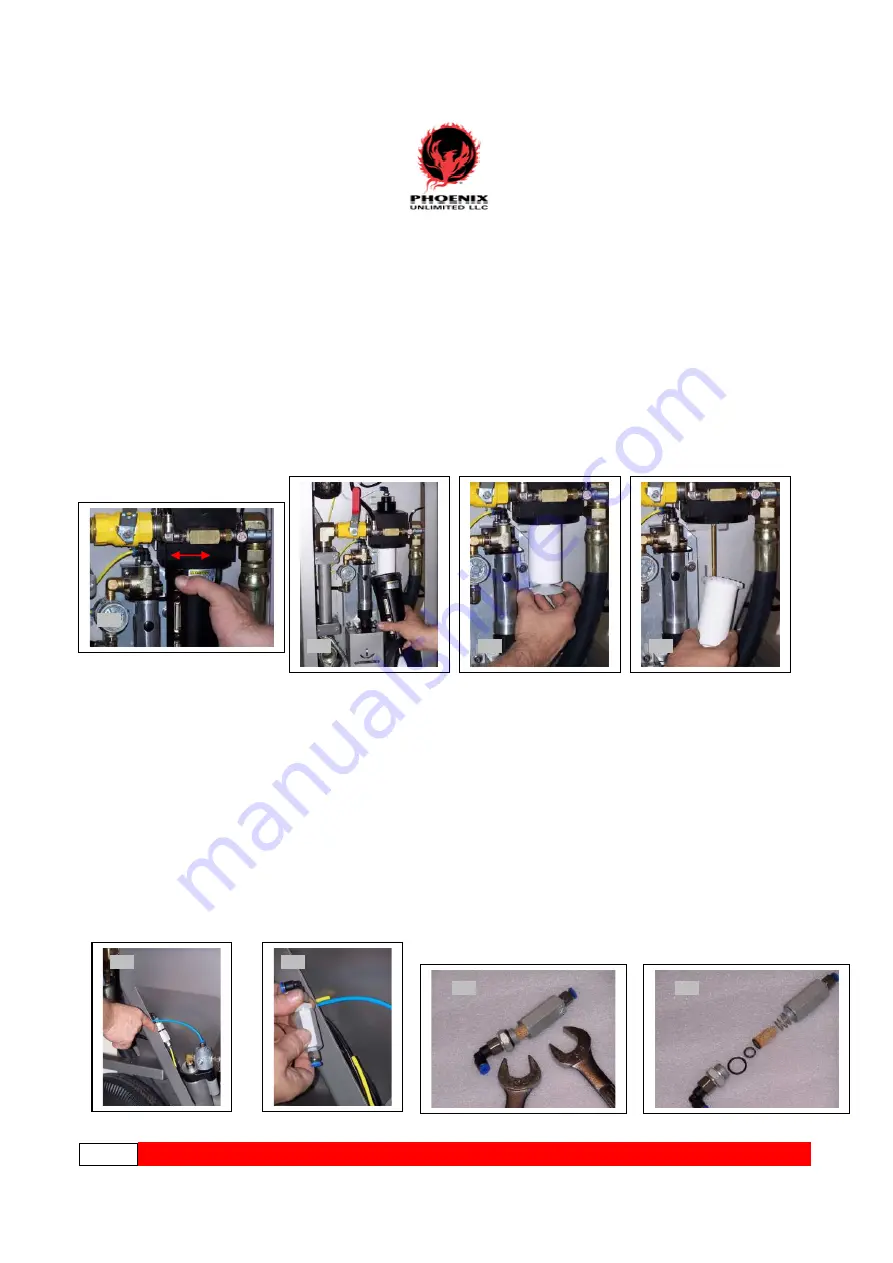
1. Press locking tab on separator canister and turn in either direction to disengage. (pic 1)
2. Lower the canister to expose filter element. (Empty any accumulated moisture in
canister before reinstalling). (pic 2)
3. Remove element retainer umbrella by turning counter-clockwise. (pic 3)
4. Remove old filter element, pulling straight down and away. (pic 4)
5. Install new element by reversing steps 1-4.
Changing the Inline Filter Element (Trigger Line)
If the unit is ready to blast (Arm/Disarm indicator is green), but does not start when the
trigger is pulled, it may indicate the need to change the trigger line inline filter element.
To perform this:
1. Locate the filter housing on inner leg of the PHX-150 near the trigger connectors.
(pic1)
2. Disconnect the tubing from filter housing push fittings (both ends), then remove filter
housing from unit. (pic 2)
3. Using two ¾” wrenches, remove the cap from the filter housing to expose the sintered
bronze filter element. (pic 3)
4. Remove filter element
.
Important: Remember proper configuration of internal spring
in relation to the element. Improper installation will result in the non-operation of the
unit.
(pic 4)
5. Install new filter element and housing by reversing steps 2-4.
Page 18
*
*
*
*
*
*
*
*
*
*
*
*
*
*
*
*
*
*
*
*
*
*
*
*
*
*
*
*
*
*
*
*
*
*
*
*
*
*
*
*
*
*
*
*
*
*
*
*
*
*
*
*
*
*
*
*
*
*
*
*
*
*
*
*
*
*
*
*
*
*
*
*
*
*
*
*
*
*
*
*
*
*
*
*
*
*
*
*
*
*
*
*
*
*
*
*
*
*
P
P
H
H
X
X
-
-
1
1
5
5
0
0
*
*
*
*
*
*
*
*
*
*
*
*
*
*
*
*
*
*
Pic 1
Pic 2
Pic 3
Pic 4
Pic 1
Pic 2
Pic 3
Pic 4


