background image

English

21

Troubleshooting

WARNING
Under no circumstances should you try to repair the system yourself, as this will invalidate the
warranty.  Do not open the system as there is a risk of electric shock.

If a fault occurs, first check the points listed below before taking the system for repair. If you
are unable to remedy a problem by following these hints, consult your dealer or Philips for
help.

NO DISC

” is displayed.

Radio reception is poor.

The system does not react when buttons
are pressed.

Sound cannot be heard or is of poor
quality.

The left and right sound outputs are
reversed.

The remote control does not function
properly.

Insert a disc.

Check if the disc is inserted upside down.

Wait until the moisture condensation at the lens
has cleared.

Replace or clean the disc, see “Maintenance”.

Use a finalised CD-RW or a correct MP3-CD
format disc.

If the signal is too weak, adjust the antenna or
connect an external antenna for better
reception.

Increase the distance between the Micro HiFi
System and your TV or VCR.

Remove and reconnect the AC power plug and
switch on the system again.

Adjust the volume.

Check that the speakers are connected
correctly.

Check if the stripped speaker wire is clamped.

Make sure the MP3-CD was recorded within
32~256 kbps bit rate with sampling frequencies
at 48 kHz, 44.1 kHz or 32 kHz.

Check the speaker connections and location.

Select the source (CD or TUNER, for example)
before pressing the function button (

ÉÅ

,

í

,

ë

).

Reduce the distance between the remote
control and the system.

Insert the battery with its polarities
(+/– signs) aligned as indicated.

Replace the battery.

Point the remote control directly toward
IR sensor on the front of the system.

Problem

Solution

pg001-024_MCM119_05

2007.4.20, 10:53

21

Summary of Contents for MCM119

Page 1: ...MCM119 Micro System User manual ...

Page 2: ...How to connect a plug The wires in the mains lead are coloured with the following code blue neutral N brown live L As these colours may not correspond with the colour markings identifying the terminals in your plug proceed as follows Connect the blue wire to the terminal marked N or coloured black Connect the brown wire to the terminal marked L or coloured red Do not connect either wire to the ear...

Page 3: ...3 3 USB DIRECT 5 2 4 3 6 1 0 9 7 8 8 SYSTEM ...

Page 4: ...tic Standby 11 Adjusting volume and sound 11 CD MP3 CD Operation Loading a disc 12 Basic playback controls 12 Playing an MP3 disc 13 Different play modes SHUFFLE and REPEAT13 Programming track numbers 13 Reviewing the programme 14 Erasing the programme 14 Radio Reception Tuning to radio stations 15 Programming radio stations 15 Automatic programming Manual programming Tuning to preset radio statio...

Page 5: ...es or discs to excessive moisture rain sand or heat sources caused by heating equipment or direct sunlight No naked flame sources such as lighted candles should be placed on the apparatus No objects filled with liquids such as vases shall be placed on the apparatus Install this unit near the AC outlet and where the AC power plug can be reached easily If the system is brought directly from a cold t...

Page 6: ... To avoid overheating of the system a safety circuit has been built in Therefore your system may switch to Standby mode automatically under extreme conditions If this happens let the system cool down before reusing it not available for all versions B Antennas Connection Connect the supplied MW loop antenna and FM antenna to the respective terminals Adjust the position of the antenna for optimal re...

Page 7: ... and connecting cords are not supplied Refer to the operating instructions of the connected equipment for details Connecting a USB device or memory card By connecting a USB mass storage device including USB flash memory USB flash players or memory cards to the Hi Fi system you can enjoy the device s stored music through the powerful speakers of Hi Fi system Insert the USB device s USB plug into th...

Page 8: ...ct the desired function for example ÉÅ à á Remove the plastic protective sheet Replacing battery lithium CR2025 into the remote control 1 Press the slot on the battery compartment 2 Pull out the battery compartment 3 Replace a new battery and fully insert the battery compartment back to the original position 1 2 3 CR2025 CAUTION Batteries contain chemical substances so they should be disposed of p...

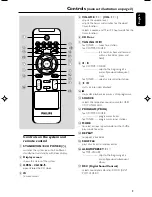
Page 9: ...3 CD USB fast searches back and forward within a track disc press and hold 8 for CD MP3 CD USB skips to the beginning of a current previous subsequent track forTUNER selects a preset radio station 9 ÉÅ starts or interrupts playback 0 9 stops disc playback or erases a disc programme SOURCE selects the respective sound source for USB CD TUNER AUX PROGRAM PROG for CD MP3 CD USB programmes tracks forT...

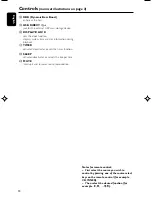
Page 10: ...ER Then select the desired function for example ÉÅ í ë DBB Dynamic Bass Boost enhances the bass USB DIRECT jack for the external USB mass storage device DISPLAY CLOCK sets the clock function displays system time and disc information during playback TIMER activates deactivates or sets the timer function SLEEP activates deactivates or selects the sleeper time MUTE interrupts and resumes sound reprod...

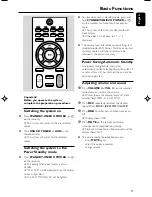
Page 11: ...If the clock has not been set is displayed The volume level interactive sound settings last selected mode ECO Power Standby or normal standby source and tuner presets will be retained in the player s memory Power Saving Automatic Standby As a power saving feature the system automatically switches to Eco Power Standby 15 minutes after a CD has reached the end and no control is operated Adjusting vo...

Page 12: ...When you recognize the passage you want release TUNING à á Normal playback continues To interrupt playback Press ÉÅduring playback The display freezes and the elapsed playing time flashes when playback is interrupted To resume press ÉÅ again To stop playback Press 9 Important The lens of the CD player should never be touched Loading a disc This CD player plays Audio Discs including CD Recordables ...

Page 13: ...ou can select and change the various play modes before or during playback The REPEAT modes can also be combined with PROGRAM SHUFFLE tracks of the entire disc are played in random order REP ALL repeats the entire disc program REPEAT plays the current track continuously 1 To select your play mode press MODE on the top of the system SHUFFLE or REPEAT on the remote before or during playback until the...

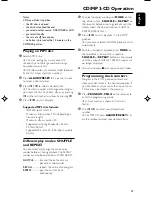
Page 14: ...d tracks FULL is displayed if you attempt to program more than 40 tracks 5 To start playback of your disc program press 9 once followed by ÉÅ or press ÉÅ directly Erasing the program You can erase the program by pressing 9 once in the STOP mode pressing 9 twice during playback opening the CD compartment PROG disappears CLEAR scrolls and then disappears from the display CD MP3 CD Operation ...

Page 15: ...ons will be overridden 1 Press í ë to select the preset number where programming should start Note If no preset number is selected default is preset 1 and all your presets will be overridden 2 Press PROGRAM PROG on the remote for more than 2 seconds to activate programming AUTO is displayed and available stations are programmed in order of waveband reception strength FM followed by MW The last pre...

Page 16: ...ive show up on your computer after you plugged the mass storage device into your computer most likely it is MSD compliant and it will work with this product b If your Mass storage device required a battery power source Please make sure you have a fresh battery in it or charge the USB device first and then plug it into the product again Supported Music type a This device only supports unprotected m...

Page 17: ...have not organized MP3 WMA files into any albums on your disc an album 00 will be automatically assigned for all those files Make sure that the file names of MP3 files end with mp3 and the file names ofWMA files end with wma For DRM protectedWMA files useWindows Media Player 10 or later for conversion Visit www microsoft com for details aboutWindows Media Player andWM DRM Windows Media Digital Rig...

Page 18: ... the remote to set the hours 4 Press DISPLAY CLOCK again The clock digits for the minutes flash 5 Press VOLUME VOL on the remote to set the minutes 6 Press DISPLAY CLOCK to confirm the time Notes The backlight for clock display is dim in standby The clock setting will be cancelled when the power cord is disconnected or if a power failure occurs During clock setting if no button is pressed within 9...

Page 19: ...mation will display for a few seconds then the system resumes to the last active source or stays in standby mode If deactivated OFF appears Note The system will exit timer setting mode if no button is pressed within 90 seconds Activating and deactivating SLEEP The sleep timer enables the system to switch off by itself after a set period of time Press SLEEP on the remote control once or more Displa...

Page 20: ...RMS Signal to noise ratio 62 dBA Frequency response 63 16000 Hz 3 dB Input sensitivity AUX 0 5V max 2 V Impedance loudspeakers 4 Ω CD PLAYER Frequency range 30 16000 Hz Signal to noise ratio 75 dBA TUNER FM wave range 87 5 108 MHz MW wave range 531 1602 kHz Sensitivity at 75 Ω mono 26 dB signal to noise ratio 2 8 µV stereo 46 dB signal to noise ratio 61 4 µV Selectivity 28 dB Total harmonic distor...

Page 21: ...leared Replace or clean the disc see Maintenance Use a finalised CD RW or a correct MP3 CD format disc If the signal is too weak adjust the antenna or connect an external antenna for better reception Increase the distance between the Micro HiFi System and yourTV orVCR Remove and reconnect the AC power plug and switch on the system again Adjust the volume Check that the speakers are connected corre...

Page 22: ...PPORTED scrolls on the display Set the clock correctly PressTIMER to switch on the timer Power has been interrupted or the power cord has been disconnected Reset the clock timer Check if the number of folders exceeds 99 or the number of titles exceeds 400 Remove the USB mass storage device or select another source Troubleshooting ...

Page 23: ...23 ...

Page 24: ...English Printed in China MCM119 PDCC JS JW 0716 Meet Philips at the Internet http www philips com ...

Reviews: