


L
YTE
S
CENE
II T
OUCH
S
CREEN
U
SER
’
S
G
UIDE
C
ONTROLLING
A
M
ASTER
1 3
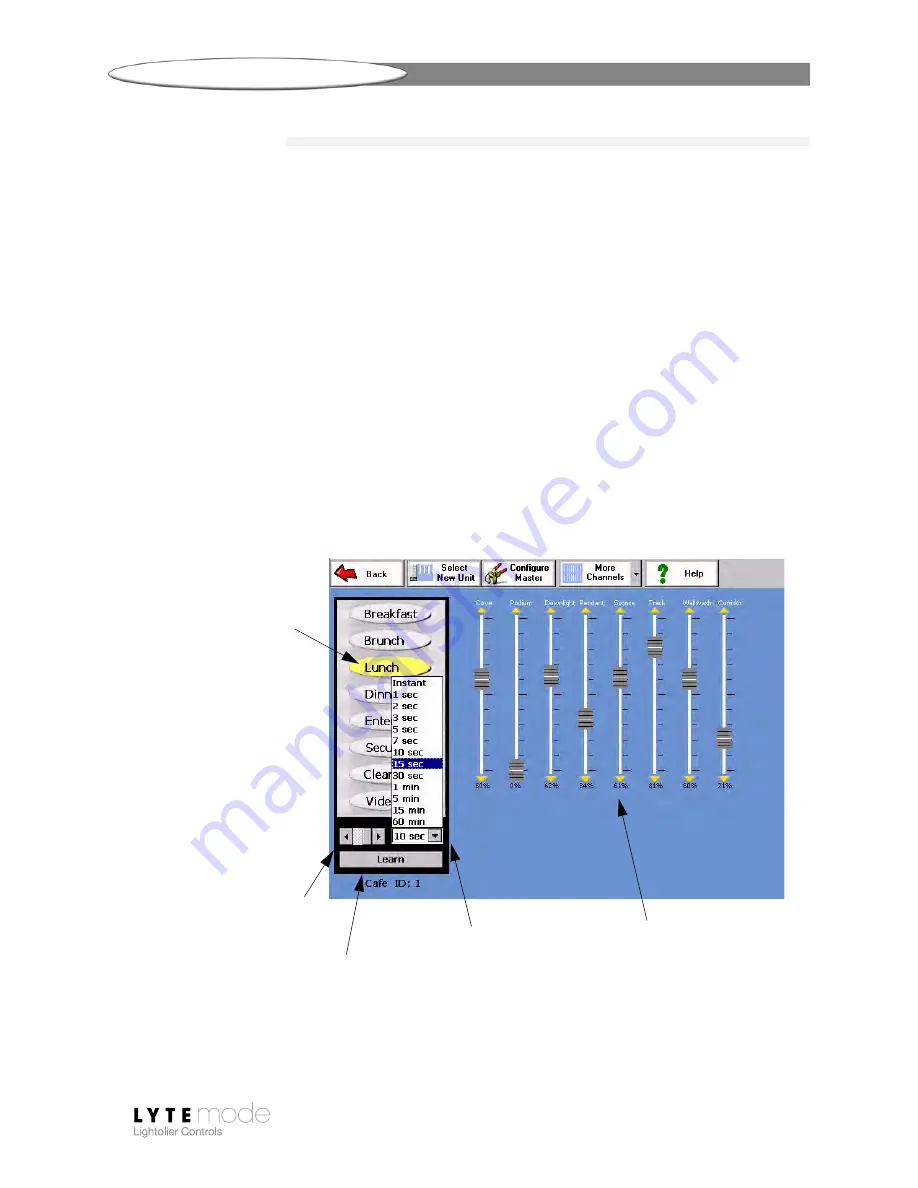
Storing a Scene
Up to 13 Scenes can be “stored” (set in memory) using the ON and A-L buttons. After a Scene has
been stored, it can be recalled by pressing the corresponding Scene button.
Before a Scene is stored, the length of the fade must be set (fade rate). The Fade Rate pop-up menu is
used to set the length of the fade. After the desired fade rate has been programmed, press the Learn
button. This action will cycle the Scene button LEDs, asking where the scene should “stored.” Pressing
a Scene button will store the current levels and fade rate into that Scene. The cycling will then stop and
the stored Scene button will illuminate.
To store a scene:
Step 1. Select a Master or Remote device for control. (Refer to
Step 2. Using virtual faders, make level changes for each channel as required.
Step 3. At
Fade Rate
pop-up menu, select fade rate as required or leave in the default
“Instant” setting.
Step 4. Press
Learn
. Scene button LEDs will cycle.
Step 5. Press Scene button where you wish to store settings. Scene button will remain
illuminated, indicating that it is currently selected.
Virtual faders used to
Fade Rate Pop-up Menu
Press ‘Learn” to initiate
Press to store scene
store sequence
Press arrows to toggle between
6-Button (ON, OFF, A-D) and
8-Button (E-L) panel icons
change lighting levels
Summary of Contents for LIGHTOLIER CONTROLS LYTESCENE ILSCLTSII
Page 1: ......
Page 33: ...LYTESCENE II TOUCH SCREEN USER S GUIDE SPECIFICATIONS 31 Notes ...
Page 34: ...SPECIFICATIONS LYTESCENE II TOUCH SCREEN USER S GUIDE 32 Notes ...
Page 36: ......


