background image

21

7. Operation

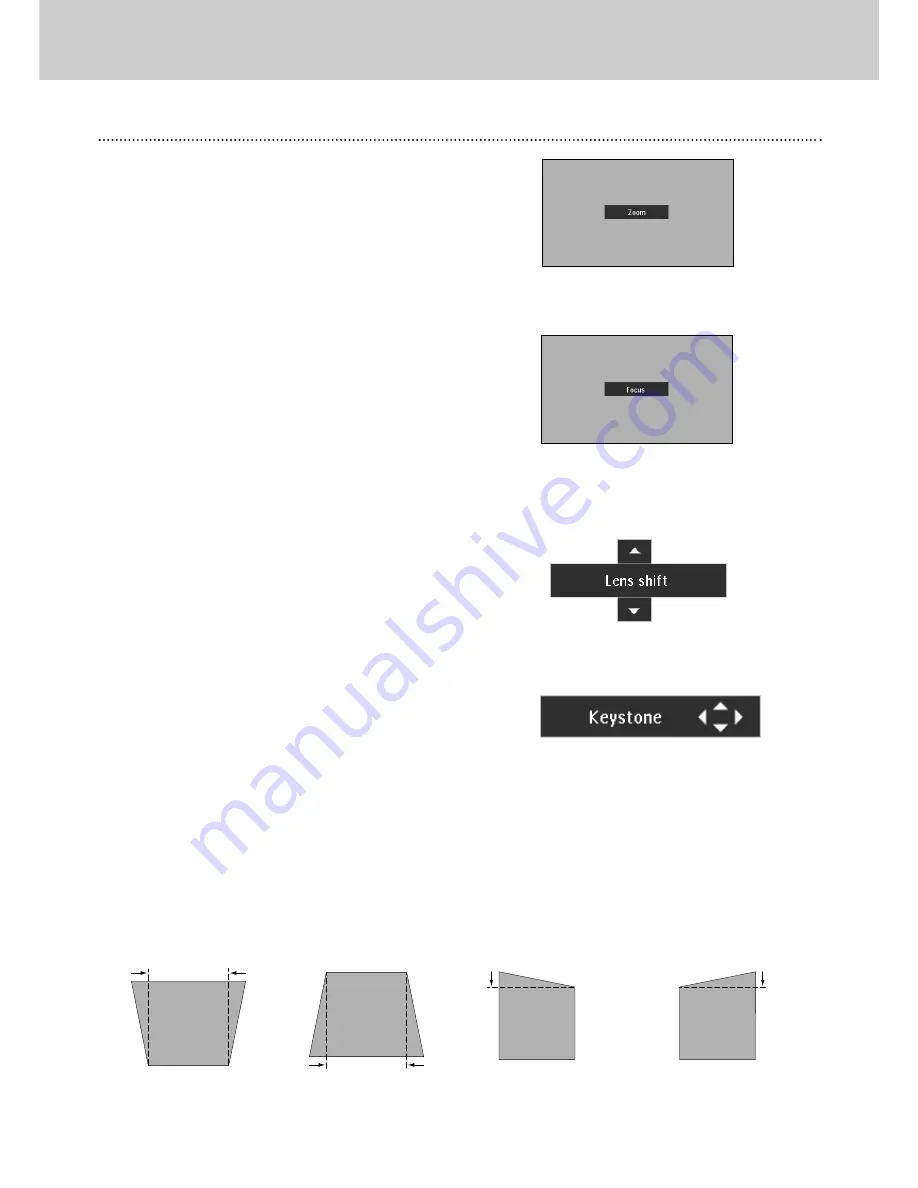
Adjusting the Screen

Adjusting the Screen

The message disappears after 4 seconds.

The message disappears after 4 seconds.

Zoom Adjustment

Focus Adjustment

Press 

zoom – / +

button to adjust the image.

Keystone Adjustment

Press 

D-keyst

button on the remote control or select

Keystone 

on Setting menu.  (Refer to page 36.)  Keystone

dialog box appears.

Correct the keystone distortion by pressing 

Cursor

Up/Down/Left/Right

button(s).  Press 

Cursor Up

button to

reduce the upper part of the image, and press 

Cursor Down

button to reduce the lower part.  Press 

Cursor Left

button to

reduce the left part, and press 

Cursor Right

button to reduce

the right part.  

If a projected picture has keystone distortion, correct the image
with Keystone adjustment.

The arrows are white in no correction.

– 

The  arrow(s) of direction being corrected

turn(s) orange.

– 

The  arrow(s) disappear(s) at the maximum

correction.

– 

If you press 

reset

button on the remote

control while the keystone dialog box is
being displayed, the keystone adjustment
will be canceled.

Lens Shift Adjustment

Note:

Focus adjustment may not function properly if the image is
corrected by Keystone adjustment.

Reduce the upper width
with 

Cursor Up

button. 

Reduce the lower width with

Cursor Down

button.  

Reduce the left part with

Cursor Left

button.  

Reduce the right part with

Cursor Right 

button.  

1

2

– Top Control

Press 

Lens

button and select 

Zoom

function. Press 

Cursor

Up/Down

to adjust the image

– Remote Control

– Top Control

Press 

Lens

button and select 

Focus

function. Press 

Cursor

Up/Down

to adjust the focus of the image.

Press 

focus – / +

button to adjust the focus of the image.

– Remote Control

Press 

lens shift – / +

button to move up / down the image.

– Top Control

Press 

Lens

button and select 

Lens shift

function. Press 

Cursor

Up/Down

to move up / down the image.

– Remote Control

Summary of Contents for LC1341

Page 1: ...User Guide Multimedia Projector ProScreen PXG30 Series ...

Page 2: ... equipment in a residential area is likely to cause harmful interference in which case the user will be required to correct the interference at his own expense If this equipment does cause harmful interference to radio or television reception which can be determined by turning the equipment off and on the user is encouraged to try to correct the interference by one or more of the following measure...

Page 3: ...ctor where the cord will be walked on 11 Follow all warnings and instructions marked on the projector 12 As a safety feature this projector is equipped with the power cord with a 3 pin grounded plug for USA versions only or a 2 pin grounded plug for European versions only The 3 pin 2 pin grounded plug will fit only into a grounding type power outlet If the plug does not fit use an adapter that is ...

Page 4: ...r is exhausted from the ventilation holes Note The cooling fan regulates the internal temperature and its performance is automatically controlled The sound of the fan may change during projector operation due to changes in the fan speed Provide appropriate space on the top sides and rear of the projector cabinet for allowing air circulation and cool ing the projector Minimum clearance must maintai...

Page 5: ...ting the Screen 21 22 Zoom Adjustment 21 Focus Adjustment 21 Lens Shift Adjustment 21 Keystone Adjustment 21 Picture Freeze 22 AV Mute 22 SmartTimer 22 Sound Adjustment 22 Direct Operation 22 Menu Operation 22 Computer Input 23 30 Selecting Input Source 23 Direct Operation 23 Menu Operation 23 Selecting Computer System 24 PC Adjustment 25 Auto Image Adjustment 25 Manual PC Adjustment 26 Picture Im...

Page 6: ...us applications 6 Digital picture enhancement technologies Featuring digital zoom 1 4 49 times digital freeze and 2D digital keystone correction correction range vertically 30º for Y axis horizontally 10º for axis 7 Smart settings Supported by SmartTimer timer to count up punctual finish of presentation SmartSet auto image for trouble free operation and optimal image quality and SmartSave power ma...

Page 7: ...e q Terminals See page 9 w AC socket For connecting the projector to AC power cord e Air exhaust vent Exhaust of air for ventilation r Carry handle t Air intake vent Intake of air for ventilation y IR sensor For receiving signals from the remote control q Air intake vent Intake of air for ventilation w Lamp cover e Air filters r Adjustable feet For adjusting the picture tilt and projection angle q...

Page 8: ...2 and Data3 P23 Video For selecting video signal as a current input source The button toggles among Auto Video S Video and Y Pb Cb Pr Cr P31 y Menu For activating or de activating the On Screen Menu of the projector P18 u OK button For executing the selected item P18 i Cursor Control For selecting an item or adjust the value in the On Screen Menu P18 Top Control q w e r t y u i o 2 1 0 o Volume Fo...

Page 9: ...on A microprocessor included in the projector may occasionally malfunction and need to be reset If necessary press this button with a sharp tool to restart the unit Do not use it excessively Terminals q w e r t y u i o 0 1 2 u RS 232C port For connecting to mouse port of a computer which is controlled via the remote control of the projector i S video in Input socket for connecting S video output f...

Page 10: ...page 0 Volume Up Down For adjusting the volume P22 1 Mute For muting the sound of the projector P22 2 Cursor Control For operating and navigate through the activated menu via Up Down and Left Right buttons P18 3 OK For executing the action in the menu when the menu is on the screen P18 4 Function For jumping back to 1st Main page 5 CH For switching video input sources The button toggles among Auto...

Page 11: ...r adjusting the zoom P21 8 lens shift For adjusting the lens shift P21 9 auto For operating Auto Image function P 25 0 D freeze For capturing a moving picture P22 1 D keyst For correcting the keystone distortion P21 2 reset Pressing this button resets the keystone adjustment while the keystone dialog box is displayed on the screen P21 3 D zoom For resizing the projected image P30 4 timer For activ...

Page 12: ...ed to work with single phase power systems having a grounded neutral conductor To reduce risk of electrical shock do not plug into any other type of power system Consult your authorized dealer or service station if you are not sure of the type of power supply being in use Connect the projector with peripheral equipment before turning the projector on Refer to pages 15 16 for connection CAUTION For...

Page 13: ... 200 300 231 154 115 77 30 Min Zoom Max Zoom 100 77 10 8 3 3m 150 115 16 4 5 0m 200 154 22 0 6 7m 250 192 27 6 8 4m 300 231 32 8 10 0m 1 1 Lens Shift Adjustment The Projection lens can be moved up and down with motorised lens shift function This function makes it easy to move up and down the projected image to an optimum position Refer to page 21 for operation Note The brightness of a room has a g...

Page 14: ...ector attach the Lens cap and retract the Adjustable Feet to prevent damage to the lens and cabinet When the projector is not in use for an extended period put it into the case or cover with the supplied dust cover Picture tilt and projection angle can be adjusted by rotating the Adjustable Feet Projection angle can be adjusted up to approximately 10 degrees Lift the front of the projector and pul...

Page 15: ...uipment on before the computer is switched on VGA Cable HDB 15 pin BNC Cable BNC x 5 Audio Cables Mini Plug stereo External Audio Equipment VGA Cable Monitor Output Monitor Input MAC ADAPTER Data 2 in VGA Cable VGA Cable Audio Output Monitor Output Audio Output Audio Cable stereo Audio Cable stereo Data out Data 1 in Audio 1 in Audio 2 in Audio 3 in R G B H V V The listed cables are not supplied w...

Page 16: ...ority over S Video socket S Video Output Audio Input Cables used for connection Video Cable RCA x 1 or RCA x 3 Audio Cable Mini Plug stereo Audio Cable RCA x 2 S Video Cable Scart Cable Note When connecting the cable the power cords of both the projector and the external equipment should be disconnected from AC outlet Audio Output R L Audio Cable RCA x 2 External Audio Equipment Audio in S Video Y...

Page 17: ... the projector s codeset 3 Tap Next to define your projector s codeset The code set screen appears 4 Enter the Codeset No from the right table and press OK to complete the setting If the codeset is correct you will hear a confirmation beep If you enter an incorrect code number you will hear an error beep and an error message screen will appear In this case press OK and look up the correct codeset ...

Page 18: ...he value Adjust the value of the selected item 3 Adjustments and settings of this projector can be done via On Screen Menu Refer to the following pages regarding each adjustment and setting procedure Operating the On Screen Menu Cursor Button Top Control MENU BAR Menu icon Item Data Press Cursor Left Right buttons to adjust the value or set function Press Cursor Up Down button to select an item OK...

Page 19: ... For adjusting picture image Contrast Brightness Color Tint Color Temp White balance R G B Sharpness Gamma Noise Reduction Progressive Refer to P34 35 For Video Source Press Menu button while connecting to Video input source Same function as Menu for PC source Input Menu For selecting input source either Video or Computer Refer to P31 PC Adjust Menu For adjusting the parameters to match with input...

Page 20: ... Then AC power cord can be disconnected if necessary Message disappears after 4 seconds When Power management function is ON the projector turns off its lamp when the signal is interrupted and no button is pressed for a certain period Refer to Power management on page 37 Note When On start function is ON this projector is turned on automatically when connecting the AC power cord to an AC outlet Re...

Page 21: ...rection being corrected turn s orange The arrow s disappear s at the maximum correction If you press reset button on the remote control while the keystone dialog box is being displayed the keystone adjustment will be canceled Lens Shift Adjustment Note Focus adjustment may not function properly if the image is corrected by Keystone adjustment Reduce the upper width with Cursor Up button Reduce the...

Page 22: ...con Volume Press Volume button s on the top control or on the remote control to adjust volume Volume dialog box appears on the screen for a few seconds button for increasing volume and button for decreasing Mute Press Mute button on the remote control to mute the sound To restore sound to its previous level press Mute button again or press Volume button s To increase volume press Cursor Right butt...

Page 23: ...to display the On Screen Menu Press Cursor Left Right button to select the Input Menu icon Press Cursor Up Down button to select Data 1 and then press OK button Source Select Menu will appear Press Cursor Up Down button select Data or RGB Scart and press OK button Select Data In or Data Out and press OK button Source Select Menu INPUT MENU Selecting Data 2 Data 1 Data RGB Scart Input Menu icon Sel...

Page 24: ...a computer Make sure the computer and the projector are properly connected Refer to Installation on page 15 Auto System Menu icon Displays system being selected PC SYSTEM MENU Select Computer System Manually System Menu icon Displays selected system The systems on this dialog box can be selected Press Menu button to display the On Screen Menu Press Cursor Left Right buttons to select PC System Men...

Page 25: ... control Select Auto Image icon and press OK button PC ADJUST MENU Auto Image PC Adjust Menu icon To store adjusted parameters Parameters adjusted with Auto Image function can be store in this projector Once parameters are stored the setting can be done just by selecting Mode in PC System Menu P24 Refer to step 3 of Manual PC Adjustment section P27 Note Fine sync Total dots and Picture Position of...

Page 26: ...ar Press Cursor Left Right button to adjust the value Select the item and press OK button PC ADJUST MENU PC Adjust Menu icon Adjusts an image as necessary to eliminate flicker from the display Press Cursor Left Right button to adjust value From 0 to 31 Fine sync Adjusts the number of total dots in one horizontal period Press Cursor Left Right button s to adjust the number to match your PC image To...

Page 27: ...ore icon and press OK button Select any of Mode 1 to 5 that you want to store to and then press OK button Resets all the adjusted parameters on adjustment dialog box to previous figure Mode free Vacant Mode Shows values of Total dots Horizontal Vertical Display area H and Display area V Store icon Mode free icon Close this dialog box To store adjustment data To clear adjustment data To clear adjus...

Page 28: ...icture level preset on this projector Standard Picture level with improved halftone for graphics Real User preset picture adjustment in Image Adjust Menu P29 Image 1 4 Image Select Menu icon Image Level Select Direct Select image level from Standard Real Image 1 Image 2 Image 3 and Image 4 by pressing V effect button on the remote control V effect button Standard Real Image 1 Image 2 Image 3 Image...

Page 29: ...htness From 0 to 63 Contrast Brightness Press either Cursor Left or Right button to obtain better balance of contrast From 0 to 15 Gamma To store manually preset image select Store icon and press OK button Image Level Menu will appear Select one from Image 1 to 4 where you want to set and then press OK button Store icon Press OK button at this icon to store the adjustment Image Adjust Menu icon Pr...

Page 30: ...pears and the message D Zoom is displayed Press OK button to compress the image size A projected image can be also compressed by pressing D zoom button on the remote control unit Digital Zoom Provides an image in its original size When the original image size is larger than the screen size 1024 x 768 this projector automatically enters Digital zoom mode Provides image to fit wide video aspect rati...

Page 31: ...nal is connected to Y Pb Cb Pr Cr sockets select Y Pb Cb Pr Cr Y Pb Cb Pr Cr Select Input source by any of the followings Press Video button on the top control Press CH button on the remote control The button toggles among Auto Video S video and Y Pb Cb Pr Cr Press video S video or Y Pb Cb Pr Cr button on the remote control If the projector cannot project properly select correct input source throu...

Page 32: ...ton PAL SECAM NTSC NTSC4 43 PAL M PAL N The projector automatically detects incoming video signal and adjusts itself to optimize its performance If the projector cannot reproduce proper video image it is necessary to select a specific component video signal format from 480i 575i 480p 575p 720p 1035i and 1080i Auto Component Video Signal Format Video or S video Y Pb Cb Pr Cr The projector automatic...

Page 33: ... preset on this projector Standard Picture level adjusted for the picture with fine tone Cinema User preset picture adjustment in Image Adjust Menu P34 35 Image 1 4 Image Select Menu icon Image Level Select Direct Select image level among Standard Cinema Image 1 Image 2 Image 3 and Image 4 by pressing V effect button on the remote control Normal picture level preset on this projector Standard Pict...

Page 34: ...3 Color Tint Press Cursor Left Right button to adjust the image sharpness From 0 to 31 Sharpness Press Cursor Left Right button to adjust red tone From 0 to 63 White balance Red Press Cursor Left Right button to adjust green tone From 0 to 63 White balance Green Press Cursor Left Right button to adjust blue tone From 0 to 63 White balance Blue Press OK button at this icon to dis play previous item...

Page 35: ...ted when 720p 1035i or 1080i is selected on AV System Menu P32 Select the function and press OK button SCREEN MENU Screen Menu icon Provides image at a wide screen ratio of 16 9 Wide Provides image at a normal video aspect ratio of 4 3 Normal To store the adjustment data select Store icon and press OK button Image Level Menu will appear Select from the Image Level 1 to 4 and then press OK button I...

Page 36: ...u Press Menu button to display the On Screen Menu Press Cursor Left Right button s to select Setting icon Language Language used in the On Screen Menu is selectable from English German French Italian Spanish Portuguese Dutch Swedish Chinese Korean and Japanese Display This function decides whether to display On Screen Displays On shows all the On Screen Displays Off sets On Screen Displays disappe...

Page 37: ...place Counter by using this function Refer to page 42 for operation Lamp counter reset Remote control Eight different remote control codesets are provided in this projector Code1 Code8 Code 1 is set by default This function is provided for avoiding mutual interference of the remote controls when operating several projectors or video equipment together Select your desired code from Code 1 to Code 8...

Page 38: ... computer is switched on first Wireless Mouse may not work properly To use the remote control as the wireless mouse for a personal computer Make sure that the mouse driver is properly installed in your computer and its USB port or mouse port is activated Operating the Wireless Mouse When controlling a PC mouse pointer operate Wireless Mouse with Cursor buttons Left button and Right button on the r...

Page 39: ... LCD Projector Dealer or Service Centre Temperature Warning Indicator Temperature Warning Indicator 12 Maintenance Ensure the Standby Indicator is lighted when turning on the projector If the temperature is not lowered enough the Temperature Warning Indicator flashes and the projector will shut down again When the projector detects an internal problem it will shut itself down and both the Temperat...

Page 40: ...rojector Clean the Air Filters as follows Clean the Air Filters with a brush or wash out dust and particles 3 Replace three Air Filters properly Make sure that the Air Filters are fully inserted 4 Do not operate the projector with the Air Filters removed Dust may accumulate on the LCD Panel and Projection Mirror degrading picture quality Do not put any objects into the Air Intake Vents It may resu...

Page 41: ...turn on the projector 6 Follow these steps to replace the lamp assembly Reset the Lamp Replace Counter Refer to Lamp Replace Counter Reset on the next page 5 Lamp Assembly Handle Lamp Cover Order Replacement Lamp Replacement Lamp can be ordered through your dealer Give the following information to the dealer when you order Model No of your projector LC1345 or LC1341 Replacement Lamp Type No LCA312...

Page 42: ...t or conditions in which the projector and lamp are being used IF A LAMP EXPLODES THE FOLLOWING SAFETY PRECAUTIONS SHOULD BETAKEN If a lamp explodes disconnect the projector s AC plug from the AC outlet immediately Contact an authorized service station for a checkup of the unit and replacement of the lamp Additionally check carefully to ensure that there are no broken shards or pieces of glass aro...

Page 43: ...n is at least 4 1 1 2m from the projector Check the Projection Lens to see if it needs cleaning Note Moving the projector from a cool temperature location to a warm temperature location may result in moisture condensation on the Projection Lens In such an event leave the projector OFF and wait until condensation disappears Picture is Left Right reversed Check Ceiling Rear feature See Other Setting...

Page 44: ...ote Control does not work Check the batteries Make sure no obstruction is between the projector and the remote control Make sure you are not too far from the projector when using remote control Maximum operating range is 16 4 5m Make sure the code of the remote control is conformed to the projector See Other Settings section on page 36 37 Problem Try these Solutions Wireless Mouse function does no...

Page 45: ...ojector cannot be turned on When the projector is cooled down enough and the temperature returns to normal the Standby Indicator lights on and the projector can be turned on The Temperature Warning Indicator keeps flashing Check and clean the Air Filter The projector is being cooled down It cannot be turned on until the Standby Indicator lights on Projector Condition The projector is operating nor...

Page 46: ... 31 On Off 0 63 0 63 Input Data 2 Data RGB Scart System System Data 3 Data In Data Out System Data Input Main menu Main menu Video Auto System System System 1 2 1 1 3 2 1 Data 1 Video S Video Y Pb Cb Pr Cr PC Adjust 640 x 480 720 x 400 800 x 600 1024 x 768 1152 x 864 1280 x 1024 1400 x 1050 Mode 1 Mode 2 Mode 3 Mode 4 Mode 5 Image Select XLow Low Mid High 0 63 0 63 0 63 0 15 Image 1 Image 2 Image ...

Page 47: ...olor temp Color Tint XLow Low Mid High Red Green Blue Sharpness Reset Store Gamma Noise reduction Progressive 0 63 0 63 0 63 0 31 0 15 Image 1 Image 2 Image 3 Image 4 Screen Sound Setting English German French Italian Spanish Portuguese Dutch Swedish Chinese Korean Japanese Store Reset On Off On Off On Off On Off On Off On Off On Off Normal Eco Code 1 Yes No Keystone Blue back Display Logo Ceiling...

Page 48: ... Feature V effect lens shift D freeze timer mouse Cursor pointer D keyst reset focus auto D zoom mouse left right OK Cancel Code set Code canceled Use Mode Remote Control Code Set 1 4 2 4 3 4 4 4 f f f stands for the hard buttons on the remote control Menu Tree 13 Appendix MenuTree Remote Control ...

Page 49: ...6 70 07 48 50 60 02 44 00 54 58 XGA 5 1024 x 768 60 31 74 92 VGA 7 640 x 480 43 269 85 00 RGB 15 734 60 Interlace RGB 15 625 50 Interlace SVGA 10 800 x 600 32 70 51 09 XGA 10 1024 x 768 62 04 77 07 MAC 19 1024 x 768 60 24 75 08 MAC 21 1152 x 870 68 68 75 06 MAC 1280 x 960 75 00 75 08 MAC 1280 x 1024 80 00 75 08 XGA 11 1024 x 768 XGA 12 1024 x 768 XGA 13 1024 x 768 XGA 14 1024 x 768 61 00 75 70 XGA...

Page 50: ... F 1 7 2 1 f 34 0 mm 44 0 mm 1 2 m 10 0 m 4 1 32 8 UHP 250 W user replaceable Lens Projection distance Lamp Audio 1 x Component video 3 x RCA 1 x CVBS RCA 1 x S video Y C DIN 5 BNC 1 x Stereo audio 3 5mm jack Video Data 2 Data 1 Data 3 S Video S VHS Y C USB type B Mouse AC 100 120 V 200 240V 50 60 Hz Operating voltage LCD panels are manufactured to the highest possible standards Even though 99 99 ...

Page 51: ...51 ...

Page 52: ...1AA6P1P3757 MC3W Printed in Japan ...

Reviews: