background image

4

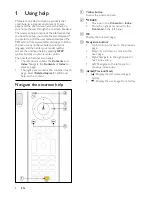
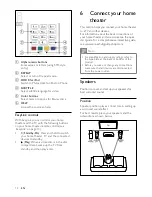
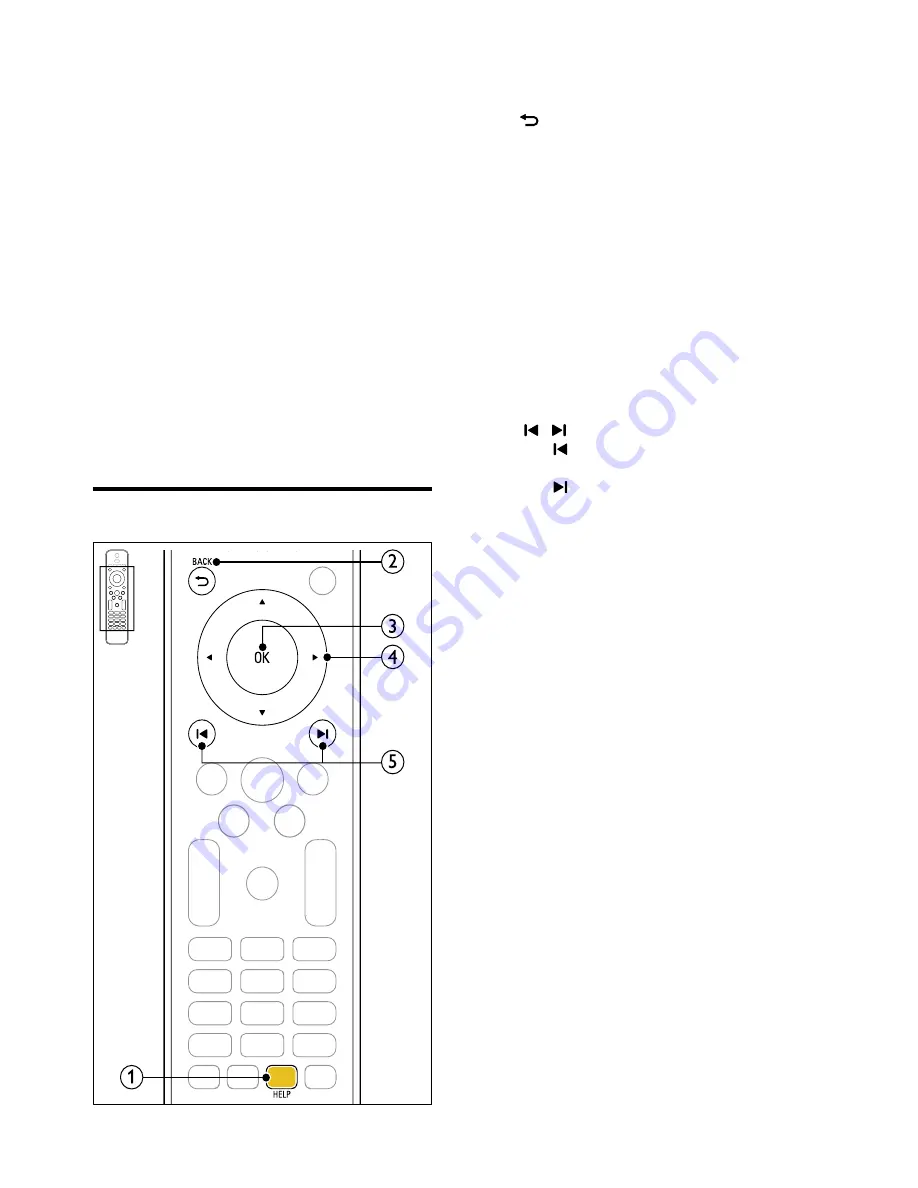
a

  Yellow button

Access the onscreen help.

b


 BACK

• 

Move up in the 

Contents

 or 

Index

• 

From the right panel, move to the 

Contents

 on the left panel.

c

 OK

Display the selected page.

d

  Navigation buttons

• 

Up: Scroll up or move to the previous 

page.

• 

Down: Scroll down or move to the 

next page.

• 

Right: Navigate to the right panel or 

next index entry.

• 

Left: Navigate to the left panel or 

previous index entry. 

e

    /   (Previous/Next)

• 

 : Display the last viewed page in 

history.

• 

 : Display the next page from history. 

1  Using help

Philips is committed to develop products that 

contribute to a greener environment. To save 

paper and the environment, access the help on 

your home theater through the onscreen interface.

The onscreen help contains all the information that 

you need to set up your home theater. However, if 

you prefer to print the user manual, download the 

PDF version from www.philips.com/support. Follow 

the instructions on the website to select your 

language, and then enter your model number.

Access the onscreen help by pressing 

HELP


(yellow button) on your remote control.

The onscreen help has two panels.

• 

The left panel contains the 

Contents

 and 

Index

. Navigate the 

Contents

 or 

Index

 to 

select a page.

• 

The right panel contains the content of each 

page. Select 

Related topics

 for additional 

help on the content.

Navigate the onscreen help


EN

Summary of Contents for HTS3261

Page 1: ...HTS3261 Register your product and get support at www philips com welcome ...

Page 2: ......

Page 3: ...re through the Internet 37 Update software through USB 38 10 Product specifications 39 11 Troubleshooting 42 12 Index 44 Contents 1 Using help 4 Navigate the onscreen help 4 2 Help and support 5 Update your onscreen help 5 FAQs 6 Contact Philips 6 3 Notice 6 Open source software 6 RMVB end user agreement Asia Pacific and China only 6 Trademarks 7 4 Important 8 Safety 8 Care for your product 8 Care...

Page 4: ... a greener environment To save paper and the environment access the help on your home theater through the onscreen interface The onscreen help contains all the information that you need to set up your home theater However if you prefer to print the user manual download the PDF version from www philips com support Follow the instructions on the website to select your language and then enter your mo...

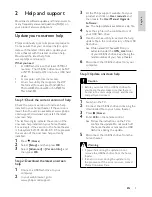
Page 5: ...eoccurs contact Philips Consumer Care 2 Help and support Download a software update and find answers to many frequently answered questions FAQs on your product at www philips com Update your onscreen help Philips continually tries to improve its products To make sure that your onscreen help is up to date with the latest information update your home theater with the latest onscreen help Download th...

Page 6: ...acific and China only Notes to End User By using this product with RealNetworks software and services the end user agrees to the following terms of REALNETWORKS INC End User may only use the software for private non commercial use in accordance with the terms of RealNetworks EULA End User is not allowed to modify translate reverse engineer decompile dissemble or use other means to discover the sou...

Page 7: ...k of SD 3C LLC CLASS 1 LASER PRODUCT RealNetworks Inc disclaims all warranties and conditions other than those set forth in this Agreement which are in lieu of all other warranties whether express and implied including but not limited to any implied warranties or conditions of merchantability and fitness for a particular purpose and effectively exclude all liability for indirect special incidental...

Page 8: ...re you use your home theater If damage is caused by failure to follow instructions the warranty does not apply Safety Risk of electric shock or fire Never expose the product and accessories to rain or water Never place liquid containers such as vases near the product If liquids are spilt on or into the product disconnect it from the power outlet immediately Contact Philips Consumer Care to have th...

Page 9: ...years of age as their visual system is not fully developed yet Care of the environment Your product is designed and manufactured with high quality materials and components which can be recycled and reused When this crossed out wheeled bin symbol is attached to a product it means that the product is covered by the European Directive 2002 96 EC Please inform yourself about the local separate collect...

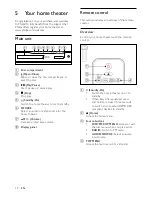
Page 10: ...isc RADIO Switch to FM radio AUDIO SOURCE Select an audio input source d TOP MENU Access the main menu of a video disc 5 Your home theater Congratulations on your purchase and welcome to Philips To fully benefit from the support that Philips offers register your home theater at www philips com welcome Main unit a Disc compartment b Open Close Open or close the disc compartment or eject the disc c ...

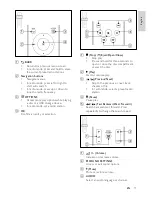
Page 11: ... search speed a Volume Increase or decrease volume b SOUND SETTINGS Access or exit sound options c Mute Mute or restore volume d AUDIO Select an audio language or channel a BACK Return to a previous menu screen In radio mode press and hold to erase the current preset radio stations b Navigation buttons Navigate menus In radio mode press left or right to start auto search In radio mode press up or ...

Page 12: ...tion plays a critical role in setting up a surround sound effect For best results place your speakers and the subwoofer as shown below a Alphanumeric buttons Enter values or letters using SMS style entry b REPEAT Select or turn off repeat mode c DOCK for iPod Switch to Philips dock for iPod or iPhone d SUBTITLE Select subtitle language for video e Color buttons Select tasks or options for Blu ray ...

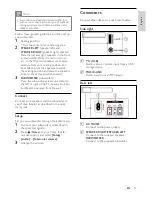
Page 13: ...AKER LEFT speaker left and SPEAKER RIGHT speaker right speakers Placethe left and right speakers in the front and equidistant from the main unit in an arc so that the two speakers are at same distance from your seating position For best effect point the speakers towards the seating position and place the speakers close to the ear level when seated 3 SUBWOOFER subwoofer Place the subwoofer at least...

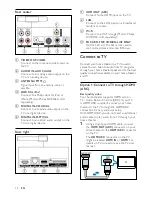
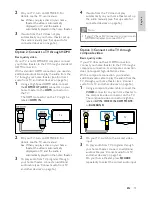
Page 14: ... the HDMI ARC connection for easy and quick setup With HDMI ARC you do not need an additional audio cable to play audio from TV through your home theater 1 Using a High Speed HDMI cable connect the HDMI OUT ARC connector on your home theater to the HDMI ARC connector on the TV The HDMI ARC connector on the TV might be labeled HDMI IN or HDMI For details on TV connectors see the TV user manual TV R...

Page 15: ...ress SOURCE repeatedly to select the correct audio input TV 2 On your TV turn on HDMI CEC For details see the TV user manual When you play a disc on your home theater the video is automatically displayed onTV and the audio is automatically played on the home theater 3 If audio from the TV does not play automatically on your home theater set up the audio manually see Set up audio for connected devi...

Page 16: ...o select the correct audio input VCR Connect audio from TV and other devices Play audio from TV or other devices through your home theater Use the best quality connection available on your TV home theater and other devices Note The audio connections in this user manual are only recommendations You can use other connections too When your home theater and TV are connected through HDMI ARC an audio c...

Page 17: ...reamed from your computer Play music photo and video from a computer or other media server on your network see Browse PC through DLNA on page 28 Net TV Not available in China Browse Net TV services to access online information games news music and other services see Browse Net TV on page 31 Software update Update the home theater software through the network see Update software through the Interne...

Page 18: ... dongle Model Philips WUB1110 A computer with media server software installed see Set up media server software on page 29 For Net TV and software update make sure that the network router has access to the Internet and is not restricted by firewalls or other security systems Set up the wireless network Connect your home theater to your router as shown below and then switch on the devices 1 Connect ...

Page 19: ...ing experience from as few as two speakers STEREO Two channel stereo sound Ideal for listening to music 4 Press OK to confirm 7 Use your home theater This section helps you use the home theater to play media from a wide range of sources Before you start Make the necessary connections described in the quick start guide and the onscreen help Complete the first time setup First time setup appears whe...

Page 20: ...SOUND SETTINGS 2 Select TREBLE MID or BASS and then press OK 3 Press the Navigation buttons up down to change the frequency 4 Press OK to confirm Discs Your home theater can play DVDs VCDs CDs and Blu ray discs It can also play discs that you ve made at home such as CD R discs of photos and music What you need For audio or 2D video Audio and video connection between your home theater and the TV An...

Page 21: ...dow 4 Select 2nd Audio Language or 2nd Subtitle Language and then press OK 5 Select the language and then press OK Note To turn off Bonus View press OPTIONS select PIP Selection Off and then press OK Play buttons Button Action Navigation buttons Navigate menus OK Confirm an entry or selection Play Start or resume play Pause play Stop play Skip to the previous or next track chapter or file Fast bac...

Page 22: ...loaded on your storage device BD Live on Blu ray On Blu ray discs with BD Live content access additional features such as internet chats with the director the latest movie trailers games wallpaper and ringtones What you need a Blu ray disc with BD Live content an internet connection a storage device a USB storage device with at least 1 GB of memory or an SD memory card of type SDHC Class 6 with at...

Page 23: ...rmats srt sub txt ssa ass smi and sami These files do not appear in the file navigation menu If the subtitles do not appear correctly change the character set Disable BD Live To restrict access to BD Live turn on the BD Live security 1 Press Home 2 Select Setup and then press OK 3 Select Advanced BD Live security On and then press OK BD Live access is restricted Note You cannot restrict internet a...

Page 24: ...earch Skip to a specific part of the video by entering the time of the scene 2nd Audio Language Select the second audio language for Blu ray video 2nd Subtitle Language Select the second subtitle language for Blu ray video Titles Select a specific title Chapters Select a specific chapter Subtitle character set If the subtitles do not appear correctly change the character set that supports the DivX...

Page 25: ...t a different camera angle Menus Display the disc menu PIP Selection Display Picture in Picture window when playing a Blu ray disc that supports the Bonus View Zoom Zoom into a video scene or picture Press the Navigation buttons left right to select a zoom factor Repeat Repeat a chapter or title Repeat A B Mark two points within a chapter or track to repeat play or turn off the repeat mode Picture...

Page 26: ...iPhone on the dock while the home theater is in iPod mode Tune stations 1 Connect the FM antenna as described in the Quick start guide 2 Press RADIO If you have already installed the radio stations the last channel that you listened to is played If you have not installed any radio stations the message AUTO INSTALL PRESS PLAY appears on the display panel Press Play 3 Press the following buttons to ...

Page 27: ...lication 3 Follow the instructions on your smartphone to download the application The MyRemote MyRemote icon is added to the home screen of your smartphone Dock your iPod or iPhone 1 Move the slide at the bottom of the dock to STANDARD and then connect the dock to the home theater 2 Connect the yellow composite cable to the dock and TV 3 Switch on the iPod or iPhone and place it on the dock Play m...

Page 28: ...dia server Access MyRemote application Access the MyRemote application from your smartphone and then identify your home theater on the home network 1 Tap MyRemote MyRemote on your smartphone Your home theater and the other devices on the network are displayed on your smartphone A browsing bar with Devices Remote and Source tabs is also displayed 2 If your home theater is not found check the networ...

Page 29: ...iles Set up media server software To enable media sharing set up the media server software Before you start Connect your home theater to your home network see Computers and the Internet on page 17 Connect your computer to the same home network Make sure that your PC firewall allows you to run Windows Media Player programs Switch on your computer and the router Microsoft Windows Media Player 11 Not...

Page 30: ...of the Mac operating system you use your screens might look different to the following screens 1 Visit http www twonkymedia com to purchase the software or download a free 30 day trial to your Macintosh 2 Start Twonky Media on the Macintosh 3 In the Twonky Media Server screen select Basic Setup and First Steps The First steps screen is displayed Microsoft Windows Media Player 12 Note Depending on ...

Page 31: ...pp Gallery or Internet Internet and then press OK Access App Gallery App Gallery to add more Apps to your screen Access Internet Internet to browse the Internet 5 Press BACK to return to the previous page or press Home to exit 4 Type a name for your media server and then click Save changes 5 Back in the Twonky Media screen select Basic Setup and Sharing The Sharing screen is displayed 6 Browse and...

Page 32: ...m the Net TV home page and then press OK 2 Select the address bar and then press the Alphanumeric buttons to enter the URL of the website To clear the text in the address bar press BACK To display the onscreen keyboard follow the instructions on the screen 3 After you enter the URL press the Navigation buttons to select the arrow next to the address bar and then press OK to confirm 4 While browsin...

Page 33: ...n the TV to map the audio of the connected device to the audio inputs on your home theater Note If you connect your home theater to the TV through an HDMI ARC connection make sure that the TV audio is mapped to the ARC input on your home theater 6 Follow the video store instructions to rent or watch a video The video is downloaded to your SD memory card You can watch it now or at any time within t...

Page 34: ...ess OK 3 Select Video Watch 3D video Auto and then press OK Subtitle position Automatically change the position of the subtitles to fit your TV screen 1 Press Home 2 Select Setup and then press OK 3 Select Preference Auto Subtitle Shift On and then press OK 8 Change settings This section helps you to change the settings of your home theater Caution Most of the settings are already configured with ...

Page 35: ...theater uses the default language of the disc Sound Change the sound settings to suit your preference HDMI audio To hear an HDMI audio output from your TV connect your home theater to the TV through an HDMI cable 1 Press Home 2 Select Setup and then press OK 3 Select Audio HDMI Audio and then press OK 4 Select the following options and then press OK Bitstream Enable bitstream output over HDMI Auto...

Page 36: ...c subtitle 1 Press Home 2 Select Setup and then press OK 3 Select Preference Subtitle and then press OK 4 Select a subtitle language for discs and then press OK Disc menu 1 Press Home 2 Select Setup and then press OK 3 Select Preference Disc Menu and then press OK 4 Select a menu language for discs and then press OK Note If your preferred disc language is not available select Others from the list ...

Page 37: ...r cannot connect to the Philips server press Home and then select Setup Network Network Installation to set up the network Sleep timer Set timers to switch the home theater to standby after a specified time 1 Press Home 2 Select Setup and then press OK 3 Select Preference Sleep Timer and then press OK 4 Select the duration of the sleep timer The sleep timer can be set up to 60 minutes If the sleep...

Page 38: ...flash drive Update software through USB What you need A USB flash drive with at least 75MB of memory The USB flash drive must be FAT or NTFS formatted Do not use a USB hard drive A computer with Internet access An archive utility that supports the ZIP file format for example WinZip for Microsoft Windows or Stufflt for Macintosh Step 1 Download the latest software 1 Connect a USB flash drive to you...

Page 39: ...ec Bit rate mp3 MP3 MP3 32 kbps 320 kbps wma ASF WMA 64 kbps 160 kbps aac AAC AAC HE AAC 192 kbps wav WAV PCM 1 4 Mbps m4a MKV AAC 192 kbps mka MKA PCM 27 648 Mbps mka MKA Dolby Digital 640 kbps mka MKA DTS core 1 54 Mbps mka MKA MPEG 912 kbps mka MKA MP3 32 kbps 320 kbps mka MKA WMA 64 kbps 160 kbps mka MKA AAC HE AAC 192 kbps 10 Product specifications Note Specifications and design are subject t...

Page 40: ...k 40 Mbps WMV9 20 Mbps mpg and mpeg files in PS container Audio codec Video codec Bit rate PCM DTS core MPEG MP3 MPEG 1 MPEG 2 20 Mbps peak 40 Mbps MPEG 1 MPEG 2 20 Mbps peak 40 Mbps Video formats If you have a high definition TV your home theater allows you to play your video files with Resolution 1920 x 1080 pixels at Frame rate 6 30 frames per second avi files in AVI container Audio codec Video...

Page 41: ...ser Laser Type Diode InGaN AIGaN BD AIGaInP DVD CD Wave length 405 7 nm 7 nm BD 655 10 nm 10 nm DVD 790 10 nm 20 nm CD Output power Max ratings 20 mW BD 6 mW DVD 7 mW CD rm and rmvb files in RM container Available only in Asia Pacific and China Audio codec Video codec Bit rate AAC COOK RV30 RV40 20 Mbps peak 40 Mbps Amplifier Total output power 400W RMS 30 THD Frequency response 20 Hz 20 kHz 3 dB ...

Page 42: ... DivX subtitles do not display correctly Make sure that the subtitle file name is the same as the movie file name see Subtitles on page 23 Select the correct character set 1 Press OPTIONS 2 Select Character Set 3 Select the supported character set 4 Press OK 11 Troubleshooting Warning Risk of electric shock Never remove the casing of the product To keep the warranty valid never try to repair the p...

Page 43: ...rk is not disturbed by microwave ovens DECT phones or other neighboring Wi Fi devices If the wireless network does not work properly try a wired network installation see Set up the wired network on page 17 Cannot read the contents of a USB storage device Make sure that the format of the USB storage device is compatible with the home theater Make sure that the file system on the USB storage device ...

Page 44: ... disc in 2D mode 21 audio 24 audio language 35 BD Live 22 Bonus View 21 control buttons 21 DivX 23 menu language 36 options 24 picture 25 picture in picture 21 play 20 subtitle 36 12 Index 2 2D video 21 3 3D 3D disc in 2D mode 21 3D safety 9 A advanced BD Live security 23 enhanced audio 35 restore default settings 37 software update 37 software version 37 amplifier 41 audio HDMI audio 35 night mod...

Page 45: ...lay 26 multimedia content from disc 20 from online stores 32 from PC 28 from USB storage device 23 synchronize picture and sound 21 time search 24 titles 24 display panel 10 DivX character set 24 subtitles 23 VOD code 23 DLNA 28 dock your iPod or iPhone 27 E EasyLink HDMI CEC audio input mapping 33 control buttons 12 one touch play 33 one touch standby 33 system audio control 33 eject disc 10 enab...

Page 46: ...age 35 parental control 36 screen saver 37 sleep timer 37 subtitle 36 product specifications 39 N Net TV access 31 clear browsing history 32 online video stores 32 watch Net TV page 31 network home network 17 name a device 18 settings 17 troubleshooting 43 update home theater software 37 Wi Fi 18 wired connection 17 wireless connection 18 night mode 35 O one touch play 33 one touch standby 33 onli...

Page 47: ...trol 33 T time search 24 titles 24 trademarks 7 treble 20 troubleshooting connection 42 main unit 42 network 43 picture 42 play 42 serial number 6 sound 42 tuning grid 26 R radio control buttons 26 FM antenna 14 listen to radio 26 specifications 41 tune stations 26 tuning grid 26 ratings 36 recycling 9 region codes 39 remote control batteries 41 overview 10 virtual 27 rent video format SD card 32 ...

Page 48: ... navigate 4 read 4 update 5 V video HDMI deep color 34 online video 32 picture resolution 34 picture settings 34 synchronize picture and sound 21 video and slideshow 27 VOD code for DivX 23 watch 3D 21 video formats 41 video on demand format SD card 32 online video stores 32 video options 24 VOD code for DivX 23 W wired network settings 17 wired connection 17 wireless network settings 18 Wi Fi 18 ...

Page 49: ...Language Code ...

Page 50: ... 2011 Koninklijke Philips Electronics N V All rights reserved sgpjp_1127 98_v1 ...

Reviews: