background image

8

9

EN

EN


Using a High Speed HDMI cable, connect 

the 

HDMI OUT (ARC)

-

TO TV

 connector 

on your SoundBar to the 

HDMI ARC


connector on the TV. 

•  The 

HDMI ARC

 connector on the TV 

might be labeled differently. For details, 

see the TV user manual.

On your TV, turn on HDMI-CEC 

operations. For details, see the TV user 

manual. 

Note


If your TV is not HDMI ARC compliant, connect 

an audio cable to hear the TV audio through your 

SoundBar (see 'Connect audio from TV and other 

devices' on page 9).


If your TV has a DVI connector, you can use an HDMI/

DVI adapter to connect to TV. However, some of the 

features may not be available.

Connect audio from TV and 

other devices

Play audio from TV or other devices through 

your Soundbar speakers.

Use the best quality connection available on 

your TV, Soundbar, and other devices. 

Note


When your Soundbar and TV are connected through 

HDMI ARC, an audio connection is not required. (see 

'Connect to TV through HDMI (ARC)' on page 8)

TV

Option 1: Connect audio through a 

digital optical cable

Best quality audio 


Using an optical cable, connect the 

OPTICAL

 connector on your SoundBar to 

the 

OPTICAL OUT

 connector on the TV 

or other device. 

•  The digital optical connector might be 

labeled 

SPDIF

 or 

SPDIF OUT

Option 2: Connect audio through a 

digital coaxial cable

Good quality audio 


Using a coaxial cable, connect the 

COAXIAL

 connector on your SoundBar 

to the 

COAXIAL/DIGITAL OUT


connector on the TV or other device. 

•  The digital coaxial connector might be 

labeled 

DIGITAL AUDIO OUT

Option 3: Connect audio through 

analog audio cables

Basic quality audio

Using an analog cable, connect the 

AUX


connectors on your SoundBar to the 

TV

3  Connect and set 

up

This section helps you connect your SoundBar 

to a TV and other devices, and then set it up. 

For information about the basic connections of 

your SoundBar and accessories, see the quick 

start guide. 

Note


For identification and supply ratings, see the type plate 

at the back or bottom of the product.


Before you make or change any connections, make sure 

that all devices are disconnected from the power outlet.

Pair up with the subwoofer

The wireless subwoofer automatically pairs 

up with the SoundBar for wireless connection 

when you turn on the SoundBar and the 

subwoofer. 

If no audio from the wireless subwoofer can be 

heard, manually pair up the subwoofer.

Turn on the SoundBar and the subwoofer.


»

If the connection to the SoundBar is 

lost, the indicator on the subwoofer 

blinks white slowly.

Press the 

CONNECT

 (connect) button 

on the subwoofer to enter the pairing 

mode.


»

 The indicator on the subwoofer blinks 

white quickly.

On the remote control, press briefly  

,   and 

BASS +

, then within six seconds, 

press and hold 

SURROUND ON

.


»

If the pairing succeeds, the indicator on 

the subwoofer lights up white.


»

If the pairing fails, the indicator on the 

subwoofer blinks white slowly.

If the pairing fails, repeat the steps above.

Press [MUTE][MUTE] [BASS+] ,then Long 

Press [SURR ON] within 6 secs to enter to the 

pairing mode.

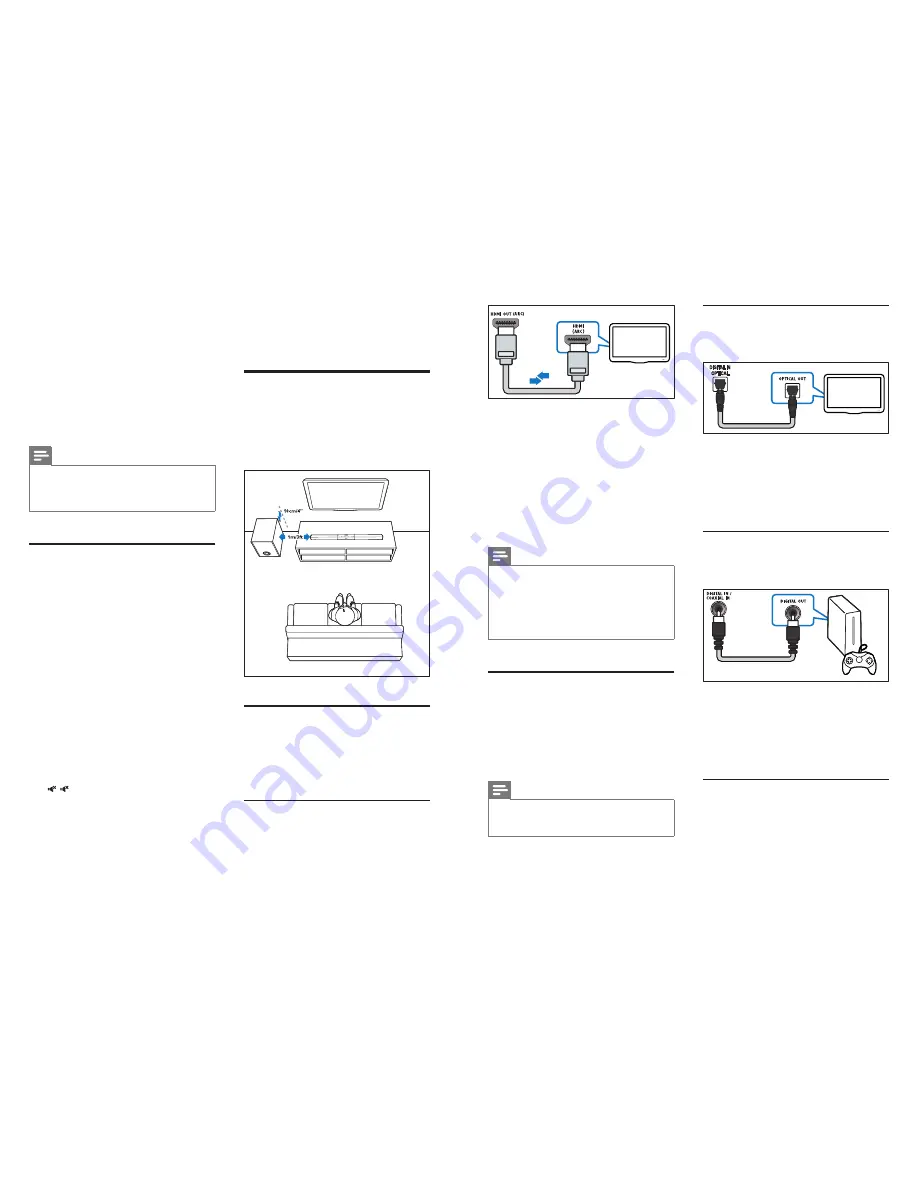
Placement

Place the subwoofer at least 1 meter (3 feet) 

away from your SoundBar, and ten centimeters 

away from the wall.

For best results, place your subwoofer as shown 

below.


Connect to TV

Connect your SoundBar to a TV. You can listen 

to audio from TV programs through your 

SoundBar. Use the best quality connection 

available on your SoundBar and TV.

Connect to TV through HDMI (ARC)

Your SoundBar supports HDMI with Audio 

Return Channel (ARC). If your TV is HDMI ARC 

compliant, you can hear the TV audio through 

your SoundBar by using a single HDMI cable.

Summary of Contents for HTL3110B/F7

Page 1: ...www philips com welcome User manual Always there to help you Register your product and get support at Question Contact Philips ...

Page 2: ...fer 8 Placement 8 Connect toTV 8 Connect audio fromTV and other devices 9 4 Use your SoundBar 11 Adjust the volume 11 Choose your sound 11 Play audio through Bluetooth 11 Play music via NFC 12 USB storage devices 13 Auto standby 13 Set display brightness 13 Apply factory settings 13 5 Update software 14 Check software version 14 Update software via USB 14 6 Wall mount 15 7 Product specifications 1...

Page 3: ...ic shock this apparatus should not be exposed to rain or moisture and objects filled with liquids such as vases should not be placed on this apparatus CAUTION To prevent electric shock match wide blade of plug to wide slot fully insert 1 Important Read and understand all instructions before you use your product If damage is caused by failure to follow instructions the warranty does not apply Help ...

Page 4: ...B Switch to USB mode AUX Switch your audio source to the AUX connection COAX Switch your audio source to the coaxial connection OPTICAL Switch your audio source to the optical connection b a c d f g h i j e l k Care for your product Use only microfiber cloth to clean the product Care of the environment Your product is designed and manufactured with high quality materials and components which can b...

Page 5: ...lect a sound mode h SURROUND ON OFF Select surround or stereo sound i AUDIO SYNC Increase or decrease audio delay j DIM Set the brightness of SoundBar display panel k NIGHT Turn night mode on or off l TREBLE Increase or decrease treble Connectors This section includes an overview of the connectors available on your SoundBar a Audio input from a USB storage device Upgrade software of this product C...

Page 6: ... up This section helps you connect your SoundBar to aTV and other devices and then set it up For information about the basic connections of your SoundBar and accessories see the quick start guide Note For identification and supply ratings see the type plate at the back or bottom of the product Before you make or change any connections make sure that all devices are disconnected from the power outl...

Page 7: ...sic with added sound effects CLEAR Hear every detail in your music and clear voices in your movies WARM Experience spoken words and music vocals in comfort PERSONAL Personalize the sound based on your preferences Surround sound mode Experience an immersive audio experience with surround sound modes 1 Press SURROUND ON OFF to turn surround mode on or off On Create a surround listening experience Of...

Page 8: ... is displayed on the display panel blinking 2 On the Bluetooth device switch on Bluetooth search for and select PHILIPS 3110B to start connection see the user manual of the Bluetooth device on how to enable Bluetooth During connection BT on the display panel blinks 3 Wait until you hear a beep sound from the SoundBar When the Bluetooth connection succeeds BT is displayed on the display panel witho...

Page 9: ...d Volume on the remote control Update software via USB 1 Check the latest software version on www philips com support Search for your model and click on Software and drivers 2 Download the software into a USB storage device a Unzip the download if zipped and make sure that the unzipped file is named HTL3110 BIN b Put the HTL3110 BIN file in the root directory 3 Connect the USB storage device to th...

Page 10: ...a connected Bluetooth device is poor The Bluetooth reception is poor Move the device closer to the SoundBar or remove any obstacle between the device and the SoundBar The connected Bluetooth device connects and disconnects constantly The Bluetooth reception is poor Move the device closer to the SoundBar or remove any obstacle between the device and the SoundBar Turn off Wi Fi function on the Bluet...

Page 11: ...Increase the separation between equipment and receiver Connect the equipment into an outlet on a circuit different from that to which the receiver is connected Consult the dealer or an experienced radio TV technician for help FCC Radiation Exposure Statement This equipment complies with FCC radiation exposure limits set forth for an uncontrolled environment This equipment should be installed and o...

Page 12: ...rme aux exigences essentielles et aux autres dispositions pertinentes de la directive 1999 5 CE German Deutsch Hiermit erklärt WOOX Innovations Limited dass sich dieser diese dieses Radio LAN device in Übereinstimmung mit den grundlegenden Anforderungen und den anderen relevanten Vorschriften der Richtlinie 1999 5 EG befindet BMWi Hiermit erklärt WOOX Innovations Limited die Übereinstimmung des Ge...

Page 13: ...Innovations Limited izjavlja da je ta radio LAN device v skladu z bistvenimi zahtevami in ostalimi relevantnimi določili direktive 1999 5 ES Spanish Español Por medio de la presente WOOX Innovations Limited declara que el Radio LAN device cumple con los requisitos esenciales y cualesquiera otras disposiciones aplicables o exigibles de la Directiva 1999 5 CE Swedish Svenska Härmed intygar WOOX Inno...

Page 14: ...Specifications are subject to change without notice 2013 Koninklijke Philips Electronics N V All rights reserved Document order number 000000000000 ...

Reviews: