testing yeast activity
Dissolve 1 tsp sugar into ½ cup lukewarm water in a measuring cup. Sprinkle 2 tsp yeast over the surface. Stir gently. Let the mixture sit
undisturbed for 10 minutes. The mixture should be foamy with a strong smell of yeast. If not, purchase new yeast.
Bread mix
Bread mixes are available in many stores. Bread mix already includes flour, salt, sugar and yeast in the right measurements, so it is convenient to
use. It also comes in many different flavours and varieties. In most cases you just have to put water or milk and butter or oil in the bread pan as
indicated in the instructions on the bread mix package, and then add the bread mix.
measuring ingredients
Perfect loaves depend on the correct amount of each ingredient. Therefore it is important that you measure ingredients correctly. Even 1 or 2
incorrectly measured tablespoons (either to much or too little) make a big difference for the end result. Never measure ingredients over the
bread pan, as you may spill excess ingredients into the bread pan.
Tip: When you have to add e.g. 280ml water, add 1 cup (250ml)of water using the measuring cup and then add 2tbsp (30ml) of water using the
measuring spoon.
storage
Store flour in an airtight container in a cool, dry place. Exposed to heat or moisture, flour loses its strength and ability to rise. Flour absorbs
flavours quickly, so store it away from onions or garlic. Store bread, sealed tightly in a plastic bag or other airtight container, at room temperature
for 1 to 2 days. French-style breads should be stored in a paper bag or exposed to the air to retain their crisp crust. They are best eaten the
same day as baked
tools
measuring spoon
- You can use the measuring spoon supplied to measure yeast, sugar, salt, milk powder and spices.
- Do not use measuring spoons to scoop up dry ingredients. Spoon dry ingredients lightly into the measuring spoon (Fig. 14).
- Heap the spoon, and then level it with the edge of a metal spatula or the straight edge of a knife. Do not press the ingredients into the
spoon, nor shake the spoon to level it (Fig. 15).
- The only ingredient that should be pressed into the measuring spoon is brown sugar. Press onto the sugar until it has the shape of the
measuring cup.
measuring cup
- Use a graduated transparent measuring cup for all liquids. Place the measuring cup on a flat surface and read the graduation at eye level. If
necessary, add or remove some liquid (Fig. 16).
cleaning and maintenance
For maximum safety, keep the appliance clean and free of grease and food residues.
Never immerse the appliance in water or any other liquid, nor rinse it under the tap.
Never use scouring pads, abrasive cleaning agents or aggressive liquids such as petrol or acetone to clean the appliance.
1
Unplug the appliance and let it cool down before you clean it.
2
After baking, immediately remove the kneading blade from the bread pan to prevent it from getting stuck.
Note: If the blade is stuck, fill the bread pan with water to a level above the kneading blade and let the bread pan soak for 30 minutes. Then remove
the kneading blade from the shaft.
3
Clean the kneading blade in hot water with some washing-up liquid. Clean the hole in the kneading blade with a wooden toothpick or a
nylon cleaning brush.
4
Clean the bread pan with a soft cloth moistened with hot water with some washing-up liquid.
Do not immerse the bread pan in water and do not clean it in the dishwasher.
5
Clean the shaft inside the bread pan with a soft cloth.
6
Rinse the inside of the bread pan with fresh water.
7
To remove the lid for easy cleaning, open the lid until it is at a 90° angle to the appliance and then lift it out of the hinge on the
appliance. (Fig. 17)
8
Wipe the lid with a moist cloth.
Do not clean the lid in the dishwasher.
9
Wipe the inside and outside of the appliance with a moist cloth.
Do not use chemical oven cleaners.
10
Dry all parts thoroughly with a soft dry cloth before you reassemble the appliance.
11
To reassemble the lid, insert the lid into the hinge and then close it. (Fig. 18)
storage
1
Wind the mains cord round the cord storage hooks in the bottom of the appliance (Fig. 19).
2
Store the appliance in a safe, dry place.
Environment
- Do not throw away the appliance with the normal household waste at the end of its life, but hand it in at an official collection point for
recycling. By doing this, you help to preserve the environment (Fig. 20).
EnglisH
15
Summary of Contents for HD9020
Page 1: ...HD9020 ...
Page 2: ...2 ...
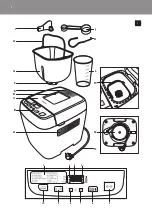
Page 3: ...3 B A D E G H N O 1 2 3 4 10 5 9 8 7 6 M J K L I F C 1 ...
Page 4: ...4 ...
Page 163: ...163 ...
Page 164: ...164 ...
Page 165: ...165 ...
Page 166: ...166 1 2 2 3 2 1 4 5 6 7 8 9 10 11 12 13 14 15 16 1 2 17 1 2 18 19 20 ...
Page 167: ...167 ...
Page 168: ...4222 003 4020 1 ...


