2-7
PCS 103 733
17
English
TUNER
DIGITAL
SOUND
CONTROL
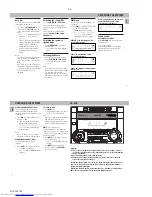
STANDBY-ON
PROGRAM
DIM
MINI HIFI SYSTEM
C D 1 • 2 • 3
BAND
TAPE 1 • 2
TAPE
VCD
TUNER
AUX
PRESET
▲
▲
TUNING
▲
▲
▲ ▲
STOP• CLEAR
SEARCH
PLAY• PAUSE
PREV
NEXT
D
B
B
VIDEO
O
P
TI
M
AL
JA
ZZ
R
O
CK
TE
C
H
N
O
DSC
RECORD DUBBING A.REPLAY
VOLUME
MICROPHONE - LEVEL
PAL/NTSC
CLOCK•TIMER
RETURN
PBC
Note:
– For 'EASY SET' feature, please refer to
page 11.
Tuning to radio stations
1
Press
TUNER
(BAND) to select TUNER
mode.
™
“
TUNER
” will be displayed.
A few seconds later, the current radio
frequency will be displayed.
2
Press
TUNER
(BAND) again to select
the desired waveband : FM or MW.
3
Press
à
or
á
for more than one
second, then release.
™
The display will show “
SEARCH
”
until a radio station with sufficient
signal strength is found.
• Repeat this procedure until the desired
station is reached.
• To tune to a weak station, briefly press
à
or
á
repeatedly until the display
shows the desired frequency and/or
when the best reception has been
obtained.
Storing Preset Stations
You can store up to 40 radio stations in the
memory. When a preset radio station is
selected, the preset number appears next
to the frequency on the display.
Automatic programming
1
Press
TUNER
(BAND).
2
Press
PROGRAM
for more than one
second.
™
The
PROG
flag starts flashing and
“
AUTO
” will be displayed.
™
The system will search for every
available station in the FM waveband
first, then search the MW waveband.
™
All available stations will be stored
automatically. The frequency and
preset number will be displayed
briefly.
™
The system will stop searching when
all the available radio stations are
stored or when the memory for 40
preset radio stations is used.
™
The system will remain tuned to the
last stored preset radio station.
Notes:
– You can cancel the automatic
programming by pressing PROGRAM or
Ç
(on the system only).
– If you want to reserve a section of
preset numbers, for example preset
numbers 1 to 9, select preset 10 before
starting automatic programming, only
the preset numbers 10 to 40 will be
programmed.
Manual programming
1
Press
TUNER
(BAND).
2
Press
TUNER
(BAND) again to select
the desired waveband : FM or MW.
3
Press
PROGRAM
for less than one
second.
™
The PROG flag starts flashing.
™
The next available preset number will
be displayed for selection.
4
Press
à
or
á
to tune to the desired
frequency.
• If you wish to store the radio station to
another preset number, press
4
or
3
to
select the desired preset number.
5
Press
PROGRAM
again.
™
The PROG flag disappears and the
radio station will be stored.
• Repeat
steps 3 – 5
to store other preset
radio stations.
18
English
TUNER
KARAOKE
Notes:
– When 40 radio stations are stored and
you attempt to store another radio
station, the display will show
"
PROGRAM FULL
”. If you want to
change an existing preset number,
repeat steps 3 – 5.
– You can cancel manual programming by
pressing
Ç
(on the system only).
– During programming, if no button is
pressed within 20 seconds, the system
will exit program mode automatically.
Tuning to Preset Radio
Stations
• Press
4
or
3
to select the desired
preset number.
™
The preset number, radio frequency,
and waveband appear on the display.
Changing the MW tuning grid
(for specific version only)
The frequency step can be changed if
necessary. In North and South America, the
frequency step between adjacent channels
in the MW band is 10 kHz. In other parts of
the world, it is 9 kHz. The frequency step
preset in the factory is 9 KHz.
For MW Band
To change from 9 kHz to 10 kHz or vice
versa
Changing of tuning grid will erase all
previously stored preset stations.
1
Disconnect the system from the AC
power supply
(pull out the AC power
cord).
2
Press and hold
TUNER
and
TUNING
á
while reconnecting the system to
the AC power supply.
™
Display will show “
GRID 10
” or
“
GRID 9
”.
Notes:
– GRID 9 indicates that the tuning grid is
in step of 9 kHz in MW band. GRID 10
indicates that the tuning grid is in step
of 10 kHz in MW band.
– FM tuning grid will also be changed
from 50 kHz to 100 kHz or vice versa. All
preset stations will also be erased.
MICROPHONE - LEVEL
Microphone Mixing
1
Set the
MIC LEVEL
control to the
minimum level to prevent acoustic
feedback (e.g. a loud howling sound)
before you connect the microphone.
2
Connect a microphone to the
MICROPHONE
socket.
3
Press
VCD
,
TUNER
,
TAPE
or
AUX
.
4
Play the selected source.
5
Adjust the volume level with
VOLUME
control.
6
Adjust the
MIC LEVEL
control to the
mixing level that you want.
7
Start singing or talking through the
microphone.
Note:
– Keep the mic away from the speakers to
prevent howling


