background image

E

n

g

li

sh

21

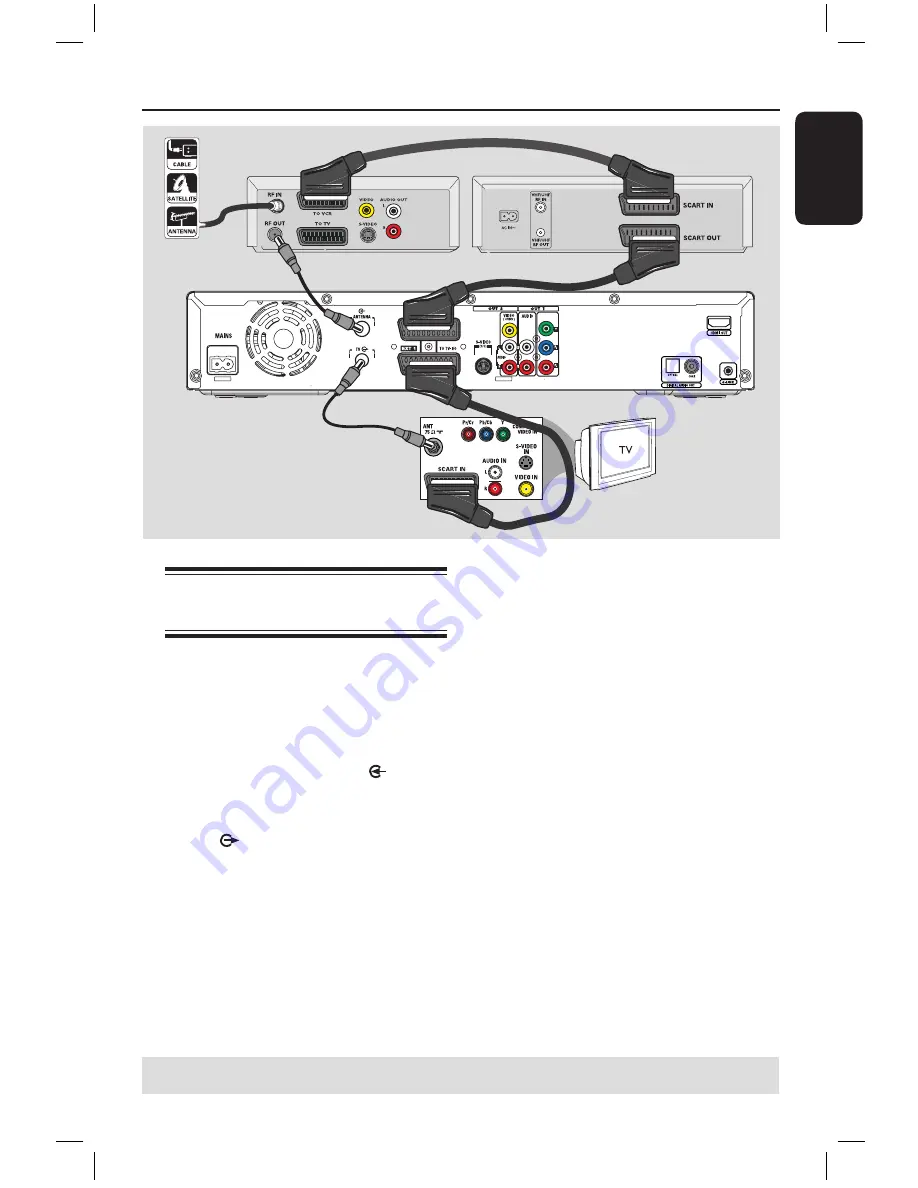
Connecting to a VCR and 
Cable Box/Satellite Receiver

A

 Keep the existing antenna connection to 

the Cable Box/Satellite Receiver.

B

 Use the supplied RF coaxial cable to 

connect the antenna output (RF OUT) 
socket on the Cable Box/Satellite 
Receiver to the 

ANTENNA

   socket 

on the recorder.

C

 Use another RF coaxial cable to connect 

the 

TV


 socket on the recorder to the 

antenna input socket on the TV.

D

 Use the scart cable to connect the  

EXT1 TO TV-I/O

 socket on the 

recorder to the corresponding SCART 
input socket on the TV.

���
����

��
���

���
����

��
����

Step 2: Optional Connections 

(continued)

B

A

C

D

E

Back of a Satellite Box
(example only)

Back of a VCR

(example only)

E

 Use another scart cable to connect the 

EXT2 AUX-I/O

 socket on the recorder 

to the Scart output socket (or labelled as 
TV OUT or TO TV) on the VCR.

F

 Use another scart cable to connect the 

Scart input socket (or labelled as TV IN 
or TO DECODER) on the VCR to the 
Scart output socket (or labelled as TV 
OUT or TO VCR) on the Cable Box/ 
Satellite Receiver.

F

TIPS: 

Refer to your optional connected devices’ user manual for other possible connections.

dvdr7300h_eu_eng2.indd   21

2005-10-04   4:14:03 PM

Summary of Contents for DVDR7300H/05

Page 1: ...User Manual 6 Bedienungsanleitung 96 cover_dvdr7300h_18581 indd 1 2005 10 04 4 22 07 PM ...

Page 2: ...een or green and yellow Before replacing the plug cover make certain that the cord grip is clamped over the sheath of the lead not simply over the two wires Copyright in the U K Recording and playback of material may require consent See Copyright Act 1956 and The Performer s Protection Acts 1958 to 1972 Norge Typeskilt finnes på apparatens underside Observer Nettbryteren er sekundert innkoplet Den ...

Page 3: ...rschriften und entsorgen Sie Ihre Altgeräte nicht mit dem normalen Haushaltsmüll Die korrekte Entsorgung Ihres Altgerätes ist ein Beitrag zur Vermeidung möglicher negativer Folgen für die Umwelt und die menschliche Gesundhei Disposal of your old product Your product is designed and manufactured with high quality materials and components which can be recycled and reused When this crossed out wheele...

Page 4: ...r intellectual property rights Use of this copyright protection technology must be authorized by Macrovision and is intended for home and other limited viewing uses only unless otherwise authorized by Macrovision Reverse engineering or disassembly is prohibited U S Patent Numbers 4 631 603 4 819 098 4 907 093 5 315 448 and 6 516 132 GUIDE Plus SHOWVIEW VIDEO Plus G LINK are 1 registered trademarks...

Page 5: ...5 English 6 Deutsch 96 Index English Deutsch Index cover_dvdr7300h_18581 indd 5 2005 10 04 4 22 13 PM ...

Page 6: ...lus system 26 27 GUIDE Plus Using the GUIDE Plus system 28 31 GUIDE Plus system introduction 28 Quick access functions 28 GUIDE Plus menu bar 29 31 Watch TV Control TV Programmes 32 Switching on to TV programme 32 Pause live TV function 32 Instant replay function 32 FlexTime function 32 Recording Before Recording 33 35 About temporary HDD storage Time Shift video bar 33 Default recording settings ...

Page 7: ...58 Repeat Scan Shuffle 59 Using the Toolbar options 60 61 Edit Recordings Edit Recordings Hard Disk 62 66 Changing the title name 62 Selecting the genre 62 Video editing 63 66 Edit Recordings Recordable DVD 67 71 About editing recordable DVDs 67 Index Picture screen 67 Deleting recordings titles 68 Protecting the recorded titles DVD RW 68 Changing the disc title name 69 Making the edited DVD RW com...

Page 8: ...tent permanently We recommend that you copy the important video content to a recordable DVD disc as backup Care and Safety Information CAUTION High voltage Do not open You run the risk of getting an electric shock The machine does not contain any user serviceable parts Please leave all maintenance work to qualified personnel Setup precautions Finding a suitable location Place the set on a flat hard ...

Page 9: ...ces pages 19 23 Step 3 Basic installation and set up pages 24 25 Step 4 GUIDE Plus set up pages 26 27 Please take time to read this user manual before using your recorder It contains important information and notes regarding operation of the DVD recorder Helpful Hints If you have questions or if problems come up during operation see the chapter Troubleshooting If you need further assistance call t...

Page 10: ...them from being deleted Product Information continued FlexTime You can watch or recall a TV programme while it is still being recorded You do not have to wait until the end of the recording before starting playback You can also watch a different programme from the hard disk while it is recording something else Instant Replay You can repeat a scene of a live TV programme by pressing JUMP BACK butto...

Page 11: ...ard search Stops playback recording j Starts recording the current TV programme or the current video input source Marks the title in the time shift buffer for recording onto the HDD Lights up while recording to the HDD or recordable DVD is in progress Sockets behind the flap Flip down the door as indicated by the OPEN label at the right hand corner k S VIDEO S video input for SVHS Hi8 camcorders or...

Page 12: ... to disc mode or displays the disc content menu h CHANNEL While in tuner mode selects the next or previous TV channel or the external input source EXT1 EXT2 CAM1 Skips to the next page up or down in the GUIDE Plus system i Day Day Skips to the previous or next day in the GUIDE Plus system Skips to the previous or next title chapter track Hold down this button for fast reverse or fast forward searc...

Page 13: ... right or select the previous next scene Cursor buttons for moving up down or select previous next title in the temporary HDD storage during playback t STOP Stops playback recording Hold down this button to open or close the disc tray u PAUSE Å Pauses the playback or recording Press repeatedly to advance a paused picture one frame at a time v PLAY Starts playback of the selected title track w TIME...

Page 14: ...erate the system A Aim the remote control directly at the remote sensor iR on the front panel B Select the source you wish to control by pressing TUNER or DISC MENU button C Select the desired function for example Using the alphanumeric keypad to enter the characters Press a number button repeatedly until the required character or the number appears To enter language dependent characters press or ...

Page 15: ...ions A Connect the existing Antenna Satellite Cable TV signal or from the Cable Box Satellite Receiver labelled as RF OUT or TO TV to the ANTENNA socket on the recorder B Use the supplied RF coaxial cable to connect the TV socket on the recorder to the antenna input socket or labelled as VHF UHF RF IN on your TV Helpful Hint Depending on how you have currently connected your TV channel directly fr...

Page 16: ...to this recorder Helpful Hints If your TV displays a selection for the SCART socket select VCR as the source for the SCART socket The EXT2 AUX I O socket is intended only for additional devices Option 2 Using the S Video socket Use an S video cable not supplied to connect the S VIDEO Y C socket on the recorder to the S Video input socket or labelled as Y C or S VHS on the TV Audio connection is re...

Page 17: ...io input socket or labelled as AV IN or AUDIO IN on the TV C Once you have completed the necessary connections and the recorder basic installation set up turn on the progressive scan feature see page 83 Option 5 Connecting to a HDMI compatibleTV HDMI High Definition Multimedia Interface is a digital interface that allows pure digital video transmission without the loss of image quality A Use an HDM...

Page 18: ...io input sockets of the connected device Helpful Hint If you have connected this recorder to your TV using the OUT1 Y PR PB sockets then connect the audio cables to the OUT1 AUDIO L R sockets as described in page 17 Option 2 Using the digital audio socket Optical or Coaxial You can connect the recorder to an AV amplifier receiver in order to enjoy multichannel surround sound Use a coaxial cable not...

Page 19: ... or TO TV on the Cable Box Satellite Receiver D Connect the supplied G LINK cable to the G LINK socket on the recorder E Place the other end of the G LINK transmitter in front of the Cable Box Satellite Receiver near to the IR sensor remote sensor so that its infrared detector can receive a clear signal This will enable the recorder to receive data from the GUIDE Plus system and control the tuner ...

Page 20: ... user manual for other possible connections B Use the supplied RF coaxial cable to connect the TV socket on the recorder to the antenna input socket or labelled as VHF UHF RF IN on your TV C Use the scart cable to connect the EXT1 TO TV I O socket on the recorder to the corresponding SCART input socket on the TV D Use another scart cable to connect the EXT2 AUX I O socket on the recorder to the Sc...

Page 21: ...on the recorder to the corresponding SCART input socket on the TV Step 2 Optional Connections continued B A C D E Back of a Satellite Box example only Back of a VCR example only E Use another scart cable to connect the EXT2 AUX I O socket on the recorder to the Scart output socket or labelled as TV OUT or TO TV on the VCR F Use another scart cable to connect the Scart input socket or labelled as T...

Page 22: ...uality Use an i LINK 4 pin cable not supplied to connect the DV IN socket on the recorder to the appropriate DV OUT socket on the camcorder Press CAM on the remote control repeatedly to select CAM2 when using this input source Helpful Hints You can also use the DV IN to connect this recorder to a Personal Computer that has a DV output socket The PC must have an IEEE 1394 Firewire connector It is n...

Page 23: ...ecorder to the corresponding S VHS or Video output socket on the camcorder Press CAM on the remote control repeatedly to select CAM1 when using this input source B Use an audio cable red white not supplied to connect the AUDIO L R sockets at the front panel of the recorder to the audio output socket on the camcorder Helpful Hint If you connect your camcorder to the scart socket at the rear of this...

Page 24: ... similar feature downloading of the TV channels will start automatically When the data transfer is complete press OK on the remote control to continue with the time date download Next go to step G CIMEMA LINK Loading data from TV OR If Language and Country menu appears on the TV use keys to select the desired menu language and press to confirm LANGUAGE AND COUNTRY Select language and country Langua...

Page 25: ...y Time Date Done 20 01 31 01 2005 OK Disc tray will not open until setup is completed i If the information is correct select Done in the menu and press OK ii If changes are required use the alphanumeric keypad 0 9 to enter the correct time and date in the respective field H The basic installation is now completed Easy setup completed Continue with GUIDE Plus installation Continue Do not Install now...

Page 26: ...the entry menu Use keys to enter the local postal code and use keys to move to previous or next entry field Note The postal code you enter must be correct and must represent a postal code in the identified country If not you will receive no or incorrect TV listings data External Receiver 1 2 3 Note If you do not have an external receiver connected leave the fields as None and press the Red button on ...

Page 27: ...t host channel setup is set to Automatic I Once complete press GUIDE to exit the menu 1 Leave the recorder in standby mode during the night to load the TV listing data 2 If you use an External Receiver you have to tune your External Receiver manually to your host channel see below table for details Leave the External Receiver ON overnight Note If you tune to your Host Channel before going into sta...

Page 28: ...on Box Displays short programme descriptions or help menus E Menu Bar Displays the GUIDE Plus menus and your current selection F Grid Tiles Displays the TV listings information by channel and time seven days in advance If certain channels are missing go to the Editor screen to check and change the channels see page 31 Quick access functions There are several features integrated in the GUIDE Plus s...

Page 29: ...me Press to go directly to the previous day s or the next day s TV listings C Press OK to start viewing Search screen The Search screen allows you to locate the programme listings by category It enables you to quickly and easily find something of interest to watch or record A Select Search and press B Use keys to select a search category Movies Sport Children Others or My Choice C Use keys to selec...

Page 30: ...ords Use keys to enter your keywords and press OK to confirm Repeat this step to add more keywords up to 16 E Press OK to activate your profile Using the GUIDE Plus system continued TIPS Press Blue button to return to the current time in the Grid screen Press GUIDE to exit the menu Schedule screen The Schedule screen allows you to examine delete and edit the scheduled recordings Additionally you are...

Page 31: ...to 24 hours Editor screen The Editor screen is the central location for you to manage your channels Every change in the Editor leads to a change in the Grid You can assign programme numbers to the TV channels switch a channel On or Off and select a channel source Tuner External Receiver Editor A Select Editor and press The display of the Editor screen depends on the specific TV reception environmen...

Page 32: ...ime Shift Buffer see next page Pause liveTV function Sometimes you might be interrupted when watching your favourite TV programme or match Now you can pause the show by pressing PAUSE Å on the remote control and press PLAY to resume playback It behaves exactly as if you were in control of the live broadcast If you want to return to the live TV programme just press TUNER Instant replay function Whe...

Page 33: ... Warning The temporary HDD can only store up to 6 hours of TV programmes All the contents will be cleared when you press STANDBY ON 2 to turn off the recorder In addition executing the following actions will also clear the contents in the temporary HDD storage Press CAM on the remote control Enter to Setup or Record mode option in the system setup menu Yes No This action will clear the Time Shift ...

Page 34: ...eyed out that means the feature is not available or not possible to change at the current state E To exit press SYSTEM Record Mode settings chart Record Mode HQ high quality SP standard play SPP standard play plus LP long play EP extended play SLP super long play SEP super extended play Hours of recordings can be stored on the Ł HDD or an empty DVD recordable disc 1 2 2 5 3 4 6 8 DVD R DVD RW HDD ...

Page 35: ... Deletes and edits on the recorded titles are not possible Off Turns off the function Chapters Automatically divides a recording title into chapters by inserting chapter markers at a specific interval This enables you to access a specific point in the recording quickly Off No chapter marker is inserted in the recording Standard Chapter markers are inserted automatically during recording at approxima...

Page 36: ...in the GUIDE Plus system Record 1 Program will appear at the right end of the video bar The recording will stop automatically at the end of the TV programme If you want to record the following TV programme press REC again If the TV programme data is not available in the GUIDE Plus system pressing REC again will set the recording time in 30 minute increments up to a maximum of 6 six hours C To stop...

Page 37: ...B Use keys to select a title in the HDD content menu and press PLAY to start playback Playback from DVD Press OPEN CLOSE ç on the recorder s front panel and load in a disc to start playback Playback from other device This is only possible if this recorder is connected to the TV using the EXT1 TO TV I O socket Press TV HDD to view the picture from the device which is connected to the EXT2 AUX I O s...

Page 38: ...tellite Receiver The feature is only applicable for the Satellite Receiver or any similar devices that is connected to the EXT2 AUX I O scart socket of this recorder In addition the Satellite Receiver must have a timer function that is able to control the recording function of this recorder A Ensure that the Sat record mode in the recording setting is set to EXT2 see page 35 B Use the Satellite Re...

Page 39: ...start and duration of TV channel recordings If a TV programme starts earlier or ends later than was scheduled this recorder will then turn on and off at the correct time Timer recording GUIDE Plus system To schedule a recording with the GUIDE Plus system simply select the desired programme from the channel list A Turn on the TV to the correct programme number for the recorder e g EXT 0 AV B Turn o...

Page 40: ...m is decrypting the programming number and transforming it into a scheduled event If an incorrect programming number is entered you have to select the correct programme number manually Follow the instructions on the TV to edit the date and time E The default recording settings are displayed in the pink tile To make changes press the matching colour coded button on the remote control Frequency Pres...

Page 41: ...enter the programme channel F Press the Green button to confirm and go to the next parameter A virtual keyboard appears on the TV for entering the title name G Once complete store the setting by pressing the Green button for The scheduled manual recording will be displayed H The default recording settings are displayed in the pink tile To make changes press the matching colour coded button on the r...

Page 42: ...een appears C Press to select a timer programme which you want to delete edit To delete the timer programme Press the Red button on the remote control for To edit the timer programme Press the Green button on the remote control for and follow the instructions on the TV to make the necessary changes entry To edit the Frequency Timing Highlight the respective tile in the menu and press the Red butto...

Page 43: ...he contents will be cleared when you start camcorder recording A Connect your Digital Video or Digital 8 camcorder to the DV IN socket of this recorder see page 22 B Turn on the TV to the correct programme number for the recorder e g EXT 0 AV C Press CAM on the remote control A warning message appears Hard Disk Recordable DVD Cancel Switching to camera mode will clear the Time Shift Buffer Select ...

Page 44: ...nts Some camcorders cannot be controlled using this recorder s remote control Mixing of PAL and NTSC video format recording on a same recordable DVD is not possible If a part of the tape is blank the recorder will pause recording Recording will restart automatically when there is a recordable signal However if there is more than 5 five minutes of blank tape the recording will end automatically A ch...

Page 45: ...the actual recordable time to the HDD or a recordable DVD see page 35 Record to Hard Disk or recordable DVD continued E To continue select to record to Hard Disk or Recordable DVD in the menu and press OK to confirm All the contents in the temporary HDD storage will be cleared except for the marked recordings Otherwise select Cancel in the menu and press OK to abort the operation F Press CHANNEL re...

Page 46: ... the menu and press OK to confirm All the contents in the temporary HDD storage will be cleared except for the marked recordings Otherwise select Cancel in the menu and press OK to abort the operation E Press CHANNEL repeatedly to select the correct input channel that matches the connected socket of the device CAM 1 S VIDEO or VIDEO socket at the front EXT 1 EXT1 TO TV I O scart socket at the back ...

Page 47: ...HQ SP SPP LP EP SLP SEP 25 mins 12 5 mins 10 mins 8 mins 6 mins 4 mins 3 mins Hours of recordings can be stored in an empty 4 7GB recordable DVD 1 2 2 5 3 4 6 8 The following information will be stored on the disc Recording mode Title name of recording Date and time of recording Index picture of title Discs for recording Three different types of DVD recordable discs can be used with this recorder ...

Page 48: ...0 INFO 1 1 COPY PROTECT 13 01 00 M4 28 02 2005 CHILD LOCK E Use keys to select a title to copy F Press the Green button on the remote control for COPY The making disc copy information appears R Making Disc copy Title CH8 10 05 JAN 101 Length 52 min Available space 183 min Archiving Time 13 min START CANCEL If you are using a DVD RW for recording you can press to select the space in the disc where ...

Page 49: ...c tray opens automatically D Write the same disc number on the disc and disc s cover for easy locating of the appropriate disc next time then press OK to exit Finding a recorded title To do this the recorded disc data must have been stored in the Disc Library The appropriate disc does not have to be in the recorder A Press HDD BROWSER on the remote control B Press to select Disc Library then press...

Page 50: ... C Use keys to select a title and press PLAY to start playback D During playback you can use the following buttons on the remote control to access additional playback features move to the beginning or previous next chapter hold down this button for fast backward forward search Press the button again to increase the search speed x4 x8 x32 while in pause mode start slow motion playback move to the p...

Page 51: ...tles by the genre you have specified Last Played Lists the titles by the sequence of titles last played Delete Protect a title in the HDD A number of editing options are displayed at the bottom of the HDD content menu They can be accessed via the matching colour coded buttons on the remote control A Press HDD BROWSER on the remote control The content menu appears HDD DELETE TITLES 2 2 ABC 28 02 200...

Page 52: ...n when a button is pressed it means the function is not available on the current disc or at the current time DVD discs and players are designed with regional restrictions Before playing a disc make sure the disc is for the same region zone as your player Starting disc playback A Press STANDBY ON 2 to turn on the recorder B Press OPEN CLOSE ç on the front of the recorder You can also hold down the ...

Page 53: ...s STOP Playing a Super Video CDs Super Video CDs may feature PBC Play Back Control This allows you to play the video CDs interactively following the menu on the display A Insert a Super Video CD If the disc index menu appears use the alphanumeric keypad 0 9 to input your selection or use keys to select a play option and press OK to confirm To return to the previous menu press BACK on the remote con...

Page 54: ...ormation on the album track and artist will also be displayed on the TV if this is included in the ID tag If both JPEG pictures and MP3s are in the same disc only the JPEG pictures can be played back This recorder does not support MP3PRO audio format Playing a JPEG image file slide show You can display JPEG pictures in the selected roll automatically one after the other at adjustable intervals A In...

Page 55: ... seconds interval D To stop playback press STOP Playback from Disc continued Helpful Hints If both JPEG pictures and MP3s are in the same disc only the JPEG pictures can be played back Some types of JPEG file cannot be played on this recorder It may require longer time for the recorder to display the disc content on the TV due to the large number of songs pictures compiled into one disc For a non s...

Page 56: ...al cameras Photo album contains different JPEG pictures created from the rolls You can delete an album without deleting the pictures of the rolls CONTENT Video Audio Photo PHOTO ROLLS PHOTO ALBUMS DVD SORTING BROWSER Adding photos to an album A Insert a JPEG photo CD CD DVD RW DVD R The content menu appears B Press repeatedly until the PHOTO ROLLS and INFO menus appear C Select a photo roll folder...

Page 57: ...e respective fields and press OK and EDIT to exit the menu EDIT ALBUM INFO Set album name date EDIT Toolbar Edit Name Edit Date To delete the album Select the album and press the Red button on the remote control for DELETE D Press OK to show the thumbnail pictures overview Overview Alb0001 REMOVE MOVE SELECT ROTATE 8 50 E Use keys to select the photo which you wish to move and press the Yellow butt...

Page 58: ...ter then press to select the title chapter number Searching forwards backwards You can fast forward or fast reverse a disc during playback and select a desired search speed A During playback hold down reverse or forward until the search speed status bar 4X or 4X appears on the TV The sound will be muted B Press the reverse or forward repeatedly to cycle through the different search speed 4X 8X 32X...

Page 59: ...rt of the marked segment The segment is repeated until the repeat mode is cancelled C To cancel repeat playback press the Blue button once again Scan disc for CD VCD DVD R RW disc only This function allows you to preview the first 10 seconds of each track on the disc A During playback press the Red button on the remote control The recorder skips to the next track after 10 seconds of playback B To r...

Page 60: ...tiple subtitle languages You can change to the language you want while playing DVD This function can also be accessed via the Green button on the remote control A Press to select Subtitle and press to enter its options B Press repeatedly until the language you want is selected then press to confirm The languages may be numbered or abbreviated such as En for English Helpful Hint Some DVDs discs allo...

Page 61: ...his option allows you to enlarge the picture on the TV screen and to pan through the enlarged picture A Press to select Zoom and press to enter zoom in mode The zoom status bar appears and displays the zoom factor Zoom 2 END ZOOM OUT ZOOM IN B Press the Blue button on the remote control to zoom in or Yellow button to zoom out C Use keys to pan through the zoomed picture D To exit zoom mode press t...

Page 62: ...menu appears HDD Title name CLEAR P01 28 03 05 12 04 Genre Video edit C Select Title name in the menu and press D Use keys to change the character number or make an entry by using the alphanumeric keypad 0 9 Use keys to move to the previous or next field To switch between upper and lower case characters press a A on the remote control To clear the title name press the Red button on the remote contr...

Page 63: ... start automatically HDD EDIT Exit NO CHAPTER CHAPTER DIVIDE HIDE PAUSE 00 00 00 01 02 Video bar In the video bar the record playback head represents the actual position of the playback D Press the matching colour coded button on the remote control to access the options displayed at the bottom of the menu Explanation of the options are provided in the following pages NO CHAPTER Red button Select t...

Page 64: ...pter before it If the two chapters were hidden then the joined chapter will also be hidden Title Chapter 1 Chapter 2 Chapter 3 Chapter 4 Chapter 1 Chapter 2 Chapter 3 Title Chapter 1 Chapter 2 Chapter 3 Chapter 4 Chapter 2a Title Chapter 1 Chapter 2 Chapter 3 Chapter 4 Chapter 1 Chapter 3 Chapter 4 Chapter 1 Chapter 3 Chapter 4 Chapter 2b for example chapter 2 is being selected BACK Select this to...

Page 65: ...om the current point of playback DVD R RW Title1 Title 2 Title 3 Title1 Title2 for example title 1 is being selected Hiding unwanted scenes You can choose to hide certain scenes for playback e g skipping a commercial scene or make the hidden scene visible again A During HDD recording playback press EDIT on the remote control B Hold down keys or use keys on the remote control to search for the scen...

Page 66: ...reen button for STOP SHOW Otherwise cancel the operation by pressing the Blue button on the remote control for CANCEL Helpful Hints All the hidden chapters will be played back while in video editing mode The selection of scenes to hide or show can only be done within a title Hidden scenes Deleting all chapter markers During recording the chapter marker is set automatically at a specific interval if...

Page 67: ...ting RW Disc name CLEAR Compatible Finalise Title name Video edit Index Picture screen The Index Picture screen shows your recordings on a recordable DVD It should appear on the TV once you load a recordable DVD or when playback is stopped TITLES 2 2 Static lights The Pianist The island of lost dream Lord of the Rings The T Habla Con Ella The Ring 00 22 08 SPP 14 01 03 01 20 00 SPP 21 02 03 00 32 ...

Page 68: ...K on the remote control to proceed For DVD RW disc Empty Title will appear in the Index Picture screen where the title was deleted The empty space can be used for new recordings For DVD R disc Deleted title will appear in the Index Picture screen where the title was deleted During playback the deleted title will be skipped Otherwise select Cancel in the menu and press OK to abort the operation Pro...

Page 69: ...s you to make an edited DVD RW compatible with other players A Insert a recorded DVD RW into the recorder B Press EDIT on the remote control The editing menu appears C Use keys to select Compatible in the menu and press OK to confirm If the option is not available for selection it means that the disc is already compatible Finalising the DVD R for playback It is necessary to finalise a DVD R disc bef...

Page 70: ...control The video editing menu appears RW SHREK EDIT MODE EDIT Exit NO CHAPTERS CHAPTER TITLE HIDE PAUSE 00 00 00 01 02 E Press the matching colour coded button on the remote control to access the options displayed at the bottom of the menu NO CHAPTER Red button Select this to erase all the chapter markers in the current title CHAPTER Green button Select this to access chapter editing menu RW SHRE...

Page 71: ...e divided into two titles Warning Once a title has been divided it cannot be reversed BACK Select this to return to the previous screen INDEX PIC Select this to use the current scene as the index picture Note In the Index Picture screen normally the first frame of a recording is shown as the title s index picture HIDE SHOW Blue button Select this to hide or show the current chapter Helpful Hints Al...

Page 72: ...anged the setting press OK to confirm and back to the previous selected item Instructions and explanations of the options are provided in the following pages If the selection in the menu is greyed out that means the feature is not available or cannot be changed in the current state D To exit press SYSTEM Note For Recording see page 35 DV Specials Preferences Date Time Sound Preferences Sound mode N...

Page 73: ... connected audio video device is compatible with Dolby Surround Dolby Digital and MPEG 2 multi channel are mixed to a Dolby Surround compatible two channel output signal Night mode This mode optimises playback of sound at low volume High volume outputs will be softened and low volume outputs are brought upward to an audible level This feature is only applicable for DVD video discs with Dolby Digit...

Page 74: ...ol to set the childlock on or off Note This recorder can memorise settings for 50 discs On Turns on child lock function A four digit pin code must be entered in order to play the locked disc or title in the HDD Off All discs can be played Change pin Use the alphanumeric keypad 0 9 to enter your new four digit pin code You must enter the same pin code again to confirm it To cancel your change press ...

Page 75: ...ystem Time date Analogue Ch Video output Setup C Press repeatedly to view the available setup options then press to access Instructions and explanations of the options are provided in the following pages If the selection in the menu is greyed out that means the feature is not available or cannot be changed in the current state D To exit press SYSTEM Jump forward System Setup Eco mode Second RC Sys...

Page 76: ...help text and colour button bar will be removed from the display Normal The help text will be removed from the menu Display Select the brightness of the recorder display panel Bright Normal brightness Dimmed Medium brightness Off Turns off the display Jump forward Set the amount of time you want to skip ahead in tuner mode when you press the JUMP FWD button on the remote control press OK to confirm...

Page 77: ...ng the time date information XXX Select the TV channel to use for transmitting preset number the time date information Off Select this before setting the time date manually If the time date is incorrect you must manually set the time date here Time 00 00 Use keys to set the hours and minutes press to move to the next digit field Once complete press OK Date 31 01 2005 Use keys to set the day month a...

Page 78: ...ecorder s remote control If the recorder finds the same TV channel as on the TV it stores it as P01 TV 02 will then appear on the display panel If no video signal is received from the TV NO TV will appear 2 Use the TV s remote control to select programme number 2 at your TV then press OK on the recorder s remote control Repeat the above steps until you have assigned all the TV channels Note Press B...

Page 79: ...set channel name press OK and the Green button for STORE Maximum four characters for preset channel name Decorder If the current TV channel is transmitted by coded TV signals that can only be viewed properly with a decoder which is connected to the EXT2 AUX I O socket you need to activate the connected decoder On Select this to allocate the connected decoder to this TV channel Off Turns off the de...

Page 80: ...quired and you have connected the recorder to yourTV using theY Pb Pr see page 17 On Turns on progressive scan mode Off Disables the progressive scan mode Note The progressive video output will be disabled if the HDMI output is turned on Video settings for HDMI connection only HDMI This feature is only applicable for HDMI connection see page 17 Auto Turns on the HDMI output The video output resolu...

Page 81: ...you want to enjoy the multi channel audio output through your HDMI connection Disable Select this if the connected device is not able to output the sound through the HDMI connection or the playback audio format is not supported by HDMI connection e g projector SACD Note Make sure that you have alternative audio connection from the recorder to your TV or the display device for the sound output see ...

Page 82: ...ss OSD Off Off Full Display Bright A Get the version information of this recorder by pressing SYSTEM on the remote control and select Setup System Version Info in the menu Write down the information for your current software version B Visit the Philips website www philips com support to check the availability of the latest firmware upgrade Download the firmware to a CD ROM C Press OPEN CLOSE ç on th...

Page 83: ...ss to select On E Read the instructions on the TV and confirm your action by pressing OK The setup is now completed and you can start to enjoy the high quality picture Otherwise select Cancel and press OK to go back to the previous menu F To exit the menu press SYSTEM If no picture A Disconnect the recorder s MAINS from the power supply B Hold down on the recorder whilst reconnect its MAINS to the ...

Page 84: ... Yes but only if the VHS tape or DVD is not copy protected What are Titles and Chapters A DVD disc contains Titles and Chapters which are similar to the Titles and Chapters of a book A Title is often a complete movie and is broken down into Chapters or individual scenes from the movies Title Chapter Title Chapter Chapter Chapter Chapter chapter markers Programmes are recorded as a single title The...

Page 85: ...mpletely free from noise HDMI is fully backward compatible with DVI As required by the HDMI standard connecting to HDMI or DVI products without DHCP High bandwidth Digital Content Protection will result in no Video or Audio output What is video upscalling With Video Upscalling you can increase the resolution of the DVD video signals from SD Standard Definition to HD High Definition The High Definitio...

Page 86: ... from the power outlet 2 Press and hold down STANDBY ON button on the front of the recorder while reconnecting to the power outlet 3 Release STANDBY ON button when IS THE TV ON appears on the display All the information stored in the memory programmes time will be cleared You may need to reset the recorder settings after completing the basic installation Aim the remote control directly at the sens...

Page 87: ...close the tray 4 Hold down button number 5 on the remote control until the tray closes This recorder will start the repair process 5 If the disc is recovered the Picture Index screen will appear Observe the following Error during recording The title may be missing Error while changing the title index picture The original title index picture may be visible Error while finalising The disc appears not...

Page 88: ...stem Menu Options Analogue Channel settings Fine Tuning for details Do not connect any cables from this recorder to the Phono input of your amplifier If you are playing a DTS CD you must use the COAXIAL or OPTICAL DIGITAL AUDIO OUTPUT socket of this recorder to connect to the Hi Fi system or amplifier If a recording is too short it is possible that a DVD player cannot detect it Observe the following...

Page 89: ...owView programming number of the desired TV channel 2 Press OK to confirm 3 Check the channel number in the Ch input field If this does not correspond to the desired TV channel select this entry field and change the channel number 4 Press OK to confirm You can finalise the disc using the following function 1 Press OPEN CLOSE on this recorder to open the disc tray 2 Insert the disc but do not close the ...

Page 90: ...e sure that you have activated this recorder as the HDMI input in the settings for the device you are using See HDMI setting HDMI connection can only be made to HDMI equipped devices with HDCP High Bandwidth Digital Content Protection If you wish to connect to a DVI connector equipped with HDCP you will need a separate adaptor DVI to HDMI Make sure the resolution of this recorder matches the devic...

Page 91: ...ections RF antenna in RF TV out Scart 1 CVBS S Video RGB out Scart 2 CVBS S Video RGB in Component Video out Progressive S Video out Video out CVBS Audio left right out Digital audio out coaxial Optical out G LINK part of GUIDE Plus HDMI out Mains Front Connections DV input i LINK S Video in Video in Audio left right in Convenience Programming Timer enhancement Automatic Satellite recording Mon Fr...

Page 92: ...ical obstruction CLOSING Disc tray is closing COMPATIBLE The recorder is busy making changes to make the disc DVD compatible COPY PROT The DVD video cassette you are trying to copy is copy protected CREATE MENU After the first recording has been successfully complete on a new disc the menu structure is created DISC ERR An error occurred when writing the title If this happens often clean the disc or...

Page 93: ...AL signal Insert a new disc or use a disc containing PAL recordings OPENING Disc tray is opening PAL DISC A disc with PAL recordings has been inserted and an attempt was made to record an NTSC signal Insert a new disc or use a disc containing NTSC recordings PHILIPS The recorder has been turned on PHOTO MMM NNN Number of the current photo for Photo mode MMM represents the order of the current phot...

Page 94: ...gid plates coated with a thin magnetic media Magnetic heads record data on the rapidly spinning disks This facilitates the reading and writing of large amounts of data at high speed JPEG A very common digital still picture format A still picture data compression system proposed by the Joint Photographic Expert Group which features small decrease in image quality in spite of its high compression ra...

Page 95: ...d hich pite of ression n Picture 3 By W can gular l audio l rolling on a u can io isplays an e played only play u can on the th more ng olour S Video usic want he back ideo to dvdr7300h_eu_eng2 indd 95 2005 10 04 4 16 19 PM ...

Reviews: