background image

23

R

ECORDING

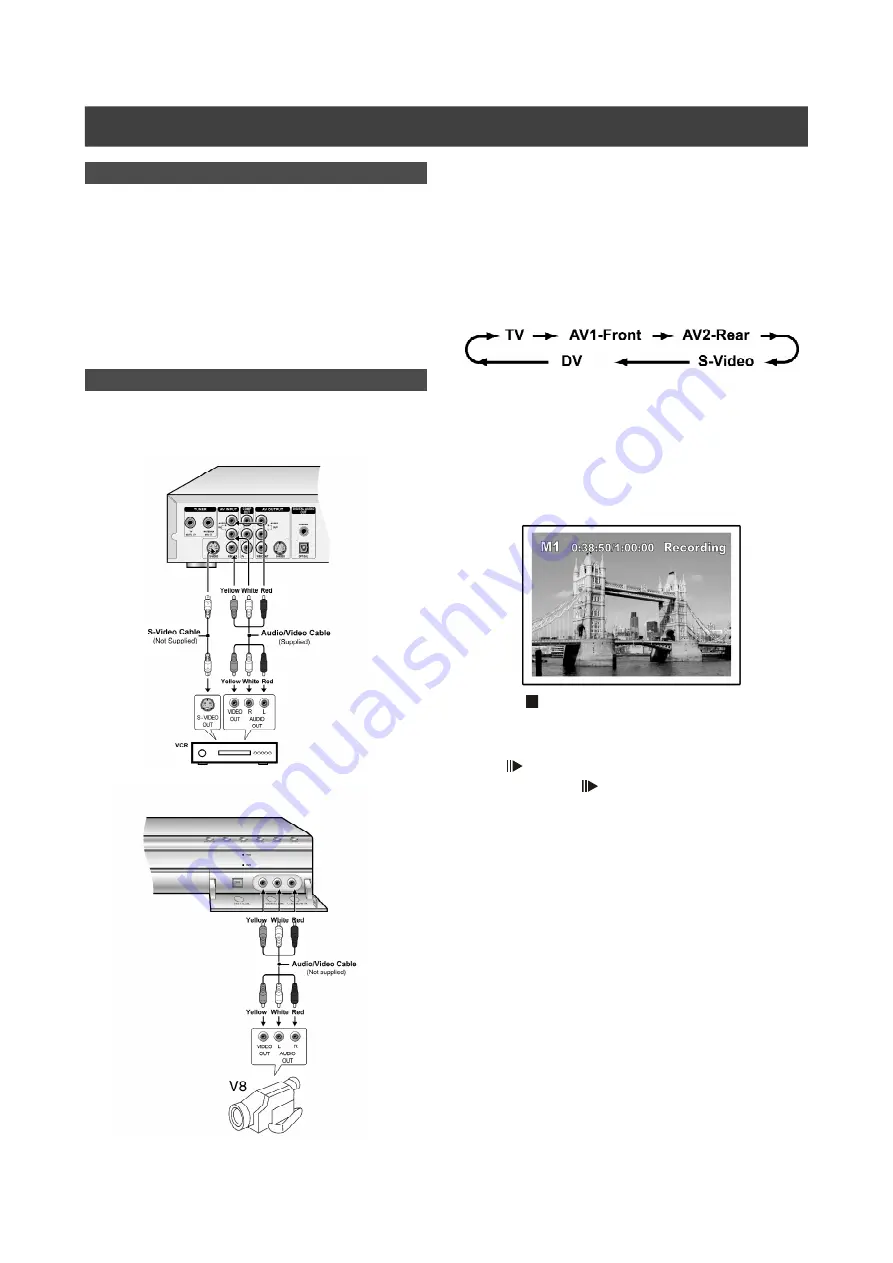
Recording from a VCR or Camcorder

Before starting to record

This DVD recorder can accept standard CVBS (RCA) analog
audio/video cable or IEEE-1394 cable and record Camcorder
onto DVD in the digital video format of your choice. The unit
functions much like a digital VCR. Examples of use include
archiving videotapes or transferring from a Video Cassette
Recorder or Camcorder to a recordable DVD disc or hard disk
drive. This DVD recorder allows basic DV control with the DVD
Recorder’s remote control when connected via the DV Link.

The front panel and rear panel connection

Connect a Video Cassette Recorder or Camcorder to the unit’s
input terminals.

To start recording

1. Press the [HDD/DVD] button to set the target

device for the recording.

2. Press [SOURCE] to select the signal-input (TV,

AV1 Front, AV2 Rear, S-Video, DV).

3. Start to play on the VCR or Camcorder.

4. Press [RECORD]  to capture your video/audio
signal from the VCR or Camcorder onto a recordable
DVD disc or hard disk.

5.Press [   STOP] to stop recording.

To pause recording

Press [ 

 PAUSE] to pause recording. If you want to restart

recording, press the [ 

 PAUSE] button to resume recording.

Summary of Contents for DVDR520H/69

Page 1: ...y 20 RECORDING Before recording 21 Recording television programs 21 Adding new recordings 22 Changing chapter intervals 22 Playing back the last recorded session 22 Recording from a VCR or Camcorder 23 One touch record 24 DV recording 24 DV control 26 TABLE OF CONTENTS TIMER RECORDING Setting the timer 26 Timer Record using the G Code system 27 FLEX TIME Pausing Live TV Broadcast 29 Record and Pla...

Page 2: ... convenience receptacles and the point where they exit from the product 16 Outdoor Antenna Grounding If an outside antenna or cable system is connected to the product be sure the antenna or cable system is grounded so as to provide some protection against voltage surges and built up static charges Article 810 of the National Electrical Code ANSI NFPA 70 provides information with regard to proper g...

Page 3: ...nitude to constitute a risk of electric shock to humans The exclamation point within an equilateral triangle is intended to alert the user to the presence of important operating and mainte nance servicing instructions in the literature accompanying the appliance CAUTION POWER button Disconnect the main plug to shut the power off completely The POWER button in any position does not disconnect the m...

Page 4: ...TO CD SACD When placing an unplayable disc on the disc tray the DVD recorder will display Unknown Disc on the display panel after attempts of trying to loading the disc fail n Region code of DVD Video This unit can playback DVD VIDEO discs compatible with the region code printed on the rear of the unit Example of playable DVD VIDEO disks n Audio System Dolby Digital Linear PCM DTS Digital Theater ...

Page 5: ...om the front of the unit The Remote Control 1 CH CH buttons 2 Open Close button OPEN CLOSE 3 Copy button COPY 4 Flex Timer button FLEX TIME 5 Numeric buttons 0 1 9 6 Guide button GUIDE 7 Navigation button NAVI 8 Source button SOURCE 9 Disc menu button DISC MENU 10 Cursor pqtu OK buttons OK 11 Play button PLAY 12 Stop button STOP 13 Skip buttons PREVIOUS NEXT 14 Record button RECORD 15 HDD DVD butt...

Page 6: ...e 7 OPEN CLOSE Button Opens or closes the disk tray 8 PLAY Button Plays a disk 9 STOP Button Stops playing or recording a disk 10 HDD DVD Button Press to switch between HDD and DVD 11 RECORD Button Starts recording 12 SOURCE Button Select equipment connected to the line inputs 13 FRONT AV VIDEO AUDIO L R Jacks Connects the input of external equipment CONTROLS AND DISPLAYS 1 Play indicator 2 DVD in...

Page 7: ... VIDEO Jack S Video signal input 3 AV2 Rear VIDEO AUDIO L R Jacks Composite signal input 4 COMPONENT VIDEO OUTPUT Y Pb Pr Jacks Component signal output 5 LINE OUT VIDEO AUDIO L R Jacks Composite signal output 6 LINE OUT S VIDEO Jack S Video signal output 7 DIGITAL AUDIO OUT COAXIAL Jack Connects an amplifier or receiver having a digital input jack 8 DIGITAL AUDIO OUT OPTICAL Jack Connects an ampli...

Page 8: ...ore using the unit follow the steps below to connect the unit to the antenna cable and TV Connecting to a TV with COMPOSITE jacks Use a RF cable supplied to connect the ANTENNA IN on the unit to the antenna outlet Use a RF cable same as supplied to connect the TV OUT on the unit to the RF input on the television Use AUDIO VIDEO cables supplied to connect the AUDIO VIDEO output on the unit to the a...

Page 9: ...r video output connections In this configuration the Red and White audio cable connections are required refer to the section titled For better Audio Quality 2 Connecting to a TV via COMPONENT out Connecting to a TV with component jacks Use COMPONENT cables not supplied to connect the COMPONENT output on the unit to the COMPONENT input on the television Notes 1 Enter system setup to enable COMPONEN...

Page 10: ...mplifier with Dolby Digital and DTS decoders to enjoy surround sound Digital out optical Use a fiber optic cable not supplied to connect the DIGITAL OUT OPTICAL digital optical output on the unit to the digital optical input on an stereo amplifier or a receiver Digital out coaxial Use a coaxial cable not supplied to connect the DIGITAL OUT COAXIAL coaxial digital output on the unit to the coaxial ...

Page 11: ...vision Before using the unit follow the steps below to connect the unit to the cable box and TV Connecting to a satellite box or a cable box with COMPOSITE jacks Use AUDIO VIDEO cables to connect the AUDIO VIDEO output of the unit to the AUDIO VIDEO input on the cable box or satellite receiver ...

Page 12: ...ote Check that the clock is correctly set before initiating the timer recording function If the clock is set incorrectly Timer Record results may not be accurate Setting Audio in AUDIO category Digital Output PCM Bit Stream Enable digital audio output with PCM or encoded data DTS Out ON OFF Setting Aspect ratio in PLAYBACK category Select 4 3 regular or 16 9 widescreen to suit your television If y...

Page 13: ...ific order If the channel assignment of your TV content provider is changed or if you are reinstalling this DVD recorder you may need to start this procedure again This will replace the TV channel stored with the new ones Before scanning channel set the TV signal and country for initiation 1 Ensure the antennas are securely connected to the DVD recorder 2 Switch on the TV set and the DVD recorder ...

Page 14: ...press SYSTEM MENU select TV TUNER Utilities Edit channel and press OK Or press SOURCE to set TV as the input signal source and press EDIT Either way the Channel Editor menu will be displayed Swapping TV channels This function allows you to manually swap the TV channel order stored in the unit to match the TV channel order stored in your TV set 1 Press p q to select a TV Channel and press u 2 Press...

Page 15: ...s contained in the G Code programming number This 9 digit G Code programming number is found in most TV listings magazines Before setting up confirm that the all cables are securely connected Setting up G Code system CHANNEL EDITOR Turning on or turning off TV channels manually After you have performed the channel scanning process you may like to add or delete some of the TV channels This function...

Page 16: ...ge number icon 6 Press PAUSE to pause playback Press PLAY to resume normal playback Press STOP to stop playback Playback picture files 1 Press GUIDE to display the Guide menu 2 Press p q to select Playback and then press OK 3 Press p q to select DVD or HDD and then press OK 4 Press p q to select Pictures and press OK 5 Press t u p q to select a picture file you want to play and press OK If you wan...

Page 17: ...ecorded title on HDD only 1 Press GUIDE to display the Guide menu 2 Press p q to select Playback and then press ENTER 3 Press p q to select HDD and press OK 4 Press p q to select Last Record and press OK Playback of the title last recorded on your HDD will begin 5 Press PAUSE to pause playback Press PLAY to resume normal playback Press STOP to stop playback at a marked stop Press STOP twice to bri...

Page 18: ...ing Press STOP to stop recording Press PAUSE to pause recording Note When placing an recordable DVD disc on the disc tray the disc preparation process will take place in the background This process only takes a few moments Timer Record Date Time Setting 1 Press GUIDE to display the Guide menu 2 Press p q to select Timer Record and then press OK 3 Press p q to select Date Time Setting and press OK ...

Page 19: ...lect Recording mode and press OK Note For Timer Record there are seven recording modes for recording on DVD disc M1 M2 M2x M3 M4 M6 and Just Fit The Just Fit recording mode is only applicable when recording onto DVD disc When the recording mode is set to be Just Fit the recording mode will be automatically adjusted depending on how much recording space is available on the disc If you select TV in ...

Page 20: ...open the disc tray and insert a recordable DVD disc Press the button again to close the tray The disc preparation process will take place in the background This process only takes a few moments 5 Press p q t u to select the file to copy and press OK 6 When complete go to EXIT and press OK Copy From DVD to HDD 1 Press GUIDE to display the Guide menu 2 Press p q to select Copy and press OK 3 Press p...

Page 21: ...le DVD disc 5 You cannot add new recording to DVD R discs after the disc is finalized 6 In some cases you may not be able to add new recording to the recordable DVD discs that contain contents written on other DVD recorders RECORDING 1 Press STANDBY ON to turn the unit on 2 Press the HDD DVD button to set the target device as HDD or DVD If DVD is selected as the target device press OPEN CLOSE to o...

Page 22: ...GUIDE select RECORD and press OK Follow the steps to set the recording mode 3 Before you start please ensure that the DVD disc or hard disk has enough available space for the recording session 4 You cannot change the channel or recording mode during recording RECORDING Change Chapter Intervals Adding new recordings Playback the last recorded title on HDD only Press uPLAY or GUIDE to start the play...

Page 23: ...rol with the DVD Recorder s remote control when connected via the DV Link The front panel and rear panel connection Connect a Video Cassette Recorder or Camcorder to the unit s input terminals To start recording 1 Press the HDD DVD button to set the target device for the recording 2 Press SOURCE to select the signal input TV AV1 Front AV2 Rear S Video DV 3 Start to play on the VCR or Camcorder 4 P...

Page 24: ...nput screen and press OK on the remote control 1 Power on your TV and this DVD recorder 2 Connect the DV cable IEEE 1394 4 pin to 4 pin cable to both the DV Camcorder and the DVD Recorder 3 Power on the DV Camcorder Start Playback mode on the DV Camcorder 4 Pause the DV Camcorder at where you want to record 5 Press GUIDE on the remote control This activates the Guide menu 6 Press p q to select the...

Page 25: ...record DV contents This unit allows basic DV control on screen The on screen functions are accessed using the DVD recorder remote control 1 Power on your TV and this DVD recorder 2 Press the HDD DVD button to set the target device for the recording If DVD is set as the target device press OPEN CLOSE to open the disc tray and insert a recordable DVD disc with the label side facing up 3 Connect the ...

Page 26: ...start to record follow the steps to set the date time picture quality and channel of the program or input source manually You can set up 16 individual sessions in the Timer Recording function TIMER RECORD 8 Press t u p q to select the Repeat once daily or weekly and then press OK to bring up the list If you select Once you need to set the date Move the cursor to highlight date and press OK Use the...

Page 27: ...Record function To stop recording during Timer Record When you press STOP it may take a few seconds for the record to stop TIMER RECORD Timer Record using the G Code system 1 Press STANDBY ON to turn the unit on 2 Press TIMER to display the Timer Record menu 3 Press p q to select an item from the timer setting list and press OK to activate the setup menu for the Timer Record function 4 Press t u p...

Page 28: ...en press OK to bring up the list Press p q t u and OK to make your selection 10 Press p q to select OK to save the setting for the timer record item and go back to the Timer Record list 11 Press p q to go to another item on the list and press OK if you want to set up for more Timer Record programs If not move to the EXIT icon and press OK to exit the Timer Record List 13 Press STANDBY ON to turn o...

Page 29: ...press the FLEX TIME button 5 When you are back in front of the TV and ready to resume viewing press uPLAY and the TV program will begin playing starting from the interrupted scene 6 Press F F or REW to perform fast forward or fast rewind scanning to the point where FLEX TIME begins Press PAUSE to pause viewing Press PAUSE again if you want to resume viewing 7 Press FLEX TIME to turn the time shift...

Page 30: ...D or ODD to playback the contents saved DVD VCD SVCD video disc playback Before you begin to enjoy the digital world of audio and video on DVDs please ensure that you have made the correct settings in the Setup menus These settings should correspond to the capabilities of your home system Having made the correct settings you are now ready to use the DVD recorder to enjoy DVDs Video CDs and CDs Pre...

Page 31: ... 3 3 Press t to correct a mistake Press t repeatedly to move back to the digit where you entered a wrong number and re enter the correct one Press OK to start playback from the specified time Notes Moving the cursor left through each menu takes you to the previous level Moving the cursor left at the first menu selection closes the dialog box PLAYBACK SUBTITLE During playback to select a subtitle l...

Page 32: ... DVD icon depending what the source is set as and press OK to change the setting 4 Press t u to move the highlight to the Video icon and press OK to view the file menu with thumbnails If you want to view the text menu move the highlight to the Text View icon and press OK 5 Press p q t u to move the highlight to the file you want to start playback and press OK 6 Press PAUSE to pause playback Press ...

Page 33: ...f you want to change the playback device press t u p q to move the highlighted cursor to the HDD icon or DVD icon depending what the source is set as and press OK to change the setting 4 Press t u to move the highlighted cursor to the Pictures icon and press OK to view the file menu with thumbnails If you want to view the text menu move the highlighted cursor to the Text View icon and press OK 5 P...

Page 34: ...ss p q to go to the PLAYBACK icon and press OK 4 Press p q to select HDD or DVD to play the files from and press OK Note Music and picture files can be played concurrently when these files are saved onto the same device 5 Press p q to go to the Pictures with music icon and press OK The browser menu of picture files will be displayed first 6 Press p q t u to select the picture file to start playbac...

Page 35: ...he BROWSER button to browse the files 5 Press p q t u to move the highlighted cursor to the file to be copied and press COPY The file is then copied to the DVD disc Note Note 1 Title name chapter markers for video titles as well as thumbnail picture markers you see in the browser menu are also copied 2 The chapter markers in the copied version may not be in exact the same positions as the original...

Page 36: ...30 characters for a name You can not leave the title column blank Protecting a title HDD and DVD You can protect the title from accidental erasure or editing when you activate the protect function When protection is turned ON the title can t be edited or erased If you do need to edit it you must first unlock the file 1 Press BROWSER to display the Browser menu 2 Press t u p q to select the title y...

Page 37: ...e same recording quality as the title selected will display 4 Press t u p q to select the title to merge and then press OK 5 To merge more titles repeat from step 2 to 4 Or press p q to select EXIT and then press OK to exit the setting Setting a title thumbnail HDD and DVD Normally the first picture of a recording is used as the index picture However you can choose any picture from the recording a...

Page 38: ...t to during playback 6 To insert chapter marks in more titles repeat from step 2 to 5 Or press p q to select EXIT and then press OK to exit the setting Note You can NOT insert chapter marks to recorded title s on a DVD R disc if the disc is finalized Erasing Chapter Mark During playback you can set and erase chapter mark s within a title 1 Press BROWSER to display the Browser menu 2 Press t u p q ...

Page 39: ...scanning Press repeatedly to play the title forward or reverse 5 During playback you can press OK to hide a chapter 6 To hide mores chapters repeat from step 2 to 5 Or press p q to select EXIT and then press OK to exit the setting Note Note 1 You can NOT hide chapters within recorded title s on a DVD R disc if the disc is finalized 2 This function is not applicable to titles without chapter marks ...

Page 40: ...r HDD and press OK Press OK to start erasing The erasing process will take place 4 When complete go to EXIT and press OK Finalize make compatible CAUTIONS For DVD R disc Finalizing is necessary when you want to play discs recorded with this unit on other DVD players or PCs with a DVD drive Once the disc has been finalized you can not add recording s to it or edit it Note For DVD RW discs finalizin...

Page 41: ...nd press OK to exit Note The Cleanup operation will permanently delete the files being selected Defragment HDD only The Defragment process reorganizes the contents of the HDD creating continuous blocks of available space 1 Press Disk Tools to display the Disk Tools Menu 2 Press p q to select Defragment and then press OK The defragment operation begins 3 When the Defragment process is completed pre...

Page 42: ... OSD Select a system operating language The options are Menu Language Select a menu operating language The options are English Traditional Chinese Simplified Chinese French Spanish Malay Audio Language Select a audio operating language The options are English Traditional Chinese Simplified Chinese French Spanish Malay Subtitle Language Select a subtitle operating language The options are English T...

Page 43: ... Set the default quality of recording M1 M2 M2x M3 M4 M6 Chapter Mark Set the interval of chapter auto insertion while recording Off 5 10 15 20 25 30 mins 1 Press SYSTEM MENU to display the system menu 2 Press p q to select System Language Playback Record Audio TV Tuner or EXIT and press u or press t to return to preview layer 3 Press p q to select the item and press u or OK 4 Press p q to set the...

Page 44: ...le discs created in VR Video Recording mode allow the contents to be programmed or edited DVD R DVD R is a recordable disc that is the same size as a DVD Video Contents can be recorded only once to a DVD R and will have the same format as a DVD Video DVD RW DVD RW is a recordable and rewritable disc DVD RW use a recording format that is comparable to a DVD Video format Interlace output NTSC the vi...

Page 45: ...G FORMAT DVD VR M1 M2 M2x M3 M4 M6 mode Dolby Digital 2 channel AUDIO FORMAT Supported Playback Analog output 2channel Digital output coaxial optical Format supported LPCM Dolby Digital MPEG AUDIOPERFORMANCE DAConverter 24 bit 96KHZ ADConverter 24 bit 96KHZ Signal Noise 1kHz 90dB Dynamic Range 1kHz 80dB Channel Separation 1kHz 110dB Total Harmonic Distortion 1kHz 65dB TUNER TVformat PAL CONNECTION...

Page 46: ......

Reviews: