background image

Audio and Subtitle Languages  27

Audio Language

Some DVDs are recorded in different languages. You may be able
to watch the same movie in French, Spanish, etc. The movie may
have special audio features, such as a director’s commentary or
music soundtrack. If these are available on the DVD, access the
different languages or featured soundtracks by following these
steps.

1

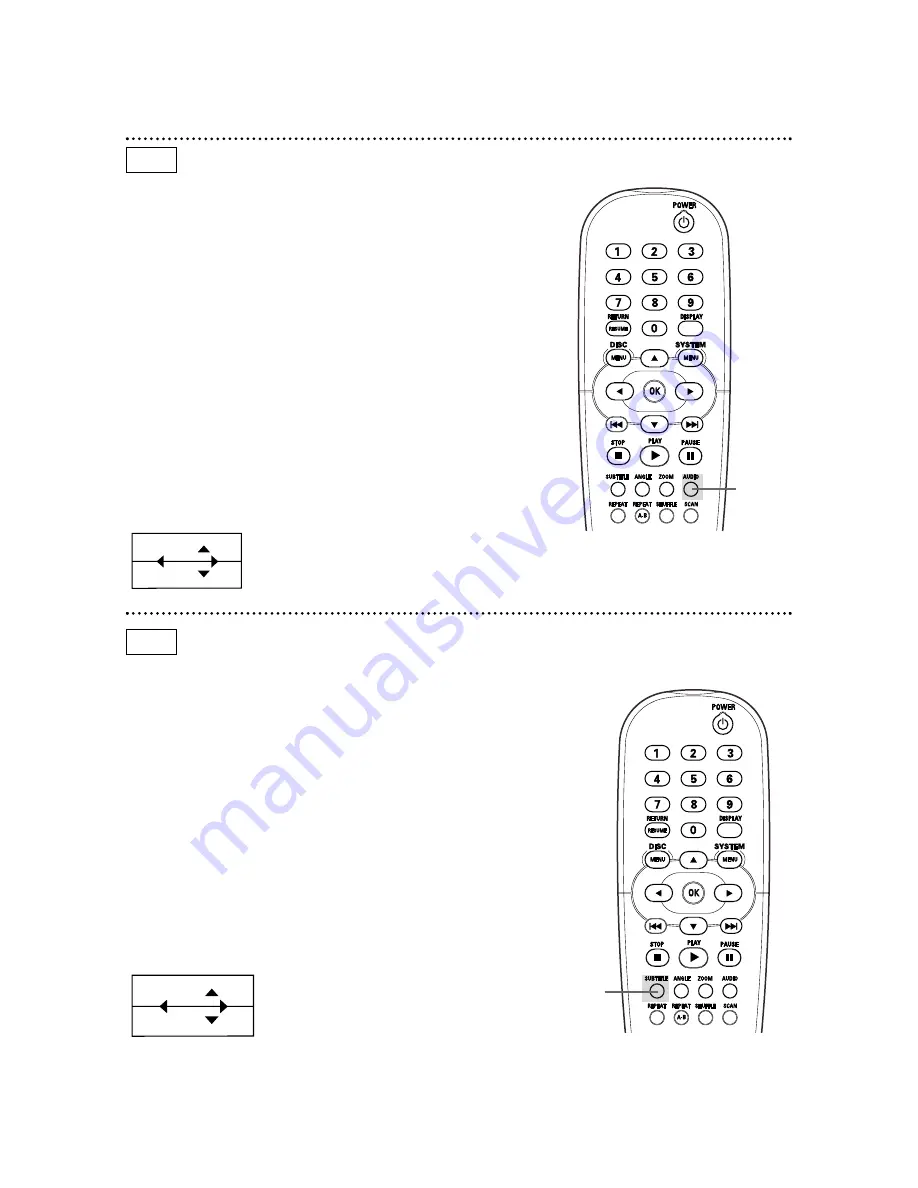
During DVD playback, press the AUDIO button. 

Y

Audio will be selected in the menu bar.

2

Within five seconds, press the AUDIO button repeatedly
to see the different languages available. 
Or, press 

o

or 

p

repeatedly to see the different languages. The language you select
will be audible in a few seconds. The menu bar will disappear
automatically in a few seconds.

Subtitles

Some DVDs include subtitles in different languages. To choose
subtitles, follow these steps.

1

During DVD playback, press the SUBTITLE button. 

Z

Subtitle will be selected in the menu bar.

2

Within five seconds, press the SUBTITLE button repeat-
edly to see the different subtitle languages. 
Or, press 

o

or

p

to see the different subtitle languages. Subtitles will appear after

a few seconds. The menu bar will disappear automatically in a few
seconds. 
You can choose subtitles only if they are available on the DVD.

1en

Z

1,2

1en

Y

DVD

DVD

1,2

Summary of Contents for DVD870L/001

Page 1: ...d everything you need to get started If you have any problems Philips Representatives can help you get the most from your new product by explaining Hookups First Time Setup and Feature Operation Do not attempt to return this product to the store For fast help call us first 1 800 531 0039 Thank you for making Philips a part of your home ...

Page 2: ...er to get the most from your PHILIPS product you must return your Warranty Registration Card within 10 days So please mail it to us right now Know these safetysymbols This bolt of lightning indicates uninsulated material within your unit may cause an electrical shock For the safety of everyone in your household please do not remove product covering The exclamation point calls attention to features...

Page 3: ... 40 41 Advanced DVD Player Setup and Features TV Shape 42 Video Shift 43 Color Settings SmartPictureTM 44 Digital Output 45 Sound Analog Output 46 Subwoofer Cut off Night Mode 47 Karaoke Vocal Language 48 Bit Rate Indicator Help Text 49 Information You May Need Helpful Hints 50 51 Glossary 52 Specifications 53 Limited Warranty 54 55 Index 56 Manufactured under license from Dolby Laboratories Dolby...

Page 4: ... radiate radio frequency energy and if not installed and used in accordance with the instructions may cause harmful interference to radio communications However there is no guarantee that interference will not occur in a particular installation If this equipment does cause harmful interference to radio or television reception which can be determined by turning the equipment off and on the user is ...

Page 5: ...g 16 Damage Requiring Service The appliance should be serviced by qualified service personnel when A The power supply cord or the plug has been damaged or B Objects have fallen or liquid has been spilled into the appliance or C The appliance has been exposed to rain or D The appliance does not appear to operate normally or exhibits a marked change in performance or E The appliance has been dropped...

Page 6: ...r if the Disc has a menu you can access the Disc Menu by pressing DISC MENU on the remote control Details are on pages 16 and 26 DVD Player Menus Some instructions explain how to use the DVD Player s menu or the System Menu to set up features of the DVD Player or the Disc You get to the DVD Player Menu by pressing SYSTEM MENU on the remote control Even if a feature is set up in the DVD Player s me...

Page 7: ... symbols below on your DVDs If these region symbols do not appear on your DVD you cannot play the DVD in this DVD Player The number inside the globe refers to a region of the world Region 1 represents the United States Canada upper regions of North America Bermuda the U S Virgin Islands and small regions near Australia A Disc encoded in a specific region format can play only on DVD Players with th...

Page 8: ...ing the disposal of packaging materials exhausted batteries and old equipment Safety Information Do not expose the system to excessive moisture rain sand or heat sources Place the DVD Player on a firm flat surface Keep the DVD Player away from domestic heating equip ment and direct sunlight When placing the DVD Player in a cabinet allow about one inch of space all around the DVD Player for ventila...

Page 9: ... 75 ohm you will need an adapter in order to connect the DVD Player to the TV Ask your electronics retailer for details The DVD picture still will exceed the quality of videotapes and other analog recordings Digital audio connections provide the clearest sound Connect one of the DVD Player s DIGITAL AUDIO OUT jacks COAXIAL or OPT ical OUT to your Stereo Receiver for the best sound quality If digit...

Page 10: ...t of the Left and Right AUDIO OUT jacks on the DVD Player Connect the other end of the cables to the left right AUDIO IN jacks on the TV Match the cable colors to the jack colors 3 Connect the power cords of the DVD Player and the TV to the power outlet Turn on the power of the TV and the DVD Player 4 Set the TV to the correct Component Video In channel Such channels may be called AUX or AUXILIARY...

Page 11: ...the power outlet Turn on the power of the TV and the DVD Player 4 Set the TV to the correct S Video In channel This channel might be near channel 00 See your TV owner s manual for details Or continue to change channels at the TV until you see the DVD Player s screen saver on the TV screen Hookups cont d 11 Connecting to a TV Only TV has an S Video In Jack Back of TV example only COAXIAL DIGITAL AU...

Page 12: ...Connect the supplied red and white audio cables to one set of the Left and Right AUDIO OUT jacks on the DVD Player Connect the other end of the cables to the left right AUDIO IN jacks on the TV Match the cable colors to the jack colors 3 Connect the power cords of the DVD Player and the TV to the power outlet Turn on the power of the TV and the DVD Player 4 Set the TV to the correct Audio Video In...

Page 13: ...ou only need one video connection 2 Connect the supplied red and white audio cables to one set of the Left and Right AUDIO OUT jacks on the DVD Player Connect the other end of the cables to the left right AUDIO IN jacks on the Stereo Receiver Match the cable colors to the jack colors 3 Connect the power cords of the DVD Player Stereo Receiver and TV to the power outlet Turn on the power of the TV ...

Page 14: ...onnection 3 You may connect a subwoofer not supplied to the SUB WF OUT jack on the DVD Player Follow the instructions sup plied with the subwoofer 4 Connect the power cords of all the equipment to power outlets Turn on the power of the TV Stereo Receiver and DVD Player 5 Set the TV to the correct Video In channel These channels often are near channel 00 See your TV manual Or change TV channels unt...

Page 15: ...y briefly Black Level Shift If you set the DVD Player to NTSC set Black level shift to On This will improve the color contrast during Disc playback Black level shift has no effect if the DVD Player is set to PAL To set Black level shift to On follow these steps 1 Press the SYSTEM MENU button will be selected Press p 2will be selected Press B 3 Press p to select Black level shift then press B Press...

Page 16: ...hen press OK The num ber of the current Title and Chapter will appear on the display panel Playback will begin If Audio CD playback does not start automatically press PLAY B to begin Audio CD playback 5 Playback will stop at the end of the Title or after the last Track 6 To stop playback at any time press STOP C To resume playback at the point at which you last stopped play back on a DVD press PLA...

Page 17: ...end the search press PLAY B to resume playback or press STOP C to stop playback Selecting Another Chapter Track 1 Press G briefly during playback to go to the next Track Chapter Press H briefly to return to the beginning of the current Track Chapter Press H repeatedly and quickly to step back to previous Tracks Chapters 2 To go directly to any Track Chapter during playback press the Number buttons...

Page 18: ... 8 backward or 1 8 1 4 1 2 or 1 forward Select 1 to play the Disc at normal speed again Select 0 or press PAUSE k on the remote control to pause the picture 5 To return to normal playback press PLAY B 6 Press SYSTEM MENU to remove the menu bar Still Picture Frame by frame Playback 1 During playback press PAUSE k A still picture will appear on the TV screen 2 To advance the still picture one frame ...

Page 19: ...D VIDEO CD VIDEO CD 1 2 Shuffle On a DVD this shuffles the playing order of Chapters within a Title if the Title includes more than one Chapter On an Audio CD activating Shuffle will play all the Tracks in random order 1 Press the SHUFFLE button SHUFFLE will appear briefly on the DVD Player display panel The Tracks or Chapters will begin playing in random order 2 To return to normal order playback...

Page 20: ...page 46 NEXT G button Press during playback to go to the next Track or Chapter Press and hold for a fast forward search Details are on page 17 OPEN CLOSE STOP PLAY PAUSE DVD 870P DVD VIDEO CD CD PLAYER STANDBY ON SOUND PREV NEXT Disc Tray Insert a DVD Video CD or Audio CD here Load the Disc with the label facing up Details are on page 16 OPEN CLOSE A button Press to open or close the Disc tray Det...

Page 21: ...ble here and to the coaxial digital Audio In jack of a Stereo Receiver Details are on page 14 SUB WF OUT Subwoofer Out Connect this jack to the In jack on your Subwoofer not supplied Refer to the Subwoofer manual for details CVBS VIDEO OUT Connect the yellow video cable sup plied here and to the TV s Video In jack Details are on page 12 OPT OUT Digital Audio Out Connect an optional audio optical c...

Page 22: ...reverse or forward searching Details are on page 17 Press p to start slow motion playback Details are on page 18 Press o to pause DVD playback PAUSE k Button Press once to pause playback Press repeatedly to advance a paused DVD picture one frame at a time frame by frame play back Details are on page 18 STOP C Button Press to stop Disc playback SUBTITLE Button Press repeatedly during playback to se...

Page 23: ...to search forward during Disc playback Details are on page 17 Or press briefly to go to the next Chapter or Track Details are on page 17 PLAY B Button Press to begin or resume Disc playback Details are on page 16 ANGLE Button Press to select a different camera angle during DVD playback Multiple angles must be available on the Disc Details are on page 28 REPEAT Button Press repeatedly to play a Cha...

Page 24: ... example some Discs let you play the movie in Spanish or hear a director s commentary during playback Check the Disc case for details Details are on page 27 Smart Picture Choose a color setting that you prefer Details are on page 44 Sound Mode Select to choose a sound mode Stereo Dolby Surround or 3D Sound Details are on page 46 Menu Bar 2 Frame by frame playback Select for forward or reverse fram...

Page 25: ...e on pages 30 34 Safe The current Disc is autho rized for playback Details are on pages 30 34 Resume Press the PLAY B but ton while Resume appears Play will resume at the point at which it last stopped X The feature you just attempt ed is not available on the current Disc or at the current time Status Window Different information appears in the Status Window The window may indicate when the disc t...

Page 26: ...layback Control PBC This feature is available only on Video CDs The Video CD must be compatible with Playback Control Check the Video CD case for details 1 Load a Video CD with PBC and press the PLAY B but ton The Video CD will show instructions or options on the TV screen Use the DVD Player s remote control buttons as directed by the Video CD 2 Press RETURN to go to a previous menu 3 If a PBC men...

Page 27: ...guages available Or press o or p repeatedly to see the different languages The language you select will be audible in a few seconds The menu bar will disappear automatically in a few seconds Subtitles Some DVDs include subtitles in different languages To choose subtitles follow these steps 1 During DVD playback press the SUBTITLE button Z Subtitle will be selected in the menu bar 2 Within five sec...

Page 28: ...screen 4 Press OK again to see only the still zoomed picture The menu bar will disappear The still zoomed picture will dim if left on the TV screen for more than five minutes This prevents damage to your TV 5 To remove the zoomed image and return to regular play back press the PLAY B button Camera Angle Some DVDs include scenes recorded from different angles To watch segments from a different angl...

Page 29: ...dit box will appear showing the elapsed playing time of the current Disc or the point at which the Disc is currently 4 Press the Number buttons to enter the time at which you want playback to begin Enter the hour minute and second from left to right in the box 5 Press OK After a few seconds playback will resume at the point you selected 6 Press the SYSTEM MENU button to remove the menu DVD 2 4 3 5...

Page 30: ...e B button again then press the Number buttons to enter your old four digit code When doing this the first time enter any four numbers you prefer You will have to enter the same code exactly twice This will set your code for the first time 4 Press the p button repeatedly to select Change code Then press the B button 5 Press four Number buttons to enter the new four digit code Then enter it again e...

Page 31: ... Details are on page 30 4 Child lock will be highlighted Press the B button 5 Press the o or p button to select Locked Ç or Unlocked Press the OK button If you chose Locked unauthorized or Locked discs will not play unless you enter your four digit code 6 Press the SYSTEM MENU button to remove the menus Z Y d 1en 1en 1 2 Access control Child lock Status window Parental level G Low power standby Ch...

Page 32: ...trol screen will appear when you try to play a Locked Disc If you do not know your code press STOP çC Then select Access Control as described in steps 1 3 on page 30 When you are asked to enter the code press STOP C four times Press SYSTEM MENU then press PLAY B to start playback Two sided DVDs may have a dif ferent ID for each side To unlock the entire Disc unlock each side Multi volume Video CDs...

Page 33: ...g then press the OK button Select 0 to deactivate Parental level The entire Disc will play Choose a rating between 1 8 and scenes with the same rating or lower will play Higher rated scenes will not play unless an alterna tive scene is available on the Disc The alternative must have the same rating or a lower one If no suitable alternative is found playback will stop Enter the 4 digit code to play...

Page 34: ...2 Press the p button repeatedly to select then press the B button Access control will be highlighted 3 Press the B button again then press the Number buttons to enter your four digit code Child lock will be highlighted 4 Press the p button repeatedly to select Change country Then press the B button 5 Press the o or p button to select the country for which the Disc is coded then press the OK button...

Page 35: ...layback press the REPEAT button again REPEAT OFF will appear briefly on the DVD Player s dis play panel Repeat A B You can also set the DVD Player to play only a specific portion of a Chapter or Track repeatedly Follow these steps 1 Press the PLAY B button to start Disc playback 2 When the Disc reaches the point at which you want repeated playback to begin press the REPEAT A B but ton A will appea...

Page 36: ...e Program press the OK button The Title number will show in the Program 4 If you want to play only a certain Chapter within a Title press the p button to select Chapter Press the B and s buttons to select a Chapter number then press the OK but ton The Title and Chapter number will show in the Program Continue steps 3 4 until you enter all the Chapters or Titles you want 5 Press the o button to sel...

Page 37: ...he program and set FTS to Off automatically 4 Press the SYSTEM MENU button to remove the menu Erasing an Item in the Program 1 While playback is stopped press the SYSTEM MENU button 2 Press the B button repeatedly to select Favorite Track Selection in the menu bar Then press the p button 3 Press the p button to select Program then press the B or s button to select an item 4 Press the OK button to ...

Page 38: ...of the Program will appear at the top of the display and on the DVD Player s display panel Repeat step 3 until you add all the Tracks you want 4 To erase a Track from the Program press the p button to select Program then press the B and s buttons to select a Track number then press the OK button The Track number will disappear from the Program 5 To play the Program press the PLAY B button FTS will...

Page 39: ...rases the Program for the current Disc and sets FTS to Off Turning FTS On or Off 1 Press the STOP C button to stop Disc playback if necessary 2 FTS is selected Press the B or s buttons to choose On or Off then press the OK button If you choose On press the PLAY B button to begin playing the Program If you choose Off the Tracks will play in normal order when you begin playback 1 2 1 2 ...

Page 40: ...s Names of Albums Artists etc on an MP3 file with a maximum of 30 characters Maximum nested directory is eight levels The maximum ALB number is 32 VBR bit rate Sampling frequencies 32 kHz 44 1 kHz 48 kHz Bit rates 32 64 96 128 192 256 kbps The following characteristics are not supported File names ending in wma aac dlf m3u and pls Chinese file names Non session closed discs Discs recorded in UDF f...

Page 41: ... TRK will appear on the DVD Player s display panel Press the REPEAT button again to play an Album repeatedly REPEAT ALBM will appear on the DVD Player s display panel Press the REPEAT button again to play an entire MP3 disc repeatedly REPEAT DISC will appear on the DVD Player s dis play panel Press the REPEAT button again to cancel repeat playback and resume regular playback 1 2 3 Album Track Time...

Page 42: ...e a regular TV and want to see the picture with black bars at the top and bottom of the screen This looks like the picture you see when watching movies in a theater Select 4 3 panscan if you have a regular TV and want both sides of the picture to be trimmed or formatted to fit your TV screen 5 Press the SYSTEM MENU button to remove the menus The format you selected must be available on the Disc If...

Page 43: ...1 Press SYSTEM MENU will be selected 2 Press p to select then press B 3 Press p repeatedly to select Video shift then press B 4 Press s or B to center the picture on your TV screen or shift the video 5 When you are satisfied with the adjustments press OK 6 Press SYSTEM MENU to remove the menus Z Y d 1en 1en 1 2 TV Shape Black level shift G Video shift s B Color settings OK to exit 1 6 2 5 Z Y d Z ...

Page 44: ...y want to play a Disc for a few minutes in each setting to decide which you prefer 5 If you selected Personal go to step 6 If you selected Rich Natural Soft or Animation you are finished Press SYSTEM MENU to remove the menus 6 Press p to select Personal Color then press B 7 Press op to select Saturation Brightness or Contrast Then press B 8 Press op to increase or decrease each setting Press s to ...

Page 45: ...All if you used the COAXIAL Digital Audio Out jack to connect the DVD Player to Stereo Receiver that has a Multi channel Decoder Details are on page 14 All is the preset factory setting Select Off if you did not use either of the COAXIAL or OPT OUT Digital Audio Out jacks For example if you used the sup plied red and white audio cables to connect the AUDIO OUT jacks of the DVD Player to a TV or St...

Page 46: ... selected 2 Press p repeatedly to select G then press B 3 Press p to select Analog output then press B 4 Press o or p to select Stereo Dolby Surround or 3D sound then press the OK button Select Stereo if your audio equipment is not compatible with either Dolby Surround or TruSurround Select Dolby Surround if your audio equipment is compatible with Dolby Surround If it is usually a Dolby Surround l...

Page 47: ...dly to select Sub woofer Cut off then press B 4 Press o or p to select High or Low then press OK 5 Press SYSTEM MENU to remove the menus Night Mode Turn on Night Mode to optimize the dynamics of the sound during low volume playback 1 Press SYSTEM MENU will be selected 2 Press p repeatedly to select G then press B 3 Press p repeatedly to select Night mode then press B 4 Press o or p to select On or...

Page 48: ...OK 5 Press SYSTEM MENU to remove the menus Language Select a different language for the Disc Menu Audio soundtrack or Subtitles if multiple languages are available on the Disc 1 Press SYSTEM MENU will be selected 2 Press p repeatedly to select r then press B 3 Press o or p to select Audio Language Subtitle or Menu then press the B button 4 Press o or p to select the language you want from the avai...

Page 49: ...PLAY button once during Disc playback 2 To remove the Bit Rate Indicator press the DISPLAY button again Help Text Set Help text to On if you want a description of on screen icons 1 Press SYSTEM MENU will be selected 2 Press p repeatedly to select then press B 3 Press p repeatedly to select Help text then press B 4 Press o or p to choose On or Off then press OK 5 Press SYSTEM MENU to remove the men...

Page 50: ...cture Check the Disc for fingerprints Clean the Disc with a soft cloth wiping from the center to the edge in a straight line Sometimes a small amount of picture distortion may appear This is not a mal function The picture is distorted or the picture is only black and white during DVD or Video CD playback TVs are produced to meet NTSC or PAL color system standards If the Disc s or DVD Player s colo...

Page 51: ...n The DVD Player does not respond to the remote control Aim the remote control directly at the sensor on the front of the DVD Player Details are on page 20 Remove any obstacles between the DVD Player and the remote control Inspect or replace the batteries in the remote control The buttons on the DVD Player or remote control do not work To reset the DVD Player completely disconnect the AC power cor...

Page 52: ...round sound system that provides 5 1 channel sound as used in movie theaters DTS Digital Theater Systems This is a surround sound system but it is different from Dolby Digital The formats were developed by different companies DVD Digital Video Disc Letterbox A TV aspect ratio setting 4 3 Displays the video in full width with black bars at the top and bottom of the TV screen This format is similar ...

Page 53: ...its fs 44 1 48 96 kHz Analog Sound Stereo Dolby Pro Logic downmix from Dolby Digital multi channel sound 3D Sound TruSurround for virtual 5 1 channel sound on two speakers AUDIO PERFORMANCE DA Converter 24 bits DVD fs 96 kHz 4 Hz 44 kHz fs 48 kHz 4 Hz 22 kHz Video CD fs 44 1 kHz 4 Hz 20 kHz Audio CD fs 44 1 kHz 4 Hz 20 kHz Signal Noise 1kHz 100 dB Dynamic Range 1kHz 97 dB Crosstalk 1kHz 110 dB Dis...

Page 54: ...tempt to exchange the product although there may be a delay if the appropri ate product is not readily available MAKE SURE YOU KEEP Please keep your sales receipt or other document showing proof of date of purchase Attach it to the owner s manual and keep both nearby Also keep the original box and packing material in case you need to return your product BEFORE EXCHANGING THE PRODUCT Please check y...

Page 55: ...xchange Form a copy of the original sales receipt and the proper payment amount into an envelope DO NOT SEND CASH Do not staple or clip these items together Label the envelope Return Documents Enclosed Place this envelope in the box with the product 5 Seal the box with packing tape and return the product via United Parcel Service UPS insured and freight prepaid to Philips Recovery Center Rojas 6 1...

Page 56: ...7 ntsc 7 15 number buttons 22 ok button 23 on screen symbols 25 open close button 20 opt out optical jack14 21 45 52 pal 15 panscan 42 parental levels 33 password 30 pause button 18 20 22 pcm 45 play button 16 20 23 playable discs 7 playback control 26 playing a disc 16 power button 22 power cord 21 power on off button 20 pr cr pb cb y video out jacks 10 13 14 21 prev ious button 20 program 36 39 ...

Reviews: